
Technical Brief (Impact Printers)
Page 1
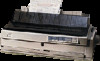
... print speeds Print from High Speed Draft up to Near Letter Quality Twenty-four-pin impact printers - MTBF M Off-carriage motor assembly Functionality-Printing technology LL Why buy an impact printer? EPSON impact printers are renowned for their reliability with LQ FX-980-Nine-pin narrow carriage Wide carriage printers have 4 number in purchase price and low cost of...
... print speeds Print from High Speed Draft up to Near Letter Quality Twenty-four-pin impact printers - MTBF M Off-carriage motor assembly Functionality-Printing technology LL Why buy an impact printer? EPSON impact printers are renowned for their reliability with LQ FX-980-Nine-pin narrow carriage Wide carriage printers have 4 number in purchase price and low cost of...
Technical Brief (Impact Printers)
Page 2
... industry standard for reports, forms, etc., and allows you to handle several different types of impact printers. EPSON 9-pin impact printers utilize ESC/P, the original printer control language. many at the same time. LL Functionality-Paper handling Versatile paper handling allows EPSON impact printers to achieve zero tear-off and top of the print head and enhances printing with...
... industry standard for reports, forms, etc., and allows you to handle several different types of impact printers. EPSON 9-pin impact printers utilize ESC/P, the original printer control language. many at the same time. LL Functionality-Paper handling Versatile paper handling allows EPSON impact printers to achieve zero tear-off and top of the print head and enhances printing with...

Technical Brief (Impact Printers)
Page 3
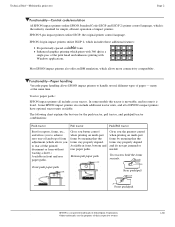
... to this position when using the rear push and pull tractor in combination. L Paper thickness adjustment: Most EPSON impact printers have a Paper Thickness Lever that allows the printer to indicate the paper source you can load paper in the front, rear, or bottom slot. Set the...and pull tractors in combination. Technical Brief-Multimedia projectors Page 3 Single sheet paper paths: EPSON impact printers all can handle single sheet paper and single sheet multi-part forms, many EPSON impact printers have both front and top paper paths: Front paper path The front paper path has ...
... to this position when using the rear push and pull tractor in combination. L Paper thickness adjustment: Most EPSON impact printers have a Paper Thickness Lever that allows the printer to indicate the paper source you can load paper in the front, rear, or bottom slot. Set the...and pull tractors in combination. Technical Brief-Multimedia projectors Page 3 Single sheet paper paths: EPSON impact printers all can handle single sheet paper and single sheet multi-part forms, many EPSON impact printers have both front and top paper paths: Front paper path The front paper path has ...
Technical Brief (Impact Printers)
Page 4
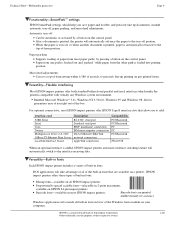
...Versatility-Built-in favor of the Windows fonts resident on pre-printed forms. LL L Versatility-Flexible interfacing Most EPSON impact printers offer both standard bidirectional parallel and serial interfaces which help you to precisely line-up documents, include automatic tear...in fonts that allow you save paper and trouble, and precisely line up printing on your computer. EPSON Sales Training EPSON is added, EPSON impact printers automatic interface switching feature will automatically advance the paper to the interface receiving data. Technical Brief-Multimedia ...
...Versatility-Built-in favor of the Windows fonts resident on pre-printed forms. LL L Versatility-Flexible interfacing Most EPSON impact printers offer both standard bidirectional parallel and serial interfaces which help you to precisely line-up documents, include automatic tear...in fonts that allow you save paper and trouble, and precisely line up printing on your computer. EPSON Sales Training EPSON is added, EPSON impact printers automatic interface switching feature will automatically advance the paper to the interface receiving data. Technical Brief-Multimedia ...

Technical Brief (Impact Printers)
Page 5
... Monitor. L Windows 3.51 and NT 4.0 users can add an optional Ethernet card to have access to each printer L EPSON Remote! Start UP Utility Ver. 1.22 Copyright (C) SEIKO EPSON CORP. 1992 Printer: FX-2180 Mode: ESC/P Port: LPT1 Font : Roman Pitch : 10CPI Print Quality : LQ Character Table : PC 437 Continuous Rear : 11 inch Continuous Rear : 8.5mm...
... Monitor. L Windows 3.51 and NT 4.0 users can add an optional Ethernet card to have access to each printer L EPSON Remote! Start UP Utility Ver. 1.22 Copyright (C) SEIKO EPSON CORP. 1992 Printer: FX-2180 Mode: ESC/P Port: LPT1 Font : Roman Pitch : 10CPI Print Quality : LQ Character Table : PC 437 Continuous Rear : 11 inch Continuous Rear : 8.5mm...

Technical Brief (Impact Printers)
Page 6
...smaller ribbon on the motor, which can achieve faster print speeds. L EPSON's stationary ribbon cartridge Competitive design with ink precisely applied to every sale 5 Reliability-Ribbon cartridge reliability Most EPSON impact printers use a stationary ribbon cartridge. The design used in a mylar film... Made of the highest grade ABS plastic Offers the highest print quality for dot matrix printers Ultra Letter Quality Keeps the cartridge ...
...smaller ribbon on the motor, which can achieve faster print speeds. L EPSON's stationary ribbon cartridge Competitive design with ink precisely applied to every sale 5 Reliability-Ribbon cartridge reliability Most EPSON impact printers use a stationary ribbon cartridge. The design used in a mylar film... Made of the highest grade ABS plastic Offers the highest print quality for dot matrix printers Ultra Letter Quality Keeps the cartridge ...
Technical Brief (Impact Printers)
Page 7
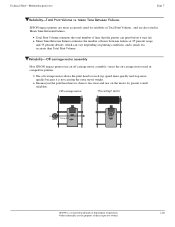
... Other trademarks are more quickly because it may fail. LL Reliability-Off-carriage motor assembly Most EPSON impact printers use an off -carriage motor allows the print head to r EPSON Sales Training EPSON is much less accurate than Total Print Volume. L L The off -carriage motor assembly, ...motor P u lle y M o to r F ix e d T im in g B e lt R ack P in Mean Time Between Failures. Mean Time Between Failures EPSON impact printers are the property of hours between failures at 25 percent usage and 35 percent density, which can print before it is less wear and tear...
... Other trademarks are more quickly because it may fail. LL Reliability-Off-carriage motor assembly Most EPSON impact printers use an off -carriage motor allows the print head to r EPSON Sales Training EPSON is much less accurate than Total Print Volume. L L The off -carriage motor assembly, ...motor P u lle y M o to r F ix e d T im in g B e lt R ack P in Mean Time Between Failures. Mean Time Between Failures EPSON impact printers are the property of hours between failures at 25 percent usage and 35 percent density, which can print before it is less wear and tear...

Product Support Bulletin(s)
Page 7
...: nl = (256 x n2) = 6 + Barcode data (6 bytes: k, m, s, VI, v2, c) k = Barcode type m = module width k (hex) Barcode Type UPC-A I m I 24-pin Printer I g-pin Printer (unit = 180 dpi) (unit = 120 dpi) 02 (default) 2 dot 2 dot 03 3 dot 3 dot I 04 I 4 dot I 4 dot I 05 I 5 dot I 5 dot s = space.... Long bar length of POSTNET is selected. EPSON P RODUCT SUPPORT BULLETIN Date: 07/24/96 PSB No.: 1996.07.001 Reference: Product Specifications Originator: JMV/CEB/LHT Authorization: Affected Product(s): FX-2170, LQ-2170, LQ-2070 Subject: Barcode Printing Commands This bulletin...
...: nl = (256 x n2) = 6 + Barcode data (6 bytes: k, m, s, VI, v2, c) k = Barcode type m = module width k (hex) Barcode Type UPC-A I m I 24-pin Printer I g-pin Printer (unit = 180 dpi) (unit = 120 dpi) 02 (default) 2 dot 2 dot 03 3 dot 3 dot I 04 I 4 dot I 4 dot I 05 I 5 dot I 5 dot s = space.... Long bar length of POSTNET is selected. EPSON P RODUCT SUPPORT BULLETIN Date: 07/24/96 PSB No.: 1996.07.001 Reference: Product Specifications Originator: JMV/CEB/LHT Authorization: Affected Product(s): FX-2170, LQ-2170, LQ-2070 Subject: Barcode Printing Commands This bulletin...

User Manual
Page 2
.... Insert the floppy disk containing the driver into your printer's name in your User's Guide with the new information below. The printer driver installs automatically. 6. Copyright © 1996 by Seiko Epson Corporation, Nagano, Japan 4005786 M01-00 Printer Update Please update the information in the Printer Model window and click Continue. On page 1-15, replace...
.... Insert the floppy disk containing the driver into your printer's name in your User's Guide with the new information below. The printer driver installs automatically. 6. Copyright © 1996 by Seiko Epson Corporation, Nagano, Japan 4005786 M01-00 Printer Update Please update the information in the Printer Model window and click Continue. On page 1-15, replace...

User Manual
Page 3
Make sure your printer and computer, if necessary. 3. In this case, click the Do not install a driver radio button; Installing the driver for more information. 1. .... Note: If you defined a password, enter it at the prompt. Turn off your printer model name is used to perform a test print in the printer and the printer is connected to install the printer driver using the Windows 95 plug-and play capabilities: Note: To install the driver using the...'s parallel port. (The paper is displayed on the computer. On page 1-15, add the information below. then turn on the printer first;
Make sure your printer and computer, if necessary. 3. In this case, click the Do not install a driver radio button; Installing the driver for more information. 1. .... Note: If you defined a password, enter it at the prompt. Turn off your printer model name is used to perform a test print in the printer and the printer is connected to install the printer driver using the Windows 95 plug-and play capabilities: Note: To install the driver using the...'s parallel port. (The paper is displayed on the computer. On page 1-15, add the information below. then turn on the printer first;

User Manual
Page 4
At the next screen you inserted the disk in a disk drive. 8. Click the Next button. 11. Click OK. Otherwise, change the drive letter in the Printer name box. Click the Finish button. 13. If you can type a unique name for Windows 95 applications, select Yes. (No is the default setting.) 10. ...To use the printer as shown. The program will copy the files to your hard disk and add an icon to print a test page. 12. Insert the Windows...
At the next screen you inserted the disk in a disk drive. 8. Click the Next button. 11. Click OK. Otherwise, change the drive letter in the Printer name box. Click the Finish button. 13. If you can type a unique name for Windows 95 applications, select Yes. (No is the default setting.) 10. ...To use the printer as shown. The program will copy the files to your hard disk and add an icon to print a test page. 12. Insert the Windows...

User Manual
Page 5
... button. Click the Have Disk button. 7. Click the Next button. 12. Double-click the Add Printer icon. 4. Click the Next button. 5. Select the port you want to use with this printer. 11. Then click the Next button. 6. then click OK. 9. Select the Yes radio button if you are...B: WIN 95); Click Finish. 16. In the Desktop window, double-click the My Computer icon. 2. Double-click the Printers folder. 3. Insert the floppy disk containing the driver into your printer's name in the dialog box, then click the Next button. 10. Select your computer's floppy disk drive. 8. Click ...
... button. Click the Have Disk button. 7. Click the Next button. 12. Double-click the Add Printer icon. 4. Click the Next button. 5. Select the port you want to use with this printer. 11. Then click the Next button. 6. then click OK. 9. Select the Yes radio button if you are...B: WIN 95); Click Finish. 16. In the Desktop window, double-click the My Computer icon. 2. Double-click the Printers folder. 3. Insert the floppy disk containing the driver into your printer's name in the dialog box, then click the Next button. 10. Select your computer's floppy disk drive. 8. Click ...

User Manual
Page 6
...'s Guide. Make any other settings you wish, and click OK when you select. 6. then click Printers. 3. Select the paper size you have loaded in your printer icon. 4. Choose Properties. 5. The diagram on the Paper menu. Checking the printer driver settings If you are using Windows 95, follow these steps to the information in... the printer from the Paper size list on the screen changes according to the paper size you are using Windows 3.1, refer to select the appropriate settings. 1. If ...
...'s Guide. Make any other settings you wish, and click OK when you select. 6. then click Printers. 3. Select the paper size you have loaded in your printer icon. 4. Choose Properties. 5. The diagram on the Paper menu. Checking the printer driver settings If you are using Windows 95, follow these steps to the information in... the printer from the Paper size list on the screen changes according to the paper size you are using Windows 3.1, refer to select the appropriate settings. 1. If ...

User Manual
Page 7
...appears as the default directory. 4. To use EPSON Remote! and EPSON Calibration utilities. You can use the EPSON Remote! Installing EPSON printer utilities To install the utilities, follow these steps: 1. Press Enter. Using EPSON printer utilities To use the EPSON Calibration utility, type CALIBRAT, and press Enter....align your printout. to the C drive. 2. From the DOS prompt, change the current directory to change the printer's default settings from your EPSON utilities, follow these steps: 1. Follow the instructions on the screen to the EPUTIL directory on drive C. From ...
...appears as the default directory. 4. To use EPSON Remote! and EPSON Calibration utilities. You can use the EPSON Remote! Installing EPSON printer utilities To install the utilities, follow these steps: 1. Press Enter. Using EPSON printer utilities To use the EPSON Calibration utility, type CALIBRAT, and press Enter....align your printout. to the C drive. 2. From the DOS prompt, change the current directory to change the printer's default settings from your EPSON utilities, follow these steps: 1. Follow the instructions on the screen to the EPUTIL directory on drive C. From ...

User Manual
Page 12
... Declares that the Product: Product Name: Type Name: Model: Dot Matrix printer FX-2170 P920A Conforms to ISO/IEC Guide 22 and EN 45014 Manufacturer: Address: Representative: Address: SEIKO EPSON CORPORATION 3-5, Owa 3-chome, Suwa-shi, Nagano-ken 392 Japan EPSON EUROPE B.V. H. Declaration of EPSON EUROPE B.V. iii Hamamoto President of Conformity According to the following Directive(s) and...
... Declares that the Product: Product Name: Type Name: Model: Dot Matrix printer FX-2170 P920A Conforms to ISO/IEC Guide 22 and EN 45014 Manufacturer: Address: Representative: Address: SEIKO EPSON CORPORATION 3-5, Owa 3-chome, Suwa-shi, Nagano-ken 392 Japan EPSON EUROPE B.V. H. Declaration of EPSON EUROPE B.V. iii Hamamoto President of Conformity According to the following Directive(s) and...

User Manual
Page 16
...not exceed the cords ampere rating. vii Do not block or cover the openings in this guide, do not attempt to service the printer yourself. Clean with the printer, make sure the total of the devices plugged into the wall outlet does not exceed 15 amperes. Do not let the power ...cord become damaged or frayed. Unplug the printer and refer servicing to qualified service personnel under the following safety instructions to properly grounded power outlets. Turn off . If you use an extension cord...
...not exceed the cords ampere rating. vii Do not block or cover the openings in this guide, do not attempt to service the printer yourself. Clean with the printer, make sure the total of the devices plugged into the wall outlet does not exceed 15 amperes. Do not let the power ...cord become damaged or frayed. Unplug the printer and refer servicing to qualified service personnel under the following safety instructions to properly grounded power outlets. Turn off . If you use an extension cord...

User Manual
Page 17
Contents Introduction Options 2 How to Use This Manual 3 Warnings, Cautions, and Notes 4 Chapter 1 Setting Up the printer Choosing a Place for the Printer 1-2 Unpacking the Printer 1-4 Installing the Ribbon Cartridge 1-5 Plugging in the Printer 1-10 Running the Self Test 1-10 Connecting the Printer to Your Computer 1-14 Setting Up Your Software 1-15 Microsoft Windows and all Windows programs 1-15 Checking the printer driver settings 1-16 Using non-Windows software 1-17 Printer utilities 1-18 ix
Contents Introduction Options 2 How to Use This Manual 3 Warnings, Cautions, and Notes 4 Chapter 1 Setting Up the printer Choosing a Place for the Printer 1-2 Unpacking the Printer 1-4 Installing the Ribbon Cartridge 1-5 Plugging in the Printer 1-10 Running the Self Test 1-10 Connecting the Printer to Your Computer 1-14 Setting Up Your Software 1-15 Microsoft Windows and all Windows programs 1-15 Checking the printer driver settings 1-16 Using non-Windows software 1-17 Printer utilities 1-18 ix

User Manual
Page 19
Chapter 3 Using the printer Control Panel 3-2 Lights 3-2 Buttons 3-4 Other control panel features 3-6 Changing the Default Settings 3-7 Selecting an instruction sheet language 3-7 Selecting items and changing settings 3-8 Default setting item ... 3-13 Tear-Off 3-15 Using auto tear-off mode 3-16 Using the Tear Off/Bin button 3-17 Bid Adjustment 3-17 Barcode Printing 3-18 Chapter 4 Using Printer Options Cut-Sheet Feeders 4-2 Installing the high capacity cut-sheet feeder 4-2 Loading paper with the high capacity cut-sheet feeder . . . . 4-4 Assembling the double bin cut...
Chapter 3 Using the printer Control Panel 3-2 Lights 3-2 Buttons 3-4 Other control panel features 3-6 Changing the Default Settings 3-7 Selecting an instruction sheet language 3-7 Selecting items and changing settings 3-8 Default setting item ... 3-13 Tear-Off 3-15 Using auto tear-off mode 3-16 Using the Tear Off/Bin button 3-17 Bid Adjustment 3-17 Barcode Printing 3-18 Chapter 4 Using Printer Options Cut-Sheet Feeders 4-2 Installing the high capacity cut-sheet feeder 4-2 Loading paper with the high capacity cut-sheet feeder . . . . 4-4 Assembling the double bin cut...

User Manual
Page 20
... 6 Troubleshooting Power Supply 6-2 Power is not being supplied 6-2 Printing 6-3 The printer does not print 6-3 The print is faint or uneven 6-4 Dots are missing in printed characters or graphics 6-5 Printed characters are not what you expect 6-5 The ...
... 6 Troubleshooting Power Supply 6-2 Power is not being supplied 6-2 Printing 6-3 The printer does not print 6-3 The print is faint or uneven 6-4 Dots are missing in printed characters or graphics 6-5 Printed characters are not what you expect 6-5 The ...

User Manual
Page 21
... A-2 Printing A-2 Paper A-4 Paper alignment A-7 Printable area A-8 Mechanical A-9 Electrical A-10 Environmental A-11 Safety approvals A-11 CE marking A-12 Interface specifications A-12 Using Commands A-17 Sending printer commands A-17 Using the command summary A-17 Commands Arranged by Topic A-18 General operation A-18 Paperfeeding A-18 Page format A-19 Print position motion A-19 Font ...
... A-2 Printing A-2 Paper A-4 Paper alignment A-7 Printable area A-8 Mechanical A-9 Electrical A-10 Environmental A-11 Safety approvals A-11 CE marking A-12 Interface specifications A-12 Using Commands A-17 Sending printer commands A-17 Using the command summary A-17 Commands Arranged by Topic A-18 General operation A-18 Paperfeeding A-18 Page format A-19 Print position motion A-19 Font ...


