Technical Brief (Impact Printers)
Page 2
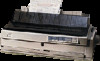
... a single pass of their respective owners. Bottom pull paper path Gives you to tear off and top of impact printers. many at the same time. EPSON 24-pin impact printers utilize ESC/P 2, which includes these additional features: el Proportionally-spaced scalab fonts Enhanced graphics printing which prints with 360 dpi in front, bottom and rear paper...
... a single pass of their respective owners. Bottom pull paper path Gives you to tear off and top of impact printers. many at the same time. EPSON 24-pin impact printers utilize ESC/P 2, which includes these additional features: el Proportionally-spaced scalab fonts Enhanced graphics printing which prints with 360 dpi in front, bottom and rear paper...
Technical Brief (Impact Printers)
Page 4
... AppleTalk connection Compatibility PC/Macintosh PC/Macintosh PC PC PC/Macintosh Macintosh When an optional interface is added, EPSON impact printers automatic interface switching feature will overide all built-in fonts in fonts that are available on a printer. After a document is loaded into printing position Microfeed adjustments Can set a top-of-form setting within 1/180...
... AppleTalk connection Compatibility PC/Macintosh PC/Macintosh PC PC PC/Macintosh Macintosh When an optional interface is added, EPSON impact printers automatic interface switching feature will overide all built-in fonts in fonts that are available on a printer. After a document is loaded into printing position Microfeed adjustments Can set a top-of-form setting within 1/180...

User Manual
Page 19
Chapter 3 Using the printer Control Panel 3-2 Lights 3-2 Buttons 3-4 Other control panel features 3-6 Changing the Default Settings 3-7 Selecting an instruction sheet language 3-7 Selecting items and changing settings 3-8 Default setting item functions 3-9 Micro Adjust 3-13 Tear-Off 3-15 Using ...
Chapter 3 Using the printer Control Panel 3-2 Lights 3-2 Buttons 3-4 Other control panel features 3-6 Changing the Default Settings 3-7 Selecting an instruction sheet language 3-7 Selecting items and changing settings 3-8 Default setting item functions 3-9 Micro Adjust 3-13 Tear-Off 3-15 Using ...

User Manual
Page 36
Insert the EPSON driver disk into your Windows programs, such as the Printer Model and click Continue. From the File menu choose Run. 4. Select FX-2170 as Word for Windows, Lotus® 1-2-3® for Windows, and CorelDRAW!®. Click OK. Setting Up the Printer 1-15 The printer driver installs ...installation or setup section that presents a list of the printer's features. Setting Up Your Software Most software lets you specify the type of printer you use so that you can take full advantage of printers. Your printer will work correctly for your system, run the Windows ...
Insert the EPSON driver disk into your Windows programs, such as the Printer Model and click Continue. From the File menu choose Run. 4. Select FX-2170 as Word for Windows, Lotus® 1-2-3® for Windows, and CorelDRAW!®. Click OK. Setting Up the Printer 1-15 The printer driver installs ...installation or setup section that presents a list of the printer's features. Setting Up Your Software Most software lets you specify the type of printer you use so that you can take full advantage of printers. Your printer will work correctly for your system, run the Windows ...

User Manual
Page 71
CUhsianpgtetrh3e Printer Control Panel 3-2 Lights 3-2 Buttons 3-4 Other control panel features 3-6 Changing the Default settings 3-7 Selecting an instruction sheet language 3-7 Selecting items and changing settings 3-8 Default setting item functions 3-9 Micro Adjust 3-13 Tear-Off 3-15 Using auto tear-off mode 3-16 Using the Tear Off/Bin button 3-17 Bid Adjustment 3-17 Barcode Printing 3-18 Using the Printer 3-1
CUhsianpgtetrh3e Printer Control Panel 3-2 Lights 3-2 Buttons 3-4 Other control panel features 3-6 Changing the Default settings 3-7 Selecting an instruction sheet language 3-7 Selecting items and changing settings 3-8 Default setting item functions 3-9 Micro Adjust 3-13 Tear-Off 3-15 Using auto tear-off mode 3-16 Using the Tear Off/Bin button 3-17 Bid Adjustment 3-17 Barcode Printing 3-18 Using the Printer 3-1

User Manual
Page 76
... Chapter 1 for details. See "Changing the Default Settings" in this chapter. See "Bid Adjustment" in this chapter. 3-6 Using the Printer Prints a data dump. All the input data are printed as follows: Load/Eject LF/FF Pitch Load/Eject and LF/FF Pause Performs...See "Problems and Solutions" in Chapter 6. Starts the Bid adjustment. Other control panel features The control panel also gives you to access to several other functions. To activate the functions listed below, turn on the printer while pressing one of buttons, as hexadecimal numbers and corresponding characters. See Chapter 1 ...
... Chapter 1 for details. See "Changing the Default Settings" in this chapter. See "Bid Adjustment" in this chapter. 3-6 Using the Printer Prints a data dump. All the input data are printed as follows: Load/Eject LF/FF Pitch Load/Eject and LF/FF Pause Performs...See "Problems and Solutions" in Chapter 6. Starts the Bid adjustment. Other control panel features The control panel also gives you to access to several other functions. To activate the functions listed below, turn on the printer while pressing one of buttons, as hexadecimal numbers and corresponding characters. See Chapter 1 ...
User Manual
Page 81
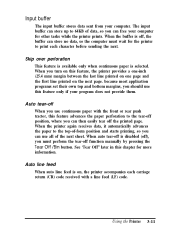
...auto tear-off function manually by pressing the Tear Off /Bin button. Auto tear-off the printed page. See 'Tear Off" later in this feature, the printer provides a one-inch (25.4 mm) margin between the last line printed on one page and the first line printed on this chapter for ... the tear-off ), you must wait for the printer to print each carriage return (CR) code received with the front or rear push tractor, this feature advances the paper perforation to the top-of the next sheet. Skip over perforation This feature is available only when continuous paper is disabled (off...
...auto tear-off function manually by pressing the Tear Off /Bin button. Auto tear-off the printed page. See 'Tear Off" later in this feature, the printer provides a one-inch (25.4 mm) margin between the last line printed on one page and the first line printed on this chapter for ... the tear-off ), you must wait for the printer to print each carriage return (CR) code received with the front or rear push tractor, this feature advances the paper perforation to the top-of the next sheet. Skip over perforation This feature is available only when continuous paper is disabled (off...

User Manual
Page 82
... is on; This means that the paper is accompanied by a carriage return (CR) code and the printer moves the next print position to the left margin. Auto carriage return When the auto carriage return feature is on, each line feed (LF) code or ESC J (n/216-inch line feed) code is ...feed code to move the print position to the left margin. Roll paper When you turn on this feature is set to easily distinguish between an uppercase "O" character and a zero. Buzzer (Beep) The printer beeps when some errors occur. When this mode, roll paper is not recognized as single-sheet paper ...
... is on; This means that the paper is accompanied by a carriage return (CR) code and the printer moves the next print position to the left margin. Auto carriage return When the auto carriage return feature is on, each line feed (LF) code or ESC J (n/216-inch line feed) code is ...feed code to move the print position to the left margin. Roll paper When you turn on this feature is set to easily distinguish between an uppercase "O" character and a zero. Buzzer (Beep) The printer beeps when some errors occur. When this mode, roll paper is not recognized as single-sheet paper ...

User Manual
Page 83
.... 2. This section explains how to use this feature to move paper forward or backward in l/216-inch increments. The loading position is turned on. Load either continuous or single-sheet paper. (Load continuous paper by the printer. Using the Printer 3-13 If your printing appears too high or ...after it has been automatically loaded by pressing the Load/Eject button.) 3. If necessary, lift the printer cover up so you to adjust the loading and tear-off position. See the next section for three seconds. Micro Adjust The micro adjust feature allows you can use micro adjust.
.... 2. This section explains how to use this feature to move paper forward or backward in l/216-inch increments. The loading position is turned on. Load either continuous or single-sheet paper. (Load continuous paper by the printer. Using the Printer 3-13 If your printing appears too high or ...after it has been automatically loaded by pressing the Load/Eject button.) 3. If necessary, lift the printer cover up so you to adjust the loading and tear-off position. See the next section for three seconds. Micro Adjust The micro adjust feature allows you can use micro adjust.

User Manual
Page 85
...described in two ways: by setting the default setting to select auto tear-off feature to the tear-off position using the pull tractor; the paper could come off the pull tractor and jam the printer. Using the Printer 3-15 Tear-Off After you have finished printing, you can use the tear-...mode. they may come off their backing and jam the printer. You can adjust the tear-off edge of the printer. Caution: Never use the tear-off feature in the previous section. Note: For both cut sheet and continuous paper, the printer remembers this new position even after it has been turned off...
...described in two ways: by setting the default setting to select auto tear-off feature to the tear-off position using the pull tractor; the paper could come off the pull tractor and jam the printer. Using the Printer 3-15 Tear-Off After you have finished printing, you can use the tear-...mode. they may come off their backing and jam the printer. You can adjust the tear-off edge of the printer. Caution: Never use the tear-off feature in the previous section. Note: For both cut sheet and continuous paper, the printer remembers this new position even after it has been turned off...

User Manual
Page 86
... for three seconds. Using auto tear-off mode When you select the auto tear-off mode default setting, the printer advances continuous paper to the tear-off position using the micro adjust feature as described in the previous section. Be sure you turn it on even when you finish printing. You can... adjust the tear-off position when you are using the pull tractor. The printer advances paper to the tear-off position only when...
... for three seconds. Using auto tear-off mode When you select the auto tear-off mode default setting, the printer advances continuous paper to the tear-off position using the micro adjust feature as described in the previous section. Be sure you turn it on even when you finish printing. You can... adjust the tear-off position when you are using the pull tractor. The printer advances paper to the tear-off position only when...

User Manual
Page 87
...the Tear Off /Bin button.) Bi-d Adjustment When using the micro adjust feature. The printer advances the paper to the tear-off all printed pages. After completing Bid adjustment, turn on the printer. When you resume printing the printer feeds the paper back to the loading position and begins printing. (You ...off edge, adjust the tear-off position using bidirectional printing, you may notice that the lines in auto tear-off mode, you can use the printer's Bid Adjustment mode as follows: 1. Then press the Tear Off/Bin button until the two lights on the printout. 4. Tear off edge. 2....
...the Tear Off /Bin button.) Bi-d Adjustment When using the micro adjust feature. The printer advances the paper to the tear-off all printed pages. After completing Bid adjustment, turn on the printer. When you resume printing the printer feeds the paper back to the loading position and begins printing. (You ...off edge, adjust the tear-off position using bidirectional printing, you may notice that the lines in auto tear-off mode, you can use the printer's Bid Adjustment mode as follows: 1. Then press the Tear Off/Bin button until the two lights on the printout. 4. Tear off edge. 2....
User Manual
Page 135
... a particular place on the page, and so on and 0 to tum the feature on . Software commands instruct the printer to enter the command. The parameters are indicated by topic. Using Commands Sending printer commands Most actions your printer performs are controlled by EPSON. The commands your software. Some software programs let you must use to...
... a particular place on the page, and so on and 0 to tum the feature on . Software commands instruct the printer to enter the command. The parameters are indicated by topic. Using Commands Sending printer commands Most actions your printer performs are controlled by EPSON. The commands your software. Some software programs let you must use to...

User Manual
Page 155
... adjust feature, 3-13-14 Moving the printer, 5-2 Multipart forms, 2-27 N Near letter quality, l-10 Non-Windows software, l-17 0 Operate button, 3-4-5 Options, 2,4-2-14 IN-2 Index See Cut-sheet feeders, Tractor positions Feeding problems, 6-7-11 FF button. E Edge guides, 1-12-13, 2-4 front, 2-6 Ejjt. See Load/Eject button Envelopes, 2-29, 4-7 EPSON Calibration, l-20 EPSON Remote!,...button, 3-4 Loading paper continuous paper, 2-12-22 cut-sheet feeder, 4-4 envelopes, 2-29 labels, 2-28 multipart form, 2-27 postcards, 2-29 single sheets, 2-3-7 Location for printer, l-2-3 M Microsoft Windows.
... adjust feature, 3-13-14 Moving the printer, 5-2 Multipart forms, 2-27 N Near letter quality, l-10 Non-Windows software, l-17 0 Operate button, 3-4-5 Options, 2,4-2-14 IN-2 Index See Cut-sheet feeders, Tractor positions Feeding problems, 6-7-11 FF button. E Edge guides, 1-12-13, 2-4 front, 2-6 Ejjt. See Load/Eject button Envelopes, 2-29, 4-7 EPSON Calibration, l-20 EPSON Remote!,...button, 3-4 Loading paper continuous paper, 2-12-22 cut-sheet feeder, 4-4 envelopes, 2-29 labels, 2-28 multipart form, 2-27 postcards, 2-29 single sheets, 2-3-7 Location for printer, l-2-3 M Microsoft Windows.

User Manual
Page 157
T Tear Off /Bin button, 3-4, 3-6 light, 3-2 Tear off feature, 3-16-17 auto tear off, 3-16-17 Testing the printer, 1-10-13 Tractor positions CHANGING, 2-9-11 front push, 2-3, 2-8, 2-12-15 pull, 2-3 ,2-8, 2-19-21, 4-8 push/pull, 2-8, 2-22-23, 4-8-9 rear push, 2-3, 2-8, 2-15-18 selecting 2-8-9 Transporting the printer, 5-4 Troubleshooting, 6-2-12 Unidirectional printing, 3-10, Unpacking the printer, l-4 Utilities EFSON Calibration, l-20 EPSON Remote!, l-18 V Voltage, caution, l-4, 1-10 W Weight, A-9 Windows, l-15-16 installing printer driver, l-15 IN-4 Index
T Tear Off /Bin button, 3-4, 3-6 light, 3-2 Tear off feature, 3-16-17 auto tear off, 3-16-17 Testing the printer, 1-10-13 Tractor positions CHANGING, 2-9-11 front push, 2-3, 2-8, 2-12-15 pull, 2-3 ,2-8, 2-19-21, 4-8 push/pull, 2-8, 2-22-23, 4-8-9 rear push, 2-3, 2-8, 2-15-18 selecting 2-8-9 Transporting the printer, 5-4 Troubleshooting, 6-2-12 Unidirectional printing, 3-10, Unpacking the printer, l-4 Utilities EFSON Calibration, l-20 EPSON Remote!, l-18 V Voltage, caution, l-4, 1-10 W Weight, A-9 Windows, l-15-16 installing printer driver, l-15 IN-4 Index