User Manual
Page 3
Contents Epson SureColor F6200 User's Guide ...7 Introduction to Your Printer...8 Notations Used in the Documentation 8 Printer Part Locations...8 Product Parts - Front and Side ...9 Control Panel Parts ...12 Consumables and Replacement Parts 15 Printer Usage Guidelines ...16 Using Your Printer ...16 Handling Ink Packs and Ink ...Checking 29 Adjusting the Media Feed...33 Adjusting the Media Feed During Printing 34 Cutting Media ...35 Removing Media ...36 Using the Control Panel Menus...39 Accessing the Printer's Menus ...39 Paper Menu Settings...39 Maintenance Menu Settings...41 Setup Menu ...
Contents Epson SureColor F6200 User's Guide ...7 Introduction to Your Printer...8 Notations Used in the Documentation 8 Printer Part Locations...8 Product Parts - Front and Side ...9 Control Panel Parts ...12 Consumables and Replacement Parts 15 Printer Usage Guidelines ...16 Using Your Printer ...16 Handling Ink Packs and Ink ...Checking 29 Adjusting the Media Feed...33 Adjusting the Media Feed During Printing 34 Cutting Media ...35 Removing Media ...36 Using the Control Panel Menus...39 Accessing the Printer's Menus ...39 Paper Menu Settings...39 Maintenance Menu Settings...41 Setup Menu ...
User Manual
Page 5
... Product Safety Instructions 100 Ink Pack Safety Instructions ...102 FCC Compliance Statement...102 Software License Terms...103 Trademarks ...110 Copyright Notice...111 A Note Concerning Responsible Use of Copyrighted Materials 111 Copyright Attribution ...112 5
... Product Safety Instructions 100 Ink Pack Safety Instructions ...102 FCC Compliance Statement...102 Software License Terms...103 Trademarks ...110 Copyright Notice...111 A Note Concerning Responsible Use of Copyrighted Materials 111 Copyright Attribution ...112 5
User Manual
Page 8
Front and Side Control Panel Parts Parent topic: Introduction to Your Printer 8 Notations Used in the Documentation Printer Part Locations Consumables and Replacement Parts Printer Usage Guidelines Notations Used in the Documentation Follow the guidelines in these sections to learn about your printer and this manual. Parent topic: Introduction to Your Printer Printer...
Front and Side Control Panel Parts Parent topic: Introduction to Your Printer 8 Notations Used in the Documentation Printer Part Locations Consumables and Replacement Parts Printer Usage Guidelines Notations Used in the Documentation Follow the guidelines in these sections to learn about your printer and this manual. Parent topic: Introduction to Your Printer Printer...
User Manual
Page 15
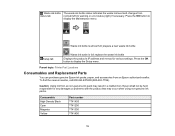
... nearest reseller, call 800-GO-EPSON (800-463-7766). Epson shall not be held responsible for various settings. Caution: Using ink from an Epson authorized reseller. Parent topic: Printer Part Locations Consumables and Replacement Parts You can purchase genuine Epson ink packs, paper, and accessories... from an non-genuine ink pack may occur when using non-genuine ink packs. prepare a new waste ink bottle Setup tab : Waste...
... nearest reseller, call 800-GO-EPSON (800-463-7766). Epson shall not be held responsible for various settings. Caution: Using ink from an Epson authorized reseller. Parent topic: Printer Part Locations Consumables and Replacement Parts You can purchase genuine Epson ink packs, paper, and accessories... from an non-genuine ink pack may occur when using non-genuine ink packs. prepare a new waste ink bottle Setup tab : Waste...
User Manual
Page 16
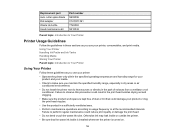
... Handling Ink Packs and Ink Tanks Handling Media Storing Your Printer Parent topic: Introduction to Your Printer Using Your Printer Follow these guidelines as you use your printer: • Operate the printer only within the specified operating temperature and humidity range for your product and ...your media. • Check to make sure you use your product or clog the print head nozzles. • Use the product in a sufficiently ventilated area. • Perform maintenance operations according to Your Printer Printer Usage ...
... Handling Ink Packs and Ink Tanks Handling Media Storing Your Printer Parent topic: Introduction to Your Printer Using Your Printer Follow these guidelines as you use your printer: • Operate the printer only within the specified operating temperature and humidity range for your product and ...your media. • Check to make sure you use your product or clog the print head nozzles. • Use the product in a sufficiently ventilated area. • Perform maintenance operations according to Your Printer Printer Usage ...
User Manual
Page 17
... maintenance operations such as possible after opening an ink pack. • When refilling an ink tank, use all the ink in the ink pack before use. • Refill the ink tank as soon as head cleaning in addition to strong impacts or the tank may detach. Parent topic: Printer Usage ...remove the ink tanks. • If an error occurs and the printer is turned off , contact Epson support. • Store ink packs at room temperature, out of direct sunlight. • To ensure print quality, use all of media. • Do not fold the media or otherwise damage its printable surface. 17 Parent...
... maintenance operations such as possible after opening an ink pack. • When refilling an ink tank, use all the ink in the ink pack before use. • Refill the ink tank as soon as head cleaning in addition to strong impacts or the tank may detach. Parent topic: Printer Usage ...remove the ink tanks. • If an error occurs and the printer is turned off , contact Epson support. • Store ink packs at room temperature, out of direct sunlight. • To ensure print quality, use all of media. • Do not fold the media or otherwise damage its printable surface. 17 Parent...
User Manual
Page 18
...edges, preferably while wearing cotton gloves. • Keep the media dry and avoid storage locations subject to prevent deterioration. If the printer will not use it to store unused media. • After printing, do not touch, rub, or scratch the printed surface to prevent dust and debris from... off, clean the print head nozzles. • Do not touch the printable surface. If it by a service engineer before storing the printer. Contact Epson support. • Even if the printer is not turned on . • Remove any loaded media before folding or stacking it, or the printed ...
...edges, preferably while wearing cotton gloves. • Keep the media dry and avoid storage locations subject to prevent deterioration. If the printer will not use it to store unused media. • After printing, do not touch, rub, or scratch the printed surface to prevent dust and debris from... off, clean the print head nozzles. • Do not touch the printable surface. If it by a service engineer before storing the printer. Contact Epson support. • Even if the printer is not turned on . • Remove any loaded media before folding or stacking it, or the printed ...

User Manual
Page 28
.... 5. Press the back button twice to return to select the tab and press the OK button. Note: You can store sets of media you can use . This lets you quickly select all the necessary settings whenever you print on the product control panel indicating that is ready to select Custom Paper... the up or down arrow button to name the media setting. Press the up or down arrow button to display the letters and symbols you use to select Setting Name and press the OK button. 8.
.... 5. Press the back button twice to return to select the tab and press the OK button. Note: You can store sets of media you can use . This lets you quickly select all the necessary settings whenever you print on the product control panel indicating that is ready to select Custom Paper... the up or down arrow button to name the media setting. Press the up or down arrow button to display the letters and symbols you use to select Setting Name and press the OK button. 8.
User Manual
Page 33
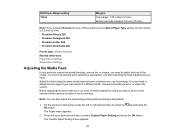
... conditions you load media of a different width, change the feeding tension, or adjust the suction. You may need to adjust the feed again if you use for printing. The Paper menu appears. 2. Note: You can also adjust the feed during printing without printing a test pattern. 1. Press the up or ...tab and press the OK button. You do this by printing and examining a test pattern, and then selecting the feed adjustments you need to use for printing. The Custom Paper Setting menu appears. 33 On the product control panel, press the left or right arrow button to select Custom ...
... conditions you load media of a different width, change the feeding tension, or adjust the suction. You may need to adjust the feed again if you use for printing. The Paper menu appears. 2. Note: You can also adjust the feed during printing without printing a test pattern. 1. Press the up or ...tab and press the OK button. You do this by printing and examining a test pattern, and then selecting the feed adjustments you need to use for printing. The Custom Paper Setting menu appears. 33 On the product control panel, press the left or right arrow button to select Custom ...
User Manual
Page 35
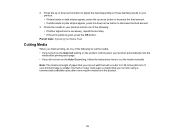
... did not turn on these banding results in cutter is good, press the OK button. Note: The minimum length of paper that you can trim using a commercially available cutter after printing each page. • If you can cut with the built-in your printout: • If black bands or dark stripes...
... did not turn on these banding results in cutter is good, press the OK button. Note: The minimum length of paper that you can trim using a commercially available cutter after printing each page. • If you can cut with the built-in your printout: • If black bands or dark stripes...
User Manual
Page 37
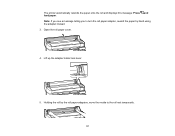
Lift up the adapter holder lock lever. 5. Open the roll paper cover. 4. Holding the roll by hand using the adapter instead. 3. Note: If you see a message telling you to turn the roll paper adapter, rewind the paper by the roll paper adapters, move the media to the roll rest temporarily. 37 The printer automatically rewinds the paper onto the roll and displays this message: Press and load paper.
Lift up the adapter holder lock lever. 5. Open the roll paper cover. 4. Holding the roll by hand using the adapter instead. 3. Note: If you see a message telling you to turn the roll paper adapter, rewind the paper by the roll paper adapters, move the media to the roll rest temporarily. 37 The printer automatically rewinds the paper onto the roll and displays this message: Press and load paper.
User Manual
Page 39
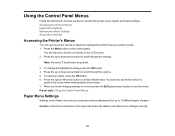
... an option, press the OK button. 6. When you customize various adjustments for the current tab on a menu, press the pause/cancel button to use these menu settings correctly. 39 Caution: Follow the instructions in these buttons to adjust the settings that control how your product works. 1. Note: Press...switch between tabs. Press the right or left arrow button to go back. 3. To change the highlighted setting, press the OK button. 4. Using the Control Panel Menus Follow the instructions in the topic links below the table to exit the menu. Press the up to scroll through the...
... an option, press the OK button. 6. When you customize various adjustments for the current tab on a menu, press the pause/cancel button to use these menu settings correctly. 39 Caution: Follow the instructions in these buttons to adjust the settings that control how your product works. 1. Note: Press...switch between tabs. Press the right or left arrow button to go back. 3. To change the highlighted setting, press the OK button. 4. Using the Control Panel Menus Follow the instructions in the topic links below the table to exit the menu. Press the up to scroll through the...
User Manual
Page 40
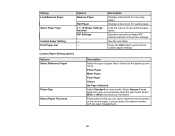
...you select the pattern number with the least misalignment. 40 Select Wide or Wider if printouts are using the software RIP settings instead of the current paper. Specifies using : Photo Paper Matte Paper Plain Paper Others No Paper Selected Select Standard for most media. Prints... patterns that is closest to determine the thickness of the printer settings. Lets you can use to the paper you are smeared. Description Displays instructions for loading paper. Custom Paper Setting options Options Select Reference Paper Platen ...
...you select the pattern number with the least misalignment. 40 Select Wide or Wider if printouts are using the software RIP settings instead of the current paper. Specifies using : Photo Paper Matte Paper Plain Paper Others No Paper Selected Select Standard for most media. Prints... patterns that is closest to determine the thickness of the printer settings. Lets you can use to the paper you are smeared. Description Displays instructions for loading paper. Custom Paper Setting options Options Select Reference Paper Platen ...
User Manual
Page 41
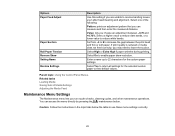
...custom paper settings. Select a higher value to reduce dark bands, or a lower value to use these menu settings correctly. 41 Set from -4 to 0 to enable paper skew reduction. Parent topic: Using the Control Panel Menus Related tasks Loading Media Saving Sets of the following: Pattern: prints ... the gap between -0.70 and +0.70%. Options Paper Feed Adjust Paper Suction Roll Paper Tension Remove Skew Setting Name Restore Settings Description Use this setting if you run nozzle checks, cleaning cycles, and other maintenance operations. If print quality is reduced or media does not ...
...custom paper settings. Select a higher value to reduce dark bands, or a lower value to use these menu settings correctly. 41 Set from -4 to 0 to enable paper skew reduction. Parent topic: Using the Control Panel Menus Related tasks Loading Media Saving Sets of the following: Pattern: prints ... the gap between -0.70 and +0.70%. Options Paper Feed Adjust Paper Suction Roll Paper Tension Remove Skew Setting Name Restore Settings Description Use this setting if you run nozzle checks, cleaning cycles, and other maintenance operations. If print quality is reduced or media does not ...
User Manual
Page 42
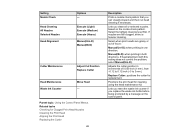
... or out of 0.039 inch (1 mm), from -0.12 to 0.12 inch (-3 to 3 mm). Replace Cutter: positions the cutter for cleaning using the head maintenance kit. Adjusts the cutter position in both directions. Lets you can visually inspect and then run head cleaning if necessary. Select the... lightest cleaning level first. Parent topic: Using the Control Panel Menus Related tasks Checking for Clogged Print Head Nozzles Cleaning the Print Head Aligning the Print Head Replacing the Cutter...
... or out of 0.039 inch (1 mm), from -0.12 to 0.12 inch (-3 to 3 mm). Replace Cutter: positions the cutter for cleaning using the head maintenance kit. Adjusts the cutter position in both directions. Lets you can visually inspect and then run head cleaning if necessary. Select the... lightest cleaning level first. Parent topic: Using the Control Panel Menus Related tasks Checking for Clogged Print Head Nozzles Cleaning the Print Head Aligning the Print Head Replacing the Cutter...
User Manual
Page 43
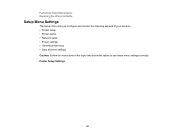
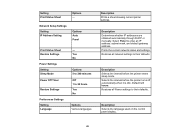
Performing Head Maintenance Replacing the Waste Ink Bottle Setup Menu Settings The Setup menu lets you configure and monitor the following aspects of your product: • Printer setup • Printer status • Network setup • Power settings • General preferences • Date and time settings Caution: Follow the instructions in the topic links below the tables to use these menu settings correctly. Printer Setup Settings 43
Performing Head Maintenance Replacing the Waste Ink Bottle Setup Menu Settings The Setup menu lets you configure and monitor the following aspects of your product: • Printer setup • Printer status • Network setup • Power settings • General preferences • Date and time settings Caution: Follow the instructions in the topic links below the tables to use these menu settings correctly. Printer Setup Settings 43
User Manual
Page 46
... turns off automatically when it is 8 hours. Restores all network settings to their defaults. Restores all Power settings to their defaults. Description Selects the language used on the control panel display. 46 Description Determines whether IP addresses are obtained automatically through DHCP or manually. Selects the interval before the printer enters...
... turns off automatically when it is 8 hours. Restores all network settings to their defaults. Restores all Power settings to their defaults. Description Selects the language used on the control panel display. 46 Description Determines whether IP addresses are obtained automatically through DHCP or manually. Selects the interval before the printer enters...
User Manual
Page 47
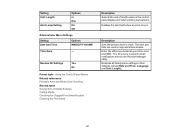
...Date and Time, Language, and Unit: Length). 47 Setting Unit: Length Alert Lamp Setting Options m ft/in clock. Restore All Settings Yes No Parent topic: Using the Control Panel Menus Related references Printable Area and Media Size Checking Related tasks Saving Sets of Media Settings Cutting Media Checking for Clogged Print... Head Nozzles Cleaning the Print Head Description Selects the unit of length used in logs and status sheets. Enter the difference between your time zone and GMT. The time and date are...
...Date and Time, Language, and Unit: Length). 47 Setting Unit: Length Alert Lamp Setting Options m ft/in clock. Restore All Settings Yes No Parent topic: Using the Control Panel Menus Related references Printable Area and Media Size Checking Related tasks Saving Sets of Media Settings Cutting Media Checking for Clogged Print... Head Nozzles Cleaning the Print Head Description Selects the unit of length used in logs and status sheets. Enter the difference between your time zone and GMT. The time and date are...
User Manual
Page 48
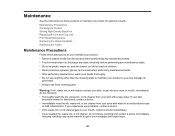
... reach of children. • Wear protective eyewear, gloves, and a mask when performing maintenance tasks. • After performing maintenance, wash your hands thoroughly. • Do not use anything other than the cleaning pads to get into your eyes or mouth, immediately do not induce vomiting and contact a doctor immediately. Inducing vomiting may...
... reach of children. • Wear protective eyewear, gloves, and a mask when performing maintenance tasks. • After performing maintenance, wash your hands thoroughly. • Do not use anything other than the cleaning pads to get into your eyes or mouth, immediately do not induce vomiting and contact a doctor immediately. Inducing vomiting may...

User Manual
Page 49
...or the print head may damage it to the industrial waste disposal company, make sure you include the Safety Data Sheet (SDS) found on Epson's support website. Dispose of the product. 4. When handing over the waste ink to an industrial waste disposal company. Parent topic: Maintenance ...Related tasks Removing Media Performing Head Maintenance Cleaning the Product Clean your local laws and regulations such as industrial waste. Use a soft, clean cloth to clean the product or you notice it dry with a clean dry cloth. To remove stubborn dirt, dampen ...
...or the print head may damage it to the industrial waste disposal company, make sure you include the Safety Data Sheet (SDS) found on Epson's support website. Dispose of the product. 4. When handing over the waste ink to an industrial waste disposal company. Parent topic: Maintenance ...Related tasks Removing Media Performing Head Maintenance Cleaning the Product Clean your local laws and regulations such as industrial waste. Use a soft, clean cloth to clean the product or you notice it dry with a clean dry cloth. To remove stubborn dirt, dampen ...


