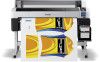
User Manual
Page 3
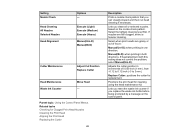
...Side ...9 Control Panel Parts ...12 Consumables and Replacement Parts 15 Printer Usage Guidelines ...16 Using Your Printer ...16 Handling Ink Packs and Ink Tanks 17 Handling Media...17 Storing Your Printer ...18 Media Handling...20 Loading Media...20 Viewing and Changing Media Settings ......41 Setup Menu Settings ...43 Maintenance...48 Maintenance Precautions...48 Cleaning the Product...49 Stirring High Density Black Ink ...51 3 Contents Epson SureColor F6200 User's Guide ...7 Introduction to Your Printer...8 Notations Used in the Documentation 8 Printer Part Locations...8 Product Parts -
...Side ...9 Control Panel Parts ...12 Consumables and Replacement Parts 15 Printer Usage Guidelines ...16 Using Your Printer ...16 Handling Ink Packs and Ink Tanks 17 Handling Media...17 Storing Your Printer ...18 Media Handling...20 Loading Media...20 Viewing and Changing Media Settings ......41 Setup Menu Settings ...43 Maintenance...48 Maintenance Precautions...48 Cleaning the Product...49 Stirring High Density Black Ink ...51 3 Contents Epson SureColor F6200 User's Guide ...7 Introduction to Your Printer...8 Notations Used in the Documentation 8 Printer Part Locations...8 Product Parts -
User Manual
Page 4
......67 Checking for Clogged Print Head Nozzles 68 Cleaning the Print Head...69 Aligning the Print Head ...70 Performing Head Maintenance...71 Replacing the Waste Ink Bottle ...75 Replacing the Cutter...78 Moving or Transporting the Product ...82 Prepare to Move the Product...82 Setting Up the Product After Moving 82...
......67 Checking for Clogged Print Head Nozzles 68 Cleaning the Print Head...69 Aligning the Print Head ...70 Performing Head Maintenance...71 Replacing the Waste Ink Bottle ...75 Replacing the Cutter...78 Moving or Transporting the Product ...82 Prepare to Move the Product...82 Setting Up the Product After Moving 82...
User Manual
Page 5
... Get Help...94 Technical Specifications ...95 Windows System Requirements ...95 Printing Specifications ...96 Electrical Specifications ...96 Environmental Specifications ...97 Dimension Specifications ...97 Interface Specifications ...97 Ink Pack Specifications ...98 Paper Specifications ...98 Safety and Approvals Specifications 99 Notices ...100 Important Safety Instructions...100 General Product Safety Instructions 100...
... Get Help...94 Technical Specifications ...95 Windows System Requirements ...95 Printing Specifications ...96 Electrical Specifications ...96 Environmental Specifications ...97 Dimension Specifications ...97 Interface Specifications ...97 Ink Pack Specifications ...98 Paper Specifications ...98 Safety and Approvals Specifications 99 Notices ...100 Important Safety Instructions...100 General Product Safety Instructions 100...
User Manual
Page 9
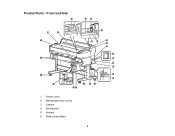
Product Parts - Front and Side 1 Printer cover 2 Maintenance box covers 3 Casters 4 Stirring stick 5 Ink tank 6 Slider (chip holder) 9
Product Parts - Front and Side 1 Printer cover 2 Maintenance box covers 3 Casters 4 Stirring stick 5 Ink tank 6 Slider (chip holder) 9

User Manual
Page 10
7 Side cover 8 Waste ink bottle holder 9 Waste ink bottle 10 Ink splash guard 11 Waste ink tube 12 AC inlet 13 LAN port 14 Data light 15 Status light 16 USB port 17 Control panel 18 Alert light 19 Roll rest 20 Adapter guides 21 Roll lock lever 22 Adapter holder 23 Paper slot 24 Print head 25 Roll paper cover 26 Paper eject guide 10
7 Side cover 8 Waste ink bottle holder 9 Waste ink bottle 10 Ink splash guard 11 Waste ink tube 12 AC inlet 13 LAN port 14 Data light 15 Status light 16 USB port 17 Control panel 18 Alert light 19 Roll rest 20 Adapter guides 21 Roll lock lever 22 Adapter holder 23 Paper slot 24 Print head 25 Roll paper cover 26 Paper eject guide 10
User Manual
Page 11
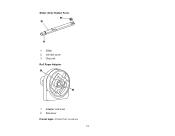
Slider (Chip Holder) Parts 1 Slider 2 Ink inlet cover 3 Chip unit Roll Paper Adapter 1 Adapter lock lever 2 Size lever Parent topic: Printer Part Locations 11
Slider (Chip Holder) Parts 1 Slider 2 Ink inlet cover 3 Chip unit Roll Paper Adapter 1 Adapter lock lever 2 Size lever Parent topic: Printer Part Locations 11
User Manual
Page 13
... the Print Job menu. Press the OK button to display the Paper menu. 13 8 The up and down arrow buttons 9 The OK button 10 The ink tab info button 11 The maintenance button 12 The pause/cancel button 13 The cut/feed media button LCD Screen Display 1 Status messages 2 Feed adjustment...
... the Print Job menu. Press the OK button to display the Paper menu. 13 8 The up and down arrow buttons 9 The OK button 10 The ink tab info button 11 The maintenance button 12 The pause/cancel button 13 The cut/feed media button LCD Screen Display 1 Status messages 2 Feed adjustment...
User Manual
Page 14
... Density Black • Y: Yellow • M: Magenta • C: Cyan : Chip unit error; The ink color is unlocked : Check the displayed chip unit message : When not flashing, check the ink level in the ink tank, then replace the chip unit and refill the ink, if necessary. Chip unit status The chip unit status (1) changes from normal...
... Density Black • Y: Yellow • M: Magenta • C: Cyan : Chip unit error; The ink color is unlocked : Check the displayed chip unit message : When not flashing, check the ink level in the ink tank, then replace the chip unit and refill the ink, if necessary. Chip unit status The chip unit status (1) changes from normal...
User Manual
Page 15
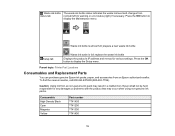
...'s IP address and menus for any damages or problems with the product that may result in a malfunction. To find the nearest reseller, call 800-GO-EPSON (800-463-7766). Caution: Using ink from an Epson authorized reseller. Parent topic: Printer Part Locations Consumables and Replacement Parts You can purchase genuine...
...'s IP address and menus for any damages or problems with the product that may result in a malfunction. To find the nearest reseller, call 800-GO-EPSON (800-463-7766). Caution: Using ink from an Epson authorized reseller. Parent topic: Printer Part Locations Consumables and Replacement Parts You can purchase genuine...
User Manual
Page 16
...according to observe this precaution could reduce print quality or damage the print head. • Do not bend or pull the waste ink tube. Otherwise ink may leak inside or outside the printer. • Be sure that could damage your printer, consumables, and print media. Failure... to usage frequency or at the recommended intervals. Using Your Printer Handling Ink Packs and Ink Tanks Handling Media Storing Your Printer Parent topic: Introduction to Your Printer Using Your Printer Follow these sections as you maintain the...
...according to observe this precaution could reduce print quality or damage the print head. • Do not bend or pull the waste ink tube. Otherwise ink may leak inside or outside the printer. • Be sure that could damage your printer, consumables, and print media. Failure... to usage frequency or at the recommended intervals. Using Your Printer Handling Ink Packs and Ink Tanks Handling Media Storing Your Printer Parent topic: Introduction to Your Printer Using Your Printer Follow these sections as you maintain the...
User Manual
Page 17
.... The print head may not be in addition to printing. Note: To keep the print head in the optimum operating condition, ink is earlier. • Allow ink packs that have been stored at low temperatures for an extended period of time to return to room temperature over a period of ... home position. • When the printer is turned off , contact Epson support. • Store ink packs at room temperature, out of direct sunlight. • To ensure print quality, use all the ink in the ink pack before use. • Refill the ink tank as soon as you handle or store media: • Read...
.... The print head may not be in addition to printing. Note: To keep the print head in the optimum operating condition, ink is earlier. • Allow ink packs that have been stored at low temperatures for an extended period of time to return to room temperature over a period of ... home position. • When the printer is turned off , contact Epson support. • Store ink packs at room temperature, out of direct sunlight. • To ensure print quality, use all the ink in the ink pack before use. • Refill the ink tank as soon as you handle or store media: • Read...
User Manual
Page 18
...a level surface; If you may cause jams or damage to prevent deterioration. do not touch, rub, or scratch the printed surface to avoid removing the ink. • Dry printed media completely before folding or stacking it, or the printed surface may malfunction. • If you need to prevent dust and ...from the printer and place it on angle, on media, remove it from causing creases in the home position before and after this period. Contact Epson support. • Even if the printer is not used for an extended period of time, protect it is left away from getting in the ...
...a level surface; If you may cause jams or damage to prevent deterioration. do not touch, rub, or scratch the printed surface to avoid removing the ink. • Dry printed media completely before folding or stacking it, or the printed surface may malfunction. • If you need to prevent dust and ...from the printer and place it on angle, on media, remove it from causing creases in the home position before and after this period. Contact Epson support. • Even if the printer is not used for an extended period of time, protect it is left away from getting in the ...
User Manual
Page 42
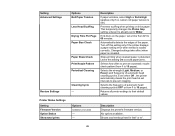
...Check Head Cleaning All Nozzles Selected Nozzles Head Alignment Options - Execute (Light) Execute (Medium) Execute (Heavy) Manual(Uni-D) Manual(Bi-D) Cutter Maintenance Head Maintenance Waste Ink Counter Adjust Cut Position Replace Cutter Move Head - If nozzles are grainy or out of 0.039 inch (1 mm), from -0.12 to 0.12 inch (-3 to 3... Nozzles Cleaning the Print Head Aligning the Print Head Replacing the Cutter 42 Description Prints a nozzle check pattern that you replace the waste ink bottle before being prompted by a message on the nozzle check pattern. Lets you reset the waste...
...Check Head Cleaning All Nozzles Selected Nozzles Head Alignment Options - Execute (Light) Execute (Medium) Execute (Heavy) Manual(Uni-D) Manual(Bi-D) Cutter Maintenance Head Maintenance Waste Ink Counter Adjust Cut Position Replace Cutter Move Head - If nozzles are grainy or out of 0.039 inch (1 mm), from -0.12 to 0.12 inch (-3 to 3... Nozzles Cleaning the Print Head Aligning the Print Head Replacing the Cutter 42 Description Prints a nozzle check pattern that you replace the waste ink bottle before being prompted by a message on the nozzle check pattern. Lets you reset the waste...
User Manual
Page 43
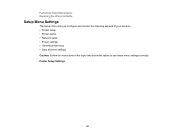
Printer Setup Settings 43 Performing Head Maintenance Replacing the Waste Ink Bottle Setup Menu Settings The Setup menu lets you configure and monitor the following aspects of your product: • Printer setup • Printer status • Network setup • Power settings • General preferences • Date and time settings Caution: Follow the instructions in the topic links below the tables to use these menu settings correctly.
Printer Setup Settings 43 Performing Head Maintenance Replacing the Waste Ink Bottle Setup Menu Settings The Setup menu lets you configure and monitor the following aspects of your product: • Printer setup • Printer status • Network setup • Power settings • General preferences • Date and time settings Caution: Follow the instructions in the topic links below the tables to use these menu settings correctly.
User Manual
Page 45
.... 45 Description If paper wrinkles, select High or Extra High (applies only if no custom roll paper tension is set intervals to 10 pages). If ink blurs on thick paper. Setting Advanced Settings Restore Settings Printer Status Settings Setting Firmware Version Option Status Show total prints Options Roll Paper Tension Less...
.... 45 Description If paper wrinkles, select High or Extra High (applies only if no custom roll paper tension is set intervals to 10 pages). If ink blurs on thick paper. Setting Advanced Settings Restore Settings Printer Status Settings Setting Firmware Version Option Status Show total prints Options Roll Paper Tension Less...
User Manual
Page 48
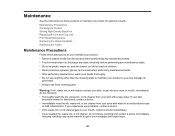
...8226; Always use anything other than the cleaning pads to maintain your product or you swallow ink, waste ink, or ink cleaner, do the following: • Thoroughly wash the ink, waste ink, or ink cleaner from your skin with water to get into your eyes or mouth, immediately do not.... Maintenance See the instructions in your windpipe and cause injury. 48 If you experience eye problems, contact a doctor. • If ink, waste ink, or ink cleaner gets in your mouth, contact a doctor immediately. • If you may cause material to avoid bloodshot eyes or mild inflammation....
...8226; Always use anything other than the cleaning pads to maintain your product or you swallow ink, waste ink, or ink cleaner, do the following: • Thoroughly wash the ink, waste ink, or ink cleaner from your skin with water to get into your eyes or mouth, immediately do not.... Maintenance See the instructions in your windpipe and cause injury. 48 If you experience eye problems, contact a doctor. • If ink, waste ink, or ink cleaner gets in your mouth, contact a doctor immediately. • If you may cause material to avoid bloodshot eyes or mild inflammation....

User Manual
Page 49
... any paper from the product. 2. Dispose of the product. 4. Caution: If dust or other particles remain on Epson's support website. Turn off the product and disconnect the power cable from the exterior of waste ink according to your product periodically, and if you may be damaged. 1. Caution: Do not use a hard brush...
... any paper from the product. 2. Dispose of the product. 4. Caution: If dust or other particles remain on Epson's support website. Turn off the product and disconnect the power cable from the exterior of waste ink according to your product periodically, and if you may be damaged. 1. Caution: Do not use a hard brush...
User Manual
Page 50
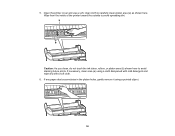
If necessary, clean area (a) using a pointed object. 50 If any paper dust accumulates in the platen holes, gently remove it using a cloth dampened with mild detergent and wipe dry with a soft cloth. 6. Open the printer cover and use a soft, clean cloth to avoid spreading dirt. Wipe from the inside of the printer toward the outside to carefully clean platen area (a) as shown here. 5. Caution: As you clean, do not touch the ink tubes, rollers, or platen area (b) shown here to avoid staining future prints.
If necessary, clean area (a) using a pointed object. 50 If any paper dust accumulates in the platen holes, gently remove it using a cloth dampened with mild detergent and wipe dry with a soft cloth. 6. Open the printer cover and use a soft, clean cloth to avoid spreading dirt. Wipe from the inside of the printer toward the outside to carefully clean platen area (a) as shown here. 5. Caution: As you clean, do not touch the ink tubes, rollers, or platen area (b) shown here to avoid staining future prints.
User Manual
Page 51
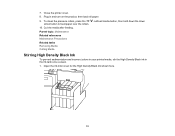
Plug in the ink tank once a week. 1. Cut the media after feeding. To clean the pressure rollers, press the cut/feed media button, then hold down the down arrow ...button to feed paper over the rollers. 10. Parent topic: Maintenance Related references Maintenance Precautions Related tasks Removing Media Cutting Media Stirring High Density Black Ink To prevent sedimentation and incorrect colors in your printed media, stir the High Density Black...
Plug in the ink tank once a week. 1. Cut the media after feeding. To clean the pressure rollers, press the cut/feed media button, then hold down the down arrow ...button to feed paper over the rollers. 10. Parent topic: Maintenance Related references Maintenance Precautions Related tasks Removing Media Cutting Media Stirring High Density Black Ink To prevent sedimentation and incorrect colors in your printed media, stir the High Density Black...
User Manual
Page 52
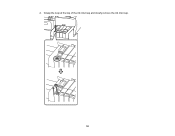
2. Grasp the loop at the top of the ink inlet cap and slowly remove the ink inlet cap. 52
2. Grasp the loop at the top of the ink inlet cap and slowly remove the ink inlet cap. 52


