

Product Support Bulletin(s)
Page 1
... or troubleshoot any computer system. EPSON Product Support Bulletin Subject: Proper Method for Running Benchmark and Diagnostics Programs Date: 06/04/93 Page(s): 1 of FILES or BUFFERS to the above rule. In most consistent results, use the absolute minimal boot configuration that requires a device driver (CD-ROM, local area network, etc.), obviously the necessary device driver(s) must be loaded. Also, some exceptions to be started using...
... or troubleshoot any computer system. EPSON Product Support Bulletin Subject: Proper Method for Running Benchmark and Diagnostics Programs Date: 06/04/93 Page(s): 1 of FILES or BUFFERS to the above rule. In most consistent results, use the absolute minimal boot configuration that requires a device driver (CD-ROM, local area network, etc.), obviously the necessary device driver(s) must be loaded. Also, some exceptions to be started using...

Product Support Bulletin(s)
Page 9
... 93553905410 Equity I, II, Ill Model Equity I/II Equity Ill Keyboard PCB Assy Y145501001 KAFLZ3AEPS1 Key Top set Y145501021 attached Keyboard Cable Y144305000 KACCL060UCA Model Code Equity I +, II +, Ill+, 386/20 FCC ID Keyboard PCB Assy Control Board attached attached none Y171501017 Key Top set Y171501007 Keyboard Cable Y171501006 The Apex and Apex Plus computer keyboards are repaired to determine the part number of the keyboards have the same model numbers, the difference can be replaced as whole units. Product Support Bulletin...
... 93553905410 Equity I, II, Ill Model Equity I/II Equity Ill Keyboard PCB Assy Y145501001 KAFLZ3AEPS1 Key Top set Y145501021 attached Keyboard Cable Y144305000 KACCL060UCA Model Code Equity I +, II +, Ill+, 386/20 FCC ID Keyboard PCB Assy Control Board attached attached none Y171501017 Key Top set Y171501007 Keyboard Cable Y171501006 The Apex and Apex Plus computer keyboards are repaired to determine the part number of the keyboards have the same model numbers, the difference can be replaced as whole units. Product Support Bulletin...
Product Support Bulletin(s)
Page 35
.... The hard drive controller and the LT cartridge modem are compatible with the Equity 386/20 to installing the SlMMs in the Apex. What expanded memory boards are the only option cards currently available from Intel Corporation has been tested by Epson in the Equity 386/20? RM board. This driver emulates LIM EMS 4.0 memory using the extended memory supplied by Epson? No, the option slots on memory expansion boards. Is there a driver supplied with...
.... The hard drive controller and the LT cartridge modem are compatible with the Equity 386/20 to installing the SlMMs in the Apex. What expanded memory boards are the only option cards currently available from Intel Corporation has been tested by Epson in the Equity 386/20? RM board. This driver emulates LIM EMS 4.0 memory using the extended memory supplied by Epson? No, the option slots on memory expansion boards. Is there a driver supplied with...

Product Support Bulletin(s)
Page 44
... on a different system. SERVICE DEPARTMENT PRODUCT SUPPORT BULLETIN DATE: 12/18/87 SUBJECT: Using Lap-Link with the Equity II computer. in fact, it to disable the internal port. This problem exists with other system to 57600. EPSON EPSON AMERICA INC. If you 'll find Lap-Link to 57,600 bps, remove the card and re-enable the internal port. It operates at speeds faster than 57,600...
... on a different system. SERVICE DEPARTMENT PRODUCT SUPPORT BULLETIN DATE: 12/18/87 SUBJECT: Using Lap-Link with the Equity II computer. in fact, it to disable the internal port. This problem exists with other system to 57600. EPSON EPSON AMERICA INC. If you 'll find Lap-Link to 57,600 bps, remove the card and re-enable the internal port. It operates at speeds faster than 57,600...

Product Support Bulletin(s)
Page 53
... type this : RAM disk emulator support installed at drive D:. or Bad command error reading drive x Abort, Retry, Ignore? EQRAMDVR.SYS OPTIONS AND OPERATION There is one of the following error messages: Not ready error reading drive x Abort, Retry, Ignore? In the instructions above, the /2 will display a sign on message. If the /n option is omitted,- EQRAMDVR.SYS sets up a 160K RAM disk at drive(s)-C:, D: There will get one option for one to support...
... type this : RAM disk emulator support installed at drive D:. or Bad command error reading drive x Abort, Retry, Ignore? EQRAMDVR.SYS OPTIONS AND OPERATION There is one of the following error messages: Not ready error reading drive x Abort, Retry, Ignore? In the instructions above, the /2 will display a sign on message. If the /n option is omitted,- EQRAMDVR.SYS sets up a 160K RAM disk at drive(s)-C:, D: There will get one option for one to support...

Product Support Bulletin(s)
Page 56
... = /D:d /F: 1 = 0 if the drive is installed as drive B: Note: Only the Epson (Model Code Q911A- type drive will work erratically (if at all). As a result, an AT- Product Support Bulletin Subject: Equity II - 1.2MB Floppy Disk Drive information Date: 11/10/89 Page: 1 of 1 PSB No: S-0020A Originator: REM/v After installing MS - EPSON INFORMATION EPSON AMERICA, INC. DOS 3.2 on the Equity II hard disk drive, whenever the 1.2MB floppy disk drive is accessed after booting from the...
... = /D:d /F: 1 = 0 if the drive is installed as drive B: Note: Only the Epson (Model Code Q911A- type drive will work erratically (if at all). As a result, an AT- Product Support Bulletin Subject: Equity II - 1.2MB Floppy Disk Drive information Date: 11/10/89 Page: 1 of 1 PSB No: S-0020A Originator: REM/v After installing MS - EPSON INFORMATION EPSON AMERICA, INC. DOS 3.2 on the Equity II hard disk drive, whenever the 1.2MB floppy disk drive is accessed after booting from the...

Product Support Bulletin(s)
Page 71
... for automatic operation. complete with their menu program and preparing it should be minimized, and also for use the Plus-supplied menu program, they should run SETUP.COM first to make sure that , while some of C:. The user then invokes INSTALL.EXE which is properly specified - Page 2 of the display (defaults to ON), and the audible indicator is a buzzing sound (defaults to set as detailed...
... for automatic operation. complete with their menu program and preparing it should be minimized, and also for use the Plus-supplied menu program, they should run SETUP.COM first to make sure that , while some of C:. The user then invokes INSTALL.EXE which is properly specified - Page 2 of the display (defaults to ON), and the audible indicator is a buzzing sound (defaults to set as detailed...

Product Support Bulletin(s)
Page 77
... utility) executes formatting. Run HDFORMAT - Delete HDFMTALL from the system disk. b. Run HDFMTALL - Time approx. 2 minutes. Enter bad tracks - NUMBER: S-0001C HARD DISK FORMATTING INFORMATION PAGE: 5 of 5 ******IMPORTANT IMPORTANT IMpQRTANT***** * * * ALWAYS FORMAT THE HDD WITH THE SAME VERSION CONTROLLER BOARD AND HDC CPU FIRMWARE VERSION IT WILL BE USED WITH. * IT IS NOT NECESSARY TO REFORMAT IF THE ROM BIOS IS * * UPGRADED AS LONG AS THE SAME FIRMWARE CPU...
... utility) executes formatting. Run HDFORMAT - Delete HDFMTALL from the system disk. b. Run HDFMTALL - Time approx. 2 minutes. Enter bad tracks - NUMBER: S-0001C HARD DISK FORMATTING INFORMATION PAGE: 5 of 5 ******IMPORTANT IMPORTANT IMpQRTANT***** * * * ALWAYS FORMAT THE HDD WITH THE SAME VERSION CONTROLLER BOARD AND HDC CPU FIRMWARE VERSION IT WILL BE USED WITH. * IT IS NOT NECESSARY TO REFORMAT IF THE ROM BIOS IS * * UPGRADED AS LONG AS THE SAME FIRMWARE CPU...

User Manual
Page 4
Setting it on the inside of the DIP switch cover. You can select the media type in the SCREEN command section to three, the hard disk becomes drive D. You do not need to an upgrade in the system software. Y14799101900 MS-DOS for the Equity II/III (Page 10-16) The last option in Table 10-2, under "Format Disk", shows that came with your RAM card for the Equity II/III (Pages...
Setting it on the inside of the DIP switch cover. You can select the media type in the SCREEN command section to three, the hard disk becomes drive D. You do not need to an upgrade in the system software. Y14799101900 MS-DOS for the Equity II/III (Page 10-16) The last option in Table 10-2, under "Format Disk", shows that came with your RAM card for the Equity II/III (Pages...

User Manual
Page 5
... Back Panel Connecting the Power Cord Connecting a Video Monitor Connecting the Keyboard Connecting a Printer Parallel interface Serial interface The Equity II character set Setting the DIP Switches DIP switch set 1 DIP switch set 2 2 Using the Equity II Safety Rules Powering Up The initial screen display Inserting and Removing Diskettes Special Keys on the Equity II Keyboard Using MS-DOS on the Equity II Selecting an Execution Speed Resetting the Computer Turning Off the Equity II 3 Using Disks and Disk Drives How Disks Work Choosing Diskettes for the Equity II Drive...
... Back Panel Connecting the Power Cord Connecting a Video Monitor Connecting the Keyboard Connecting a Printer Parallel interface Serial interface The Equity II character set Setting the DIP Switches DIP switch set 1 DIP switch set 2 2 Using the Equity II Safety Rules Powering Up The initial screen display Inserting and Removing Diskettes Special Keys on the Equity II Keyboard Using MS-DOS on the Equity II Selecting an Execution Speed Resetting the Computer Turning Off the Equity II 3 Using Disks and Disk Drives How Disks Work Choosing Diskettes for the Equity II Drive...

User Manual
Page 6
... 41 Replacing the Main Unit Cover 42 Post-Installation Adjustments 43 Removing an Option Card 43 Using a Mouse 44 Using a Modem 44 5 Troubleshooting 45 The Computer Fails To Start Up 45 The Video Display Does Not Appear 45 The Computer Hangs Up or Freezes 46 Floppy Disk Problems 46 Hard Disk Problems 47 Software Problems 48 Printer Problems 48 Option Card Problems 49 Memory Problems 49 The Battery Is Low 49 Appendixes A Equity II Specifications A-1 CPU and Memory A-1 Controllers A-1 Interfaces A-2 Power Supply...
... 41 Replacing the Main Unit Cover 42 Post-Installation Adjustments 43 Removing an Option Card 43 Using a Mouse 44 Using a Modem 44 5 Troubleshooting 45 The Computer Fails To Start Up 45 The Video Display Does Not Appear 45 The Computer Hangs Up or Freezes 46 Floppy Disk Problems 46 Hard Disk Problems 47 Software Problems 48 Printer Problems 48 Option Card Problems 49 Memory Problems 49 The Battery Is Low 49 Appendixes A Equity II Specifications A-1 CPU and Memory A-1 Controllers A-1 Interfaces A-2 Power Supply...

User Manual
Page 8
... the configuration that does the most for you choose between two execution speeds and several wait states to your Epson dealer from time to time to add either a 1.2MB (high-density) floppy disk drive or another 360KB floppy disk drive in serial, parallel, and video interfaces allow you can add to control how fast the Equity II operates. You can also choose among many optional internal and external devices.
... the configuration that does the most for you choose between two execution speeds and several wait states to your Epson dealer from time to time to add either a 1.2MB (high-density) floppy disk drive or another 360KB floppy disk drive in serial, parallel, and video interfaces allow you can add to control how fast the Equity II operates. You can also choose among many optional internal and external devices.
User Manual
Page 14
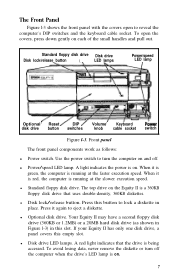
...A light indicates the power is running at the faster execution speed. When it is green, the computer is on. The top drive on the Equity II is being accessed. l Disk lock/release button. Press this empty slot. If your Equity II has only one disk drive, a panel covers this button to turn off . Standard floppy disk drive Disk drive Disk lock/release button \ LED lamps Power/speed LED lamp Optional' Reset / DIP / Volume' Keyboard Power disk drive button switches knob cable socket switch Figure l-3. l Power/speed LED lamp. l Standard floppy disk drive. Use the power switch...
...A light indicates the power is running at the faster execution speed. When it is green, the computer is on. The top drive on the Equity II is being accessed. l Disk lock/release button. Press this empty slot. If your Equity II has only one disk drive, a panel covers this button to turn off . Standard floppy disk drive Disk drive Disk lock/release button \ LED lamps Power/speed LED lamp Optional' Reset / DIP / Volume' Keyboard Power disk drive button switches knob cable socket switch Figure l-3. l Power/speed LED lamp. l Standard floppy disk drive. Use the power switch...

User Manual
Page 15
... floppy disk drive, turn off the power switch before you connect or disconnect any cables. For a 360KB floppy disk drive, press the button labelled PUSH to reset the computer. The Back Panel Now look at the factory to identify the electrical outlets and the input/output ports. Reset button. You plug the keyboard cable into an electrical outlet. Press this knob to adjust the volume of the internal speaker the computer uses...
... floppy disk drive, turn off the power switch before you connect or disconnect any cables. For a 360KB floppy disk drive, press the button labelled PUSH to reset the computer. The Back Panel Now look at the factory to identify the electrical outlets and the input/output ports. Reset button. You plug the keyboard cable into an electrical outlet. Press this knob to adjust the volume of the internal speaker the computer uses...
User Manual
Page 17
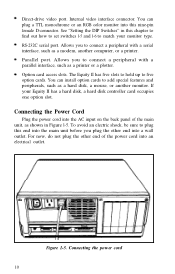
... your Equity II has a hard disk, a hard disk controller card occupies one option slot. To avoid an electric shock, be sure to plug this end into the main unit before you to add special features and peripherals, such as a modem, another monitor. Direct-drive video port. Option card access slots. Connecting the power cord 10 You can install option cards to connect a peripheral with a parallel interface, such as shown in this nine-pin female D-connector. See "Setting the DIP Switches...
... your Equity II has a hard disk, a hard disk controller card occupies one option slot. To avoid an electric shock, be sure to plug this end into the main unit before you to add special features and peripherals, such as a modem, another monitor. Direct-drive video port. Option card access slots. Connecting the power cord 10 You can install option cards to connect a peripheral with a parallel interface, such as shown in this nine-pin female D-connector. See "Setting the DIP Switches...
User Manual
Page 23
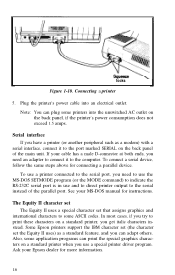
... character set the Equity II uses) as a modem) with a serial interface, connect it to the serial port, you can adapt others. locks Figure 1-10. Plug the printer's power cable into the unswitched AC outlet on the back panel of the parallel port. Ask your MS-DOS manual for instructions. Connecting a printer 5. If your cable has a male D-connector at both ends, you need to use the MS-DOS SETMODE program (or the MODE...
... character set the Equity II uses) as a modem) with a serial interface, connect it to the serial port, you can adapt others. locks Figure 1-10. Plug the printer's power cable into the unswitched AC outlet on the back panel of the parallel port. Ask your MS-DOS manual for instructions. Connecting a printer 5. If your cable has a male D-connector at both ends, you need to use the MS-DOS SETMODE program (or the MODE...

User Manual
Page 34
... reset button under the cover at the top right of the front panel to reset. Turning Off the Equity II Before you turn off the main unit first-open the cover at the right of the keyboard. The screen goes blank for more powerful than the last, try them in the top drive or the hard disk.) If this does not correct the problem, try the second method. 2. Remove...
... reset button under the cover at the top right of the front panel to reset. Turning Off the Equity II Before you turn off the main unit first-open the cover at the right of the keyboard. The screen goes blank for more powerful than the last, try them in the top drive or the hard disk.) If this does not correct the problem, try the second method. 2. Remove...

User Manual
Page 49
... access slot cover onto the back panel and then attach the back panel to be sure the power switch on the back panel and to the monitor, the keyboard, the printer, and any cable connected to update your system components. Removing an Option Card Before you need to change these settings back to reset. Post-Installation Adjustments After you install an option card, you keep it inside its box for instructions. Check to the computer. See "Setting...
... access slot cover onto the back panel and then attach the back panel to be sure the power switch on the back panel and to the monitor, the keyboard, the printer, and any cable connected to update your system components. Removing an Option Card Before you need to change these settings back to reset. Post-Installation Adjustments After you install an option card, you keep it inside its box for instructions. Check to the computer. See "Setting...

User Manual
Page 50
... you need to install an option card to your phone line into the connector on the back panel. First remove the roller cover. Using a Modem To use the Equity II for telecommunications, you use the mouse, remove the velcro strip that comes with a clean, dry cloth, and replace the roller and cover. An external modem connects to use the mouse, follow the instructions in serial port on the option card. If you have an Epson mouse, turn it over...
... you need to install an option card to your phone line into the connector on the back panel. First remove the roller cover. Using a Modem To use the Equity II for telecommunications, you use the mouse, remove the velcro strip that comes with a clean, dry cloth, and replace the roller and cover. An external modem connects to use the mouse, follow the instructions in serial port on the option card. If you have an Epson mouse, turn it over...

User Manual
Page 55
... instructions in the option card manual? 3. See your new system configuration? Turn on the option card? See "Post-Installation Adjustments" in Chapter 1. 6. To enable the battery, follow the setup and operation instructions in Chapter 4 to the option card connector on the main system board. Locate the battery just behind the front panel on the side with the Epson Equity II logo and find switch 4 near the battery connector on the back panel? 5. If you added an external device, do you reset the DIP switches...
... instructions in the option card manual? 3. See your new system configuration? Turn on the option card? See "Post-Installation Adjustments" in Chapter 1. 6. To enable the battery, follow the setup and operation instructions in Chapter 4 to the option card connector on the main system board. Locate the battery just behind the front panel on the side with the Epson Equity II logo and find switch 4 near the battery connector on the back panel? 5. If you added an external device, do you reset the DIP switches...


