
User Manual
Page 9
...and presentations-USB thumb drive port (EX5200/EX7200 only) ■ Quick, convenient control-Direct Power On, sleep mode, Instant Off ®/On ■ Easy picture adjustment-ultra flexible, Keystone correction with digital zoom (VS200/EX3200) or Auto Keystone correction with a built-in speaker. ...It also provides a native SVGA (VS200/EX3200), XGA (EX5200), or WXGA (EX7200) resolution. You can connect it to a wide range of white and color light...
...and presentations-USB thumb drive port (EX5200/EX7200 only) ■ Quick, convenient control-Direct Power On, sleep mode, Instant Off ®/On ■ Easy picture adjustment-ultra flexible, Keystone correction with digital zoom (VS200/EX3200) or Auto Keystone correction with a built-in speaker. ...It also provides a native SVGA (VS200/EX3200), XGA (EX5200), or WXGA (EX7200) resolution. You can connect it to a wide range of white and color light...
User Manual
Page 10
...■ Notes contain important information about your equipment and displaying and adjusting the image. ■ Built-in Dynamic color mode with Auto Iris setting turned on the projector or the remote control. Here's where you need to your projector. ■ Tips contain additional... (A/V Mute slide) that won't get lost ■ Low power, long-lasting lamp with 2 Power Consumption modes ■ Carrying case (EX3200/EX5200/EX7200 only) and remote control included note Your projector may differ from the ? Additional enhancements: ■ Audio out (VS200/EX3200 only) ■ 2000:1...
...■ Notes contain important information about your equipment and displaying and adjusting the image. ■ Built-in Dynamic color mode with Auto Iris setting turned on the projector or the remote control. Here's where you need to your projector. ■ Tips contain additional... (A/V Mute slide) that won't get lost ■ Low power, long-lasting lamp with 2 Power Consumption modes ■ Carrying case (EX3200/EX5200/EX7200 only) and remote control included note Your projector may differ from the ? Additional enhancements: ■ Audio out (VS200/EX3200 only) ■ 2000:1...
User Manual
Page 33
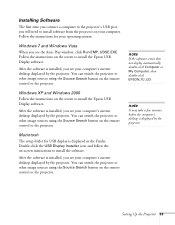
Macintosh The setup folder for your computer. Windows 7 and Windows Vista When you see the Auto Play window, click Run EMP_UDSE.EXE. Windows XP and Windows 2000 Follow the instructions on the screen to install the software. Double-click the USB ...-click EPSON_PJ_UD. After the software is installed, you see your computer's current desktop displayed by the projector. You can switch the projector to install the Epson USB Display software. Installing Software The first time you connect a computer to the projector's USB port, you will need to other image sources using the...
Macintosh The setup folder for your computer. Windows 7 and Windows Vista When you see the Auto Play window, click Run EMP_UDSE.EXE. Windows XP and Windows 2000 Follow the instructions on the screen to install the software. Double-click the USB ...-click EPSON_PJ_UD. After the software is installed, you see your computer's current desktop displayed by the projector. You can switch the projector to install the Epson USB Display software. Installing Software The first time you connect a computer to the projector's USB port, you will need to other image sources using the...

User Manual
Page 34
... (the monitor port on your computer's monitor port. You may damage the port or connector, or the device you are trying to RGB or Auto (see page 41). 34 Setting Up the Projector You may need to change the Input Signal setting in the projector's Signal menu to connect. ...EX5200/EX7200 Computer (Component Video) port 2. Connecting to the VGA Computer Port You can connect an optional audio cable to play sound through the projector (see ...
... (the monitor port on your computer's monitor port. You may damage the port or connector, or the device you are trying to RGB or Auto (see page 41). 34 Setting Up the Projector You may need to change the Input Signal setting in the projector's Signal menu to connect. ...EX5200/EX7200 Computer (Component Video) port 2. Connecting to the VGA Computer Port You can connect an optional audio cable to play sound through the projector (see ...
User Manual
Page 39
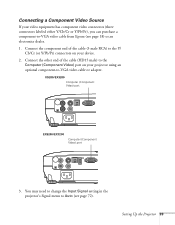
VS200/EX3200 Computer (Component Video) port EX5200/EX7200 Computer (Component Video) port 3. You may need to change the Input Signal setting in the projector's Signal menu to Auto (see page 18) or an electronics dealer. 1. Connect the other end of the cable (3 male RCA) to the Y/ Cb/Cr (or Y/Pb/Pr) ...video equipment has component video connectors (three connectors labeled either Y/Cb/Cr or Y/Pb/Pr), you can purchase a component-to-VGA video cable from Epson (see page 72). Connect the component end of the cable (HD15 male) to the Computer (Component Video) port on your device. 2.
VS200/EX3200 Computer (Component Video) port EX5200/EX7200 Computer (Component Video) port 3. You may need to change the Input Signal setting in the projector's Signal menu to Auto (see page 18) or an electronics dealer. 1. Connect the other end of the cable (3 male RCA) to the Y/ Cb/Cr (or Y/Pb/Pr) ...video equipment has component video connectors (three connectors labeled either Y/Cb/Cr or Y/Pb/Pr), you can purchase a component-to-VGA video cable from Epson (see page 72). Connect the component end of the cable (HD15 male) to the Computer (Component Video) port on your device. 2.
User Manual
Page 51
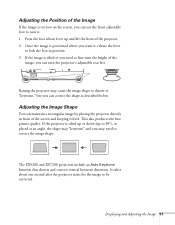
..." and you may cause the image shape to distort or "keystone," but you can correct the shape as described below. The EX5200 and EX7200 projectors include an Auto Keystone function that detects and corrects vertical keystone distortion. Adjusting the Position of the Image If the image is too low on the screen...
..." and you may cause the image shape to distort or "keystone," but you can correct the shape as described below. The EX5200 and EX7200 projectors include an Auto Keystone function that detects and corrects vertical keystone distortion. Adjusting the Position of the Image If the image is too low on the screen...

User Manual
Page 55
Press the Aspect button on the EX5200/ EX7200. Select from a USB device using the USB source on the remote control. Aspect button note You cannot change the aspect ratio when displaying from a computer ... by changing the aspect (width to fit. Choose this setting to automatically resize the image and make the best use of the display area. ■ Auto (HDMI images on EX5200 only): Automatically sets the aspect ratio according to cycle through the Computer (Component Video) port only): Displays images using the full...
Press the Aspect button on the EX5200/ EX7200. Select from a USB device using the USB source on the remote control. Aspect button note You cannot change the aspect ratio when displaying from a computer ... by changing the aspect (width to fit. Choose this setting to automatically resize the image and make the best use of the display area. ■ Auto (HDMI images on EX5200 only): Automatically sets the aspect ratio according to cycle through the Computer (Component Video) port only): Displays images using the full...

User Manual
Page 56
Choose this setting to automatically resize the image and make the best use of the display area. ■ Auto (HDMI images only): Automatically sets the aspect ratio according to fit. ■ Full: Displays images using the full projection area and maintains the aspect ratio ... in the best aspect ratio. ■ 16:9: Converts the aspect ratio of the image to 16:9. 4:3 ratio images are elongated horizontally to the input signal. EX7200 ■ Normal: Displays images using the full width of the projection area, but does not retain the aspect ratio. 4:3 ratio images are maintained).
Choose this setting to automatically resize the image and make the best use of the display area. ■ Auto (HDMI images only): Automatically sets the aspect ratio according to fit. ■ Full: Displays images using the full projection area and maintains the aspect ratio ... in the best aspect ratio. ■ 16:9: Converts the aspect ratio of the image to 16:9. 4:3 ratio images are elongated horizontally to the input signal. EX7200 ■ Normal: Displays images using the full width of the projection area, but does not retain the aspect ratio. 4:3 ratio images are maintained).
User Manual
Page 69
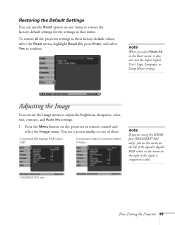
... their factory-default values, select the Reset menu, highlight Reset All, press Enter, and select Yes to adjust the brightness, sharpness, color, tint, contrast, and Auto Iris settings. 1. You see the menu on the left if the signal is digital RGB video, or the menu on the right if the signal... is component video. * EX5200/EX7200 only Fine-Tuning the Projector 69 Restoring the Default Settings You can use the Reset option on any menu to one of these: Computer/USB...
... their factory-default values, select the Reset menu, highlight Reset All, press Enter, and select Yes to adjust the brightness, sharpness, color, tint, contrast, and Auto Iris settings. 1. You see the menu on the left if the signal is digital RGB video, or the menu on the right if the signal... is component video. * EX5200/EX7200 only Fine-Tuning the Projector 69 Restoring the Default Settings You can use the Reset option on any menu to one of these: Computer/USB...

User Manual
Page 70
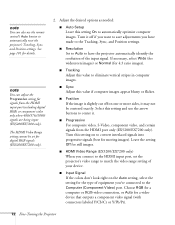
... the image bluer or Low to tint it redder (default setting is Medium). (Not available if sRGB is selected as the Color Mode setting.) ■ Auto Iris Automatically adjusts the projected luminance according to magenta in the Settings menu, then choose Normal or ECO (the default setting is Normal). 2. Adjust the...
... the image bluer or Low to tint it redder (default setting is Medium). (Not available if sRGB is selected as the Color Mode setting.) ■ Auto Iris Automatically adjusts the projected luminance according to magenta in the Settings menu, then choose Normal or ECO (the default setting is Normal). 2. Adjust the...
User Manual
Page 72
...automatically identify the resolution of equipment you connect to the HDMI input port, set for digital RGB signals (EX5200/EX7200 only). 2. Choose RGB for a computer or RGB-video connection, or Auto for details. See page 101 for a video device that outputs a component video signal (with connectors labeled ...input port (excluding digital RGB) or component video only when 480i/576i/1080i signals are being input (EX5200/EX7200 only). Adjust the desired options as needed: ■ Auto Setup Leave this setting On to center it may not be set the projector's video range to eliminate ...
...automatically identify the resolution of equipment you connect to the HDMI input port, set for digital RGB signals (EX5200/EX7200 only). 2. Choose RGB for a computer or RGB-video connection, or Auto for details. See page 101 for a video device that outputs a component video signal (with connectors labeled ...input port (excluding digital RGB) or component video only when 480i/576i/1080i signals are being input (EX5200/EX7200 only). Adjust the desired options as needed: ■ Auto Setup Leave this setting On to center it may not be set the projector's video range to eliminate ...

User Manual
Page 73
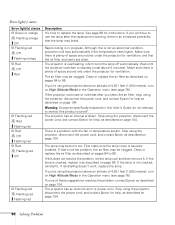
...can use the Settings menu to height). This feature is available only when the projector is tilted upward or downward. VS200/EX3200 EX5200/EX7200 ■ Keystone Adjusts the shape of width to lock the buttons on the projector, adjust audio volume, and customize several other features.... the Video port. If you notice that lines or edges look jagged after adjustment, decrease the Sharpness setting (see page 69). ■ Auto Keystone (EX5200/EX7200 only) Automatically compensates for the type of equipment you are using a 60-Hz PAL system (then select PAL60). ■ Aspect Sets the...
...can use the Settings menu to height). This feature is available only when the projector is tilted upward or downward. VS200/EX3200 EX5200/EX7200 ■ Keystone Adjusts the shape of width to lock the buttons on the projector, adjust audio volume, and customize several other features.... the Video port. If you notice that lines or edges look jagged after adjustment, decrease the Sharpness setting (see page 69). ■ Auto Keystone (EX5200/EX7200 only) Automatically compensates for the type of equipment you are using a 60-Hz PAL system (then select PAL60). ■ Aspect Sets the...
User Manual
Page 96
... abnormal condition, projection will stop using the projector, disconnect the power cord, and contact Epson for ventilation. If none of 4,921 feet (1,500 meters), turn on page 104. 96 Solving Problems The projector has an Auto Iris error or power error. Although this User's Guide, do not attempt to use... the lamp after you continue to service this does not resolve the problem, let the lamp cool and then remove it . Stop using the projector, disconnect the power cord, and contact Epson for ...
... abnormal condition, projection will stop using the projector, disconnect the power cord, and contact Epson for ventilation. If none of 4,921 feet (1,500 meters), turn on page 104. 96 Solving Problems The projector has an Auto Iris error or power error. Although this User's Guide, do not attempt to use... the lamp after you continue to service this does not resolve the problem, let the lamp cool and then remove it . Stop using the projector, disconnect the power cord, and contact Epson for ...

User Manual
Page 99
... Signal menu. If you created them for a different resolution. If necessary, change your computer's resolution and frequency or refresh rate is displayed. ■ Press the Auto button on the remote control or the Enter button on the remote control to modify existing presentation files if you 're using Mac OS X: 1. Make...
... Signal menu. If you created them for a different resolution. If necessary, change your computer's resolution and frequency or refresh rate is displayed. ■ Press the Auto button on the remote control or the Enter button on the remote control to modify existing presentation files if you 're using Mac OS X: 1. Make...

User Manual
Page 100
..., adjust its signal is selected in the Image menu (see page 71), if necessary. ■ If you're projecting an image from a computer, press the Auto button on the Signal menu (see page 72). ■ If you've used the Keystone adjustment, you 're projecting from a computer with the projector.
..., adjust its signal is selected in the Image menu (see page 71), if necessary. ■ If you're projecting an image from a computer, press the Auto button on the Signal menu (see page 72). ■ If you've used the Keystone adjustment, you 're projecting from a computer with the projector.

User Manual
Page 101
... from the screen (see page 53). ■ If the projector is angled sharply toward the screen, it more directly in the next section. Press the Auto button on the remote control or the Enter button on page 72. 1. You may need to wait before using the focus ring (see page 24... proper range (projection distance) from a computer, you may not be possible to reduce the amount of the characters may be projecting an image for the Auto button to appear as described in front of the screen. ■ Lower the projection angle to focus the entire image. note You must be dirt...
... from the screen (see page 53). ■ If the projector is angled sharply toward the screen, it more directly in the next section. Press the Auto button on the remote control or the Enter button on page 72. 1. You may need to wait before using the focus ring (see page 24... proper range (projection distance) from a computer, you may not be possible to reduce the amount of the characters may be projecting an image for the Auto button to appear as described in front of the screen. ■ Lower the projection angle to focus the entire image. note You must be dirt...
User Manual
Page 108
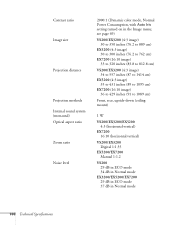
... size Projection distance Projection methods Internal sound system (monaural) Optical aspect ratio Zoom ratio Noise level 2000:1 (Dynamic color mode, Normal Power Consumption, with Auto Iris setting turned on in Normal mode 108 Technical Specifications see page 69) VS200/EX3200 (4:3 image) 30 to 350 inches (76.2 to 889 cm)... EX5200 (4:3 image) 30 to 300 inches (76.2 to 762 cm) EX7200 (16:10 image) 33 to 320 inches (83.8 to 812.8 cm) VS200/EX3200 (4:3 image) 34 to 557 inches (87 to 1414 cm) EX5200 (4:3 image)...
... size Projection distance Projection methods Internal sound system (monaural) Optical aspect ratio Zoom ratio Noise level 2000:1 (Dynamic color mode, Normal Power Consumption, with Auto Iris setting turned on in Normal mode 108 Technical Specifications see page 69) VS200/EX3200 (4:3 image) 30 to 350 inches (76.2 to 889 cm)... EX5200 (4:3 image) 30 to 300 inches (76.2 to 762 cm) EX7200 (16:10 image) 33 to 320 inches (83.8 to 812.8 cm) VS200/EX3200 (4:3 image) 34 to 557 inches (87 to 1414 cm) EX5200 (4:3 image)...
User Manual
Page 109
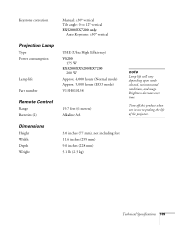
Turn off this product when not in use to 12° vertical EX5200/EX7200 only: Auto Keystone: ±30° vertical UHE (Ultra High Efficiency) VS200 175 W EX3200/EX5200/EX7200 200 W Approx. 4,000 hours (Normal mode) Approx. 5,000 hours (ECO mode) V13H010L58 19.7 feet (6 meters) Alkaline AA 3.0 inches (77 mm), not including feet 11...
Turn off this product when not in use to 12° vertical EX5200/EX7200 only: Auto Keystone: ±30° vertical UHE (Ultra High Efficiency) VS200 175 W EX3200/EX5200/EX7200 200 W Approx. 4,000 hours (Normal mode) Approx. 5,000 hours (ECO mode) V13H010L58 19.7 feet (6 meters) Alkaline AA 3.0 inches (77 mm), not including feet 11...
User Manual
Page 121
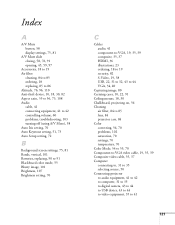
..., 73, 108 Audio cable, 41 connecting equipment, 41 to 42 controlling volume, 60 problems, troubleshooting, 103 turning off (using A/V Mute), 58 Auto Iris setting, 70 Auto Keystone setting, 51, 73 Auto Setup setting, 72 B Background screen settings, 75, 81 Bands, vertical, 101 Batteries, replacing, 90 to 91 Blackboard color mode, 55 Blurry image...
..., 73, 108 Audio cable, 41 connecting equipment, 41 to 42 controlling volume, 60 problems, troubleshooting, 103 turning off (using A/V Mute), 58 Auto Iris setting, 70 Auto Keystone setting, 51, 73 Auto Setup setting, 72 B Background screen settings, 75, 81 Bands, vertical, 101 Batteries, replacing, 90 to 91 Blackboard color mode, 55 Blurry image...
Brochure
Page 3
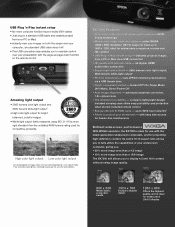
... allows you to -life color and reliable performance - 3LCD, 3-chip technology • Widescreen, larger-than-life images - COLO TPUT TPUT WHIT EX7200 Features • Rich, true-to maintain control over your investment - ideal for widescreen computers, movies and HD content • USB Plug 'n... Play instant setup - Instant Off®/On, Sleep Mode (A/V Mute), Direct Power Off • Auto image alignment - all ! • This USB connection also enables you to fully utilize the capabilities of images taken from two competing projectors run...
... allows you to -life color and reliable performance - 3LCD, 3-chip technology • Widescreen, larger-than-life images - COLO TPUT TPUT WHIT EX7200 Features • Rich, true-to maintain control over your investment - ideal for widescreen computers, movies and HD content • USB Plug 'n... Play instant setup - Instant Off®/On, Sleep Mode (A/V Mute), Direct Power Off • Auto image alignment - all ! • This USB connection also enables you to fully utilize the capabilities of images taken from two competing projectors run...


