Product Brochure
Page 2
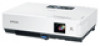
Epson EX100 Specifications Projection System High aperture Epson 3-chip 3LCD technology Projection Method Front/rear/ceiling mount LCD Driving Method Epson Poly-silicon TFT Active Matrix Pixel Number 786,432 dots x 3 (1024 x 768) LCDs Native Resolution XGA Aspect Ratio 4:3 (... to 35 ˚C) Power Supply Voltage 100 - 240 V ±10%, 50/60 Hz AC Power Consumption 244 W, 18 W standby (network on observation of Epson America, Inc. Packaging Specifications EX100 Dimensions 11.4" x 14.6" x 7.7" (W x D x H) Weight 7.3 lb Replacement Lamp Dimensions 5.1" x 5.5" x 5.6" (W x D x H) Weight 0.59 lb ...
Epson EX100 Specifications Projection System High aperture Epson 3-chip 3LCD technology Projection Method Front/rear/ceiling mount LCD Driving Method Epson Poly-silicon TFT Active Matrix Pixel Number 786,432 dots x 3 (1024 x 768) LCDs Native Resolution XGA Aspect Ratio 4:3 (... to 35 ˚C) Power Supply Voltage 100 - 240 V ±10%, 50/60 Hz AC Power Consumption 244 W, 18 W standby (network on observation of Epson America, Inc. Packaging Specifications EX100 Dimensions 11.4" x 14.6" x 7.7" (W x D x H) Weight 7.3 lb Replacement Lamp Dimensions 5.1" x 5.5" x 5.6" (W x D x H) Weight 0.59 lb ...
Quick Setup
Page 2
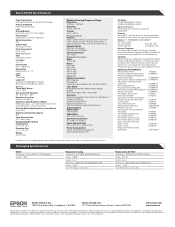
... Time, Monday through Friday, for details. PrivateLine is set as a wireless mouse. This information is your User's Guide. Quick Setup EX100 Using the remote control If this key lets you can use the remote control to operate the projector. Turn off projector display and sound... then make sure its batteries are enabled. 1. You may be labelled CRT/LCD or have to get help for the duration of their respective owners. Internet Support Visit Epson's support website at www.epson.com/webreg. You can download utilities and documentation, get product updates, special ...
... Time, Monday through Friday, for details. PrivateLine is set as a wireless mouse. This information is your User's Guide. Quick Setup EX100 Using the remote control If this key lets you can use the remote control to operate the projector. Turn off projector display and sound... then make sure its batteries are enabled. 1. You may be labelled CRT/LCD or have to get help for the duration of their respective owners. Internet Support Visit Epson's support website at www.epson.com/webreg. You can download utilities and documentation, get product updates, special ...
User's Guide
Page 18
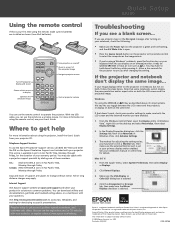
...source. (Allow a few seconds for the projector to sync up after changing the setting. 18 Displaying and Adjusting the Image It may be labeled CRT/LCD or have an icon such as . The Projector and Notebook Don't Display the Same Image If you're projecting from a notebook, and you '... notebook: ■ On most systems, there's a function key that lets you display on your computer at the same time. It may be labeled CRT/LCD or have an icon such as . You may have to hold down the Fn key while pressing it . Troubleshooting Display Problems Follow these guidelines. You...
...source. (Allow a few seconds for the projector to sync up after changing the setting. 18 Displaying and Adjusting the Image It may be labeled CRT/LCD or have an icon such as . The Projector and Notebook Don't Display the Same Image If you're projecting from a notebook, and you '... notebook: ■ On most systems, there's a function key that lets you display on your computer at the same time. It may be labeled CRT/LCD or have an icon such as . You may have to hold down the Fn key while pressing it . Troubleshooting Display Problems Follow these guidelines. You...
User's Guide
Page 19
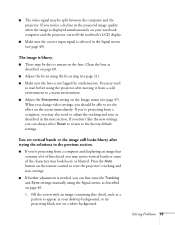
.... 3. The method for details. Make sure the Mirror Displays checkbox is selected. 4. Follow these steps: 1. Make sure the VGA Display or Color LCD dialog box is selected. Make sure Mirror Displays is set up your system to make sure the external Monitor port is checked 5. If you're...you may need to click a Monitor tab, then make sure both screens, you should check your monitor settings to display on both the LCD screen and the external monitor port are enabled. In the Display Properties dialog box, click the Settings tab, then click Advanced (in Windows ...
.... 3. The method for details. Make sure the Mirror Displays checkbox is selected. 4. Follow these steps: 1. Make sure the VGA Display or Color LCD dialog box is selected. Make sure Mirror Displays is set up your system to make sure the external Monitor port is checked 5. If you're...you may need to click a Monitor tab, then make sure both screens, you should check your monitor settings to display on both the LCD screen and the external monitor port are enabled. In the Display Properties dialog box, click the Settings tab, then click Advanced (in Windows ...
User's Guide
Page 47
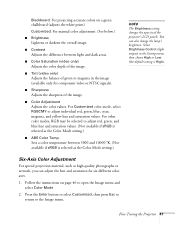
... if sRGB is High). You can adjust the hue and saturation for component video or NTSC signals). ■ Sharpness Adjusts the sharpness of the projector's LCD panels.
... if sRGB is High). You can adjust the hue and saturation for component video or NTSC signals). ■ Sharpness Adjusts the sharpness of the projector's LCD panels.
User's Guide
Page 73
... key that both at the same time. ■ Depending on an external monitor. It may be labelled CRT/LCD. Open System Preferences. 2. Make sure the VGA Display or Color LCD dialog box is selected. Check your computer's documentation or online help for details. On most systems, the key ...details. Click the Arrangement or Arrange tab. 6. Only part of the computer image is displayed. ■ Press the Auto button on both the LCD screen and external monitor port are enabled. If you display on your computer's video card, you might need to use the Display utility in ...
... key that both at the same time. ■ Depending on an external monitor. It may be labelled CRT/LCD. Open System Preferences. 2. Make sure the VGA Display or Color LCD dialog box is selected. Check your computer's documentation or online help for details. On most systems, the key ...details. Click the Arrangement or Arrange tab. 6. Only part of the computer image is displayed. ■ Press the Auto button on both the LCD screen and external monitor port are enabled. If you display on your computer's video card, you might need to use the Display utility in ...
User's Guide
Page 74
See page 50. note Some notebooks cannot display the same resolution and/or aspect ratio on both the LCD screen and the projected image. ■ Press the Resize button on the remote control. ■ Press the Esc button on page 86. ■ Windows: Right-...
See page 50. note Some notebooks cannot display the same resolution and/or aspect ratio on both the LCD screen and the projected image. ■ Press the Resize button on the remote control. ■ Press the Esc button on page 86. ■ Windows: Right-...
User's Guide
Page 75
... or smears on the lens. You may need to adjust the tracking and sync as your notebook computer and the projector, turn off the notebook's LCD display. ■ Make sure the correct input signal is needed, you may look heavy or blurred. If you don't like the new settings, you should...
... or smears on the lens. You may need to adjust the tracking and sync as your notebook computer and the projector, turn off the notebook's LCD display. ■ Make sure the correct input signal is needed, you may look heavy or blurred. If you don't like the new settings, you should...


