User Manual
Page 8
... ...187 Refilling Ink ...188 Ink Safety Precautions ...188 Check Ink Levels ...189 Checking Ink Levels ...190 Checking Ink Levels with Windows 190 Checking Ink Levels with OS X...192 Disabling Special Offers with Windows 193 Purchase Epson Ink ...194 Ink Bottle Part Numbers...194 Refilling the Ink Tanks ...194 ...204 Cleaning the Print Head Using the Product Control Panel 205 Cleaning the Print Head Using a Computer Utility 206 Power Ink Flushing ...209 Flushing the Ink Using a Computer Utility 209 Print Head Alignment ...210 Aligning the Print Head Using the Product Control Panel 211 ...
... ...187 Refilling Ink ...188 Ink Safety Precautions ...188 Check Ink Levels ...189 Checking Ink Levels ...190 Checking Ink Levels with Windows 190 Checking Ink Levels with OS X...192 Disabling Special Offers with Windows 193 Purchase Epson Ink ...194 Ink Bottle Part Numbers...194 Refilling the Ink Tanks ...194 ...204 Cleaning the Print Head Using the Product Control Panel 205 Cleaning the Print Head Using a Computer Utility 206 Power Ink Flushing ...209 Flushing the Ink Using a Computer Utility 209 Print Head Alignment ...210 Aligning the Print Head Using the Product Control Panel 211 ...

User Manual
Page 200
Adjusting Print Quality If your print quality declines, you may need to flush the ink tubes. If running these utilities does not solve the problem, you may need to clean the print head nozzles. Print Head Maintenance Print Head Alignment ... the product. 200 Load a few sheets of Sheets Print Head Maintenance If your product. 1. Print Head Nozzle Check Print Head Cleaning Power Ink Flushing Parent topic: Adjusting Print Quality Related topics Refilling Ink Print Head Nozzle Check You can check the print head nozzles using the control panel on your printouts become too light...
Adjusting Print Quality If your print quality declines, you may need to flush the ink tubes. If running these utilities does not solve the problem, you may need to clean the print head nozzles. Print Head Maintenance Print Head Alignment ... the product. 200 Load a few sheets of Sheets Print Head Maintenance If your product. 1. Print Head Nozzle Check Print Head Cleaning Power Ink Flushing Parent topic: Adjusting Print Quality Related topics Refilling Ink Print Head Nozzle Check You can check the print head nozzles using the control panel on your printouts become too light...

User Manual
Page 209
... your product, and select Options & Supplies. Note: After a Power Ink Flushing, you must contact Epson for support. When an ink pad reaches the end of the ink pads by causing them to flush the ink. Flushing the Ink Using a Computer Utility Parent topic: Print Head Maintenance Related topics Refilling Ink Flushing the Ink Using a Computer Utility You can perform a Power Ink Flushing. Click the Power Ink Flushing button. 209
... your product, and select Options & Supplies. Note: After a Power Ink Flushing, you must contact Epson for support. When an ink pad reaches the end of the ink pads by causing them to flush the ink. Flushing the Ink Using a Computer Utility Parent topic: Print Head Maintenance Related topics Refilling Ink Flushing the Ink Using a Computer Utility You can perform a Power Ink Flushing. Click the Power Ink Flushing button. 209
User Manual
Page 210
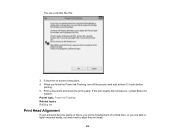
Follow the on-screen instructions. 4. If the print quality did not improve, contact Epson for support. Parent topic: Power Ink Flushing Related topics Refilling Ink Print Head Alignment If your printouts become grainy or blurry, you notice misalignment of vertical lines, or you see a window like this: 3. Print a document and check the print quality. You see dark or light horizontal bands, you finish the Power Ink Flushing, turn off the product and wait at least 12 hours before printing. 5. When you may need to align the print head. 210
Follow the on-screen instructions. 4. If the print quality did not improve, contact Epson for support. Parent topic: Power Ink Flushing Related topics Refilling Ink Print Head Alignment If your printouts become grainy or blurry, you notice misalignment of vertical lines, or you see a window like this: 3. Print a document and check the print quality. You see dark or light horizontal bands, you finish the Power Ink Flushing, turn off the product and wait at least 12 hours before printing. 5. When you may need to align the print head. 210
User Manual
Page 254
...if any high speed settings in this manual. Note: Flushing the ink tubes replaces all the ink inside the tubes, so flush the ink only if you loaded the printable side of the paper correctly for a long time, run the Power Ink Flushing utility. OS X Related topics Loading Paper Solving Print ... you loaded. • Make sure you cannot improve print quality by other means. See the Apple website for details. 254 See the ink flushing section for details. Note: When printing using AirPrint, the available print settings are clogged. Then clean the print head, if necessary. &#...
...if any high speed settings in this manual. Note: Flushing the ink tubes replaces all the ink inside the tubes, so flush the ink only if you loaded the printable side of the paper correctly for a long time, run the Power Ink Flushing utility. OS X Related topics Loading Paper Solving Print ... you loaded. • Make sure you cannot improve print quality by other means. See the Apple website for details. 254 See the ink flushing section for details. Note: When printing using AirPrint, the available print settings are clogged. Then clean the print head, if necessary. &#...

User Manual
Page 255
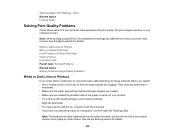
...sheet at a time. • Make sure your paper meets the specifications for your product. • Use Epson papers to ensure proper saturation and absorption of genuine Epson inks. • Make sure the paper type setting in your product software matches the type of paper you loaded...Solving Print Quality Problems Related concepts Print Head Nozzle Check Print Head Cleaning Print Head Alignment Power Ink Flushing Related references Paper or Media Type Settings - Adjust the Print Density and/or Increase Ink Drying Time settings. • If printed copies are blurry or smeared, try these solutions...
...sheet at a time. • Make sure your paper meets the specifications for your product. • Use Epson papers to ensure proper saturation and absorption of genuine Epson inks. • Make sure the paper type setting in your product software matches the type of paper you loaded...Solving Print Quality Problems Related concepts Print Head Nozzle Check Print Head Cleaning Print Head Alignment Power Ink Flushing Related references Paper or Media Type Settings - Adjust the Print Density and/or Increase Ink Drying Time settings. • If printed copies are blurry or smeared, try these solutions...

User Manual
Page 256
... Head Cleaning Print Head Alignment Print Head Cleaning Print Head Alignment Related references Available Epson Papers Paper Specifications Related tasks Selecting Basic Print Settings - OS X Cleaning the Paper Path 256 See the ink flushing section for a long time, run the Power Ink Flushing utility. Place it on a flat, stable surface that extends beyond the base of...
... Head Cleaning Print Head Alignment Print Head Cleaning Print Head Alignment Related references Available Epson Papers Paper Specifications Related tasks Selecting Basic Print Settings - OS X Cleaning the Paper Path 256 See the ink flushing section for a long time, run the Power Ink Flushing utility. Place it on a flat, stable surface that extends beyond the base of...
User Manual
Page 259
...product. See the ink flushing section for a long time, run the Power Ink Flushing utility. However, you have not used the product for details. Windows Selecting Additional Layout and Print Options - Scanning Software Does Not Operate Correctly Cannot Start Epson Scan Parent topic:... Solving Problems 259 OS X Managing Color - Parent topic: Solving Print Quality Problems Related concepts Print Head Nozzle Check Print Head Cleaning Power Ink Flushing Related references Available Epson Papers Related tasks Selecting Basic ...
...product. See the ink flushing section for a long time, run the Power Ink Flushing utility. However, you have not used the product for details. Windows Selecting Additional Layout and Print Options - Scanning Software Does Not Operate Correctly Cannot Start Epson Scan Parent topic:... Solving Problems 259 OS X Managing Color - Parent topic: Solving Print Quality Problems Related concepts Print Head Nozzle Check Print Head Cleaning Power Ink Flushing Related references Available Epson Papers Related tasks Selecting Basic ...
User Manual
Page 283
...Epson product near such devices or inside a medical facility, follow the directions from authorized staff members at the facility, and follow basic safety precautions to reduce the risk of fire, electric shock, and personal injury, including the following conditions: if the power cord or plug is damaged; otherwise ink... the home (far right) position. • When storing or transporting the product, do not tilt it, stand it on your eyes, flush them thoroughly with water. If the liquid crystal solution gets into your hands, wash them immediately with soap and water. Do not use a...
...Epson product near such devices or inside a medical facility, follow the directions from authorized staff members at the facility, and follow basic safety precautions to reduce the risk of fire, electric shock, and personal injury, including the following conditions: if the power cord or plug is damaged; otherwise ink... the home (far right) position. • When storing or transporting the product, do not tilt it, stand it on your eyes, flush them thoroughly with water. If the liquid crystal solution gets into your hands, wash them immediately with soap and water. Do not use a...


