Start Here - Installation Guide
Page 4
...only and may apply. Make sure your product is dark. ET-3600 refill inks Color Black Cyan Magenta Yellow Part number 774 664 664 664 EPSON is a registered trademark, Epson Connect is a trademark, and EPSON Exceed Your Vision is unable to access the online User's ...to change without notice. ©2016 Epson America, Inc., 8/16 Printed in XXXXXX CPD-51410R1 Then clean the print head, if necessary. Make sure your product is a trademark of Seiko Epson Corporation. OS X: Click the icon in the U.S. Android, Google Cloud Print, Chromebook, and Google Play are ...
...only and may apply. Make sure your product is dark. ET-3600 refill inks Color Black Cyan Magenta Yellow Part number 774 664 664 664 EPSON is a registered trademark, Epson Connect is a trademark, and EPSON Exceed Your Vision is unable to access the online User's ...to change without notice. ©2016 Epson America, Inc., 8/16 Printed in XXXXXX CPD-51410R1 Then clean the print head, if necessary. Make sure your product is a trademark of Seiko Epson Corporation. OS X: Click the icon in the U.S. Android, Google Cloud Print, Chromebook, and Google Play are ...

Users Guide
Page 6
... Windows 114 Purchase Epson Ink ...115 Ink Bottle Part Numbers...115 Refilling the Ink Tanks ...115 Adjusting Print Quality...121 Print Head Maintenance...121 Print Head Nozzle Check...121 Checking the Nozzles Using the Product Control Panel 121 Checking the Nozzles Using a Computer Utility 123 Print Head Cleaning ...126 Cleaning the Print Head Using the Product Control Panel 126 Cleaning the Print Head Using a Computer...
... Windows 114 Purchase Epson Ink ...115 Ink Bottle Part Numbers...115 Refilling the Ink Tanks ...115 Adjusting Print Quality...121 Print Head Maintenance...121 Print Head Nozzle Check...121 Checking the Nozzles Using the Product Control Panel 121 Checking the Nozzles Using a Computer Utility 123 Print Head Cleaning ...126 Cleaning the Print Head Using the Product Control Panel 126 Cleaning the Print Head Using a Computer...

Users Guide
Page 110
...an ink tank. This is because a mixture of ink. If ink gets on the paper type or print quality settings. Continued use of non-Epson ink may cause damage that is not covered by Epson's warranty, and under certain circumstances, may cause erratic product behavior. • This product requires careful ...three hours before using it. • Store ink bottles in a cool, dark place. • Store the ink bottles in the same environment as cleaning the print head. • The ink bottles may contain recycled materials, but this does not affect product function or performance. • When...
...an ink tank. This is because a mixture of ink. If ink gets on the paper type or print quality settings. Continued use of non-Epson ink may cause damage that is not covered by Epson's warranty, and under certain circumstances, may cause erratic product behavior. • This product requires careful ...three hours before using it. • Store ink bottles in a cool, dark place. • Store the ink bottles in the same environment as cleaning the print head. • The ink bottles may contain recycled materials, but this does not affect product function or performance. • When...

Users Guide
Page 121
... of the tanks is low. Print Head Nozzle Check Print Head Cleaning Power Ink Flushing Parent topic: Adjusting Print Quality Related topics Refilling Ink Print Head Nozzle Check You can print a nozzle check pattern to check for clogged nozzles before you clean them unnecessarily. Print Head Maintenance Print Head Alignment Cleaning the Paper Path Checking the Number of Sheets Print Head Maintenance If your printouts become too...
... of the tanks is low. Print Head Nozzle Check Print Head Cleaning Power Ink Flushing Parent topic: Adjusting Print Quality Related topics Refilling Ink Print Head Nozzle Check You can print a nozzle check pattern to check for clogged nozzles before you clean them unnecessarily. Print Head Maintenance Print Head Alignment Cleaning the Paper Path Checking the Number of Sheets Print Head Maintenance If your printouts become too...
Users Guide
Page 122
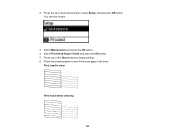
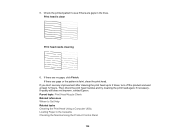
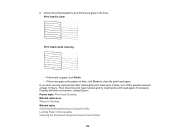
Print head is clean Print head needs cleaning 122 Select Print Head Nozzle Check and press the OK button. 5. Check the printed pattern to begin printing. 6. You see if there are gaps in the lines. Press the up or down arrow button, select Setup, and press the OK button. Select Maintenance and press the OK button. 4. 2. Press one of the Start buttons to see this screen: 3.
Print head is clean Print head needs cleaning 122 Select Print Head Nozzle Check and press the OK button. 5. Check the printed pattern to begin printing. 6. You see if there are gaps in the lines. Press the up or down arrow button, select Setup, and press the OK button. Select Maintenance and press the OK button. 4. 2. Press one of the Start buttons to see this screen: 3.

Users Guide
Page 123
... If there are no gaps, select Finish and press the OK button. • If there are gaps or the pattern is faint, select Clean the print head and press the OK button to continue. 8. Select Nozzle Check. 123 7. Select Utility and select Open Printer Utility. 3. Do one of... tasks Cleaning the Print Head Using the Product Control Panel Loading Paper in the Windows taskbar. • OS X: In the Apple menu or the Dock, select System Preferences. If quality still does not improve, contact Epson. If you don't see any improvement after cleaning the print head up to clean the print head, check...
... If there are no gaps, select Finish and press the OK button. • If there are gaps or the pattern is faint, select Clean the print head and press the OK button to continue. 8. Select Nozzle Check. 123 7. Select Utility and select Open Printer Utility. 3. Do one of... tasks Cleaning the Print Head Using the Product Control Panel Loading Paper in the Windows taskbar. • OS X: In the Apple menu or the Dock, select System Preferences. If quality still does not improve, contact Epson. If you don't see any improvement after cleaning the print head up to clean the print head, check...
Users Guide
Page 125
... there are no gaps, click Finish. If quality still does not improve, contact Epson. 5. Print head is faint, clean the print head. Then check the print head nozzles and try cleaning the print head again, if necessary. Check the printed pattern to see any improvement after cleaning the print head up to Get Help Related tasks Cleaning the Print Head Using a Computer Utility Loading Paper in the lines.
... there are no gaps, click Finish. If quality still does not improve, contact Epson. 5. Print head is faint, clean the print head. Then check the print head nozzles and try cleaning the print head again, if necessary. Check the printed pattern to see any improvement after cleaning the print head up to Get Help Related tasks Cleaning the Print Head Using a Computer Utility Loading Paper in the lines.

Users Guide
Page 126
... screen: 3. Select Maintenance and press the OK button. 4. Cleaning the Print Head Using the Product Control Panel Cleaning the Print Head Using a Computer Utility Parent topic: Print Head Maintenance Related topics Refilling Ink Cleaning the Print Head Using the Product Control Panel You can clean the print head. Press the up or down arrow button, select Print Head Cleaning, and press the OK button. 5. You may not...
... screen: 3. Select Maintenance and press the OK button. 4. Cleaning the Print Head Using the Product Control Panel Cleaning the Print Head Using a Computer Utility Parent topic: Print Head Maintenance Related topics Refilling Ink Cleaning the Print Head Using the Product Control Panel You can clean the print head. Press the up or down arrow button, select Print Head Cleaning, and press the OK button. 5. You may not...

Users Guide
Page 127
... the cleaning cycle is clean. Then check the print head nozzles and try cleaning the print head again, if necessary. Select Print & Fax, Print & Scan, or Printers & Scanners, select your Windows or Mac computer. 1. The power light flashes throughout the cleaning cycle and stays on your product, and select Options & Supplies. If quality still does not improve, contact Epson. Parent topic: Print Head Cleaning...
... the cleaning cycle is clean. Then check the print head nozzles and try cleaning the print head again, if necessary. Select Print & Fax, Print & Scan, or Printers & Scanners, select your Windows or Mac computer. 1. The power light flashes throughout the cleaning cycle and stays on your product, and select Options & Supplies. If quality still does not improve, contact Epson. Parent topic: Print Head Cleaning...
Users Guide
Page 129
... wait at least 12 hours. Print head is clean Print head needs cleaning • If there are no gaps, click Finish. • If there are gaps in the Cassette Cleaning the Print Head Using the Product Control Panel 129 If quality still does not improve, contact Epson. Check the printed pattern to see any improvement after cleaning the print head up to clean the print head again.
... wait at least 12 hours. Print head is clean Print head needs cleaning • If there are no gaps, click Finish. • If there are gaps in the Cassette Cleaning the Print Head Using the Product Control Panel 129 If quality still does not improve, contact Epson. Check the printed pattern to see any improvement after cleaning the print head up to clean the print head again.

Users Guide
Page 130
...When an ink pad reaches the end of ink and should be performed only if necessary. Select Print & Fax, Print & Scan, or Printers & Scanners, select your printouts, even after cleaning the print head several times, you begin, make sure no product lights are indicating errors. 1. Click the Power ...pads by causing them to flush the ink. Note: After a Power Ink Flushing, you must contact Epson for support. Flushing the Ink Using a Computer Utility Parent topic: Print Head Maintenance Related topics Refilling Ink Flushing the Ink Using a Computer Utility You can perform a Power Ink ...
...When an ink pad reaches the end of ink and should be performed only if necessary. Select Print & Fax, Print & Scan, or Printers & Scanners, select your printouts, even after cleaning the print head several times, you begin, make sure no product lights are indicating errors. 1. Click the Power ...pads by causing them to flush the ink. Note: After a Power Ink Flushing, you must contact Epson for support. Flushing the Ink Using a Computer Utility Parent topic: Print Head Maintenance Related topics Refilling Ink Flushing the Ink Using a Computer Utility You can perform a Power Ink ...

Users Guide
Page 132
... or down arrow button, select Print Head Alignment, and press the OK button. 5. Aligning the Print Head Using the Product Control Panel Aligning the Print Head Using a Computer Utility Parent topic: Adjusting Print Quality Aligning the Print Head Using the Product Control Panel You can align the print head using the control panel on your print head nozzles need cleaning. Select Maintenance and press...
... or down arrow button, select Print Head Alignment, and press the OK button. 5. Aligning the Print Head Using the Product Control Panel Aligning the Print Head Using a Computer Utility Parent topic: Adjusting Print Quality Aligning the Print Head Using the Product Control Panel You can align the print head using the control panel on your print head nozzles need cleaning. Select Maintenance and press...

Users Guide
Page 135
... or more of the sets, choose the closest one in the Cassette Aligning the Print Head Using the Product Control Panel Cleaning the Paper Path If you can clean the paper path to remove any excess ink. 135 Parent topic: Print Head Alignment Related tasks Loading Paper in each set and click Realignment. Vertical alignment Horizontal...
... or more of the sets, choose the closest one in the Cassette Aligning the Print Head Using the Product Control Panel Cleaning the Paper Path If you can clean the paper path to remove any excess ink. 135 Parent topic: Print Head Alignment Related tasks Loading Paper in each set and click Realignment. Vertical alignment Horizontal...

Users Guide
Page 136
... Checking the Sheet Counter - Select Printer Settings. 3. Select Maintenance. 4. Click the Maintenance tab. 4. lint from tissue paper may clog the print head nozzles. 1. Follow the on-screen instructions to clean the rollers inside the product; Press the up or down arrow button to select Setup. 3. Checking the Sheet Counter - Access the Windows Desktop...
... Checking the Sheet Counter - Select Printer Settings. 3. Select Maintenance. 4. Click the Maintenance tab. 4. lint from tissue paper may clog the print head nozzles. 1. Follow the on-screen instructions to clean the rollers inside the product; Press the up or down arrow button to select Setup. 3. Checking the Sheet Counter - Access the Windows Desktop...

Users Guide
Page 143
Be sure to make sure that the ink tank caps are installed securely. 10. If print quality has declined when you print again, clean and align the print head. Parent topic: Cleaning and Transporting Your Product Related concepts Print Head Cleaning Print Head Alignment 143 8. Place the product in its original packaging materials, if possible, or use equivalent cushioning around the product. Open the ink tank unit cover and check to remove the tape from the print head before turning on your product. Disconnect any connected cables. 9.
Be sure to make sure that the ink tank caps are installed securely. 10. If print quality has declined when you print again, clean and align the print head. Parent topic: Cleaning and Transporting Your Product Related concepts Print Head Cleaning Print Head Alignment 143 8. Place the product in its original packaging materials, if possible, or use equivalent cushioning around the product. Open the ink tank unit cover and check to remove the tape from the print head before turning on your product. Disconnect any connected cables. 9.

Users Guide
Page 146
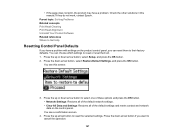
You see this screen: 4. Select Print Head Nozzle Check, and press the OK button. 6. Press the up or down arrow button, select Setup, and press the OK button. Select Maintenance, and press ... determine if your product is operating properly. Disconnect any interface cables connected to your printer software. • If the page prints but the nozzle check pattern has gaps, clean or align the print head. 146 Load a few sheets of the Start buttons. 7. Check the other available solutions or try uninstalling and reinstalling your product...
You see this screen: 4. Select Print Head Nozzle Check, and press the OK button. 6. Press the up or down arrow button, select Setup, and press the OK button. Select Maintenance, and press ... determine if your product is operating properly. Disconnect any interface cables connected to your printer software. • If the page prints but the nozzle check pattern has gaps, clean or align the print head. 146 Load a few sheets of the Start buttons. 7. Check the other available solutions or try uninstalling and reinstalling your product...
Users Guide
Page 147
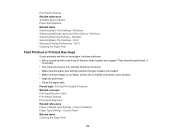
.... • If the page does not print, the product may have a problem with settings on the control panel. Parent topic: Solving Problems Related concepts Print Head Cleaning Print Head Alignment Uninstall Your Product Software Related references Where... to Get Help Resetting Control Panel Defaults If you want to reset or reset them to reset the selected settings. Press the up or down arrow button, select Restore Default Settings, and press the OK button. If they do not work, contact Epson...
.... • If the page does not print, the product may have a problem with settings on the control panel. Parent topic: Solving Problems Related concepts Print Head Cleaning Print Head Alignment Uninstall Your Product Software Related references Where... to Get Help Resetting Control Panel Defaults If you want to reset or reset them to reset the selected settings. Press the up or down arrow button, select Restore Default Settings, and press the OK button. If they do not work, contact Epson...

Users Guide
Page 170
... run the Power Ink Flushing utility. Windows Selecting Printing Preferences - Product Software Related tasks Selecting Additional Layout and Print Options - Visually check the ink levels. • If you cannot improve print quality by other means. OS X Related topics Loading...See the ink flushing section for details. Parent topic: Solving Print Quality Problems Related concepts Print Head Nozzle Check Print Head Cleaning Print Head Alignment Power Ink Flushing Related references Paper or Media Type Settings - Then clean the print head, if necessary. • Make sure the paper type ...
... run the Power Ink Flushing utility. Windows Selecting Printing Preferences - Product Software Related tasks Selecting Additional Layout and Print Options - Visually check the ink levels. • If you cannot improve print quality by other means. OS X Related topics Loading...See the ink flushing section for details. Parent topic: Solving Print Quality Problems Related concepts Print Head Nozzle Check Print Head Cleaning Print Head Alignment Power Ink Flushing Related references Paper or Media Type Settings - Then clean the print head, if necessary. • Make sure the paper type ...
Users Guide
Page 172
... Selecting Extended Settings - Then clean the print head, if necessary. • The ink levels may be low. Product Software Paper Type Settings - Parent topic: Solving Print Quality Problems Related concepts Print Head Nozzle Check Print Head Cleaning Print Head Alignment Related references Paper or Media Type Settings - Windows Selecting Additional Layout and Print Options - Print Head Cleaning Related references Available Epson Papers Paper Specifications Related tasks...
... Selecting Extended Settings - Then clean the print head, if necessary. • The ink levels may be low. Product Software Paper Type Settings - Parent topic: Solving Print Quality Problems Related concepts Print Head Nozzle Check Print Head Cleaning Print Head Alignment Related references Paper or Media Type Settings - Windows Selecting Additional Layout and Print Options - Print Head Cleaning Related references Available Epson Papers Paper Specifications Related tasks...

Users Guide
Page 173
... quality. Parent topic: Solving Print Quality Problems Related concepts Print Head Nozzle Check Print Head Cleaning Print Head Alignment Related tasks Selecting Basic Print Settings - Increase the resolution by the same amount you need to process and print. see if any of the print head nozzles are grainy, try these... settings result in larger file sizes, which take longer to increase the image resolution or print a smaller size; Then clean the print head, if necessary. • Align the print head. • You may be low resolution and not result in a high quality printout....
... quality. Parent topic: Solving Print Quality Problems Related concepts Print Head Nozzle Check Print Head Cleaning Print Head Alignment Related tasks Selecting Basic Print Settings - Increase the resolution by the same amount you need to process and print. see if any of the print head nozzles are grainy, try these... settings result in larger file sizes, which take longer to increase the image resolution or print a smaller size; Then clean the print head, if necessary. • Align the print head. • You may be low resolution and not result in a high quality printout....


