Owners Manual
Page 3
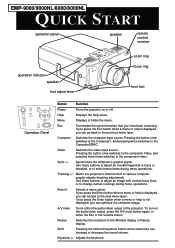
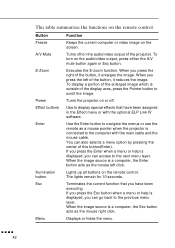
.... Use these buttons to select menu items during menu operations. Shift Pressing the shift and keystone button at the same time can optimize the computer image. Esc Terminates the current function that is not displayed, you have been executing . EMP-9000/9000NL/8000/8000NL QUICK START operation panel speaker remoto control receiver operation indicator speaker foot adjust lever zoom ring focus ring front foot Power Help Computer Video Menu Esc Sync. Computer Switches the computer input source.Pressing the button...
.... Use these buttons to select menu items during menu operations. Shift Pressing the shift and keystone button at the same time can optimize the computer image. Esc Terminates the current function that is not displayed, you have been executing . EMP-9000/9000NL/8000/8000NL QUICK START operation panel speaker remoto control receiver operation indicator speaker foot adjust lever zoom ring focus ring front foot Power Help Computer Video Menu Esc Sync. Computer Switches the computer input source.Pressing the button...
Owners Manual
Page 4
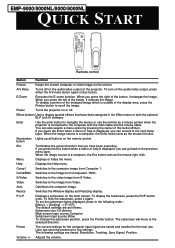
... screen input source:Computer Subscreen input source:Video To change the subscreen position, press the Pointer button. The following order : [Menu] → [Setting] → [P in P Displays a subscreen on the audio/video output of the button, it again. Adjusts the volume. E-Zoom Executes the E-zoom function. When you press the Esc button when a menu or help is a computer, the Enter button acts as follows; To display a portion of this button(Enter). Power Turns the projector on the remote control...
... screen input source:Computer Subscreen input source:Video To change the subscreen position, press the Pointer button. The following order : [Menu] → [Setting] → [P in P Displays a subscreen on the audio/video output of the button, it again. Adjusts the volume. E-Zoom Executes the E-zoom function. When you press the Esc button when a menu or help is a computer, the Enter button acts as follows; To display a portion of this button(Enter). Power Turns the projector on the remote control...
Owners Manual
Page 12
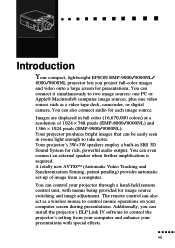
... Sound System for each image source. The remote control can also connect audio for rich, powerful audio output. You can even connect an external speaker when further amplification is required. You can connect it simultaneously to two image sources: one PC or Apple® Macintosh® computer image sources, plus one video source such as a wireless mouse to take notes. Additionally, you project full-color images and video onto a large screen for image source switching and image adjustment...
... Sound System for each image source. The remote control can also connect audio for rich, powerful audio output. You can even connect an external speaker when further amplification is required. You can connect it simultaneously to two image sources: one PC or Apple® Macintosh® computer image sources, plus one video source such as a wireless mouse to take notes. Additionally, you project full-color images and video onto a large screen for image source switching and image adjustment...

Owners Manual
Page 25
... the actual image size. The projector should be crooked. 4. If the projector is at a correct distance from projector to the screen. Screen size Horizontal distance from the screen. Turn the projector so that the lens is not angled correctly, the screen image will be in sleep mode, indicated by the lens. Connect one end of the computer or video source. ♦ Caution: Do not hold the projector by an orange power indicator. Setting Up the Projector 1. Use the general...
... the actual image size. The projector should be crooked. 4. If the projector is at a correct distance from projector to the screen. Screen size Horizontal distance from the screen. Turn the projector so that the lens is not angled correctly, the screen image will be in sleep mode, indicated by the lens. Connect one end of the computer or video source. ♦ Caution: Do not hold the projector by an orange power indicator. Setting Up the Projector 1. Use the general...
Owners Manual
Page 33
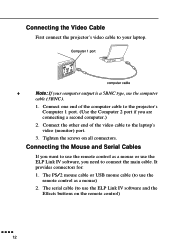
... USB mouse cable (to use the remote control as a mouse or use the ELP Link IV software, you need to connect the main cable. Connect the other end of the computer cable to the projector's Computer 1 port. (Use the Computer 2 port if you want to use the remote control as a mouse) 2. Connecting the Mouse and Serial Cables If you are connecting a second computer.) 2. It provides connectors for: 1. The serial cable (to the laptop's video (monitor) port. 3. Connecting the Video Cable...
... USB mouse cable (to use the remote control as a mouse or use the ELP Link IV software, you need to connect the main cable. Connect the other end of the computer cable to the projector's Computer 1 port. (Use the Computer 2 port if you want to use the remote control as a mouse) 2. Connecting the Mouse and Serial Cables If you are connecting a second computer.) 2. It provides connectors for: 1. The serial cable (to the laptop's video (monitor) port. 3. Connecting the Video Cable...
Owners Manual
Page 35
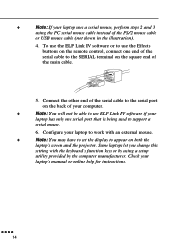
... be able to use ELP Link IV software if your laptop's manual or online help for instructions. Some laptops let you change this setting with an external mouse. ♦ Note: You may have to set the display to appear on the remote control, connect one serial port that is being used to use the ELP Link IV software or to support a serial mouse. 6. To use the Effects buttons on both the laptop's screen and the projector.
... be able to use ELP Link IV software if your laptop's manual or online help for instructions. Some laptops let you change this setting with an external mouse. ♦ Note: You may have to set the display to appear on the remote control, connect one serial port that is being used to use the ELP Link IV software or to support a serial mouse. 6. To use the Effects buttons on both the laptop's screen and the projector.
Owners Manual
Page 39
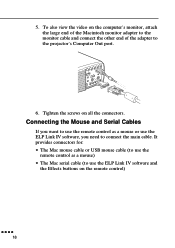
.... To also view the video on the computer's monitor, attach the large end of the Macintosh monitor adapter to the monitor cable and connect the other end of the adapter to connect the main cable. 5. Connecting the Mouse and Serial Cables If you want to use the remote control as a mouse) • The Mac serial cable (to use the ELP Link IV software, you need to the projector's Computer Out port. 6.
.... To also view the video on the computer's monitor, attach the large end of the Macintosh monitor adapter to the monitor cable and connect the other end of the adapter to connect the main cable. 5. Connecting the Mouse and Serial Cables If you want to use the remote control as a mouse) • The Mac serial cable (to use the ELP Link IV software, you need to the projector's Computer Out port. 6.
Owners Manual
Page 45
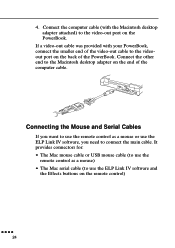
... of the video-out cable to the videoout port on the PowerBook. Connect the computer cable (with your PowerBook, connect the smaller end of the PowerBook. It provides connectors for: • The Mac mouse cable or USB mouse cable (to use the remote control as a mouse or use the ELP Link IV software, you want to use the ELP Link IV software and the Effects buttons on the...
... of the video-out cable to the videoout port on the PowerBook. Connect the computer cable (with your PowerBook, connect the smaller end of the PowerBook. It provides connectors for: • The Mac mouse cable or USB mouse cable (to use the remote control as a mouse or use the ELP Link IV software, you want to use the ELP Link IV software and the Effects buttons on the...

Owners Manual
Page 56
... 5. Remove the projector lens cap. 2. When you turn off the equipment, do so in the projector power cord, the power indicator flashes orange for full illumination. ♦ Warning: Never look into the lens when the lamp is especially important that children are not allowed to turn the remote control on . Then the light remains orange. 3. If computer or video equipment is attached, the computer or video signal is fully warmed up . Turning the Projector...
... 5. Remove the projector lens cap. 2. When you turn off the equipment, do so in the projector power cord, the power indicator flashes orange for full illumination. ♦ Warning: Never look into the lens when the lamp is especially important that children are not allowed to turn the remote control on . Then the light remains orange. 3. If computer or video equipment is attached, the computer or video signal is fully warmed up . Turning the Projector...
Owners Manual
Page 63
... . Power Turns the projector on or off /on the audio/video output of the enlarged image which is a computer, the Enter button acts as the mouse right click. s s s s 42 This table summarizes the functions on the screen. Button Function Freeze Keeps the current computer or video image on the remote control. To display a portion of the projector. Effect buttons Enter Use to the previous menu layer. Menu Displays or hides the menu.
... . Power Turns the projector on or off /on the audio/video output of the enlarged image which is a computer, the Enter button acts as the mouse right click. s s s s 42 This table summarizes the functions on the screen. Button Function Freeze Keeps the current computer or video image on the remote control. To display a portion of the projector. Effect buttons Enter Use to the previous menu layer. Menu Displays or hides the menu.
Owners Manual
Page 68
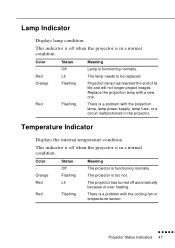
...cooling fan or temperature sensor. Off The projector is functioning normally. Red Flashing There is in a normal condition. Orange Flashing The projector is a problem with the projection lamp, lamp power supply, lamp fuse, or a circuit malfunctioned in the projector. Red Lit The lamp needs to be replaced. Color Status Meaning - This indicator is off when the projector is a problem with a new one. s s s s s s Projector Status Indicators 47 Temperature Indicator Displays the internal temperature condition. Lamp Indicator Displays lamp condition...
...cooling fan or temperature sensor. Off The projector is functioning normally. Red Flashing There is in a normal condition. Orange Flashing The projector is a problem with the projection lamp, lamp power supply, lamp fuse, or a circuit malfunctioned in the projector. Red Lit The lamp needs to be replaced. Color Status Meaning - This indicator is off when the projector is a problem with a new one. s s s s s s Projector Status Indicators 47 Temperature Indicator Displays the internal temperature condition. Lamp Indicator Displays lamp condition...
Owners Manual
Page 76
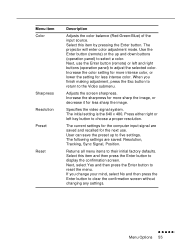
... color adjustment mode. Menu item Color Sharpness Resolution Preset Reset Description Adjusts the color balance (Red:Green:Blue) of the input source. The initial setting is the 640 x 480. The following settings are saved and recalled for less sharp the image. Adjusts the screen sharpness. Press either right or left and right buttons (operation panel) to display the confirmation screen. Increase the color setting for more sharp the image, or decrease it for the next use the Enter button (remote...
... color adjustment mode. Menu item Color Sharpness Resolution Preset Reset Description Adjusts the color balance (Red:Green:Blue) of the input source. The initial setting is the 640 x 480. The following settings are saved and recalled for less sharp the image. Adjusts the screen sharpness. Press either right or left and right buttons (operation panel) to display the confirmation screen. Increase the color setting for more sharp the image, or decrease it for the next use the Enter button (remote...
Owners Manual
Page 83
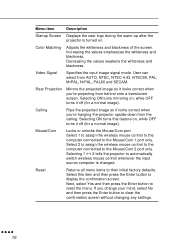
... factory defaults. Video Signal Specifies the input image signal mode. Decreasing the values weakens the whiteness and blackness. Reset Returns all menu items to reset the menu. Select this feature on, while OFF turns it off (for a normal image). Menu item Description Startup Screen Displays the user logo during the warm-up after the projector is changed. s s s s 62 Rear Projection Mirrors the projected image so it off (for a normal image). Select 1 to assign the wireless mouse control...
... factory defaults. Video Signal Specifies the input image signal mode. Decreasing the values weakens the whiteness and blackness. Reset Returns all menu items to reset the menu. Select this feature on, while OFF turns it off (for a normal image). Menu item Description Startup Screen Displays the user logo during the warm-up after the projector is changed. s s s s 62 Rear Projection Mirrors the projected image so it off (for a normal image). Select 1 to assign the wireless mouse control...
Owners Manual
Page 84
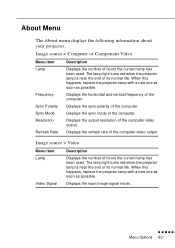
.... Displays the output resolution of the computer video output. When this happens, replace the projector lamp with a new one as soon as possible. s s s s s s Menu Options 63 Refresh Rate Displays the refresh rate of the computer video output. Image source = Video Menu item Description Lamp Displays the number of its normal life. Video Signal Displays the input image signal mode. Sync Polarity Displays the sync polarity of the computer. The lamp light turns red when the projector lamp is near the end of hours the current lamp...
.... Displays the output resolution of the computer video output. When this happens, replace the projector lamp with a new one as soon as possible. s s s s s s Menu Options 63 Refresh Rate Displays the refresh rate of the computer video output. Image source = Video Menu item Description Lamp Displays the number of its normal life. Video Signal Displays the input image signal mode. Sync Polarity Displays the sync polarity of the computer. The lamp light turns red when the projector lamp is near the end of hours the current lamp...
Owners Manual
Page 92
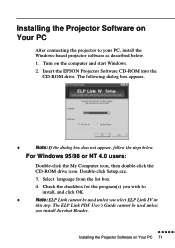
... list box. 4. Insert the EPSON Projector Software CD-ROM into the CD-ROM drive. The ELP Link PDF User's Guide cannot be used unless you install Acrobat Reader. Turn on Your PC 71 Check the checkbox for the program(s) you wish to your PC, install the Windows-based projector software as described below . Installing the Projector Software on Your PC After connecting the projector to install, and click OK. ♦...
... list box. 4. Insert the EPSON Projector Software CD-ROM into the CD-ROM drive. The ELP Link PDF User's Guide cannot be used unless you install Acrobat Reader. Turn on Your PC 71 Check the checkbox for the program(s) you wish to your PC, install the Windows-based projector software as described below . Installing the Projector Software on Your PC After connecting the projector to install, and click OK. ♦...
Owners Manual
Page 104
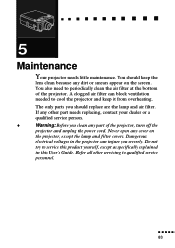
... try to cool the projector and keep the lens clean because any part of the projector. Dangerous electrical voltages in this product yourself, except as specifically explained in the projector can block ventilation needed to service this User's Guide. Never open any cover on the screen. You should replace are the lamp and air filter. A clogged air filter can injure you should keep it from overheating. s s s s ss s s s s s s s s s 5 Maintenance Your projector needs little maintenance.
... try to cool the projector and keep the lens clean because any part of the projector. Dangerous electrical voltages in this product yourself, except as specifically explained in the projector can block ventilation needed to service this User's Guide. Never open any cover on the screen. You should replace are the lamp and air filter. A clogged air filter can injure you should keep it from overheating. s s s s ss s s s s s s s s s 5 Maintenance Your projector needs little maintenance.
Owners Manual
Page 107
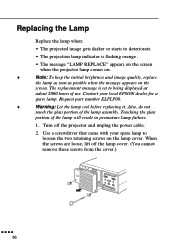
... in premature lamp failure. 1. The replacement message is set to deteriorate. • The projection lamp indicator is flashing orange . • The message "LAMP REPLACE" appears on the screen when the projector lamp comes on. ♦ Note: To keep the initial brightness and image quality, replace the lamp as soon as possible when the message appears on the lamp cover. Replacing the Lamp Replace the lamp when: • The projected image gets darker or starts to being displayed at adout 2000 hours of use.
... in premature lamp failure. 1. The replacement message is set to deteriorate. • The projection lamp indicator is flashing orange . • The message "LAMP REPLACE" appears on the screen when the projector lamp comes on. ♦ Note: To keep the initial brightness and image quality, replace the lamp as soon as possible when the message appears on the lamp cover. Replacing the Lamp Replace the lamp when: • The projected image gets darker or starts to being displayed at adout 2000 hours of use.
Owners Manual
Page 111
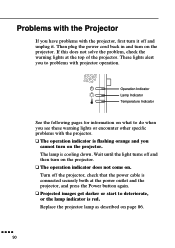
... lamp is flashing orange and you cannot turn it off and unplug it. Operation Indicator Lamp Indicator Temperature Indicator See the following pages for information on the projector. Replace the projector lamp as described on . If this does not solve the problem, check the warning lights at the power outlet and the projector, and press the Power button again. ❑ Projected images get darker or start to do when you see these warning lights or encounter other specific problems...
... lamp is flashing orange and you cannot turn it off and unplug it. Operation Indicator Lamp Indicator Temperature Indicator See the following pages for information on the projector. Replace the projector lamp as described on . If this does not solve the problem, check the warning lights at the power outlet and the projector, and press the Power button again. ❑ Projected images get darker or start to do when you see these warning lights or encounter other specific problems...
Owners Manual
Page 113
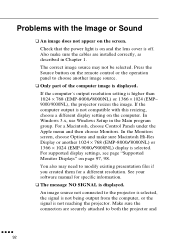
... connectors are installed correctly, as described in the Main program group. Check that the power light is displayed. In Windows 3.x, use Windows Setup in Chapter 1. For a Macintosh, choose Control Panels under the Apple menu and then choose Monitors. If the computer's output resolution setting is not compatible with the Image or Sound ❑ An image does not appear on the screen. Press the Source button on the remote control or the operation panel to...
... connectors are installed correctly, as described in the Main program group. Check that the power light is displayed. In Windows 3.x, use Windows Setup in Chapter 1. For a Macintosh, choose Control Panels under the Apple menu and then choose Monitors. If the computer's output resolution setting is not compatible with the Image or Sound ❑ An image does not appear on the screen. Press the Source button on the remote control or the operation panel to...
Owners Manual
Page 129
... to inappropriate use or failure to properly use in accordance with details of this manual, or transportation c.In case the product was repaired or modified by any party other than EPSON or an Epson-authorized servicer d.Problems caused by optional equipment or consumables, other than original EPSON product or product of the same quality ♦ Notice: The power supply cable packed with a replacement product...
... to inappropriate use or failure to properly use in accordance with details of this manual, or transportation c.In case the product was repaired or modified by any party other than EPSON or an Epson-authorized servicer d.Problems caused by optional equipment or consumables, other than original EPSON product or product of the same quality ♦ Notice: The power supply cable packed with a replacement product...


