User Manual
Page 32
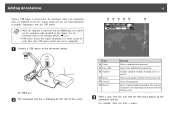
... the document camera. Clears all F Pointer Function Selects a color for the annotation. For example, when you select. Clears an annotation with the left side of a driver cannot be compatible. c Select a tool. s p.56 • USB mouse devices that you draw a square: Tool A Colors B Line width C Graphics D Eraser E Clear all annotations. Click the...
... the document camera. Clears all F Pointer Function Selects a color for the annotation. For example, when you select. Clears an annotation with the left side of a driver cannot be compatible. c Select a tool. s p.56 • USB mouse devices that you draw a square: Tool A Colors B Line width C Graphics D Eraser E Clear all annotations. Click the...
User Manual
Page 54
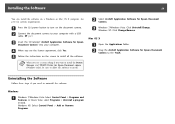
..., click Yes. Windows XP: Select Control Panel > Add or Remove Programs. s p.21 c Insert the CD labeled "ArcSoft Application Software for Epson Document Camera to the Trash. Windows XP: Click Change/Remove. Mac OS X a Open the Applications folder. b Drag the ArcSoft Application Software for... turn on the screen to your computer. d When you see a screen asking if you want to install the Button Manager and TWAIN Driver for Epson Document camera (Windows only), be sure to allow the software to uninstall the software. Installing the Software 54 You can install the software ...
..., click Yes. Windows XP: Select Control Panel > Add or Remove Programs. s p.21 c Insert the CD labeled "ArcSoft Application Software for Epson Document Camera to the Trash. Windows XP: Click Change/Remove. Mac OS X a Open the Applications folder. b Drag the ArcSoft Application Software for... turn on the screen to your computer. d When you see a screen asking if you want to install the Button Manager and TWAIN Driver for Epson Document camera (Windows only), be sure to allow the software to uninstall the software. Installing the Software 54 You can install the software ...
User Manual
Page 65
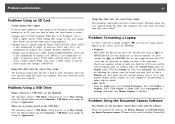
...first create a folder named DCIM, then create a folder within it with the software When you installed the software, the Button Manager and TWAIN Driver for details. • Mac OS X: From the Apple menu, select System Preferences, then click Display or Displays. Problems and Solutions 65 ...image files from your computer, they won 't show the actual time they were created. Avoid editing your computer's documentation or online help for Epson Document camera (Windows only) weren't installed. Image files don't have the correct time stamp The document camera does not have a built-...
...first create a folder named DCIM, then create a folder within it with the software When you installed the software, the Button Manager and TWAIN Driver for details. • Mac OS X: From the Apple menu, select System Preferences, then click Display or Displays. Problems and Solutions 65 ...image files from your computer, they won 't show the actual time they were created. Avoid editing your computer's documentation or online help for Epson Document camera (Windows only) weren't installed. Image files don't have the correct time stamp The document camera does not have a built-...

User Manual
Page 66
Problems and Solutions 66 the software, being sure to allow the Button Manager and TWAIN Driver for Epson Document camera to Mass Storage. You don't see the live camera image on your computer The document camera's USB Mode setting may be set to install. You need to change the setting to Application. Press the [Menu] button and select Function > USB Mode, then change this setting to Application. Now you can use the USB cable to the projector using a VGA cable, composite video cable, or HDMI cable. First disconnect the USB cable, then reconnect to display the image.
Problems and Solutions 66 the software, being sure to allow the Button Manager and TWAIN Driver for Epson Document camera to Mass Storage. You don't see the live camera image on your computer The document camera's USB Mode setting may be set to install. You need to change the setting to Application. Press the [Menu] button and select Function > USB Mode, then change this setting to Application. Now you can use the USB cable to the projector using a VGA cable, composite video cable, or HDMI cable. First disconnect the USB cable, then reconnect to display the image.