Quick Start
Page 1
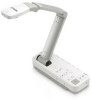
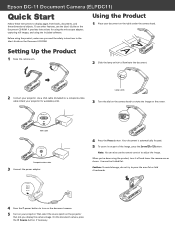
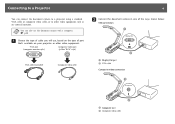
... power button to adjust the image. When you display the camera image. Epson DC-11 Document Camera (ELPDC11) Quick Start Follow these instructions to illuminate the document. 2 Connect your projector. It provides instructions for available ports). VGA cable Composite video cable 3 Connect the power adapter. 4 Press the Focus button. Use a VGA cable (included) or...
... power button to adjust the image. When you display the camera image. Epson DC-11 Document Camera (ELPDC11) Quick Start Follow these instructions to illuminate the document. 2 Connect your projector. It provides instructions for available ports). VGA cable Composite video cable 3 Connect the power adapter. 4 Press the Focus button. Use a VGA cable (included) or...
Quick Start
Page 2
...if purchased new and operated in the United States or Canada, will be free from the date of your Epson product prove defective during the warranty period, please call the Epson Connection at its option, exchange or repair the product without charge for parts or labor. Shipments to Get Help ...trademarks of like kind and quality. Toll or long distance charges may be another model of their respective owners. PrivateLine is a registered trademark and Epson Connection is subject to an external monitor. (On a PC, hold down the Fn key and press or CRT/LCD. Installing the Software You can...
...if purchased new and operated in the United States or Canada, will be free from the date of your Epson product prove defective during the warranty period, please call the Epson Connection at its option, exchange or repair the product without charge for parts or labor. Shipments to Get Help ...trademarks of like kind and quality. Toll or long distance charges may be another model of their respective owners. PrivateLine is a registered trademark and Epson Connection is subject to an external monitor. (On a PC, hold down the Fn key and press or CRT/LCD. Installing the Software You can...
User's Guide
Page 6
... the Document Camera 15 Securing the Document Camera 16 Basic Setup and Use Plugging In and Turning On 18 Connecting to a Projector 19 Connecting to a Computer 20 Connect to Use the Document Camera Software 20 Connect Without Using the Document Camera Software 21 Displaying a Document or Other Materials 22 Freezing an Image 23 Displaying...
... the Document Camera 15 Securing the Document Camera 16 Basic Setup and Use Plugging In and Turning On 18 Connecting to a Projector 19 Connecting to a Computer 20 Connect to Use the Document Camera Software 20 Connect Without Using the Document Camera Software 21 Displaying a Document or Other Materials 22 Freezing an Image 23 Displaying...
User's Guide
Page 7
... and Sharing Your Videos 47 Solving Problems Problems and Solutions 49 Operation Problems 49 Image Quality Problems 49 Problems Using an SD Card 50 Problems Connecting a Laptop 50 Problems Using the Document Camera Software 50 Where to Get Help 51 Europe 51 Africa 56 Middle East 56 North and Central America...
... and Sharing Your Videos 47 Solving Problems Problems and Solutions 49 Operation Problems 49 Image Quality Problems 49 Problems Using an SD Card 50 Problems Connecting a Laptop 50 Problems Using the Document Camera Software 50 Where to Get Help 51 Europe 51 Africa 56 Middle East 56 North and Central America...
User's Guide
Page 9
.... • Still image capture Capture still images in rich detail with a computer and the included software. Included Items • Remote control with a connected computer. Product Features 9 • Versatile setup Connect the document camera to any projector using a standard VGA or composite video cable, or to other video equipment such as a slideshow. •...
.... • Still image capture Capture still images in rich detail with a computer and the included software. Included Items • Remote control with a connected computer. Product Features 9 • Versatile setup Connect the document camera to any projector using a standard VGA or composite video cable, or to other video equipment such as a slideshow. •...
User's Guide
Page 10
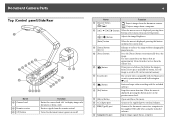
...size. Stops the current function. Press the [Focus] button to a computer via the supplied USB cable when using the included software. Connects the document camera to automatically focus the image. If you press and hold the button, the still image is saved to display images ...of a document or from a computer. Connects the supplied power cord and adapter. The unit cannot focus on or off. 10 Name Function D [Source] button [ ][ ] [ ] Projects images ...
...size. Stops the current function. Press the [Focus] button to a computer via the supplied USB cable when using the included software. Connects the document camera to automatically focus the image. If you press and hold the button, the still image is saved to display images ...of a document or from a computer. Connects the supplied power cord and adapter. The unit cannot focus on or off. 10 Name Function D [Source] button [ ][ ] [ ] Projects images ...

User's Guide
Page 14
Outputs remote control signals. When used with an Epson projector, changes the input source connected to the projector. Turns the video and audio on or off when you are connecting the document camera when used with an Epson projector. Remote Control Buttons 14 Name M [Source] button [ ][ ] N [A/V Mute] button O [Source Search] button P Remote control light emitting area Function [ ] Projects images from a computer. [ ] Projects images from the document camera.
Outputs remote control signals. When used with an Epson projector, changes the input source connected to the projector. Turns the video and audio on or off when you are connecting the document camera when used with an Epson projector. Remote Control Buttons 14 Name M [Source] button [ ][ ] N [A/V Mute] button O [Source Search] button P Remote control light emitting area Function [ ] Projects images from a computer. [ ] Projects images from the document camera.
User's Guide
Page 18
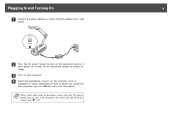
Plugging In and Turning On 18 a Connect the power adapter as Computer or Video), depending on port to which you 're done using the document camera, press the [t] power button twice to .... Plug the adapter into a wall outlet. c Turn on the projector (such as shown. b Press the [t] power button to turn on the document camera. a When you connected. Your projector may use different names for the document camera to output an image. d Select the appropriate "source" on your projector. It takes about 10...
Plugging In and Turning On 18 a Connect the power adapter as Computer or Video), depending on port to which you 're done using the document camera, press the [t] power button twice to .... Plug the adapter into a wall outlet. c Turn on the projector (such as shown. b Press the [t] power button to turn on the document camera. a When you connected. Your projector may use different names for the document camera to output an image. d Select the appropriate "source" on your projector. It takes about 10...
User's Guide
Page 19
s p.20 a Choose the type of the ways shown below: VGA connection VGA cable (included) Composite video cable A Display Out port B VGA cable Composite video connection A Composite port B Composite video cable a You can connect the document camera to a projector using a standard VGA cable or composite ...'s available on your projector or other video equipment such as an external monitor. Connecting to other video equipment: VGA port (computer monitor style) Composite video port (yellow "RCA" style) b Connect the document camera in one of cable you will use the document camera with...
s p.20 a Choose the type of the ways shown below: VGA connection VGA cable (included) Composite video cable A Display Out port B VGA cable Composite video connection A Composite port B Composite video cable a You can connect the document camera to a projector using a standard VGA cable or composite ...'s available on your projector or other video equipment such as an external monitor. Connecting to other video equipment: VGA port (computer monitor style) Composite video port (yellow "RCA" style) b Connect the document camera in one of cable you will use the document camera with...
User's Guide
Page 20
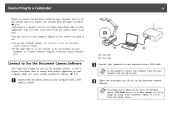
...cable, as display PowerPoint slides or images from another application on the screen, the document camera's USB Mode may be set to Mass Storage; see "Connect to Use the Document Camera Software" below. • If you don't plan to use the software or it's not installed on p.40 to ... and videos. Make sure you plan to use: • To use the included software, see p.50 to your projector using a VGA cable. s p.39 a Connect the document camera to your computer with composite video, but most computers lack this type of port. a If an image doesn't appear on your computer...
...cable, as display PowerPoint slides or images from another application on the screen, the document camera's USB Mode may be set to Mass Storage; see "Connect to Use the Document Camera Software" below. • If you don't plan to use the software or it's not installed on p.40 to ... and videos. Make sure you plan to use: • To use the included software, see p.50 to your projector using a VGA cable. s p.39 a Connect the document camera to your computer with composite video, but most computers lack this type of port. a If an image doesn't appear on your computer...
User's Guide
Page 21
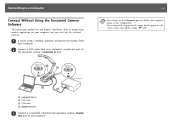
... 21 a You cannot use the included software. a If you connected a laptop but you can't use the Composite port to display your projector. s p.50 A Computer In port B VGA cable C VGA cable D Display Out port c Connect a second VGA cable from the document camera's Display Out port to... your computer image in this configuration. Connecting to a Computer Connect Without Using the Document Camera Software This connection method lets you display PowerPoint slides or images from another application on the screen, check your computer, ...
... 21 a You cannot use the included software. a If you connected a laptop but you can't use the Composite port to display your projector. s p.50 A Computer In port B VGA cable C VGA cable D Display Out port c Connect a second VGA cable from the document camera's Display Out port to... your computer image in this configuration. Connecting to a Computer Connect Without Using the Document Camera Software This connection method lets you display PowerPoint slides or images from another application on the screen, check your computer, ...
User's Guide
Page 24
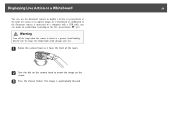
... bright light could damage your eyes. b Turn the dial on the camera head to display a lecture or presentation at a person. If the document camera is connected to a computer with a USB cable, you can use the document camera to orient the image on the screen.
... bright light could damage your eyes. b Turn the dial on the camera head to display a lecture or presentation at a person. If the document camera is connected to a computer with a USB cable, you can use the document camera to orient the image on the screen.

User's Guide
Page 25
...control. To switch back to switch between your computer application and the live camera image, press the [Source] - [ ] button. s p.40 When you connect with USB cable, you cannot switch to computer image if you press the [ ] button. • If you can use the document camera software to ...display captured images and videos, or use the document camera's [Source] buttons to the live camera image. • If you've connected your computer with a USB cable (s p.20), you 've selected Capture mode in the document camera software. Switching Between Your Computer and the Live...
...control. To switch back to switch between your computer application and the live camera image, press the [Source] - [ ] button. s p.40 When you connect with USB cable, you cannot switch to computer image if you press the [ ] button. • If you can use the document camera software to ...display captured images and videos, or use the document camera's [Source] buttons to the live camera image. • If you've connected your computer with a USB cable (s p.20), you 've selected Capture mode in the document camera software. Switching Between Your Computer and the Live...
User's Guide
Page 30
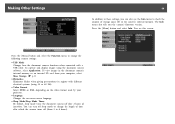
... off after which the camera turns off sleep mode or change the following camera settings: • USB Mode Changes how the document camera functions when connected with different electrical systems (using the document camera software, select Application. s p.35 • Flickerless Eliminates flicker when giving presentations in regions with a USB cable. To...
... off after which the camera turns off sleep mode or change the following camera settings: • USB Mode Changes how the document camera functions when connected with different electrical systems (using the document camera software, select Application. s p.35 • Flickerless Eliminates flicker when giving presentations in regions with a USB cable. To...

User's Guide
Page 31
Images are stored in the document camera's internal memory. Follow the instructions on p.38 to view. You can store up to about 4000 images (depending on the document camera. Saving Images and Displaying a Slideshow You can also export captured images to an SD memory card or view them from a connected computer. You can display a slideshow of captured images. a You cannot store videos on their content), and then select just the ones you want to record videos.
Images are stored in the document camera's internal memory. Follow the instructions on p.38 to view. You can store up to about 4000 images (depending on the document camera. Saving Images and Displaying a Slideshow You can also export captured images to an SD memory card or view them from a connected computer. You can display a slideshow of captured images. a You cannot store videos on their content), and then select just the ones you want to record videos.

User's Guide
Page 35
... USB cable The document camera's internal memory appears as described below. f Use your computer to view the files, or to Mass Storage. a Connect the document camera to your projector with a USB cable to be damaged. Caution Before disconnecting the USB cable, make sure your files have a built... may experience problems copying or moving the files. Otherwise, they were created. s p.50 g When you may be readable. e Now connect the document camera to change the function of its USB port as an external drive on the document camera and projector. Before using the document...
... USB cable The document camera's internal memory appears as described below. f Use your computer to view the files, or to Mass Storage. a Connect the document camera to your projector with a USB cable to be damaged. Caution Before disconnecting the USB cable, make sure your files have a built... may experience problems copying or moving the files. Otherwise, they were created. s p.50 g When you may be readable. e Now connect the document camera to change the function of its USB port as an external drive on the document camera and projector. Before using the document...
User's Guide
Page 40
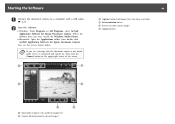
... USB cable. s p.20 b Start the software: • Windows: From Programs or All Programs, select ArcSoft Application Software for Epson Document Camera. Then click the Connect button in the upper-right corner of the screen. 40 C Capture buttons (still image, burst, time lapse, and video) D ...Live Annotation button E Preview area (live camera image) F Connect button A Main modes (capture, edit, and file management) B Capture album (previously captured images) When the software does not start, install the Windows...
... USB cable. s p.20 b Start the software: • Windows: From Programs or All Programs, select ArcSoft Application Software for Epson Document Camera. Then click the Connect button in the upper-right corner of the screen. 40 C Capture buttons (still image, burst, time lapse, and video) D ...Live Annotation button E Preview area (live camera image) F Connect button A Main modes (capture, edit, and file management) B Capture album (previously captured images) When the software does not start, install the Windows...
User's Guide
Page 44
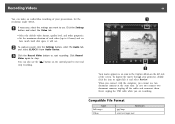
...-click it will use two document cameras at the same time. Set the resolution under SXGA. To display the movie through your presentation. When you connect with the computer, you want to use the [ ] button on the left side of each video (up to start recording. a If necessary, ... and see how much hard disk space it and select Preview. b To capture sound, click the Settings button, select the Audio tab, and select ELPDC11 from Audio Device. Click Record Video again to start and stop . Recording Videos 44 You can also use . Click the Settings button and select the...
...-click it will use two document cameras at the same time. Set the resolution under SXGA. To display the movie through your presentation. When you connect with the computer, you want to use the [ ] button on the left side of each video (up to start recording. a If necessary, ... and see how much hard disk space it and select Preview. b To capture sound, click the Settings button, select the Audio tab, and select ELPDC11 from Audio Device. Click Record Video again to start and stop . Recording Videos 44 You can also use . Click the Settings button and select the...
User's Guide
Page 49
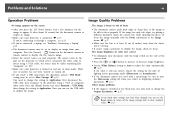
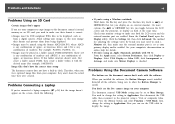
...10 cm (4 inches) away from your projector. Image Quality Problems The image is turned on the screen • After you 've connected a laptop, see "Problems Connecting a Laptop" p.50. • The document camera may need to change the setting to appear. Problems and Solutions 49 Operation Problems ...• Make sure your projector is stretched or has black bars, you can use the USB cable to Mass Storage. s p.19 If you're connecting it through a computer, see p.20. • If you press the [t] Power button, wait a few moments for the document camera to adjust the...
...10 cm (4 inches) away from your projector. Image Quality Problems The image is turned on the screen • After you 've connected a laptop, see "Problems Connecting a Laptop" p.50. • The document camera may need to change the setting to appear. Problems and Solutions 49 Operation Problems ...• Make sure your projector is stretched or has black bars, you can use the USB cable to Mass Storage. s p.19 If you're connecting it through a computer, see p.20. • If you press the [t] Power button, wait a few moments for the document camera to adjust the...
User's Guide
Page 50
... Color LCD, click Arrangement or Arrange, and make sure the external monitor port is correct: • Images must be placed in clock. Problems Connecting a Laptop If you've connected a laptop computer (s p.20) but the image doesn't appear on the screen, check the following: • If you display on your images, as or...
... Color LCD, click Arrangement or Arrange, and make sure the external monitor port is correct: • Images must be placed in clock. Problems Connecting a Laptop If you've connected a laptop computer (s p.20) but the image doesn't appear on the screen, check the following: • If you display on your images, as or...