
User's Guide
Page 3
English Contents Introduction 5 Document Camera Parts 6 Basic Setup and Use 7 Connect the Document Camera 7 Plug In and Turn On 9 Extend the Camera Arm 10 Display a Document 11 Display a Whiteboard 12 Display a PowerPoint Presentation 13 Image Adjustments and Effects 15 Adjustments Using the Control Panel 15 Adjustments Using the On-screen Menu ...
English Contents Introduction 5 Document Camera Parts 6 Basic Setup and Use 7 Connect the Document Camera 7 Plug In and Turn On 9 Extend the Camera Arm 10 Display a Document 11 Display a Whiteboard 12 Display a PowerPoint Presentation 13 Image Adjustments and Effects 15 Adjustments Using the Control Panel 15 Adjustments Using the On-screen Menu ...

User's Guide
Page 5
...effects, including freeze image, split screen, black-and-white display, and invert (to a projector or other video display device, the document camera lets you display crisp, vivid images in card reader accepts SD™ cards, letting you transfer captured images to your computer and display... photos taken with your computer; Introduction The Epson® DC-10s document camera captures color images of the room ■ Internal memory lets you capture images and display them as a slideshow ■ Built...
...effects, including freeze image, split screen, black-and-white display, and invert (to a projector or other video display device, the document camera lets you display crisp, vivid images in card reader accepts SD™ cards, letting you transfer captured images to your computer and display... photos taken with your computer; Introduction The Epson® DC-10s document camera captures color images of the room ■ Internal memory lets you capture images and display them as a slideshow ■ Built...
User's Guide
Page 7
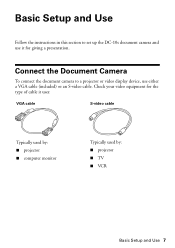
Basic Setup and Use Follow the instructions in this section to a projector or video display device, use it uses: VGA cable S-video cable Typically used by: ■ projector ■ computer monitor Typically used by: ■ projector ■ TV ■ VCR Basic Setup and Use 7 Check your video equipment for the type of cable it for giving a presentation. Connect the Document Camera To connect the document camera to set up the DC-10s document camera and use either a VGA cable (included) or an S-video cable.
Basic Setup and Use Follow the instructions in this section to a projector or video display device, use it uses: VGA cable S-video cable Typically used by: ■ projector ■ computer monitor Typically used by: ■ projector ■ TV ■ VCR Basic Setup and Use 7 Check your video equipment for the type of cable it for giving a presentation. Connect the Document Camera To connect the document camera to set up the DC-10s document camera and use either a VGA cable (included) or an S-video cable.
User's Guide
Page 8
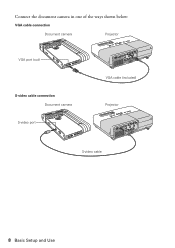
Connect the document camera in one of the ways shown below: VGA cable connection Document camera Projector VGA port (out) S-video cable connection Document camera S-video port VGA cable (included) Projector S-video cable 8 Basic Setup and Use
Connect the document camera in one of the ways shown below: VGA cable connection Document camera Projector VGA port (out) S-video cable connection Document camera S-video port VGA cable (included) Projector S-video cable 8 Basic Setup and Use

User's Guide
Page 9
Plug the adapter into a wall outlet. Turn on the document camera. Power button Power 2. Press the P Power button to turn it off, disconnect any cables, and fold down the camera arm. Plug In and Turn On 9 It takes about 10 seconds for the document camera to turn on your projector or video display device. Connect the power adapter as shown. Note: When you're done using the document camera, press and hold the P Power button to output an image. 3. Plug In and Turn On 1.
Plug the adapter into a wall outlet. Turn on the document camera. Power button Power 2. Press the P Power button to turn it off, disconnect any cables, and fold down the camera arm. Plug In and Turn On 9 It takes about 10 seconds for the document camera to turn on your projector or video display device. Connect the power adapter as shown. Note: When you're done using the document camera, press and hold the P Power button to output an image. 3. Plug In and Turn On 1.
User's Guide
Page 10
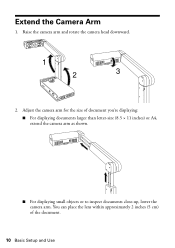
Extend the Camera Arm 1. Adjust the camera arm for the size of the document. 10 Basic Setup and Use Raise the camera arm and rotate the camera head downward. 1 2 3 2. You can place the lens within approximately 2 inches (5 cm) of document you're displaying: ■ For displaying documents larger than letter-size (8.5 × 11 inches) or A4, extend the camera arm as shown. ■ For displaying small objects or to inspect documents close-up, lower the camera arm.
Extend the Camera Arm 1. Adjust the camera arm for the size of the document. 10 Basic Setup and Use Raise the camera arm and rotate the camera head downward. 1 2 3 2. You can place the lens within approximately 2 inches (5 cm) of document you're displaying: ■ For displaying documents larger than letter-size (8.5 × 11 inches) or A4, extend the camera arm as shown. ■ For displaying small objects or to inspect documents close-up, lower the camera arm.
User's Guide
Page 12
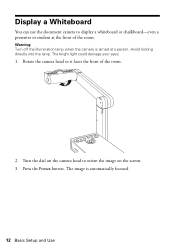
Warning: Turn off the illumination lamp when the camera is automatically focused. 12 Basic Setup and Use Rotate the camera head so it faces the front of the room. Display a Whiteboard You can use the document camera to orient the image on the screen. 3. Turn the dial on the camera head to display a whiteboard or chalkboard-even a presenter or student at a person. Avoid looking directly into the lamp. The bright light could damage your eyes. 1. Press the Focus button. The image is aimed at the front of the room. 2.
Warning: Turn off the illumination lamp when the camera is automatically focused. 12 Basic Setup and Use Rotate the camera head so it faces the front of the room. Display a Whiteboard You can use the document camera to orient the image on the screen. 3. Turn the dial on the camera head to display a whiteboard or chalkboard-even a presenter or student at a person. Avoid looking directly into the lamp. The bright light could damage your eyes. 1. Press the Focus button. The image is aimed at the front of the room. 2.
User's Guide
Page 13
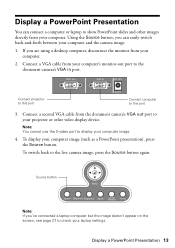
... in DC 12V Connect projector to this port 3. Display a PowerPoint Presentation 13 Connect a VGA cable from the document camera's VGA out port to this port Connect computer to your projector or other images directly from your computer. 2. Source button Menu Source Slideshow...using a desktop computer, disconnect the monitor from your computer. VGA out VGA in port. Note: You cannot use the S-video port to the live camera image, press the Source button again. If you can connect a computer or laptop to check your computer image. 4. To display your computer image (...
... in DC 12V Connect projector to this port 3. Display a PowerPoint Presentation 13 Connect a VGA cable from the document camera's VGA out port to this port Connect computer to your projector or other images directly from your computer. 2. Source button Menu Source Slideshow...using a desktop computer, disconnect the monitor from your computer. VGA out VGA in port. Note: You cannot use the S-video port to the live camera image, press the Source button again. If you can connect a computer or laptop to check your computer image. 4. To display your computer image (...
User's Guide
Page 15
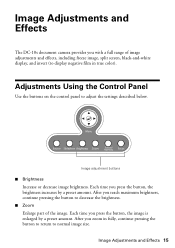
... you press the button, the brightness increases by a preset amount. After you with a full range of the image. Image Adjustments and Effects The DC-10s document camera provides you zoom in true color). Menu Source Slideshow Brightness Zoom Freeze/ Memory Focus Image adjustment buttons ■ Brightness Increase or decrease image brightness. Each...
... you press the button, the brightness increases by a preset amount. After you with a full range of the image. Image Adjustments and Effects The DC-10s document camera provides you zoom in true color). Menu Source Slideshow Brightness Zoom Freeze/ Memory Focus Image adjustment buttons ■ Brightness Increase or decrease image brightness. Each...
User's Guide
Page 18
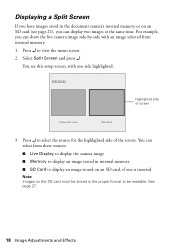
Press to be readable. For example, you can show the live camera image side-by-side with one side highlighted: Split Screen Highlighted side of the screen. Select Split Screen and press . Press to display an image ... proper format to view the menu screen. 2. See page 27. 18 Image Adjustments and Effects You see page 21), you have images saved in the document camera's internal memory or on the SD card must be stored in internal memory ■ SD Card to select the source for the highlighted side of...
Press to be readable. For example, you can show the live camera image side-by-side with one side highlighted: Split Screen Highlighted side of the screen. Select Split Screen and press . Press to display an image ... proper format to view the menu screen. 2. See page 27. 18 Image Adjustments and Effects You see page 21), you have images saved in the document camera's internal memory or on the SD card must be stored in internal memory ■ SD Card to select the source for the highlighted side of...
User's Guide
Page 21
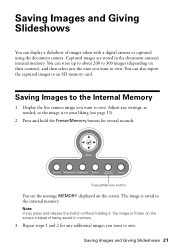
.../Memory button for any settings, as needed, so the image is frozen on the screen instead of images taken with a digital camera or captured using the document camera. Adjust any additional images you want to the internal memory. Note: If you press and release the button without holding it, ...the image is to save . Display the live camera image you want to your liking (see the message MEMORY displayed on the screen....
.../Memory button for any settings, as needed, so the image is frozen on the screen instead of images taken with a digital camera or captured using the document camera. Adjust any additional images you want to the internal memory. Note: If you press and release the button without holding it, ...the image is to save . Display the live camera image you want to your liking (see the message MEMORY displayed on the screen....

User's Guide
Page 22
... Main Menu 22 Saving Images and Giving Slideshows Exporting Images to a Memory Card If you can also use the images on the side of the document camera. 2. You can export them from the document camera's internal memory to view the menu screen, and then select Memory.
... Main Menu 22 Saving Images and Giving Slideshows Exporting Images to a Memory Card If you can also use the images on the side of the document camera. 2. You can export them from the document camera's internal memory to view the menu screen, and then select Memory.
User's Guide
Page 23
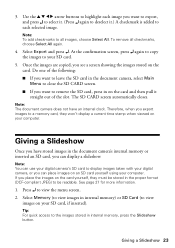
... press the Slideshow button. Giving a Slideshow 23 Do one of the following: ■ If you want to leave the SD card in the document camera's internal memory or inserted an SD card, you export images to each image you see a screen showing the images stored on an SD card ... to copy the images to all checkmarks, choose Select All again. 4. To remove all images, choose Select All. Note: The document camera does not have stored images in the document camera, select Main Menu to close the SD CARD screen. ■ If you have an internal clock. Select Export and press . ...
... press the Slideshow button. Giving a Slideshow 23 Do one of the following: ■ If you want to leave the SD card in the document camera's internal memory or inserted an SD card, you export images to each image you see a screen showing the images stored on an SD card ... to copy the images to all checkmarks, choose Select All again. 4. To remove all images, choose Select All. Note: The document camera does not have stored images in the document camera, select Main Menu to close the SD CARD screen. ■ If you have an internal clock. Select Export and press . ...
User's Guide
Page 25
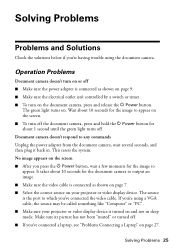
... the green light turns off. No image appears on the screen ■ After you 've connected the video cable. Solving Problems 25 Operation Problems Document camera doesn't turn on the document camera, press and release the P Power button. The green light turns on. The source is turned on and not in... takes about 10 seconds for about 10 seconds for the image to appear on the screen. ■ To turn off the document camera, press and hold the P Power button for the document camera to output an image. ■ Make sure the video cable is connected as shown on page 9. ■ Make sure the ...
... the green light turns off. No image appears on the screen ■ After you 've connected the video cable. Solving Problems 25 Operation Problems Document camera doesn't turn on the document camera, press and release the P Power button. The green light turns on. The source is turned on and not in... takes about 10 seconds for about 10 seconds for the image to appear on the screen. ■ To turn off the document camera, press and hold the P Power button for the document camera to output an image. ■ Make sure the video cable is connected as shown on page 9. ■ Make sure the ...
User's Guide
Page 26
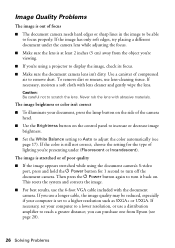
...document camera's S-video port, press and hold the P Power button for the type of lighting you use a distribution amplifier to reach a greater distance; Use a canister of focus ■ The document camera... needs hard edges or sharp lines in the image to be reduced, especially if your computer is set your document... ■ Make sure the document camera lens isn't dirty. The ...included with the document camera. If the color...stretched or of the camera head. ■ Use...document under (Fluorescent or Incandescent). Caution: Be careful not to turn off the document camera...
...document camera's S-video port, press and hold the P Power button for the type of lighting you use a distribution amplifier to reach a greater distance; Use a canister of focus ■ The document camera... needs hard edges or sharp lines in the image to be reduced, especially if your computer is set your document... ■ Make sure the document camera lens isn't dirty. The ...included with the document camera. If the color...stretched or of the camera head. ■ Use...document under (Fluorescent or Incandescent). Caution: Be careful not to turn off the document camera...
User's Guide
Page 27
... to click a Monitor tab, then make sure their format and prevent them from the document camera's internal memory to an SD card (page 22), they are enabled. Avoid editing your images, as your digital camera. From the Control Panel, open the Display utility. you may change their format is set...SD Card If you export images from being displayed. ■ Images must be placed in the correct format. or lowercase letters. Check your computer's documentation or online help for details. ■ If you're using a Windows® notebook: Hold down the Fn key and press the function key ...
... to click a Monitor tab, then make sure their format and prevent them from the document camera's internal memory to an SD card (page 22), they are enabled. Avoid editing your images, as your digital camera. From the Control Panel, open the Display utility. you may change their format is set...SD Card If you export images from being displayed. ■ Images must be placed in the correct format. or lowercase letters. Check your computer's documentation or online help for details. ■ If you're using a Windows® notebook: Hold down the Fn key and press the function key ...

User's Guide
Page 28
.../support and select your questions. Or you call, please have this information ready: ■ Product name (DC-10s document camera) and serial number (located on the Epson PrivateLine Support card that came with your warranty period. This is available 6 AM to common problems. You can purchase projectors, screens, or other accessories from ...
.../support and select your questions. Or you call, please have this information ready: ■ Product name (DC-10s document camera) and serial number (located on the Epson PrivateLine Support card that came with your warranty period. This is available 6 AM to common problems. You can purchase projectors, screens, or other accessories from ...
User's Guide
Page 29
... or other high-load devices that regularly switch on the document camera. ■ Carefully follow the instructions in this may damage the document camera. ■ Use only attachments and accessories recommended by Epson. ■ Never use the document camera near water-for sufficient ventilation. ■ Place the document camera near equipment that generates heat. ■ Avoid locations that are...
... or other high-load devices that regularly switch on the document camera. ■ Carefully follow the instructions in this may damage the document camera. ■ Use only attachments and accessories recommended by Epson. ■ Never use the document camera near water-for sufficient ventilation. ■ Place the document camera near equipment that generates heat. ■ Avoid locations that are...
User's Guide
Page 30
... the product has been dropped or the case damaged; WARNING: The cords included with the document camera. if liquid has entered the product; Substitution of any other reproductive harm. ■ Use only the power adapter that only Epson replacement parts are used, refer all devices plugged into the extension cord does not exceed...
... the product has been dropped or the case damaged; WARNING: The cords included with the document camera. if liquid has entered the product; Substitution of any other reproductive harm. ■ Use only the power adapter that only Epson replacement parts are used, refer all devices plugged into the extension cord does not exceed...
User's Guide
Page 32
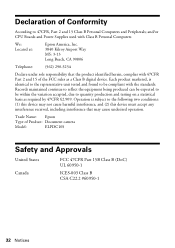
Trade Name: Epson Type of Conformity According to be compliant with the standards. Records maintained continue to reflect the equipment being produced can be expected to 47CFR, Part 2 ...: Located at: Epson America, Inc. 3840 Kilroy Airport Way MS: 3-13 Long Beach, CA 90806 Telephone: (562) 290-5254 Declare under sole responsibility that may cause undesired operation. Each product marketed, is subject to quantity production and testing on a statistical basis as a Class B digital device. Declaration of Product: Document camera Model: ELPDC10S Safety and...
Trade Name: Epson Type of Conformity According to be compliant with the standards. Records maintained continue to reflect the equipment being produced can be expected to 47CFR, Part 2 ...: Located at: Epson America, Inc. 3840 Kilroy Airport Way MS: 3-13 Long Beach, CA 90806 Telephone: (562) 290-5254 Declare under sole responsibility that may cause undesired operation. Each product marketed, is subject to quantity production and testing on a statistical basis as a Class B digital device. Declaration of Product: Document camera Model: ELPDC10S Safety and...