User Manual
Page 2
...bags away from the use of this EPSON product. Caution: Never attempt to qualified service personnel. SEIKO EPSON CORPORATION shall not be liable to the purchaser of their respective owners. Dangerous electrical voltages inside the document camera can severely injure you. Refer all rights...replace the lamps. Printed on the document camera. Important Safety Information WARNING: Never open any risk of suffocation. Copyright Notice All rights reserved. General Notice: Other product names used herein are registered trademarks of SEIKO EPSON CORPORATION. No part of this publication ...
...bags away from the use of this EPSON product. Caution: Never attempt to qualified service personnel. SEIKO EPSON CORPORATION shall not be liable to the purchaser of their respective owners. Dangerous electrical voltages inside the document camera can severely injure you. Refer all rights...replace the lamps. Printed on the document camera. Important Safety Information WARNING: Never open any risk of suffocation. Copyright Notice All rights reserved. General Notice: Other product names used herein are registered trademarks of SEIKO EPSON CORPORATION. No part of this publication ...
User Manual
Page 3
... to a Projector or Monitor 8 Connecting the RCA Cable 8 Connecting the Optional S-Video Cable 9 Adjusting the Frequency 10 Using the Document Camera 11 Turning On Your Equipment 12 Turning On the Document Camera 12 What To Do If You See a Blank Screen 14 Positioning Your Document on the Stage 14 Adjusting the Lighting...
... to a Projector or Monitor 8 Connecting the RCA Cable 8 Connecting the Optional S-Video Cable 9 Adjusting the Frequency 10 Using the Document Camera 11 Turning On Your Equipment 12 Turning On the Document Camera 12 What To Do If You See a Blank Screen 14 Positioning Your Document on the Stage 14 Adjusting the Lighting...

User Manual
Page 4
3 4 5 6 Maintaining and Transporting the Document Camera 21 Cleaning the Lenses 22 Cleaning the Document Camera Case 22 Transporting the Document Camera 23 Solving Problems 25 Solving Problems with the Image 26 Where to Get Help 27 Telephone Support Services 28 Technical Specifications 29 General 29 Dimensions 30 Electrical 31 Environmental 31 Safety 31 Notices 33 Important Safety Instructions 33 Declaration of Conformity 35 FCC Compliance Statement 36 Warranty 37 Index 39 iv
3 4 5 6 Maintaining and Transporting the Document Camera 21 Cleaning the Lenses 22 Cleaning the Document Camera Case 22 Transporting the Document Camera 23 Solving Problems 25 Solving Problems with the Image 26 Where to Get Help 27 Telephone Support Services 28 Technical Specifications 29 General 29 Dimensions 30 Electrical 31 Environmental 31 Safety 31 Notices 33 Important Safety Instructions 33 Declaration of Conformity 35 FCC Compliance Statement 36 Warranty 37 Index 39 iv
User Manual
Page 5
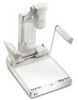
... × 9.6 in your presentations. The document camera's lamps provide ample lighting for S-Video and composite video provides additional versatility. And the document camera's support for printed material and 3-D objects. The camera can be connected to auditoriums, you can show ...still images and motion video in . (324 × 238 mm). Welcome 1 With its 16× zoom capability, even 10 point type can also present true motion, NTSC video. WWelcome The EPSON® ELPDC03 Motion Presentation Camera is a document camera...
... × 9.6 in your presentations. The document camera's lamps provide ample lighting for S-Video and composite video provides additional versatility. And the document camera's support for printed material and 3-D objects. The camera can be connected to auditoriums, you can show ...still images and motion video in . (324 × 238 mm). Welcome 1 With its 16× zoom capability, even 10 point type can also present true motion, NTSC video. WWelcome The EPSON® ELPDC03 Motion Presentation Camera is a document camera...
User Manual
Page 6
... services are available if you read through it 's free. Getting More Information Need tips on the card included with your document camera? I http://support.epson.com Download FAQs and e-mail your document camera. Please follow these guidelines as Presenters Services to use on the road. More information about your equipment. The site provides...
... services are available if you read through it 's free. Getting More Information Need tips on the card included with your document camera? I http://support.epson.com Download FAQs and e-mail your document camera. Please follow these guidelines as Presenters Services to use on the road. More information about your equipment. The site provides...
User Manual
Page 7
You'll find instructions for a video presentation. 1Setting Up the Document Camera This chapter tells you how to set up the document camera for the following in this chapter: I Unpacking the document camera I Unfolding the document camera I Positioning the document camera I Connecting to a projector or monitor Setting Up the Document Camera 3
You'll find instructions for a video presentation. 1Setting Up the Document Camera This chapter tells you how to set up the document camera for the following in this chapter: I Unpacking the document camera I Unfolding the document camera I Positioning the document camera I Connecting to a projector or monitor Setting Up the Document Camera 3

User Manual
Page 8
Unpacking the Document Camera After unpacking the document camera, make sure you have all the items shown below: dust cover RCA cable document camera power cord Save all packaging in case you need to another location. For transportation instructions, see page 23. 4 Setting Up the Document Camera Always use the original packaging (or the equivalent) when you need to send the document camera to ship the document camera.
Unpacking the Document Camera After unpacking the document camera, make sure you have all the items shown below: dust cover RCA cable document camera power cord Save all packaging in case you need to another location. For transportation instructions, see page 23. 4 Setting Up the Document Camera Always use the original packaging (or the equivalent) when you need to send the document camera to ship the document camera.

User Manual
Page 9
Lift the camera arm until you hear a click. While holding down the document camera, press the support release and lift the support until you hear a click. camera arm Setting Up the Document Camera 5 support support release 2. Unfolding the Document Camera Follow the steps below to unfold the document camera. 1.
Lift the camera arm until you hear a click. While holding down the document camera, press the support release and lift the support until you hear a click. camera arm Setting Up the Document Camera 5 support support release 2. Unfolding the Document Camera Follow the steps below to unfold the document camera. 1.

User Manual
Page 10
Unfold the first lamp arm (1) and then the second (2) as shown until the lens faces the stage (downward) and you hear a click. camera head lens stage 4. Pull the camera head forward until they stop. If a protective sheet covers the stage, remove it. 1 2 6 Setting Up the Document Camera 3.
Unfold the first lamp arm (1) and then the second (2) as shown until the lens faces the stage (downward) and you hear a click. camera head lens stage 4. Pull the camera head forward until they stop. If a protective sheet covers the stage, remove it. 1 2 6 Setting Up the Document Camera 3.

User Manual
Page 11
... within 5 feet (1.5 m) of your output source. caution Do not hold or lift the document camera by the camera head or lighting unit arms, or you place it . Setting Up the Document Camera 7 Positioning the Document Camera Before connecting the document camera, you need to decide where to place it convenient to follow these guidelines: I Make...
... within 5 feet (1.5 m) of your output source. caution Do not hold or lift the document camera by the camera head or lighting unit arms, or you place it . Setting Up the Document Camera 7 Positioning the Document Camera Before connecting the document camera, you need to decide where to place it convenient to follow these guidelines: I Make...
User Manual
Page 12
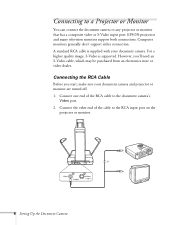
... a Projector or Monitor You can connect the document camera to the document camera's Video port. 2. However, you start, make sure your document camera. For a higher quality image, S-Video is supplied with your document camera and projector or monitor are turned off. 1. or 8 Setting Up the Document Camera EPSON projectors and many television monitors support both connections.
... a Projector or Monitor You can connect the document camera to the document camera's Video port. 2. However, you start, make sure your document camera. For a higher quality image, S-Video is supplied with your document camera and projector or monitor are turned off. 1. or 8 Setting Up the Document Camera EPSON projectors and many television monitors support both connections.
User Manual
Page 13
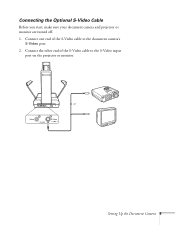
Connect the other end of the S-Video cable to the S-Video input port on the projector or monitor. Connect one end of the S-Video cable to the document camera's S-Video port. 2. or Setting Up the Document Camera 9 Connecting the Optional S-Video Cable Before you start, make sure your document camera and projector or monitor are turned off. 1.
Connect the other end of the S-Video cable to the S-Video input port on the projector or monitor. Connect one end of the S-Video cable to the document camera's S-Video port. 2. or Setting Up the Document Camera 9 Connecting the Optional S-Video Cable Before you start, make sure your document camera and projector or monitor are turned off. 1.

User Manual
Page 14
It is factory set the switch to 50Hz to reduce flickering. Adjusting the Frequency The frequency selection switch is located on the rear of the document camera, next to 60 Hz. In an area where power frequency is 50 Hz, set to the S-Video port. frequency selection switch 10 Setting Up the Document Camera
It is factory set the switch to 50Hz to reduce flickering. Adjusting the Frequency The frequency selection switch is located on the rear of the document camera, next to 60 Hz. In an area where power frequency is 50 Hz, set to the S-Video port. frequency selection switch 10 Setting Up the Document Camera

User Manual
Page 15
This chapter covers the following: I Turning on the document camera and other equipment I Turning off and storing the document camera Using the Document Camera 11 2Using the Document Camera Once you have set up the document camera, you're ready to turn it on the stage I Adjusting the lighting I Adjusting the image I Using the camera head as a conventional video camera I Positioning your document on , adjust the image, and give your presentation.
This chapter covers the following: I Turning on the document camera and other equipment I Turning off and storing the document camera Using the Document Camera 11 2Using the Document Camera Once you have set up the document camera, you're ready to turn it on the stage I Adjusting the lighting I Adjusting the image I Using the camera head as a conventional video camera I Positioning your document on , adjust the image, and give your presentation.

User Manual
Page 16
Turning On the Document Camera Follow these steps to plug in Chapter 1. power inlet 2. Turn on your document camera and other end to the document camera's power inlet. Connect one end of the power cord to a grounded electrical outlet. 3. Then turn on your document camera as described in and turn on the document camera: 1. Turning On Your Equipment Make sure your projector or monitor first. Connect the other equipment are set up and connected correctly, as described below. Always turn on the projector or monitor. 12 Using the Document Camera
Turning On the Document Camera Follow these steps to plug in Chapter 1. power inlet 2. Turn on your document camera and other end to the document camera's power inlet. Connect one end of the power cord to a grounded electrical outlet. 3. Then turn on your document camera as described in and turn on the document camera: 1. Turning On Your Equipment Make sure your projector or monitor first. Connect the other equipment are set up and connected correctly, as described below. Always turn on the projector or monitor. 12 Using the Document Camera

User Manual
Page 17
... wait a few moments, the POWER and Auto Focus indicator lights and the lamps turn off the document camera as described on page 18. note If you 're done with your image, turn to page 15 for help. Place your image doesn't appear, see ...an image on . Turn on the stage. If your presentation material on the document camera. Using the Document Camera 13 When you turn on screen. 4. You should see the next section for instructions on . After a few seconds before turning it back on...
... wait a few moments, the POWER and Auto Focus indicator lights and the lamps turn off the document camera as described on page 18. note If you 're done with your image, turn to page 15 for help. Place your image doesn't appear, see ...an image on . Turn on the stage. If your presentation material on the document camera. Using the Document Camera 13 When you turn on screen. 4. You should see the next section for instructions on . After a few seconds before turning it back on...

User Manual
Page 18
If you need to change the orientation of the document, rotate the camera head 90° to the right or 90°/180° to Chapter 4... on the Stage Place your document with the top near the rear of the document camera. Some documents can pass through slot 14 Using the Document Camera I If an image still doesn't appear, refer to the left. What To Do... Screen If an image doesn't appear, try the following: I Make sure the cables are lit. rotate camera head 90° rotate camera head 90°/180° paper pass-through the rear of the stage. Use the paper pass-through slot...
If you need to change the orientation of the document, rotate the camera head 90° to the right or 90°/180° to Chapter 4... on the Stage Place your document with the top near the rear of the document camera. Some documents can pass through slot 14 Using the Document Camera I If an image still doesn't appear, refer to the left. What To Do... Screen If an image doesn't appear, try the following: I Make sure the cables are lit. rotate camera head 90° rotate camera head 90°/180° paper pass-through the rear of the stage. Use the paper pass-through slot...
User Manual
Page 19
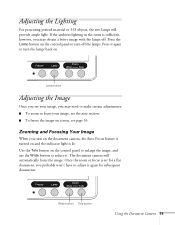
... the indicator light is lit. Zooming and Focusing Your Image When you may obtain a better image with the lamps off the lamps. The document camera will provide ample light. Use the Tele button on the control panel to enlarge the image, and use the Wide button to reduce it again... I To freeze the image on . Lamp button Adjusting the Image Once you see your image, see page 16. Wide button Tele button Using the Document Camera 15 Once the zoom or focus is sufficient, however, you probably won't have to turn the lamps back on screen, see the next section. Adjusting...
... the indicator light is lit. Zooming and Focusing Your Image When you may obtain a better image with the lamps off the lamps. The document camera will provide ample light. Use the Tele button on the control panel to enlarge the image, and use the Wide button to reduce it again... I To freeze the image on . Lamp button Adjusting the Image Once you see your image, see page 16. Wide button Tele button Using the Document Camera 15 Once the zoom or focus is sufficient, however, you probably won't have to turn the lamps back on screen, see the next section. Adjusting...

User Manual
Page 20
... Freeze button again to display your audience will have an image to turn off automatic focusing. Freeze indicator light Freeze button 16 Using the Document Camera Material with a varying depth of a moving object.
... Freeze button again to display your audience will have an image to turn off automatic focusing. Freeze indicator light Freeze button 16 Using the Document Camera Material with a varying depth of a moving object.
User Manual
Page 21
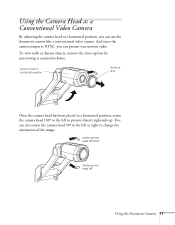
... to present objects right-side up lens by unscrewing it counterclockwise. rotate camera head 90°/180° rotate camera head 90° Using the Document Camera 17 camera head in a horizontal position, rotate the camera head 180° to the left or right to change the orientation ...of the image. Using the Camera Head as a Conventional Video Camera By adjusting the camera head to a horizontal...
... to present objects right-side up lens by unscrewing it counterclockwise. rotate camera head 90°/180° rotate camera head 90° Using the Document Camera 17 camera head in a horizontal position, rotate the camera head 180° to the left or right to change the orientation ...of the image. Using the Camera Head as a Conventional Video Camera By adjusting the camera head to a horizontal...