Product Information Guide
Page 2
... assignments for both connectors are identical. Related Documentation 4003816 EPSON ELP-3000 Data/Video Projector Owner's Manual PL-ELP3000 EPSON ELP-3000 Data/Video Projector Parts Price List TM-ELP3000 EPSON ELP-3000 Data/Video Projector Service Manual 7 IGreendigRal 9 Redanalog 16 Blue digital 17 Red digital cable ID 15 24 GND 3 25 VGA/no video cable ID pin 4 26 Monochrome digital 19 (Hercules) ELP-3000-2 4/95 VGA and Monitor connector pin assignments The...
... assignments for both connectors are identical. Related Documentation 4003816 EPSON ELP-3000 Data/Video Projector Owner's Manual PL-ELP3000 EPSON ELP-3000 Data/Video Projector Parts Price List TM-ELP3000 EPSON ELP-3000 Data/Video Projector Service Manual 7 IGreendigRal 9 Redanalog 16 Blue digital 17 Red digital cable ID 15 24 GND 3 25 VGA/no video cable ID pin 4 26 Monochrome digital 19 (Hercules) ELP-3000-2 4/95 VGA and Monitor connector pin assignments The...
Product Support Bulletin(s)
Page 6
... port. With the projector's Remote Control Unit. CONNECTlNG THE SERIAL CABLE A. B. Attach the 9 pin connector on the serial cable to control presentation software running on a computer. Serial cable. E P S O N PRODUCT SUPPORT BULLETIN Date: 10/25/1996 PSB No.: PSB.1996.10.003 Reference: ELP-3000, ELP-3300 USER GUIDE Originator: BS Authorization: jJ& Affected Product(s): ELP-3000 & ELP-3300 Subject: USING...
... port. With the projector's Remote Control Unit. CONNECTlNG THE SERIAL CABLE A. B. Attach the 9 pin connector on the serial cable to control presentation software running on a computer. Serial cable. E P S O N PRODUCT SUPPORT BULLETIN Date: 10/25/1996 PSB No.: PSB.1996.10.003 Reference: ELP-3000, ELP-3300 USER GUIDE Originator: BS Authorization: jJ& Affected Product(s): ELP-3000 & ELP-3300 Subject: USING...

Product Support Bulletin(s)
Page 9
...Remote Control Unit when a function key is pressed the Remote Control Unit could Remote communication problems. Try moving the remote closer to projector. Serial cable may be attache4 or connected properly. 3. Serial option is connected to any of the following: 1. The type of Lighting or ... the REMOTE PROGRAMMER Special menu does not match the actual port the serial cable is not selected in the computer. D. Projector may not be turned OFF. 2. "PROJECTOR OFF-LINE" message can occur due to on the projector. 4. B. E. F. IF YOU HAVE PROBLEMS A. The Serial Port on...
...Remote Control Unit when a function key is pressed the Remote Control Unit could Remote communication problems. Try moving the remote closer to projector. Serial cable may be attache4 or connected properly. 3. Serial option is connected to any of the following: 1. The type of Lighting or ... the REMOTE PROGRAMMER Special menu does not match the actual port the serial cable is not selected in the computer. D. Projector may not be turned OFF. 2. "PROJECTOR OFF-LINE" message can occur due to on the projector. 4. B. E. F. IF YOU HAVE PROBLEMS A. The Serial Port on...
Technical Brief (Multimedia Projectors)
Page 6
... the network EasyConfiguration : Set up EasyMP.net EasyTablet : Operate projector as well as a white board to one printer? LL L EPSON Sales Training EPSON and EPSON Stylus are registered trademarks of Seiko Epson Corporation. 3/01 Other trademarks are available on the EPSON PowerLite 8150i) allows presenters to give presentations without using a computer.... Use EasyMarker to draw lines and annotate slides in your computer or via a USB cable right to the card in the projector.) While the presentation is in multi format simple viewer EasyBoard : Electronic white board EasyMarker ...
... the network EasyConfiguration : Set up EasyMP.net EasyTablet : Operate projector as well as a white board to one printer? LL L EPSON Sales Training EPSON and EPSON Stylus are registered trademarks of Seiko Epson Corporation. 3/01 Other trademarks are available on the EPSON PowerLite 8150i) allows presenters to give presentations without using a computer.... Use EasyMarker to draw lines and annotate slides in your computer or via a USB cable right to the card in the projector.) While the presentation is in multi format simple viewer EasyBoard : Electronic white board EasyMarker ...

User Manual
Page 5
...to a Video Source 11 Connecting to an Audio Source 13 Connecting to an External Speaker or PA System 14 Setting Up Serial Communication 15 Connecting the serial cable 15 Installing the software 16 Connecting the Remote Control with the Lead Wire 17 2 Using the Projector 19 ...Turning the Equipment On and Off 20 Focusing and Positioning the Screen Image 21 Controlling the Projector 23 Adjusting the settings from ELP Link 26 Monitoring the Projector ...
...to a Video Source 11 Connecting to an Audio Source 13 Connecting to an External Speaker or PA System 14 Setting Up Serial Communication 15 Connecting the serial cable 15 Installing the software 16 Connecting the Remote Control with the Lead Wire 17 2 Using the Projector 19 ...Turning the Equipment On and Off 20 Focusing and Positioning the Screen Image 21 Controlling the Projector 23 Adjusting the settings from ELP Link 26 Monitoring the Projector ...

User Manual
Page 10
...the Most Out of the lamp. The kit includes an RS-232C serial cable and two software utilities: ELP Link and ELP Remote Programmer. l The ELP Remote Programmer allows you to make adjustments to the projector from your remote control, including the ability to drag or click windows and ... and five buttons on the remote control can be programmed to access the projector menus, are available on using ELP Link, see Chapter 4. This conserves electricity, cools the projector, and extends the life of Your Projector ix Serial Communication Kit The Serial Communication Kit allows your computer and...
...the Most Out of the lamp. The kit includes an RS-232C serial cable and two software utilities: ELP Link and ELP Remote Programmer. l The ELP Remote Programmer allows you to make adjustments to the projector from your remote control, including the ability to drag or click windows and ... and five buttons on the remote control can be programmed to access the projector menus, are available on using ELP Link, see Chapter 4. This conserves electricity, cools the projector, and extends the life of Your Projector ix Serial Communication Kit The Serial Communication Kit allows your computer and...
User Manual
Page 11
... X Introduction They allow you to view the projected image. l Remote control lead wire, which the projector sits behind the screen. Optional Accessories To enhance your ELP-3000 dealer or by calling EPSON Accessories at (800) 873-7766. Both a soft and hard case are available. To use the ...remote control when an object is blocking the path between the remote control and projector, such as during rear projection when the screen is between the remote control and the projector. l Carrying cases especially designed for the projector and its cables.
... X Introduction They allow you to view the projected image. l Remote control lead wire, which the projector sits behind the screen. Optional Accessories To enhance your ELP-3000 dealer or by calling EPSON Accessories at (800) 873-7766. Both a soft and hard case are available. To use the ...remote control when an object is blocking the path between the remote control and projector, such as during rear projection when the screen is between the remote control and the projector. l Carrying cases especially designed for the projector and its cables.

User Manual
Page 19
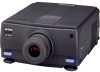
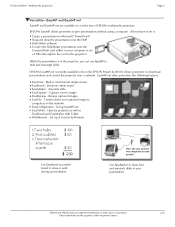
Unpacking the Projector After you unpack the projector, make sure you have all these components: l Projector l Remote control l 2 AA batteries l Power cord l Y-shaped VGA cable l 2 Macintosh adapters (labeled VGA and MONITOR) l Lens cover l Video/audio cable l RS-232C serial communication kit, which consists of these components. It should always be transported in the future. Save all of...
Unpacking the Projector After you unpack the projector, make sure you have all these components: l Projector l Remote control l 2 AA batteries l Power cord l Y-shaped VGA cable l 2 Macintosh adapters (labeled VGA and MONITOR) l Lens cover l Video/audio cable l RS-232C serial communication kit, which consists of these components. It should always be transported in the future. Save all of...

User Manual
Page 20
...is usually provided with your video device. l To connect the projector to -3.5mm audio cable. You can obtain one from your PC has a 25-pin RS-232C port, you need au S-Video cable. Unpacking the Projector 3 One is provided for ah new PowerBooks that have video-out capability. l For... a Macintosh PowerBook, you need an RCA-to external speakers, you need a second video/audio cable. l To receive an S-Video signal, you need a 25-pin ...
...is usually provided with your video device. l To connect the projector to -3.5mm audio cable. You can obtain one from your PC has a 25-pin RS-232C port, you need au S-Video cable. Unpacking the Projector 3 One is provided for ah new PowerBooks that have video-out capability. l For... a Macintosh PowerBook, you need an RCA-to external speakers, you need a second video/audio cable. l To receive an S-Video signal, you need a 25-pin ...

User Manual
Page 24
.... 3. Connecting to the MONITOR connector of the Y-cable. 2. To access the connectors on the projector, push open the coyer located on the back of the projector, under the handle. 1. Tighten the screws for all connectors to make sure they are fastened securely. Disconnect the computer's monitor cable from the VGA port on the right...
.... 3. Connecting to the MONITOR connector of the Y-cable. 2. To access the connectors on the projector, push open the coyer located on the back of the projector, under the handle. 1. Tighten the screws for all connectors to make sure they are fastened securely. Disconnect the computer's monitor cable from the VGA port on the right...

User Manual
Page 25
... the laptop's monitor port. 3. Connect the VGA connector on the Y-cable to the projector's Computer IN/OUT port. 2 . When the external graphics port is activated, some laptop computers automatically turn off their internal display See your computer manual for ...all connectors to make sure they are fastened securely. Connecting to a PC laptop computer Before beginning, turn off the projector and computer if they are on using the internal display, 8 1 l Installation Tighten the screws for information on . To access the connectors on the...
... the laptop's monitor port. 3. Connect the VGA connector on the Y-cable to the projector's Computer IN/OUT port. 2 . When the external graphics port is activated, some laptop computers automatically turn off their internal display See your computer manual for ...all connectors to make sure they are fastened securely. Connecting to a PC laptop computer Before beginning, turn off the projector and computer if they are on using the internal display, 8 1 l Installation Tighten the screws for information on . To access the connectors on the...

User Manual
Page 26
... VGA connector (1b). 2. Attach the Macintosh adapters provided with the projector to the appropriate connectors on the back of the projector, under the handle. 1. Connect the Y-cable's LCD connector to the Macintosh's monitor port. 4. Connect the VGA adapter (attached to the Y-cable) to the projector's Computer IN/OUT port. 5. Connecting to a Computer 9 To access the...
... VGA connector (1b). 2. Attach the Macintosh adapters provided with the projector to the appropriate connectors on the back of the projector, under the handle. 1. Connect the Y-cable's LCD connector to the Macintosh's monitor port. 4. Connect the VGA adapter (attached to the Y-cable) to the projector's Computer IN/OUT port. 5. Connecting to a Computer 9 To access the...

User Manual
Page 27
... handle. 1. In the PowerBook's Display Control Panel, select Mirroring. 10 1 l Installation Connect the Y-cable's LCD connector to a PowerBook Your PowerBook must have a video-out capability, See page 6 for all connectors to the video-out cable. 4. Before beginning, turn off the projector and computer if they are on the right side of the PowerBook. 2. Tighten the...
... handle. 1. In the PowerBook's Display Control Panel, select Mirroring. 10 1 l Installation Connect the Y-cable's LCD connector to a PowerBook Your PowerBook must have a video-out capability, See page 6 for all connectors to the video-out cable. 4. Before beginning, turn off the projector and computer if they are on the right side of the PowerBook. 2. Tighten the...
User Manual
Page 28
... have S-Video if your video source has a one type of cable you use the S-Video cable supplied with the projector. You have composite video if your video source has a four-pin video jack. Connecting to a Video Source 11 Connecting to a Video Source The projector can connect to the projector: 1. Turn off the projector and video source if they are on the video source. The projector supports NTSC...
... have S-Video if your video source has a one type of cable you use the S-Video cable supplied with the projector. You have composite video if your video source has a four-pin video jack. Connecting to a Video Source 11 Connecting to a Video Source The projector can connect to the projector: 1. Turn off the projector and video source if they are on the video source. The projector supports NTSC...

User Manual
Page 29
Insert the other yellow RCA plug to the video-out jack of the video/audio cable to the video-out jack of the S-Video cable into the projector's S-Video jack. For information about audio, see page 13.) For S-Video, insert one end of the video source. (The red and white plugs carry audio. Connect the other end to the projector's Video In jack. For composite video, connect the yellow RCA plug on one end of your video source. 12 1 l Installation
Insert the other yellow RCA plug to the video-out jack of the video/audio cable to the video-out jack of the S-Video cable into the projector's S-Video jack. For information about audio, see page 13.) For S-Video, insert one end of the video source. (The red and white plugs carry audio. Connect the other end to the projector's Video In jack. For composite video, connect the yellow RCA plug on one end of your video source. 12 1 l Installation

User Manual
Page 30
... that has only a single plug, connect it to an Audio Source The projector has two inputs for audio: one for your video source. To receive audio from your computer dealer. 1. Connect the other end of the audio cable to the audio source. Connect one for your computer and one end of... the cable to the appropriate (computer or video source) Audio In jacks on the projector. Insert the white plug in the L Audio Out jack, and the ...
... that has only a single plug, connect it to an Audio Source The projector has two inputs for audio: one for your video source. To receive audio from your computer dealer. 1. Connect the other end of the audio cable to the audio source. Connect one for your computer and one end of... the cable to the appropriate (computer or video source) Audio In jacks on the projector. Insert the white plug in the L Audio Out jack, and the ...

User Manual
Page 31
... obtain an RCAto-3.5mm Stereo audio cable. Connect the RCA plug to an External Speaker or PA System For most small-or medium-sized rooms, the projector's internal speakers are sufficient. To connect the projector to an external sound system, you need extra amplification for a large room, you...from your computer dealer. Connecting to the external amplified speaker or PA system. Connect the cable's 3.5mm stereo miniplug into the L side. You should now adjust the Fade menu setting. Insert the cable's red plug into the R side, and the white plug into the projector's Audio Out jack. 2.
... obtain an RCAto-3.5mm Stereo audio cable. Connect the RCA plug to an External Speaker or PA System For most small-or medium-sized rooms, the projector's internal speakers are sufficient. To connect the projector to an external sound system, you need extra amplification for a large room, you...from your computer dealer. Connecting to the external amplified speaker or PA system. Connect the cable's 3.5mm stereo miniplug into the L side. You should now adjust the Fade menu setting. Insert the cable's red plug into the R side, and the white plug into the projector's Audio Out jack. 2.

User Manual
Page 32
... remote control to your computer. Connect one end of a cable, a Macintosh adapter, and two software utilities: ELP Link and ELP Remote Programmer. For information on the ELP Remote Programmer, see Chapters 2 and 3. Connecting the serial cable To connect the serial RS-232C cable to control your computer and projector: 1. By default, the Serial setting in the next...
... remote control to your computer. Connect one end of a cable, a Macintosh adapter, and two software utilities: ELP Link and ELP Remote Programmer. For information on the ELP Remote Programmer, see Chapters 2 and 3. Connecting the serial cable To connect the serial RS-232C cable to control your computer and projector: 1. By default, the Serial setting in the next...
User Manual
Page 33
... icon and follow the onscreen instructions. It may be labeled Serial, RS-232C, COM1, or something similar. Each contains ELP Link and the ELP Remote Programmer, Before installing the software, exit any open programs. Insert the appropriate diskette in a diskette drive. Choose OK. If you have a 25-pin ... software Two diskettes are provided with the kit: one for the Macintosh and one for your platform. Connect the other end of the RS-232C cable to the PC's RS-232C serial connector or to the RS-232C adapter on your Macintosh. Then do the following icon: 3. In the Command ...
... icon and follow the onscreen instructions. It may be labeled Serial, RS-232C, COM1, or something similar. Each contains ELP Link and the ELP Remote Programmer, Before installing the software, exit any open programs. Insert the appropriate diskette in a diskette drive. Choose OK. If you have a 25-pin ... software Two diskettes are provided with the kit: one for the Macintosh and one for your platform. Connect the other end of the RS-232C cable to the PC's RS-232C serial connector or to the RS-232C adapter on your Macintosh. Then do the following icon: 3. In the Command ...
User Manual
Page 65
... the Key Record button or, if you want to program. 6. This makes the new button assignment active with the remote control. Note: In Windows, the ELP Remote Programmer assumes use the remote control and the new macros, be in record mode. Repeat steps 3 through 4 for each key you have connected the... RS-232C cable as Command + 0, while in record mode to choose keys from Mouse/Special Buttons.) On the PC, use COM2 port, choose COM2 in the File menu...
... the Key Record button or, if you want to program. 6. This makes the new button assignment active with the remote control. Note: In Windows, the ELP Remote Programmer assumes use the remote control and the new macros, be in record mode. Repeat steps 3 through 4 for each key you have connected the... RS-232C cable as Command + 0, while in record mode to choose keys from Mouse/Special Buttons.) On the PC, use COM2 port, choose COM2 in the File menu...


