User Manual
Page 3
Contents DS-560 User's Guide ...7 Scanner Basics...8 Scanner Parts Locations ...8 Scanner Parts...8 Scanner Buttons and Lights...10 Page Separation Lever...11 User Replaceable Epson Scanner Parts 12 Changing the Power Off and Sleep Timer Settings 13 Loading Originals...14 Loading Originals in the Input Tray...14 Loading Multiple Sizes of Originals in the Input Tray 17 Original Document Loading Capacity 20 Loading Plastic Cards in the Input Tray 21 Plastic Card Loading Capacity...25 Loading Special Documents...25 Large or Thick Original...
Contents DS-560 User's Guide ...7 Scanner Basics...8 Scanner Parts Locations ...8 Scanner Parts...8 Scanner Buttons and Lights...10 Page Separation Lever...11 User Replaceable Epson Scanner Parts 12 Changing the Power Off and Sleep Timer Settings 13 Loading Originals...14 Loading Originals in the Input Tray...14 Loading Multiple Sizes of Originals in the Input Tray 17 Original Document Loading Capacity 20 Loading Plastic Cards in the Input Tray 21 Plastic Card Loading Capacity...25 Loading Special Documents...25 Large or Thick Original...
User Manual
Page 4
...Network...80 Scanner Cannot Connect to Editable Text (OCR 54 Scanning Using OCR - Windows 54 Scanning Using OCR - OS X ...55 Scanning to a SharePoint Server or Cloud Service 57 Cleaning and Transporting Your Scanner 60 Cleaning Your Scanner ...60 Cleaning Inside Your Scanner...60 Checking the Scanner Roller Counter 63 Replacing the Scanner Rollers ...64 Resetting the Scanner Roller Counter 70 Transporting Your Scanner ...71 Solving Problems ...73 Scanner Light Status ...73 Solving Scanning Problems ...75 Scanner Does Not Turn On or Turns Off Unexpectedly 75 Scanner Button Does Not Work...
...Network...80 Scanner Cannot Connect to Editable Text (OCR 54 Scanning Using OCR - Windows 54 Scanning Using OCR - OS X ...55 Scanning to a SharePoint Server or Cloud Service 57 Cleaning and Transporting Your Scanner 60 Cleaning Your Scanner ...60 Cleaning Inside Your Scanner...60 Checking the Scanner Roller Counter 63 Replacing the Scanner Rollers ...64 Resetting the Scanner Roller Counter 70 Transporting Your Scanner ...71 Solving Problems ...73 Scanner Light Status ...73 Solving Scanning Problems ...75 Scanner Does Not Turn On or Turns Off Unexpectedly 75 Scanner Button Does Not Work...
User Manual
Page 5
... Image 84 Spots or Lines Appear in All Scanned Images 84 Scanned Image Edges are Cropped 85 When to Get Help...87 Technical Specifications ...89 Windows System Requirements ...89 Mac System Requirements ...89 General Specifications ...90 Dimension Specifications ...91 Network Interface Specifications ...91 Electrical Specifications ...91 Environmental Specifications ...92 USB Interface Specifications...93 Safety and Approvals Specifications 93 Notices ...94 Important Safety Instructions...94 Restrictions on Copying ...96 Default Delay Times for Power Management for Epson...
... Image 84 Spots or Lines Appear in All Scanned Images 84 Scanned Image Edges are Cropped 85 When to Get Help...87 Technical Specifications ...89 Windows System Requirements ...89 Mac System Requirements ...89 General Specifications ...90 Dimension Specifications ...91 Network Interface Specifications ...91 Electrical Specifications ...91 Environmental Specifications ...92 USB Interface Specifications...93 Safety and Approvals Specifications 93 Notices ...94 Important Safety Instructions...94 Restrictions on Copying ...96 Default Delay Times for Power Management for Epson...
User Manual
Page 12
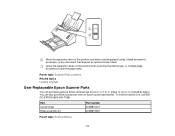
...). Part Carrier sheet Roller assembly kit Part number B12B813431 B12B813561 Parent topic: Scanner Basics 12 or multiple-page documents to this position when scanning standard single- Move the separation lever to prevent paper jams. Parent topic: Scanner Parts Locations Related topics Loading Originals User Replaceable Epson Scanner Parts You can also purchase accessories from an Epson authorized reseller. Leave the separation lever in this position only when scanning plastic cards, folded documents, envelopes, or any document...
...). Part Carrier sheet Roller assembly kit Part number B12B813431 B12B813561 Parent topic: Scanner Basics 12 or multiple-page documents to this position when scanning standard single- Move the separation lever to prevent paper jams. Parent topic: Scanner Parts Locations Related topics Loading Originals User Replaceable Epson Scanner Parts You can also purchase accessories from an Epson authorized reseller. Leave the separation lever in this position only when scanning plastic cards, folded documents, envelopes, or any document...
User Manual
Page 13
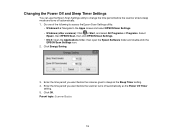
... Apps screen and select EPSON Scan Settings. • Windows (other versions): Click or Start, and select All Programs or Programs. Select Epson, then EPSON Scan, then click EPSON Scan Settings. • OS X: Open the Applications folder, then open the Epson Software folder and double-click the EPSON Scan Settings icon. 2. Click OK. Click Energy Saving. 3. Do one of the following to access the Epson Scan Settings utility: • Windows 8.x: Navigate to change the time period before the scanner enters sleep mode and turns off automatically...
... Apps screen and select EPSON Scan Settings. • Windows (other versions): Click or Start, and select All Programs or Programs. Select Epson, then EPSON Scan, then click EPSON Scan Settings. • OS X: Open the Applications folder, then open the Epson Software folder and double-click the EPSON Scan Settings icon. 2. Click OK. Click Energy Saving. 3. Do one of the following to access the Epson Scan Settings utility: • Windows 8.x: Navigate to change the time period before the scanner enters sleep mode and turns off automatically...

User Manual
Page 33
... these steps. 1. Set the connection mode on your scanner from the Select Scanner list. 3. Do one of the scanner so you will have to the Apps screen and select EPSON Scan Settings. • Windows (other versions): Click or Start > All Programs or Programs > EPSON > EPSON Scan > EPSON Scan Settings. • OS X: Open the Applications folder, click Epson Software, and click Epson Scan Settings. 2. Parent topic: Wi-Fi Infrastructure Mode Setup Related tasks Setting Up Network Scanning Setting Up Network Scanning After manually configuring your scanner to connect to Wi-Fi...
... these steps. 1. Set the connection mode on your scanner from the Select Scanner list. 3. Do one of the scanner so you will have to the Apps screen and select EPSON Scan Settings. • Windows (other versions): Click or Start > All Programs or Programs > EPSON > EPSON Scan > EPSON Scan Settings. • OS X: Open the Applications folder, click Epson Software, and click Epson Scan Settings. 2. Parent topic: Wi-Fi Infrastructure Mode Setup Related tasks Setting Up Network Scanning Setting Up Network Scanning After manually configuring your scanner to connect to Wi-Fi...

User Manual
Page 35
... Mode Setup Determining the Scanner's IP Address If you have multiple scanners on your network, you need to know the IP address of the following to start Epson Scan Settings: • Windows 8.x: Navigate to the Apps screen and select Epson Scan Settings. • Windows (other versions): Click or Start, and select All Programs or Programs. Select EPSON > EPSON Scan > EPSON Scan Settings. • OS X: Open the Applications folder, select EPSON Software, and click EPSON Scan Settings. 2. If your product is not already connected to 4 devices. 1 Epson scanner...
... Mode Setup Determining the Scanner's IP Address If you have multiple scanners on your network, you need to know the IP address of the following to start Epson Scan Settings: • Windows 8.x: Navigate to the Apps screen and select Epson Scan Settings. • Windows (other versions): Click or Start, and select All Programs or Programs. Select EPSON > EPSON Scan > EPSON Scan Settings. • OS X: Open the Applications folder, select EPSON Software, and click EPSON Scan Settings. 2. If your product is not already connected to 4 devices. 1 Epson scanner...

User Manual
Page 42
...scanned and saved to the scanner. 42 Make sure you installed the scanner software and connected the scanner to change the default scan settings when you scan using the start button. Note: Document Capture Pro and Document Capture do this using the Document Capture Pro (Windows) or Document Capture (OS X) program. 1. Press the start button. Note: If your scanner. 3. Scanning You can view or change the default scan settings when you scan using the start button. This automatically starts the scanning program you have specified. You do not support scanning from the scanner button...
...scanned and saved to the scanner. 42 Make sure you installed the scanner software and connected the scanner to change the default scan settings when you scan using the start button. Note: Document Capture Pro and Document Capture do this using the Document Capture Pro (Windows) or Document Capture (OS X) program. 1. Press the start button. Note: If your scanner. 3. Scanning You can view or change the default scan settings when you scan using the start button. This automatically starts the scanning program you have specified. You do not support scanning from the scanner button...

User Manual
Page 43
... the Apps screen and select Document Capture Pro. • Windows (other versions): Click or Start, and select All Programs or Programs. Select EPSON Software, then select Document Capture Pro. • OS X: Open the Applications folder, select the Epson Software folder, and select Document Capture. Enter a name for the new job, then select the settings you want to start button from a Scanner Button Scanning with Document Capture Pro (Windows) or Document Capture (OS X), the program automatically saves your scanned file on your computer in Document Capture Pro or Document Capture for...
... the Apps screen and select Document Capture Pro. • Windows (other versions): Click or Start, and select All Programs or Programs. Select EPSON Software, then select Document Capture Pro. • OS X: Open the Applications folder, select the Epson Software folder, and select Document Capture. Enter a name for the new job, then select the settings you want to start button from a Scanner Button Scanning with Document Capture Pro (Windows) or Document Capture (OS X), the program automatically saves your scanned file on your computer in Document Capture Pro or Document Capture for...
User Manual
Page 46
... documents into separate files by detecting blank pages or barcodes in your scanned images, click File Name Settings and select Apply job separation in the format and folder you specify. Click OK, Send, or Print to the Apps screen and select EPSON Scan under EPSON or EPSON Software. • Windows (other versions): Click or Start, and select All Programs or Programs. Select EPSON or EPSON Software and click EPSON Scan. • OS X: Open the Applications folder, open the Epson Software folder, and double...
... documents into separate files by detecting blank pages or barcodes in your scanned images, click File Name Settings and select Apply job separation in the format and folder you specify. Click OK, Send, or Print to the Apps screen and select EPSON Scan under EPSON or EPSON Software. • Windows (other versions): Click or Start, and select All Programs or Programs. Select EPSON or EPSON Software and click EPSON Scan. • OS X: Open the Applications folder, open the Epson Software folder, and double...
User Manual
Page 49
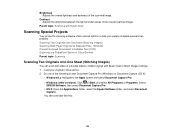
...): Click or Start, and select All Programs or Programs. Select EPSON Software, then select Document Capture Pro. • OS X: Open the Applications folder, select the Epson Software folder, and select Document Capture. Parent topic: Scanning with Epson Scan's Stitch Images settings. 1. Contrast Adjusts the difference between the light and dark areas of the scanned image. Scanning Two Originals onto One Sheet (Stitching Images) Scanning Multi-Page Originals as Separate Files - You see a window like this: 49 Windows Convert Scanned Documents to Editable Text (OCR) Scanning to...
...): Click or Start, and select All Programs or Programs. Select EPSON Software, then select Document Capture Pro. • OS X: Open the Applications folder, select the Epson Software folder, and select Document Capture. Parent topic: Scanning with Epson Scan's Stitch Images settings. 1. Contrast Adjusts the difference between the light and dark areas of the scanned image. Scanning Two Originals onto One Sheet (Stitching Images) Scanning Multi-Page Originals as Separate Files - You see a window like this: 49 Windows Convert Scanned Documents to Editable Text (OCR) Scanning to...
User Manual
Page 70
... on and connected to your computer. 2. Make sure the scanner is not installed correctly. Plug in the AC adapter and turn on the scanner. Click Maintenance. Reset the roller counter after replacing the rollers. Remove the roller and reinstall it, then try to the Apps screen and select EPSON Scan Settings. • Windows (other versions): Click or Start > All Programs or Programs > EPSON > EPSON Scan > EPSON Scan Settings. • OS X: Open the Applications folder, click Epson Software, and click Epson Scan Settings. 3. You see a screen like this...
... on and connected to your computer. 2. Make sure the scanner is not installed correctly. Plug in the AC adapter and turn on the scanner. Click Maintenance. Reset the roller counter after replacing the rollers. Remove the roller and reinstall it, then try to the Apps screen and select EPSON Scan Settings. • Windows (other versions): Click or Start > All Programs or Programs > EPSON > EPSON Scan > EPSON Scan Settings. • OS X: Open the Applications folder, click Epson Software, and click Epson Scan Settings. 3. You see a screen like this...
User Manual
Page 75
... Scanning Problems Check these solutions: • Make sure the AC adapter is installed correctly. Parent topic: Solving Scanning Problems Related tasks Changing the Power Off and Sleep Timer Settings Scanner Button Does Not Work as Expected Scanning Software Does Not Operate Correctly Cannot Start Epson Scan Original Feeds Incorrectly in Scanner Original Jams in the Windows security settings; Parent topic: Solving Scanning Problems Related tasks Assigning Start Button Settings or Scan Jobs 75 see Windows help for details. Scanner Does Not Turn On or Turns Off Unexpectedly Scanner...
... Scanning Problems Check these solutions: • Make sure the AC adapter is installed correctly. Parent topic: Solving Scanning Problems Related tasks Changing the Power Off and Sleep Timer Settings Scanner Button Does Not Work as Expected Scanning Software Does Not Operate Correctly Cannot Start Epson Scan Original Feeds Incorrectly in Scanner Original Jams in the Windows security settings; Parent topic: Solving Scanning Problems Related tasks Assigning Start Button Settings or Scan Jobs 75 see Windows help for details. Scanner Does Not Turn On or Turns Off Unexpectedly Scanner...
User Manual
Page 76
...; Check the connection setting and test the connection using a USB cable, make sure no other drivers are installed, uninstall them, then reinstall this scanner's software. Make sure the correct Connection setting is selected, then click the Test button. • Windows (other versions): Click or Start > All Programs or Programs > EPSON > EPSON Scan > EPSON Scan Settings. Scanning Software Does Not Operate Correctly If your scanning software does not operate correctly, try these solutions: • Make sure your scanner is turned on and any interface cables are securely connected...
...; Check the connection setting and test the connection using a USB cable, make sure no other drivers are installed, uninstall them, then reinstall this scanner's software. Make sure the correct Connection setting is selected, then click the Test button. • Windows (other versions): Click or Start > All Programs or Programs > EPSON > EPSON Scan > EPSON Scan Settings. Scanning Software Does Not Operate Correctly If your scanning software does not operate correctly, try these solutions: • Make sure your scanner is turned on and any interface cables are securely connected...
User Manual
Page 77
...Scan installed. Parent topic: Solving Scanning Problems Related tasks Cleaning Inside Your Scanner Related topics Loading Originals 77 If the error persists, deselect the Detect Double Feed setting. If you do not have problems feeding originals in the Epson Scan window or the Document Capture Pro window (Windows only), start Epson Scan, select Configuration, select the Detect Double Feed setting, and select Standard as the Paper Thickness setting. • OS X: Open the Applications folder, click Epson Software, and click EPSON Scan Settings. Make sure the correct Connection setting...
...Scan installed. Parent topic: Solving Scanning Problems Related tasks Cleaning Inside Your Scanner Related topics Loading Originals 77 If the error persists, deselect the Detect Double Feed setting. If you do not have problems feeding originals in the Epson Scan window or the Document Capture Pro window (Windows only), start Epson Scan, select Configuration, select the Detect Double Feed setting, and select Standard as the Paper Thickness setting. • OS X: Open the Applications folder, click Epson Software, and click EPSON Scan Settings. Make sure the correct Connection setting...
User Manual
Page 82
... All Scanned Images Scanned Image Edges are Blurry If characters in a scanned image appear blurry, adjust these sections if a scanned image on your computer screen has a quality problem. • If you connected your scanner to a Windows computer using Direct Wi-Fi and it automatically selected Access Point Mode, you selected the correct Image Type setting for your original and select the Text Enhancement setting in Epson Scan. Check the network connection or adapter settings in the Windows Control Panel and set...
... All Scanned Images Scanned Image Edges are Blurry If characters in a scanned image appear blurry, adjust these sections if a scanned image on your computer screen has a quality problem. • If you connected your scanner to a Windows computer using Direct Wi-Fi and it automatically selected Access Point Mode, you selected the correct Image Type setting for your original and select the Text Enhancement setting in Epson Scan. Check the network connection or adapter settings in the Windows Control Panel and set...

User Manual
Page 86
... Problems Uninstalling Scanner Software - Select the scanner software program and click Uninstall/Change. • Windows 7 or Windows Vista: Open the Windows Control Panel utility. Double-click Add or Remove Programs. Select the scanner software program and click Change/Remove. 86 Adjust the cropping area shown in Epson Scan. • Document Capture Pro (Windows): Select Detailed Settings from the Scan window. Click the Scan button. Parent topic: Solving Scanned Image Quality Problems Related tasks Scanning with Document Capture Pro and Document Capture Scanning with Epson Scan...
... Problems Uninstalling Scanner Software - Select the scanner software program and click Uninstall/Change. • Windows 7 or Windows Vista: Open the Windows Control Panel utility. Double-click Add or Remove Programs. Select the scanner software program and click Change/Remove. 86 Adjust the cropping area shown in Epson Scan. • Document Capture Pro (Windows): Select Detailed Settings from the Scan window. Click the Scan button. Parent topic: Solving Scanned Image Quality Problems Related tasks Scanning with Document Capture Pro and Document Capture Scanning with Epson Scan...
User Manual
Page 90
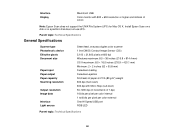
Parent topic: Technical Specifications General Specifications Scanner type Photoelectric device Effective pixels Document size Paper input Paper output Paper capacity Scanning resolution Output resolution Image data Interface Light source Sheet feed, one pass duplex color scanner 1 line CMOS Contact Image Sensor (CIS) 5,100 × 21,600 pixels at 600 dpi Windows maximum: 8.5 × 36 inches (215.9 × 914.4 mm) OS X maximum: 8.5 × 16.5 inches (215.9 × 420.1 mm) Minimum: 2 × 2 inches (52 ×...
Parent topic: Technical Specifications General Specifications Scanner type Photoelectric device Effective pixels Document size Paper input Paper output Paper capacity Scanning resolution Output resolution Image data Interface Light source Sheet feed, one pass duplex color scanner 1 line CMOS Contact Image Sensor (CIS) 5,100 × 21,600 pixels at 600 dpi Windows maximum: 8.5 × 36 inches (215.9 × 914.4 mm) OS X maximum: 8.5 × 16.5 inches (215.9 × 420.1 mm) Minimum: 2 × 2 inches (52 ×...
User Manual
Page 95
... orientation may damage both devices connected by the operating instructions.) • Unplug the scanner and the AC adapter before cleaning. If there are fuses in the plug, make sure you replace them with fuses of the product in the scanner's guides. • Do not insert objects into any opening as photocopiers or air control systems that are not going to use liquid or aerosol...
... orientation may damage both devices connected by the operating instructions.) • Unplug the scanner and the AC adapter before cleaning. If there are fuses in the plug, make sure you replace them with fuses of the product in the scanner's guides. • Do not insert objects into any opening as photocopiers or air control systems that are not going to use liquid or aerosol...
Notices and Warranty
Page 1
... interference in a particular installation. When warranty service involves the exchange of Product: Image scanner Model: J341B Marketing Name: DS-560 Epson America, Inc. This warranty does not cover damage to the Epson product caused by parts or supplies not manufactured, distributed or certified by disasters such as fire, flood, and lightning, improper electrical current, software problems, interaction with the standards. Epson is needed, Epson will not occur...
... interference in a particular installation. When warranty service involves the exchange of Product: Image scanner Model: J341B Marketing Name: DS-560 Epson America, Inc. This warranty does not cover damage to the Epson product caused by parts or supplies not manufactured, distributed or certified by disasters such as fire, flood, and lightning, improper electrical current, software problems, interaction with the standards. Epson is needed, Epson will not occur...


