Product Information Guide
Page 1
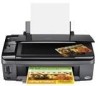
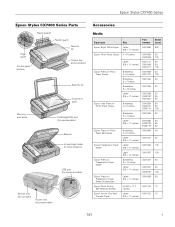
Epson Stylus CX7400 Series Epson Stylus CX7400 Series Parts Edge guide Control panel buttons Paper support Feeder guard Scanner lid Output tray and extensions Memory card slots Scanner lid Document table...) Accessories Media Paper type Epson Bright White Paper Epson Photo Paper Glossy Epson Premium Photo Paper Glossy Epson Ultra Premium Photo Paper Glossy Epson Premium Photo Paper Semi-gloss Epson Presentation Paper Matte Epson Premium Presentation Paper Matte Epson Premium Presentation Paper Matte Double-sided Epson Photo Quality Self-adhesive Sheets Epson Iron-on Cool Peel Transfer...
Epson Stylus CX7400 Series Epson Stylus CX7400 Series Parts Edge guide Control panel buttons Paper support Feeder guard Scanner lid Output tray and extensions Memory card slots Scanner lid Document table...) Accessories Media Paper type Epson Bright White Paper Epson Photo Paper Glossy Epson Premium Photo Paper Glossy Epson Ultra Premium Photo Paper Glossy Epson Premium Photo Paper Semi-gloss Epson Presentation Paper Matte Epson Premium Presentation Paper Matte Epson Premium Presentation Paper Matte Double-sided Epson Photo Quality Self-adhesive Sheets Epson Iron-on Cool Peel Transfer...
Product Information Guide
Page 2
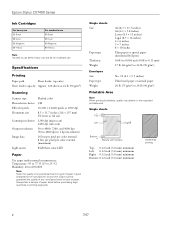
...178;) Printable Area Note: When printing borderless, quality may decline in 1 dpi increments) 16 bits per pixel per color internal 8 bits per pixel per color external (maximum) RGB three color LED Paper Use paper under normal circumstances: Temperature: 59 to 77 °F (15 to 25 °C) Humidity...) minimum Left: 0.12 inch (3.0 mm) minimum Right: 0.12 inch (3.0 mm) minimum Bottom: 0.12 inch (3.0 mm) minimum Borderless printing 2 7/07 Epson Stylus CX7400 Series Ink Cartridges For heavy use 69 Black 69 Cyan 69 Magenta 69 Yellow For moderate use 88 Black 88 Cyan 88 Magenta 88 Yellow Note...
...178;) Printable Area Note: When printing borderless, quality may decline in 1 dpi increments) 16 bits per pixel per color internal 8 bits per pixel per color external (maximum) RGB three color LED Paper Use paper under normal circumstances: Temperature: 59 to 77 °F (15 to 25 °C) Humidity...) minimum Left: 0.12 inch (3.0 mm) minimum Right: 0.12 inch (3.0 mm) minimum Bottom: 0.12 inch (3.0 mm) minimum Borderless printing 2 7/07 Epson Stylus CX7400 Series Ink Cartridges For heavy use 69 Black 69 Cyan 69 Magenta 69 Yellow For moderate use 88 Black 88 Cyan 88 Magenta 88 Yellow Note...
Product Information Guide
Page 3
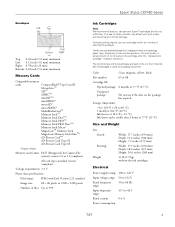
Epson Stylus CX7400 Series Envelopes Left Top Bottom Right Top: 0.20 inch (5.0 mm) minimum Left: 0.12 inch (3.0 mm) ... Ink freezes at 10.4 °F (-12 °C) Ink thaws and is used for Camera File system) version 1.0 or 2.0 compliant. Color Cyan, magenta, yellow, black Part number 69 or 88 Cartridge life Opened package: 6 months at 77 °F (25 °C) Size...to 120 V 90 to 132 V 50 to 60 Hz 49.5 to 9200 × 9200 pixels Number of use genuine Epson® cartridges and do not refill them. The printer ships with Exif Version 2.21 standard Image size: 80 × 80...
Epson Stylus CX7400 Series Envelopes Left Top Bottom Right Top: 0.20 inch (5.0 mm) minimum Left: 0.12 inch (3.0 mm) ... Ink freezes at 10.4 °F (-12 °C) Ink thaws and is used for Camera File system) version 1.0 or 2.0 compliant. Color Cyan, magenta, yellow, black Part number 69 or 88 Cartridge life Opened package: 6 months at 77 °F (25 °C) Size...to 120 V 90 to 132 V 50 to 60 Hz 49.5 to 9200 × 9200 pixels Number of use genuine Epson® cartridges and do not refill them. The printer ships with Exif Version 2.21 standard Image size: 80 × 80...
Product Information Guide
Page 4
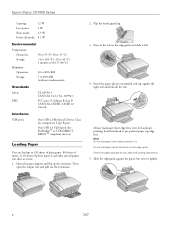
... out the extensions. 2. Flip the feeder guard up the extension. Note: Do not load paper with holes punched in the tab on the edge guide. Epson Stylus CX7400 Series Copying: 12 W Low power: 3 W Sleep mode: 2.5 W Power-off mode: 0.2 W Environmental Temperature Operation: Storage: Humidity Operation: Storage: 50 to 95 °F (10 to 35 °C) -4 to...
... out the extensions. 2. Flip the feeder guard up the extension. Note: Do not load paper with holes punched in the tab on the edge guide. Epson Stylus CX7400 Series Copying: 12 W Low power: 3 W Sleep mode: 2.5 W Power-off mode: 0.2 W Environmental Temperature Operation: Storage: Humidity Operation: Storage: 50 to 95 °F (10 to 35 °C) -4 to...
Product Information Guide
Page 5
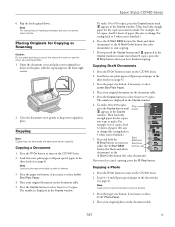
... surface. 1. The number is displayed in the Copies window. Load letter-size plain paper or Epson special paper in the Copies window. Place your on the CX7400 Series. 2. Press the P On button to make . Copying a Photo 1. Place your original document... to select 4"×6" Photo Paper. 4. Note: Load only the recommended number of sheets. 3. Epson Stylus CX7400 Series 6. Place your original photo on the CX7400 Series. 2. Then load only enough paper for color documents) to 9 copies. Press the Copies button to select from 1 to start copying. 7. ...
... surface. 1. The number is displayed in the Copies window. Load letter-size plain paper or Epson special paper in the Copies window. Place your on the CX7400 Series. 2. Press the P On button to make . Copying a Photo 1. Place your original document... to select 4"×6" Photo Paper. 4. Note: Load only the recommended number of sheets. 3. Epson Stylus CX7400 Series 6. Place your original photo on the CX7400 Series. 2. Then load only enough paper for color documents) to 9 copies. Press the Copies button to select from 1 to start copying. 7. ...
Product Information Guide
Page 6
Epson Stylus CX7400 Series 5. If you will only be turned off the CX7400 Series when the memory card access light is not connected to 1 when you have into the correct slot as shown below. 1. Printing an Index Sheet 1. Then ... the sheet and scanning the sheet. Insert a memory card in the Copies window. Press the x Start B&W button (for black-and-white photos) or the x Start Color button (for your photo to fit on the card. Print Photos From an Index Sheet You can select the photos you want to perform the...
Epson Stylus CX7400 Series 5. If you will only be turned off the CX7400 Series when the memory card access light is not connected to 1 when you have into the correct slot as shown below. 1. Printing an Index Sheet 1. Then ... the sheet and scanning the sheet. Insert a memory card in the Copies window. Press the x Start B&W button (for black-and-white photos) or the x Start Color button (for your photo to fit on the card. Print Photos From an Index Sheet You can select the photos you want to perform the...
Product Information Guide
Page 7
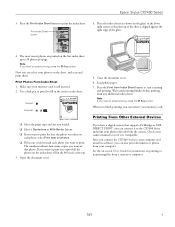
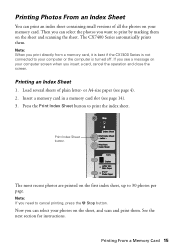
Epson Stylus CX7400 Series 3. The most recent photos are printed on the first index sheet, up to print the index sheet. Make sure your memory card is compatible. The ... to 30 photos per page. Print Photos From Index Sheet 1. When you finish printing, you need to the CX7400 Series and print your photos directly from your computer and install its software, you connect the CX7400 Series to see if it to cancel printing, press the y Stop button. Correct: Incorrect: ❏ Select the paper...
Epson Stylus CX7400 Series 3. The most recent photos are printed on the first index sheet, up to print the index sheet. Make sure your memory card is compatible. The ... to 30 photos per page. Print Photos From Index Sheet 1. When you finish printing, you need to the CX7400 Series and print your photos directly from your computer and install its software, you connect the CX7400 Series to see if it to cancel printing, press the y Stop button. Correct: Incorrect: ❏ Select the paper...
Product Information Guide
Page 8
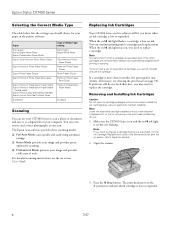
... or copying. If printouts still do not look their best, you may dry out. 1. Make sure the CX7400 Series is on and the red B ink light is low or expended. 8 7/07 Press the y Stop button. Epson Stylus CX7400 Series Selecting the Correct Media Type The table below lists the settings you should choose for your paper...
... or copying. If printouts still do not look their best, you may dry out. 1. Make sure the CX7400 Series is on and the red B ink light is low or expended. 8 7/07 Press the y Stop button. Epson Stylus CX7400 Series Selecting the Correct Media Type The table below lists the settings you should choose for your paper...
Product Information Guide
Page 9
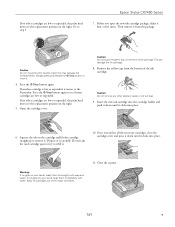
...close the cartridge cover and press it down until it clicks into your hands, wash them immediately with soap and water. this may damage the CX7400 Series. Always press and release the y Stop button to move the print head by hand; If ink gets into place. Close the scanner. ... are low or expended, the print head moves to step 5. Insert the new ink cartridge into place. 6. Dispose of the ink cartridge. Epson Stylus CX7400 Series 7. This can damage the ink cartridge. 8. Once you open the new ink cartridge package, shake it clicks into the cartridge holder and push...
...close the cartridge cover and press it down until it clicks into your hands, wash them immediately with soap and water. this may damage the CX7400 Series. Always press and release the y Stop button to move the print head by hand; If ink gets into place. Close the scanner. ... are low or expended, the print head moves to step 5. Insert the new ink cartridge into place. 6. Dispose of the ink cartridge. Epson Stylus CX7400 Series 7. This can damage the ink cartridge. 8. Once you open the new ink cartridge package, shake it clicks into the cartridge holder and push...
Product Information Guide
Page 10
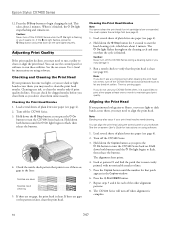
...light or dark bands across them, you press the P On button to clean or align the print head. Turn off the CX7400 Series. 3. Caution: Never turn off the CX7400 Series while the P On light is complete. 10 7/07 Checking and Cleaning the Print Head If your printouts look grainy or ...the print head nozzles. Cleaning uses ink, so clean the nozzles only if print quality declines. If there are clean Nozzles need cleaning. Epson Stylus CX7400 Series 12. Check the nozzle check pattern that the print head is low or expended. Run a nozzle check to verify that prints to ...
...light or dark bands across them, you press the P On button to clean or align the print head. Turn off the CX7400 Series. 3. Caution: Never turn off the CX7400 Series while the P On light is complete. 10 7/07 Checking and Cleaning the Print Head If your printouts look grainy or ...the print head nozzles. Cleaning uses ink, so clean the nozzles only if print quality declines. If there are clean Nozzles need cleaning. Epson Stylus CX7400 Series 12. Check the nozzle check pattern that the print head is low or expended. Run a nozzle check to verify that prints to ...
Product Information Guide
Page 11
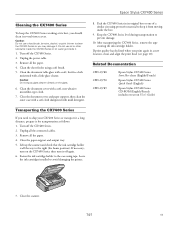
... mild detergent. 8. Clean the sheet feeder using tape. Related Documentation CPD-23788 CPD-23790 CPD-23789 Epson Stylus CX7400 Series Start Here sheet (English/French) Epson Stylus CX7400 Series Quick Guide (English) Epson Stylus CX7400 Series CD-ROM (English/French includes on the glass. 6. Epson Stylus CX7400 Series Cleaning the CX7400 Series To keep it off again. 6. Unplug the power cable. 3. Caution: Do not use oil or other...
... mild detergent. 8. Clean the sheet feeder using tape. Related Documentation CPD-23788 CPD-23790 CPD-23789 Epson Stylus CX7400 Series Start Here sheet (English/French) Epson Stylus CX7400 Series Quick Guide (English) Epson Stylus CX7400 Series CD-ROM (English/French includes on the glass. 6. Epson Stylus CX7400 Series Cleaning the CX7400 Series To keep it off again. 6. Unplug the power cable. 3. Caution: Do not use oil or other...
Quick Reference Guide
Page 1
Epson Stylus® CX7400 Series Quick Guide Basic Copying, Printing, and Scanning Maintaining Your All-in-One Solving Problems
Epson Stylus® CX7400 Series Quick Guide Basic Copying, Printing, and Scanning Maintaining Your All-in-One Solving Problems

Quick Reference Guide
Page 3
Caution: Cautions must be observed to avoid damage to avoid bodily injury. Of course, your CX7400 Series can do a lot more when you how to do most of a document or photo ■ Print from a memory card or digital camera ■ ... document or photo and restore or correct the color, if necessary ■ Perform routine maintenance ■ Solve simple problems This book tells you connect it on your computer! Introduction After you have set up your Epson Stylus® CX7400 Series all-in-one as you read your CX7400 Series instructions: Warning: Warnings must be followed carefully...
Caution: Cautions must be observed to avoid damage to avoid bodily injury. Of course, your CX7400 Series can do a lot more when you how to do most of a document or photo ■ Print from a memory card or digital camera ■ ... document or photo and restore or correct the color, if necessary ■ Perform routine maintenance ■ Solve simple problems This book tells you connect it on your computer! Introduction After you have set up your Epson Stylus® CX7400 Series all-in-one as you read your CX7400 Series instructions: Warning: Warnings must be followed carefully...
Quick Reference Guide
Page 10
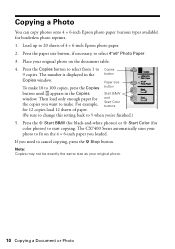
Paper size To make . The CX7400 Series automatically sizes your photo to fit on the document table. 4. Note...original photo. 10 Copying a Document or Photo Copying a Photo You can copy photos onto 4 × 6-inch Epson photo paper (various types available) for the copies you want to make 10 to 100 copies, press the Copies button... photo reprints. 1. Press the x Start B&W (for black-and-white photos) or x Start Color (for 12 copies load 12 sheets of 4 × 6-inch Epson photo paper. 2. Load up to 20 sheets of paper. Press the paper size button, if necessary...
Paper size To make . The CX7400 Series automatically sizes your photo to fit on the document table. 4. Note...original photo. 10 Copying a Document or Photo Copying a Photo You can copy photos onto 4 × 6-inch Epson photo paper (various types available) for the copies you want to make 10 to 100 copies, press the Copies button... photo reprints. 1. Press the x Start B&W (for black-and-white photos) or x Start Color (for 12 copies load 12 sheets of 4 × 6-inch Epson photo paper. 2. Load up to 20 sheets of paper. Press the paper size button, if necessary...
Quick Reference Guide
Page 12
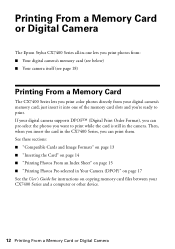
... a computer or other device. 12 Printing From a Memory Card or Digital Camera Printing From a Memory Card or Digital Camera The Epson Stylus CX7400 Series all-in-one of the memory card slots and you print color photos directly from : ■ Your digital camera's memory card (see below) ■ Your camera itself (see page 18) Printing...
... a computer or other device. 12 Printing From a Memory Card or Digital Camera Printing From a Memory Card or Digital Camera The Epson Stylus CX7400 Series all-in-one of the memory card slots and you print color photos directly from : ■ Your digital camera's memory card (see below) ■ Your camera itself (see page 18) Printing...
Quick Reference Guide
Page 13
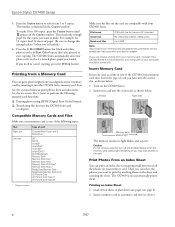
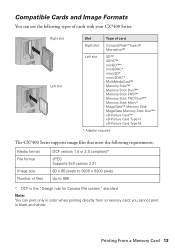
Compatible Cards and Image Formats You can use the following types of cards with your CX7400 Series: Right slot Left slot Slot Type of card Right slot CompactFlash® Type I/II Microdrive&#...Memory Stick Duo™* xD-Picture Card™ xD-Picture Card Type H xD-Picture Card Type M * Adapter required The CX7400 Series supports image files that meet the following requirements: Media format File format Image size Number of files DCF version 1.0 or 2.0 ... only in black and white. Printing From a Memory Card 13 you cannot print in color when printing directly from a memory card;
Compatible Cards and Image Formats You can use the following types of cards with your CX7400 Series: Right slot Left slot Slot Type of card Right slot CompactFlash® Type I/II Microdrive&#...Memory Stick Duo™* xD-Picture Card™ xD-Picture Card Type H xD-Picture Card Type M * Adapter required The CX7400 Series supports image files that meet the following requirements: Media format File format Image size Number of files DCF version 1.0 or 2.0 ... only in black and white. Printing From a Memory Card 13 you cannot print in color when printing directly from a memory card;
Quick Reference Guide
Page 14
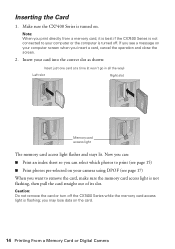
... the screen. 2. Note: When you want to your computer or the computer is turned off the CX7400 Series while the memory card access light is flashing; Insert your computer screen when you may lose data on...you see page 17) When you print directly from a memory card, it is best if the CX7400 Series is not connected to remove the card, make sure the memory card access light is turned on ... slot Memory card access light The memory card access light flashes and stays lit. Make sure the CX7400 Series is not flashing, then pull the card straight out of its slot. Now you can: ■...
... the screen. 2. Note: When you want to your computer or the computer is turned off the CX7400 Series while the memory card access light is flashing; Insert your computer screen when you may lose data on...you see page 17) When you print directly from a memory card, it is best if the CX7400 Series is not connected to remove the card, make sure the memory card access light is turned on ... slot Memory card access light The memory card access light flashes and stays lit. Make sure the CX7400 Series is not flashing, then pull the card straight out of its slot. Now you can: ■...
Quick Reference Guide
Page 15
...close the screen. Insert a memory card in a memory card slot (see a message on your computer screen when you need to print the index sheet. The CX7400 Series automatically prints them on the sheet and scanning the sheet. Load several sheets of all the photos on your memory card. Print Index Sheet button... connected to 30 photos per page. Note: When you see page 14). 3. If you print directly from a memory card, it is best if the CX7400 Series is turned off. Printing Photos From an Index Sheet You can select your photos on the sheet, and scan and print them. Then you can...
...close the screen. Insert a memory card in a memory card slot (see a message on your computer screen when you need to print the index sheet. The CX7400 Series automatically prints them on the sheet and scanning the sheet. Load several sheets of all the photos on your memory card. Print Index Sheet button... connected to 30 photos per page. Note: When you see page 14). 3. If you print directly from a memory card, it is best if the CX7400 Series is turned off. Printing Photos From an Index Sheet You can select your photos on the sheet, and scan and print them. Then you can...
Quick Reference Guide
Page 17
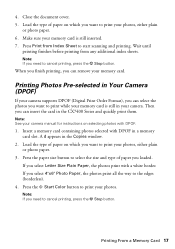
... border. Press the paper size button to start scanning and printing. Press Print from any additional index sheets. A d appears in the CX7400 Series and quickly print them. Then you loaded. Printing Photos Pre-selected in Your Camera (DPOF) If your camera supports DPOF (Digital Print Order... you can insert the card in the Copies window. 2. Insert a memory card containing photos selected with DPOF. 1. Press the x Start Color button to print your camera manual for instructions on which you need to print while your photos, either plain or photo paper. 3. Close ...
... border. Press the paper size button to start scanning and printing. Press Print from any additional index sheets. A d appears in the CX7400 Series and quickly print them. Then you loaded. Printing Photos Pre-selected in Your Camera (DPOF) If your camera supports DPOF (Digital Print Order... you can insert the card in the Copies window. 2. Insert a memory card containing photos selected with DPOF. 1. Press the x Start Color button to print your camera manual for instructions on which you need to print while your photos, either plain or photo paper. 3. Close ...

Quick Reference Guide
Page 18
... photos must be supported, depending on your camera. 7. Note: Epson cannot guarantee the compatibility of paper type, size, and layout may not be JPEG format and sized from the camera. Turn on your camera and the CX7400 Series settings. 1. Printing From a Digital Camera If you have a...instructions that supports PictBridge™ or USB DIRECTPRINT™ printing, you want to print your photos (see if it to the CX7400 Series and print your CX7400 Series is compatible. Check your camera manual to select your camera to see page 4). 5. Press the paper size button to the ...
... photos must be supported, depending on your camera. 7. Note: Epson cannot guarantee the compatibility of paper type, size, and layout may not be JPEG format and sized from the camera. Turn on your camera and the CX7400 Series settings. 1. Printing From a Digital Camera If you have a...instructions that supports PictBridge™ or USB DIRECTPRINT™ printing, you want to print your photos (see if it to the CX7400 Series and print your CX7400 Series is compatible. Check your camera manual to select your camera to see page 4). 5. Press the paper size button to the ...


