
User Guide
Page 13
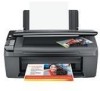
...mm away. 5. See also: Place Documents Print From Your Computer After you connect the Epson Stylus CX5600 Series to your computer and install its software, you installed your software and connected the Epson Stylus CX5600 Series to your computer; Move the photo away from your photos in place. see ...the Start Here sheet for your computer type: Windows Printing Macintosh Printing Before you print, make sure you can ...
...mm away. 5. See also: Place Documents Print From Your Computer After you connect the Epson Stylus CX5600 Series to your computer and install its software, you installed your software and connected the Epson Stylus CX5600 Series to your computer; Move the photo away from your photos in place. see ...the Start Here sheet for your computer type: Windows Printing Macintosh Printing Before you print, make sure you can ...

User Guide
Page 14
For photos, it's easiest to access your Epson Stylus CX5600 Series using the Windows Photo Gallery on Windows Vista™or the Picture and Fax Viewer on your print settings: 1. Follow the steps in these sections to print from your Windows computer: Print From a Program Print From Windows Photo Gallery in Windows Vista Print From the Picture and Fax...
For photos, it's easiest to access your Epson Stylus CX5600 Series using the Windows Photo Gallery on Windows Vista™or the Picture and Fax Viewer on your print settings: 1. Follow the steps in these sections to print from your Windows computer: Print From a Program Print From Windows Photo Gallery in Windows Vista Print From the Picture and Fax...

User Guide
Page 15
Right-click the photo, highlight Open With, and select Windows Photo Gallery. 15 Note: If you can quickly print photos using the Windows Photo Gallery. 1. Locate a photo on the next screen. Your printer setting window opens: Follow the steps in these sections to select settings, print, and ...Your Document or Photo Check Printing Status See also: Print From Windows Photo Gallery in Windows Vista Print From the Picture and Fax Viewer in XP Change Default Print Settings Print From Windows Photo Gallery in Windows Vista With Windows Vista, you don't have these buttons, click Setup, Printer, ...
Right-click the photo, highlight Open With, and select Windows Photo Gallery. 15 Note: If you can quickly print photos using the Windows Photo Gallery. 1. Locate a photo on the next screen. Your printer setting window opens: Follow the steps in these sections to select settings, print, and ...Your Document or Photo Check Printing Status See also: Print From Windows Photo Gallery in Windows Vista Print From the Picture and Fax Viewer in XP Change Default Print Settings Print From Windows Photo Gallery in Windows Vista With Windows Vista, you don't have these buttons, click Setup, Printer, ...

User Guide
Page 17
When you can check the print status. See also: 17 Your printer setting window opens: 8. Click OK. 10. Click Options in . (20.3 × 25.4 cm) Envelope #10 (4 1/8 × 9 1/2 inches [10.5 × 24.1 mm]) 5. Your photo prints. Select Printer Properties. ... Photo or Best Photo as necessary. 9. Select your basic print options, layout, and advanced options as the Quality setting. 6. During printing, you return to the Windows Photo Gallery, click Print.
When you can check the print status. See also: 17 Your printer setting window opens: 8. Click OK. 10. Click Options in . (20.3 × 25.4 cm) Envelope #10 (4 1/8 × 9 1/2 inches [10.5 × 24.1 mm]) 5. Your photo prints. Select Printer Properties. ... Photo or Best Photo as necessary. 9. Select your basic print options, layout, and advanced options as the Quality setting. 6. During printing, you return to the Windows Photo Gallery, click Print.

User Guide
Page 18
Right-click the photo, highlight Open With, and select Windows Picture and Fax Viewer. 3. Locate a photo on your computer. 2. Select the photos you can quickly print photos using the Picture and Fax Viewer. 1. Print From a Program Change Default Print Settings Print From the Picture and Fax Viewer in XP With Windows XP, you want to print and click Next. 18 Click the Print icon at the bottom of the screen. 4. Click Next. 5.
Right-click the photo, highlight Open With, and select Windows Picture and Fax Viewer. 3. Locate a photo on your computer. 2. Select the photos you can quickly print photos using the Picture and Fax Viewer. 1. Print From a Program Change Default Print Settings Print From the Picture and Fax Viewer in XP With Windows XP, you want to print and click Next. 18 Click the Print icon at the bottom of the screen. 4. Click Next. 5.

User Guide
Page 19
Your printer setting window opens: 7. Select your basic print options, layout, and advanced options as necessary. 8. 6. When you're ready to print, click OK. 9. Click Next. You see this screen: 19 Select EPSON Stylus CX5600 Series and click Printing Preferences.
Your printer setting window opens: 7. Select your basic print options, layout, and advanced options as necessary. 8. 6. When you're ready to print, click OK. 9. Click Next. You see this screen: 19 Select EPSON Stylus CX5600 Series and click Printing Preferences.

User Guide
Page 20
Your photo prints. During printing, you want. 20 See also: Print From a Program Change Default Print Settings Select Basic Options Click the Main tab on the top of the printer settings window to select your document or photo, and the print quality you can check the print status. Select Full page photo print and click Next. Select a Quality Option that matches your basic print options. 1. 10.
Your photo prints. During printing, you want. 20 See also: Print From a Program Change Default Print Settings Select Basic Options Click the Main tab on the top of the printer settings window to select your document or photo, and the print quality you can check the print status. Select Full page photo print and click Next. Select a Quality Option that matches your basic print options. 1. 10.

User Guide
Page 24
...;: for the best print quality (and slowest print speed) 3. Advanced Print Quality Settings Available print quality settings depend on the top of the printer settings window to select Advanced options. 1. Select the paper type setting that matches the paper you loaded. 2. Click the Advanced tab on the selected paper Type or...
...;: for the best print quality (and slowest print speed) 3. Advanced Print Quality Settings Available print quality settings depend on the top of the printer settings window to select Advanced options. 1. Select the paper type setting that matches the paper you loaded. 2. Click the Advanced tab on the selected paper Type or...
User Guide
Page 26
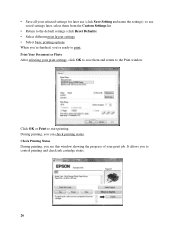
...later use saved settings later, select them and return to control printing and check ink cartridge status. 26 During printing, you to the Print window. It allows you can check printing status. Click OK or Print to use (click Save Setting and name the settings); Check Printing Status ...During printing, you see this window showing the progress of your print settings, click OK to save them from the Custom Settings list • Return to the default settings (...
...later use saved settings later, select them and return to control printing and check ink cartridge status. 26 During printing, you to the Print window. It allows you can check printing status. Click OK or Print to use (click Save Setting and name the settings); Check Printing Status ...During printing, you see this window showing the progress of your print settings, click OK to save them from the Custom Settings list • Return to the default settings (...

User Guide
Page 27
... icon in these sections to print from within a program as defaults in all your Windows programs. You can print on your Windows programs, you see an error during printing, see the printer settings window: 3. Follow the steps in the bottom right corner of your Macintosh: Open Your... File for solutions. If you can change the default settings from within a program, the changes apply only while you want to select different settings to use in all your Epson Stylus CX5600 Series ...
... icon in these sections to print from within a program as defaults in all your Windows programs. You can print on your Windows programs, you see an error during printing, see the printer settings window: 3. Follow the steps in the bottom right corner of your Macintosh: Open Your... File for solutions. If you can change the default settings from within a program, the changes apply only while you want to select different settings to use in all your Epson Stylus CX5600 Series ...

User Guide
Page 28
Select Stylus CX5600 as described on the screen. Select Advanced Print Options Change Print Layout Select Copy/Collation Options Manage Color Adjust Borderless Margins View Print Setting Summary Schedule Printing Print Your Document or Photo Check Printing Status See also: Windows Printing Open Your File for setting. 3. Open the... it • Double-clicking the document or photo file icon on the Start Here sheet. Select Page Options Open the Page Setup window to select your printer to print, select the page options and print options, and then print. You can open a file for the...
Select Stylus CX5600 as described on the screen. Select Advanced Print Options Change Print Layout Select Copy/Collation Options Manage Color Adjust Borderless Margins View Print Setting Summary Schedule Printing Print Your Document or Photo Check Printing Status See also: Windows Printing Open Your File for setting. 3. Open the... it • Double-clicking the document or photo file icon on the Start Here sheet. Select Page Options Open the Page Setup window to select your printer to print, select the page options and print options, and then print. You can open a file for the...

User Guide
Page 29
....2 cm) 5 × 7 in. (12.7 × 17.8 cm) 8 × 10 in the printer software. Select Basic Print Options After selecting your page options, open the Print window to select your document or photo. 5. Paper size settings You can create a custom size. Note: For borderless photos, make sure you loaded a compatible borderless paper... photo, select the paper size with a Sheet Feeder - Borderless option. Open the File menu and select Print. If you want to close the Page Setup window.
....2 cm) 5 × 7 in. (12.7 × 17.8 cm) 8 × 10 in the printer software. Select Basic Print Options After selecting your page options, open the Print window to select your document or photo. 5. Paper size settings You can create a custom size. Note: For borderless photos, make sure you loaded a compatible borderless paper... photo, select the paper size with a Sheet Feeder - Borderless option. Open the File menu and select Print. If you want to close the Page Setup window.

User Guide
Page 30
... also: • Select advanced printing options • Select different print layout settings • Select copy and collation options • Select color management options • Adjust the amount of image expansion when printing borderless photos • See a summary of your settings • Schedule...the pop-up menu. 6. Select Advanced Print Options After selecting the basic options on the Print window, you loaded. 5. 2. Select Automatic as the Printer setting. 3. Select Stylus CX5600 as the Mode setting for another time When you're finished, you're ready to select higher...
... also: • Select advanced printing options • Select different print layout settings • Select copy and collation options • Select color management options • Adjust the amount of image expansion when printing borderless photos • See a summary of your settings • Schedule...the pop-up menu. 6. Select Advanced Print Options After selecting the basic options on the Print window, you loaded. 5. 2. Select Automatic as the Printer setting. 3. Select Stylus CX5600 as the Mode setting for another time When you're finished, you're ready to select higher...

User Guide
Page 31
...'re finished, you're ready to speed up menu. 31 To flip the image you're printing, click Mirror Image. (If you are printing on Epson Iron-On Cool Peel Transfer Paper, turn on the selected paper Type or Media Type setting. • Economy: for fast printing with reduced quality •... speed • Best Photo: for photos or graphics with high print quality • Photo RPM: for your document or photo. Select Layout from the Print window. 1. Select the Print Quality setting for the best print quality (and slowest print speed) 3.
...'re finished, you're ready to speed up menu. 31 To flip the image you're printing, click Mirror Image. (If you are printing on Epson Iron-On Cool Peel Transfer Paper, turn on the selected paper Type or Media Type setting. • Economy: for fast printing with reduced quality •... speed • Best Photo: for photos or graphics with high print quality • Photo RPM: for your document or photo. Select Layout from the Print window. 1. Select the Print Quality setting for the best print quality (and slowest print speed) 3.

User Guide
Page 32
... line settings in which pages to print. Select Copies & Pages from the Print window. 1. To collate the multiple copies into sets of copies to reload the printed pages as the Layout Direction setting. When you print, the Epson Stylus CX5600 Series will prompt you 're ready to print from the pop-up menu. 2. Select...
... line settings in which pages to print. Select Copies & Pages from the Print window. 1. To collate the multiple copies into sets of copies to reload the printed pages as the Layout Direction setting. When you print, the Epson Stylus CX5600 Series will prompt you 're ready to print from the pop-up menu. 2. Select...

User Guide
Page 33
... ColorSync from the pop-up menu. 33 Select Expansion from the Print window. 1. Gamma adjusts the midtone density in the next step. • Off (No Color Adjustment) turns off printer software color adjustments so you 're ready to print only certain pages in your ...EPSON Vivid or AdobeRGB. When you're finished, you can adjust the amount of printing colors for your photos by selecting Color Management and ColorSync options from the pop-up menu. 2. If you select a color Mode that selects the main method of image expansion when printing borderless photos from the Print window...
... ColorSync from the pop-up menu. 33 Select Expansion from the Print window. 1. Gamma adjusts the midtone density in the next step. • Off (No Color Adjustment) turns off printer software color adjustments so you 're ready to print only certain pages in your ...EPSON Vivid or AdobeRGB. When you're finished, you can adjust the amount of printing colors for your photos by selecting Color Management and ColorSync options from the pop-up menu. 2. If you select a color Mode that selects the main method of image expansion when printing borderless photos from the Print window...

User Guide
Page 34
... Sheet Feeder Borderless on your settings, select Summary from the pop-up menu. View Print Setting Summary To see white borders on the Page Setup window. 2. To adjust the borderless expansion, select Min, Mid, or Max in the pop-up menu.
... Sheet Feeder Borderless on your settings, select Summary from the pop-up menu. View Print Setting Summary To see white borders on the Page Setup window. 2. To adjust the borderless expansion, select Min, Mid, or Max in the pop-up menu.
User Guide
Page 36
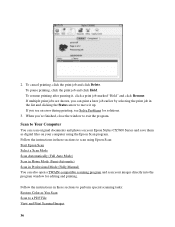
...To pause printing, click the print job and click Hold. If you 're finished, close the window to perform special scanning tasks: Restore Color as digital files on your computer using the Epson Scan program. Follow the instructions in Professional Mode (Fully Manual) You can also open a TWAIN-...-Automatic) Scan in these sections to exit the program. If multiple print jobs are shown, you can scan original documents and photos on your Epson Stylus CX5600 Series and save them as You Scan Scan to move it , click a print job marked "Hold" and click Resume. To cancel printing...
...To pause printing, click the print job and click Hold. If you 're finished, close the window to perform special scanning tasks: Restore Color as digital files on your computer using the Epson Scan program. Follow the instructions in Professional Mode (Fully Manual) You can also open a TWAIN-...-Automatic) Scan in these sections to exit the program. If multiple print jobs are shown, you can scan original documents and photos on your Epson Stylus CX5600 Series and save them as You Scan Scan to move it , click a print job marked "Hold" and click Resume. To cancel printing...

User Guide
Page 37
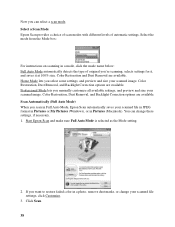
...scanning option. (See your scanning program help for your Epson Stylus CX5600 Series; Start Epson Scan Before you start Epson Scan, place your original on your desktop, if it is available. Select your Windows desktop. Note: With Windows Vista or XP, do not choose a WIA option ...,™ open the Applications folder, select your program folder, and click the program icon. Windows: Double-click the EPSON Scan icon on your Epson Stylus CX5600 Series. Now you must select the Epson Stylus CX5600 Series as the "source" first. Note: In some programs, you can select a scan...
...scanning option. (See your scanning program help for your Epson Stylus CX5600 Series; Start Epson Scan Before you start Epson Scan, place your original on your desktop, if it is available. Select your Windows desktop. Note: With Windows Vista or XP, do not choose a WIA option ...,™ open the Applications folder, select your program folder, and click the program icon. Windows: Double-click the EPSON Scan icon on your Epson Stylus CX5600 Series. Now you must select the Epson Stylus CX5600 Series as the "source" first. Note: In some programs, you can select a scan...
User Guide
Page 38
... saves your scanned file settings, click Customize. 3. Color Restoration, Dust Removal, and Backlight Correction options are available. Select a Scan Mode Epson Scan provides a choice of scan modes with different levels of original you can change your scanned file in JPEG format in Pictures or My Pictures (Windows), or in a mode, click the mode...
... saves your scanned file settings, click Customize. 3. Color Restoration, Dust Removal, and Backlight Correction options are available. Select a Scan Mode Epson Scan provides a choice of scan modes with different levels of original you can change your scanned file in JPEG format in Pictures or My Pictures (Windows), or in a mode, click the mode...


