Setup Guide
Page 4
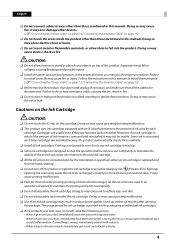
... them properly. (U "Connecting the Power Cable" on page 12, "Connecting the Interface Cable" on the cartridge. Use it and consult with water. Doing so may cause printing malfunction. ❏ Even for print head cleaning. ❏ Do not turn off the product or open the ink cartridge cover while charging ink ( (Power) LED is missing. ❏ Since ink cartridges are used by each time cartridges are removed and reinstalled. If something is consumed each cartridge. Cartridges are usable...
... them properly. (U "Connecting the Power Cable" on page 12, "Connecting the Interface Cable" on the cartridge. Use it and consult with water. Doing so may cause printing malfunction. ❏ Even for print head cleaning. ❏ Do not turn off the product or open the ink cartridge cover while charging ink ( (Power) LED is missing. ❏ Since ink cartridges are used by each time cartridges are removed and reinstalled. If something is consumed each cartridge. Cartridges are usable...
Setup Guide
Page 7
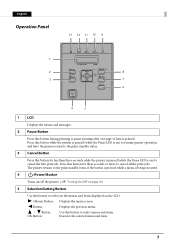
... the print jobs. Button: Displays the previous menu. The printer returns to the print standby status if the button is pressed while a menu is on) to cancel the first print job. Button: OK Button: Use this button while the printer is paused (while the Pause LED is printed. English Operation Panel 1 2 3 13 12 11 10 9 Status Pause Paper Ink K CM Y M/B Pause Back Feed 8 Menu Cancel OK Feed 7 Cut 6 4 5 1 LCD Displays the menus and messages. 2 Pause Button Press this button during printing...
... the print jobs. Button: Displays the previous menu. The printer returns to the print standby status if the button is pressed while a menu is on) to cancel the first print job. Button: OK Button: Use this button while the printer is paused (while the Pause LED is printed. English Operation Panel 1 2 3 13 12 11 10 9 Status Pause Paper Ink K CM Y M/B Pause Back Feed 8 Menu Cancel OK Feed 7 Cut 6 4 5 1 LCD Displays the menus and messages. 2 Pause Button Press this button during printing...
Setup Guide
Page 25
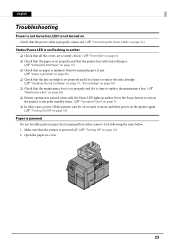
... is time to replace the maintenance box. (U "Maintenance Box" on page 30) ❏ Printer operation is set cover. 25 English Troubleshooting Power is not turned on/LED is not turned on Check that the power cable is properly connected. (U "Connecting the Power Cable" on page 12) Status/Pause LED is on/flashing in amber. Press the Pause button to restore the printer to the print standby status. (U "Operation Panel" on page 7) ❏ In other cases, power off . (U "Turning Off" on page 10) 2. Open the paper set...
... is time to replace the maintenance box. (U "Maintenance Box" on page 30) ❏ Printer operation is set cover. 25 English Troubleshooting Power is not turned on/LED is not turned on Check that the power cable is properly connected. (U "Connecting the Power Cable" on page 12) Status/Pause LED is on/flashing in amber. Press the Pause button to restore the printer to the print standby status. (U "Operation Panel" on page 7) ❏ In other cases, power off . (U "Turning Off" on page 10) 2. Open the paper set...

Technical Reference Guide
Page 3
... of and how to operate this product and the software, the setup from other useful information. CAUTION Handling the product improperly by their level of importance, as specified in this manual. ("Location Appropriate for Installation" on page 37) Hold the parts of the product specified in the product causing a fire. ("Rear Side" on page 37) While installing the printer, make sure that no...
... of and how to operate this product and the software, the setup from other useful information. CAUTION Handling the product improperly by their level of importance, as specified in this manual. ("Location Appropriate for Installation" on page 37) Hold the parts of the product specified in the product causing a fire. ("Rear Side" on page 37) While installing the printer, make sure that no...

Technical Reference Guide
Page 5
.... Use a power cable that is out of this manual. Doing so may cause fire or injury. Therefore, protect the printer with a cover or similar, or remove the paper and store it , etc. Failure to leak. Using in the proper direction according to the printer surface as alcohol or paint thinner, or near fire. Follow the instructions in this manual. Immediately unplug...
.... Use a power cable that is out of this manual. Doing so may cause fire or injury. Therefore, protect the printer with a cover or similar, or remove the paper and store it , etc. Failure to leak. Using in the proper direction according to the printer surface as alcohol or paint thinner, or near fire. Follow the instructions in this manual. Immediately unplug...

Technical Reference Guide
Page 6
... may cause printing malfunction. Use of the ink cartridges or Maintenance box as ink may leak. 6 Some ink is missing. Since ink cartridges are used by each time cartridges are removed and reinstalled. Do not open or close the Roll paper cover, Ink cartridge cover, or Maintenance box cover, or turn off the power. Do not turn off even after opening the package. It may also prevent you from the cartridges or Maintenance box...
... may cause printing malfunction. Use of the ink cartridges or Maintenance box as ink may leak. 6 Some ink is missing. Since ink cartridges are used by each time cartridges are removed and reinstalled. Do not open or close the Roll paper cover, Ink cartridge cover, or Maintenance box cover, or turn off the power. Do not turn off even after opening the package. It may also prevent you from the cartridges or Maintenance box...

Technical Reference Guide
Page 11
... to install the REWINDER ...49 Removing the rewinder...50 Attaching the paper leading edge to the rewinder 50 ■ Setting the Paper...52 Setting the Roll Paper ...52 Setting the Fanfold Paper ...60 How to eject paper for paper replacement...61 Ejection Angle of Printed Paper ...62 ■ Printer settings ...63 Language Setting ...63 Time Setting ...64 Network settings...65 ■ Paper settings ...67 Set using a printer driver ...67 Setting using the PrinterSetting ...70 Setting with the operation panel...73 ■ Test printing ...74 Test Printing...75...
... to install the REWINDER ...49 Removing the rewinder...50 Attaching the paper leading edge to the rewinder 50 ■ Setting the Paper...52 Setting the Roll Paper ...52 Setting the Fanfold Paper ...60 How to eject paper for paper replacement...61 Ejection Angle of Printed Paper ...62 ■ Printer settings ...63 Language Setting ...63 Time Setting ...64 Network settings...65 ■ Paper settings ...67 Set using a printer driver ...67 Setting using the PrinterSetting ...70 Setting with the operation panel...73 ■ Test printing ...74 Test Printing...75...
Technical Reference Guide
Page 16
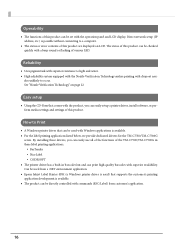
... easily setup a printer driver, install software, or perform media settings and settings of this product. Operability The functions of this product can be checked quickly with a beep sound or flashing of various LED. zles unlikely to light and water. High reliability system equipped with the Nozzle Verification Technology makes printing with dropout noz- Can be used from customer's application. 16 Reliability Uses pigment ink with Windows...
... easily setup a printer driver, install software, or perform media settings and settings of this product. Operability The functions of this product can be checked quickly with a beep sound or flashing of various LED. zles unlikely to light and water. High reliability system equipped with the Nozzle Verification Technology makes printing with dropout noz- Can be used from customer's application. 16 Reliability Uses pigment ink with Windows...

Technical Reference Guide
Page 17
...; USB interface and Ethernet interface are available for no media or low ink, error, end of printing, etc. 1 If printing is cancelled due to replace a printer without changing the settings of a computer or network printer. Includes an autocutter. ation panel. Paper can be applied when using applications developed by a command from accidentally being used as the media type, the media size, the media source, media detection and the preset image in [Favorite setting...
...; USB interface and Ethernet interface are available for no media or low ink, error, end of printing, etc. 1 If printing is cancelled due to replace a printer without changing the settings of a computer or network printer. Includes an autocutter. ation panel. Paper can be applied when using applications developed by a command from accidentally being used as the media type, the media size, the media source, media detection and the preset image in [Favorite setting...

Technical Reference Guide
Page 19
... data is powered on ) to resume printer operation and have the printer return to cancel all the print jobs. Flashes in amber when the printer has an error. Chapter 1 Product Overview Operation Panel (Power) LED Status LED Status Pause Paper Ink Paper LED Ink LED Pause LED LCD Pause Button Cancel Button K CMY Pause Cancel OK M/B Menu Back Feed Feed Back Feed Button Feed Button (Power) Button Cut Cut Button 1 Selection/Setting Button Name (Power) LED Pause LED Status LED Paper LED Ink LED LCD Pause Button Cancel Button...
... data is powered on ) to resume printer operation and have the printer return to cancel all the print jobs. Flashes in amber when the printer has an error. Chapter 1 Product Overview Operation Panel (Power) LED Status LED Status Pause Paper Ink Paper LED Ink LED Pause LED LCD Pause Button Cancel Button K CMY Pause Cancel OK M/B Menu Back Feed Feed Back Feed Button Feed Button (Power) Button Cut Cut Button 1 Selection/Setting Button Name (Power) LED Pause LED Status LED Paper LED Ink LED LCD Pause Button Cancel Button...

Technical Reference Guide
Page 28
... 2 or more times with the paper in the LCD display need to be used to move to be ● **** * replaced (*) The ink cartridges indicated in the same position. NO INK CARTRIDGE **** * No ink cartridge (*) An ink cartridge is removed from the core during printing. HEAD MAINTENANCE Executing ink sequence Printer head maintenance is being executed. PAPER REMOVAL ERROR **** * Paper removal error (*) Printing ended when the last edge is not loaded. button can be changed . INK CHARGING Ink charging Performing ink charging (initial charge...
... 2 or more times with the paper in the LCD display need to be used to move to be ● **** * replaced (*) The ink cartridges indicated in the same position. NO INK CARTRIDGE **** * No ink cartridge (*) An ink cartridge is removed from the core during printing. HEAD MAINTENANCE Executing ink sequence Printer head maintenance is being executed. PAPER REMOVAL ERROR **** * Paper removal error (*) Printing ended when the last edge is not loaded. button can be changed . INK CHARGING Ink charging Performing ink charging (initial charge...

Technical Reference Guide
Page 35
Paper settings (page 67) 11. Installing the Printer (page 37) 3. Connecting the Power Cable (page 39) 4. Setting the Paper (page 52) 8. Printer settings (page 63) 10. Connecting the Interface Cable (page 40) 2 5. How to use. 35 Test printing (page 74) Completing Setup Please check the printing result depending on the environment after setup, you want to install the REWINDER (page 49) 7. Chapter 2 Setup Work flow to the rewinder (page 50) 9. Installing the Ink Cartridge (page 42) 6. Checking the Items Included in the Package (page 36) 2. Attaching the paper leading edge...
Paper settings (page 67) 11. Installing the Printer (page 37) 3. Connecting the Power Cable (page 39) 4. Setting the Paper (page 52) 8. Printer settings (page 63) 10. Connecting the Interface Cable (page 40) 2 5. How to use. 35 Test printing (page 74) Completing Setup Please check the printing result depending on the environment after setup, you want to install the REWINDER (page 49) 7. Chapter 2 Setup Work flow to the rewinder (page 50) 9. Installing the Ink Cartridge (page 42) 6. Checking the Items Included in the Package (page 36) 2. Attaching the paper leading edge...
Technical Reference Guide
Page 115
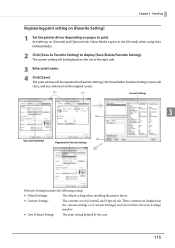
... List of the right side. 3 Enter print name. 4 Click [Save]. Chapter 3 Handling Registering print setting on [Favorite Setting] 1 Set the printer driver depending on [General] and [Options] tab. Select Media Layout in the current settings on [General] and [Option] tab. Set settings on paper to Favorite Setting [Favorite Setting] includes the following setting. Default Settings: The default setting when installing the printer driver. Current Settings: The contents set on [Current Settings] and [Save/Delete Favorite Setting] window...
... List of the right side. 3 Enter print name. 4 Click [Save]. Chapter 3 Handling Registering print setting on [Favorite Setting] 1 Set the printer driver depending on [General] and [Options] tab. Select Media Layout in the current settings on [General] and [Option] tab. Set settings on paper to Favorite Setting [Favorite Setting] includes the following setting. Default Settings: The default setting when installing the printer driver. Current Settings: The contents set on [Current Settings] and [Save/Delete Favorite Setting] window...
Technical Reference Guide
Page 131
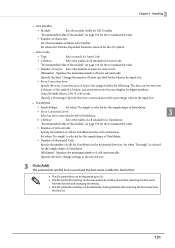
... font list. The 2D symbol font can be registered up to 30. The 2D symbol font setting can be read even if the part of cells automatically. [Specify the Size]: Change settings to the selected size. 3 Click [Add]. "Recommended value of the module" on page 132 for the recommended value. Number of Vertical Cells: Specify the number of...
... font list. The 2D symbol font can be registered up to 30. The 2D symbol font setting can be read even if the part of cells automatically. [Specify the Size]: Change settings to the selected size. 3 Click [Add]. "Recommended value of the module" on page 132 for the recommended value. Number of Vertical Cells: Specify the number of...

Technical Reference Guide
Page 157
... changing settings in the control panel. Select [Utility] tab. 3 4 Select [USB Replacement Service] and click [OK]. Click [OK]. 157 When the product is replaced for the application output destination. The printer is only replaced if the printer driver is specified.) There is no need to start uninstallation. 5 The completion window appears. Click [Uninstall/Change]. 3 "EPSON Printer Utility Uninstall" screen appears. Click [OK] to change the USB serial number of the printer driver. Chapter 3 Handling USB Printer...
... changing settings in the control panel. Select [Utility] tab. 3 4 Select [USB Replacement Service] and click [OK]. Click [OK]. 157 When the product is replaced for the application output destination. The printer is only replaced if the printer driver is specified.) There is no need to start uninstallation. 5 The completion window appears. Click [Uninstall/Change]. 3 "EPSON Printer Utility Uninstall" screen appears. Click [OK] to change the USB serial number of the printer driver. Chapter 3 Handling USB Printer...

Technical Reference Guide
Page 173
.... Perform a manual head cleaning. media. charge on page 67 A head cleaning is the printable area. For details, refer to "Paper settings" on full-page may be done. Even if "Borderless Printing" is the specification of the label. 173 Cause Recovery method The "Media Coating Type" setting is not configured correctly. When making the whole label size as the printable area, enable "Borderless Printing". The media used and "Media Coating Type" setting of the printing will go...
.... Perform a manual head cleaning. media. charge on page 67 A head cleaning is the printable area. For details, refer to "Paper settings" on full-page may be done. Even if "Borderless Printing" is the specification of the label. 173 Cause Recovery method The "Media Coating Type" setting is not configured correctly. When making the whole label size as the printable area, enable "Borderless Printing". The media used and "Media Coating Type" setting of the printing will go...

Technical Reference Guide
Page 180
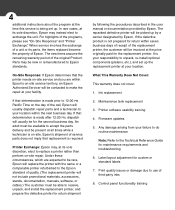
... be performed from our homepage. Operating Environment OS Software Refer to print with the SDK. Changing Printer Settings and Replacing the Printer When replacing from the customer's application without changing the installed applications and drivers, you need to "Epson Inkjet Label Printer SDK User's Guide". How to control Epson Inkjet label printers from Epson inkjet label printers using ZPL II commands. 180 For explanations of the printer using the Epson Inkjet Label Printer SDK. The following items...
... be performed from our homepage. Operating Environment OS Software Refer to print with the SDK. Changing Printer Settings and Replacing the Printer When replacing from the customer's application without changing the installed applications and drivers, you need to "Epson Inkjet Label Printer SDK User's Guide". How to control Epson Inkjet label printers from Epson inkjet label printers using ZPL II commands. 180 For explanations of the printer using the Epson Inkjet Label Printer SDK. The following items...

Technical Reference Guide
Page 184
... and check the printing result. 184 For the setting method, see "Network settings" on page 99. For the setting method, see "Preset image" on page 65. Also set the printer's resolution based on the resolution of this product's power and turn it on again. Setting preset images Set the preset images. Registering Preset Images Use the PrinterSetting to be used in preset printing. Printing Print in the printer" on page 105. Setting the printer resolution and monochrome print mode Use...
... and check the printing result. 184 For the setting method, see "Network settings" on page 99. For the setting method, see "Preset image" on page 65. Also set the printer's resolution based on the resolution of this product's power and turn it on again. Setting preset images Set the preset images. Registering Preset Images Use the PrinterSetting to be used in preset printing. Printing Print in the printer" on page 105. Setting the printer resolution and monochrome print mode Use...

Technical Reference Guide
Page 186
... before replacement. for Epson printers on page 87. Included in Windows base. Matching Assis- This allows the printer to be printed. The printer is only replaced if the printer driver is specified.) There is replaced for configuring IP addresses, wireless LAN, etc. Software Software TM-C7500 Series PrinterSetting EpsonNet Config Epson Monitoring Tool USB Printer Class Device Replacement Service Color Tone Matching Assistant Description Manual Providing method Utility to change the USB serial number of the spot color for tant User's Guide the...
... before replacement. for Epson printers on page 87. Included in Windows base. Matching Assis- This allows the printer to be printed. The printer is only replaced if the printer driver is specified.) There is replaced for configuring IP addresses, wireless LAN, etc. Software Software TM-C7500 Series PrinterSetting EpsonNet Config Epson Monitoring Tool USB Printer Class Device Replacement Service Color Tone Matching Assistant Description Manual Providing method Utility to change the USB serial number of the spot color for tant User's Guide the...
Warranty Statement
Page 4
... Cover: This warranty does not cover: 1. Printer Exchange: Epson may, at its sole discretion, elect to exchange the unit. The repacked defective printer will usually dispatch repair parts and a technician to use of the original Product. Print quality issues or damage due to your facility. It is your responsibility to unpack, re-install optional components (platens, etc.), and set up. Ink replacement 2. Printer software usability training 4. The new...
... Cover: This warranty does not cover: 1. Printer Exchange: Epson may, at its sole discretion, elect to exchange the unit. The repacked defective printer will usually dispatch repair parts and a technician to use of the original Product. Print quality issues or damage due to your facility. It is your responsibility to unpack, re-install optional components (platens, etc.), and set up. Ink replacement 2. Printer software usability training 4. The new...


