
Wristband Instruction Manual
Page 1
... not to be found. WB-L series WB-M series WB-S series © 2012 Seiko Epson Corporation. All rights reserved. Ver.WSN00170 or later, printer driver: Ver.1.2.0.0 or later) and TM-C3500 series printer. ʲRecommended Print Settingʳ Print setting: Setting items TM-C3400 series TM... immediately stop using the wristband continuously for the T M-C3400 series printer ( rmware; To use the wristband safely and correctly, read the User's Manual for the printer. ʲUsage Precautionsʳ ɾ Do not use the wristband when a user has a skin problem or wound on a...
... not to be found. WB-L series WB-M series WB-S series © 2012 Seiko Epson Corporation. All rights reserved. Ver.WSN00170 or later, printer driver: Ver.1.2.0.0 or later) and TM-C3500 series printer. ʲRecommended Print Settingʳ Print setting: Setting items TM-C3400 series TM... immediately stop using the wristband continuously for the T M-C3400 series printer ( rmware; To use the wristband safely and correctly, read the User's Manual for the printer. ʲUsage Precautionsʳ ɾ Do not use the wristband when a user has a skin problem or wound on a...

Wristband Instruction Manual
Page 2
Dermatologically tested (by pulling it to both sides. 6. Store in an individual box in locations subject to the base of the wristband. 9. Install an attachment for wristband to Use the Wristbandʳ 1. Print necessary information on Storageʳ Do not store the wristbands in a cool dark place after opening. Wrap the wristband around where you attach it o using scissors or a similar tool. ʲProduct Materialsʳ Product Wristband Snap Material PET PE PE The wristband and the snap are antibacterial. After closing the snap, check whether the snap is rmly xed ...
Dermatologically tested (by pulling it to both sides. 6. Store in an individual box in locations subject to the base of the wristband. 9. Install an attachment for wristband to Use the Wristbandʳ 1. Print necessary information on Storageʳ Do not store the wristbands in a cool dark place after opening. Wrap the wristband around where you attach it o using scissors or a similar tool. ʲProduct Materialsʳ Product Wristband Snap Material PET PE PE The wristband and the snap are antibacterial. After closing the snap, check whether the snap is rmly xed ...

Start Here
Page 1
... §2.909 Operation is identical to the representative unit tested and found to comply with the instruction manual, may be compliant with Class B Personal Computers: We: EPSON AMERICA, INC. Num ambiente doméstico, este produto poderá causar interferência de... Each product marketed is subject to the products that may not cause harmful interference, and (2) this device. Trade Name: EPSON Type of CONFORMITY According to User's Manual and Technical Reference Guide included on a statistical basis as a Class B digital device. Detaylı bilgi ve gü...
... §2.909 Operation is identical to the representative unit tested and found to comply with the instruction manual, may be compliant with Class B Personal Computers: We: EPSON AMERICA, INC. Num ambiente doméstico, este produto poderá causar interferência de... Each product marketed is subject to the products that may not cause harmful interference, and (2) this device. Trade Name: EPSON Type of CONFORMITY According to User's Manual and Technical Reference Guide included on a statistical basis as a Class B digital device. Detaylı bilgi ve gü...
Users Manual
Page 2
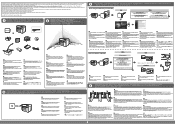
...em seguida, instale-o. De papierrolkap kan onverwacht RU dichtvallen en dan zult u misschien uw vingers klemmen. No part of this manual are registered trademarks of California, Berkeley, and its affiliates shall be caught. mit der CD und richten Sie den Drucker gem... mientras esté abierta la tapa del papel continuo. NOTICE: The contents of this product includes software developed by Seiko Epson Corporation, Nagano, Japan. 1 UnpackingɹDéballageɹPackungsinhaltɹUitpakkenɹDisimballaggio DesembalajeɹDesembalamento Installing the Printer&#...
...em seguida, instale-o. De papierrolkap kan onverwacht RU dichtvallen en dan zult u misschien uw vingers klemmen. No part of this manual are registered trademarks of California, Berkeley, and its affiliates shall be caught. mit der CD und richten Sie den Drucker gem... mientras esté abierta la tapa del papel continuo. NOTICE: The contents of this product includes software developed by Seiko Epson Corporation, Nagano, Japan. 1 UnpackingɹDéballageɹPackungsinhaltɹUitpakkenɹDisimballaggio DesembalajeɹDesembalamento Installing the Printer&#...
Product Specifications
Page 2
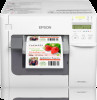
... 360 dpi - die cut or continuous; fan fold 4.7-7.5mils (0.12-0.19mm) O.D. 4.0" (102mm) max. Printer (without notice. The C3500 using Epson pigment inks is BS5609 certified for GHS labels.2 1Speed is printing 2.2" (56mm) width bidirectional mode, with banding reduction disabled in 360 x ...360 dpi resolution. 2Epson's ColorWorks C3500 inkjet printer with Epson's DURABrite® pigment inks used in combination with utilities and manuals Ordering information 10.3" 12.2" TM-C3500 Inkjet Printer GJIC22P(C) Ink Cartridge GJIC22P (K) Ink Cartridge GJIC22P (M) ...
... 360 dpi - die cut or continuous; fan fold 4.7-7.5mils (0.12-0.19mm) O.D. 4.0" (102mm) max. Printer (without notice. The C3500 using Epson pigment inks is BS5609 certified for GHS labels.2 1Speed is printing 2.2" (56mm) width bidirectional mode, with banding reduction disabled in 360 x ...360 dpi resolution. 2Epson's ColorWorks C3500 inkjet printer with Epson's DURABrite® pigment inks used in combination with utilities and manuals Ordering information 10.3" 12.2" TM-C3500 Inkjet Printer GJIC22P(C) Ink Cartridge GJIC22P (K) Ink Cartridge GJIC22P (M) ...

Quick Printing Guide for NiceLabel
Page 2
NiceLabel and NiceLabel Pro are the property of their respective owners and used with the permission of Euro Plus d.o.o. in the United States and other trademarks are registered trademark or trademark of Euro Plus d.o.o. All other countries. Exceed Your Vision is used for identification purpose only. © Seiko Epson Corporation 2015. All rights reserved. 2 In this manual, the NiceLabel GUI is registered trademark or trademark of Seiko Epson Corporation. Trademarks EPSON is a registered trademark of Seiko Epson Corporation.
NiceLabel and NiceLabel Pro are the property of their respective owners and used with the permission of Euro Plus d.o.o. in the United States and other trademarks are registered trademark or trademark of Euro Plus d.o.o. All other countries. Exceed Your Vision is used for identification purpose only. © Seiko Epson Corporation 2015. All rights reserved. 2 In this manual, the NiceLabel GUI is registered trademark or trademark of Seiko Epson Corporation. Trademarks EPSON is a registered trademark of Seiko Epson Corporation.

Quick Printing Guide for NiceLabel
Page 3
See the NiceLabel manual for details on Euro Plus "NiceLabel Pro 6.3.1" (NiceLabel), using TM-C3500. See the "TM-C3500 Technical Reference Guide" for how to use the printer and printer driver. Caution: The usage may differ when printing with a different version....0 x 51.0 mm (Die-cut Label) Printed Information: Text Data Picture Data Barcode Data (Barcode Type: CODE39) Install NiceLabel beforehand. Overview This manual contains necessary information to print on how to install and operate BarTender. Change the content based on the actual use the following print data as...
See the NiceLabel manual for details on Euro Plus "NiceLabel Pro 6.3.1" (NiceLabel), using TM-C3500. See the "TM-C3500 Technical Reference Guide" for how to use the printer and printer driver. Caution: The usage may differ when printing with a different version....0 x 51.0 mm (Die-cut Label) Printed Information: Text Data Picture Data Barcode Data (Barcode Type: CODE39) Install NiceLabel beforehand. Overview This manual contains necessary information to print on how to install and operate BarTender. Change the content based on the actual use the following print data as...

Quick Printing Guide for NiceLabel
Page 9
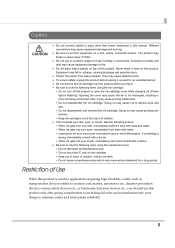
Creating Label Design See the following and create a label design using NiceLabel. Picture data Barcode data 9 Text data [Text] Object [Barcode] Object [Picture] Object Use the Text Object to insert Text Data. Use the Image Object to insert Picture Data. Use the Barcode Object to the NiceLabel manual. For detail, refer to insert Barcode Data. Make sure you have the top, bottom, left, and right margins of 1.5 mm and more inside the label size.
Creating Label Design See the following and create a label design using NiceLabel. Picture data Barcode data 9 Text data [Text] Object [Barcode] Object [Picture] Object Use the Text Object to insert Text Data. Use the Image Object to insert Picture Data. Use the Barcode Object to the NiceLabel manual. For detail, refer to insert Barcode Data. Make sure you have the top, bottom, left, and right margins of 1.5 mm and more inside the label size.

Technical Reference Guide
Page 3
... that must be observed to prevent damage to your equipment or a malfunction. Provides information that must follow warnings carefully to Symbols The symbols in this manual are identified by their level of causing information loss. For Safety Key to avoid serious bodily injury. You must be observed to avoid damage to...
... that must be observed to prevent damage to your equipment or a malfunction. Provides information that must follow warnings carefully to Symbols The symbols in this manual are identified by their level of causing information loss. For Safety Key to avoid serious bodily injury. You must be observed to avoid damage to...
Technical Reference Guide
Page 5
... to be recharged, resulting in more ink being consumed. Doing so may cause the ink to set this equipment on top of Use When this manual. Cautions CAUTION Do not connect cables in ways other than those mentioned in this product is flashing). Restriction of this product.
... to be recharged, resulting in more ink being consumed. Doing so may cause the ink to set this equipment on top of Use When this manual. Cautions CAUTION Do not connect cables in ways other than those mentioned in this product is flashing). Restriction of this product.

Technical Reference Guide
Page 6
Manual Content The manual is made up of printer applications for developers. About this manual and the firmware that has been upgraded. The specifications of the supported paper sizes are different for the firmware covered in this Manual Aim of the Manual This manual was created to provide information on development, design, and installation of systems and development and design of the following sections: Chapter 1 Product Overview Chapter 2 Setup Chapter 3 Handling Chapter 4 Application Development Information Chapter 5 Maintenance Chapter 6 Appendix 6
Manual Content The manual is made up of printer applications for developers. About this manual and the firmware that has been upgraded. The specifications of the supported paper sizes are different for the firmware covered in this Manual Aim of the Manual This manual was created to provide information on development, design, and installation of systems and development and design of the following sections: Chapter 1 Product Overview Chapter 2 Setup Chapter 3 Handling Chapter 4 Application Development Information Chapter 5 Maintenance Chapter 6 Appendix 6

Technical Reference Guide
Page 7
Contents ■ For Safety...3 Key to Symbols ...3 Warnings ...4 Cautions...5 ■ Restriction of Use ...5 ■ About this Manual ...6 Aim of the Manual...6 Manual Content ...6 ■ Contents ...7 Product Overview 11 ■ Features ...11 Easy Setup ...13 How to Print ...13 Other Features ...13 ■ Parts Name and Function 14 ...
Contents ■ For Safety...3 Key to Symbols ...3 Warnings ...4 Cautions...5 ■ Restriction of Use ...5 ■ About this Manual ...6 Aim of the Manual...6 Manual Content ...6 ■ Contents ...7 Product Overview 11 ■ Features ...11 Easy Setup ...13 How to Print ...13 Other Features ...13 ■ Parts Name and Function 14 ...

Technical Reference Guide
Page 9
...or white lines or black lines are printed 155 When the printer is not found even if EpsonNet Config is started 157 HELP for EPSON Printers ...158 ■ Setting Check Modes...160 Self-test Mode ...160 Status Sheet Printing (LAN interface model only 162 ■ ... Information 175 ■ Printer Control Method ...175 ■ Printer Driver ...176 ■ Using Epson Inkjet Label Printer SDK 177 Operating environment ...177 Where to download ...177 ■ Utilities and Manuals ...178 Download ...181 Maintenance 183 ■ Necessary Information for an Administrator of the Printer 185 ...
...or white lines or black lines are printed 155 When the printer is not found even if EpsonNet Config is started 157 HELP for EPSON Printers ...158 ■ Setting Check Modes...160 Self-test Mode ...160 Status Sheet Printing (LAN interface model only 162 ■ ... Information 175 ■ Printer Control Method ...175 ■ Printer Driver ...176 ■ Using Epson Inkjet Label Printer SDK 177 Operating environment ...177 Where to download ...177 ■ Utilities and Manuals ...178 Download ...181 Maintenance 183 ■ Necessary Information for an Administrator of the Printer 185 ...

Technical Reference Guide
Page 30
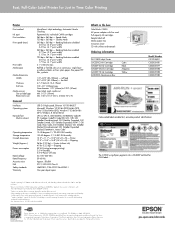
The items included in the package. Checking the Items Included in the Package When using the printer for the first time, check the items included in the package are as follows: A B C D E F G H User' s Manual I J K L A TM-C3500 Series D Ink cartridge G Paper ejection tray J Label roll paper B Dedicated AC adapter C AC cable *1 E Maintenance box F USB cable H Paper feed guide *2 I Power switch cover K User's Manual L CD-ROM *1 The AC cable may not be included with the product. *2 Attached on the rear of the fanfold paper cover. 30
The items included in the package. Checking the Items Included in the Package When using the printer for the first time, check the items included in the package are as follows: A B C D E F G H User' s Manual I J K L A TM-C3500 Series D Ink cartridge G Paper ejection tray J Label roll paper B Dedicated AC adapter C AC cable *1 E Maintenance box F USB cable H Paper feed guide *2 I Power switch cover K User's Manual L CD-ROM *1 The AC cable may not be included with the product. *2 Attached on the rear of the fanfold paper cover. 30

Technical Reference Guide
Page 97
... Control Character ASCII 3 SHIFT {S CODE C {C FNC3 {3 CODE A {A FNC1 {1 FNC4 {4 CODE B {B FNC2 {2 '{' {{ ❏ The HRI characters of the following, an error occurs. barcode printing can be manually specified. Control Character HRI Character SHIFT Not printed CODE A/B/C Not printed FNC1~ 4 Space is printed Control character (00h ~1Fh, 7Fh) Space is no need to...
... Control Character ASCII 3 SHIFT {S CODE C {C FNC3 {3 CODE A {A FNC1 {1 FNC4 {4 CODE B {B FNC2 {2 '{' {{ ❏ The HRI characters of the following, an error occurs. barcode printing can be manually specified. Control Character HRI Character SHIFT Not printed CODE A/B/C Not printed FNC1~ 4 Space is printed Control character (00h ~1Fh, 7Fh) Space is no need to...

Technical Reference Guide
Page 138
... page 162. The settings for this printer are as shown below. The printer driver has no function to "Manual". We recommend consulting with "IP address setting mode" set to automatically follow the IP address set for ten seconds or more. See... follows: Item IP address setting mode*1 IP address Host computer name Domain name Factory settings Manual / Auto 192.168.192.168*2 EPSONxxxxxx (xxxxxx sets the lowest 6 digits of utilities (InstallNavi, EpsonNet Config, EPSON Deployment Tool, etc.). Network Interface The LAN interface information for this printer. 1 Make sure...
... page 162. The settings for this printer are as shown below. The printer driver has no function to "Manual". We recommend consulting with "IP address setting mode" set to automatically follow the IP address set for ten seconds or more. See... follows: Item IP address setting mode*1 IP address Host computer name Domain name Factory settings Manual / Auto 192.168.192.168*2 EPSONxxxxxx (xxxxxx sets the lowest 6 digits of utilities (InstallNavi, EpsonNet Config, EPSON Deployment Tool, etc.). Network Interface The LAN interface information for this printer. 1 Make sure...

Technical Reference Guide
Page 142
... may be misaligned laterally right after the initial ink charge, specified colors may not be produced (colors may be blurry depending on page 137. Perform manual head cleaning until there are no more than three seconds to load the paper in the center. outer edges of the print result are blurry...
... may be misaligned laterally right after the initial ink charge, specified colors may not be produced (colors may be blurry depending on page 137. Perform manual head cleaning until there are no more than three seconds to load the paper in the center. outer edges of the print result are blurry...

Technical Reference Guide
Page 143
... step 10 in Print quality for all [Print Settings]. The resolution for the printer and print data For TM-C3500, the resolution for the printer and print data. For more information, see the manual supplied with the application. 143 outer edges of the paper are using , see step 9 in "Replacing Fanfold Paper...
... step 10 in Print quality for all [Print Settings]. The resolution for the printer and print data For TM-C3500, the resolution for the printer and print data. For more information, see the manual supplied with the application. 143 outer edges of the paper are using , see step 9 in "Replacing Fanfold Paper...

Technical Reference Guide
Page 144
... of bars. On the [Printer Utilities] tab, select [Printer Setting Utility]. To be more information on the barcode generator application you are using , see the manual supplied with the printer driver, or a barcode generator application to be blurry depending on the thickness of bidirectional printing. tion No. 6 - - 144 Trouble Print quality...
... of bars. On the [Printer Utilities] tab, select [Printer Setting Utility]. To be more information on the barcode generator application you are using , see the manual supplied with the printer driver, or a barcode generator application to be blurry depending on the thickness of bidirectional printing. tion No. 6 - - 144 Trouble Print quality...

Technical Reference Guide
Page 145
...smudged [Media Type]. Paper" on page 66, or step 10 in "Replacing Fanfold Paper with Fanfold - Set [Platen Vacuum Manual Adjust- The print head may tab, set [Platen Vacuum Manual become smudged Adjustment]. - touch the paper and On the printer driver's [Options] the paper may ment]. You can also use... paper. - because the platen's suction may touch and the settings for the shutters on page 76. 3 If the print head has Perform manual head cleaning. See "Shutter Adjustment" on the platen. foreign objects Hold down the cleaning button for some paper [Platen Vacuum...
...smudged [Media Type]. Paper" on page 66, or step 10 in "Replacing Fanfold Paper with Fanfold - Set [Platen Vacuum Manual Adjust- The print head may tab, set [Platen Vacuum Manual become smudged Adjustment]. - touch the paper and On the printer driver's [Options] the paper may ment]. You can also use... paper. - because the platen's suction may touch and the settings for the shutters on page 76. 3 If the print head has Perform manual head cleaning. See "Shutter Adjustment" on the platen. foreign objects Hold down the cleaning button for some paper [Platen Vacuum...


