
Technical Brief (Impact Printers)
Page 1
... cost of printer: Low cost - Reliability - EPSON impact printers are the property of their reliability with tireless printheads and superior quality ribbons. or 24-pin, which determines the type of printing and the number of printing. Impact printers are capable ... 9- Contents This technical brief provides detailed information on the following topics, related to all begin with FX, LX, or DFX Twenty-four pin printers all EPSON impact printers: Functionality M Printing technology M Control code/emulation M Paper handling M SmartPark™ settings Versatility M Flexible ...
... cost of printer: Low cost - Reliability - EPSON impact printers are the property of their reliability with tireless printheads and superior quality ribbons. or 24-pin, which determines the type of printing and the number of printing. Impact printers are capable ... 9- Contents This technical brief provides detailed information on the following topics, related to all begin with FX, LX, or DFX Twenty-four pin printers all EPSON impact printers: Functionality M Printing technology M Control code/emulation M Paper handling M SmartPark™ settings Versatility M Flexible ...

Technical Brief (Impact Printers)
Page 6
... respective owners. EPSON's stationary ribbon cartridge offers the following benefits: L L The stationary ribbon cartridge can jam or damage the print head Protects and extends the life of extended use a stationary ribbon cartridge. The design used in a mylar film Made of the highest grade ABS plastic Offers the highest print quality for dot matrix printers Ultra Letter Quality...
... respective owners. EPSON's stationary ribbon cartridge offers the following benefits: L L The stationary ribbon cartridge can jam or damage the print head Protects and extends the life of extended use a stationary ribbon cartridge. The design used in a mylar film Made of the highest grade ABS plastic Offers the highest print quality for dot matrix printers Ultra Letter Quality...

Product Information Guide
Page 1
...;í Roman Sans Serif Draft Draft Condensed Font LF/FF 12 Micro Adjust Paper Park Pause 3sec 3ULQWHUý6SHFLILFDWLRQVý Printing Printing method: 9-pin dot matrix Print speed: 3ULQWLQJýPRGH 'UDIW 'UDIW 'UDIWýFRQGHQVHG 'UDIWýFRQGHQVHG 'UDIWýHPSKDVL]HG 'UDIWýGRXEOHýZLGWK 1/4 1/4 1/4ýGRXEOHý...
...;í Roman Sans Serif Draft Draft Condensed Font LF/FF 12 Micro Adjust Paper Park Pause 3sec 3ULQWHUý6SHFLILFDWLRQVý Printing Printing method: 9-pin dot matrix Print speed: 3ULQWLQJýPRGH 'UDIW 'UDIW 'UDIWýFRQGHQVHG 'UDIWýFRQGHQVHG 'UDIWýHPSKDVL]HG 'UDIWýGRXEOHýZLGWK 1/4 1/4 1/4ýGRXEOHý...
Product Information Guide
Page 2
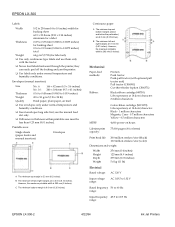
... them only with optional pull tractor unit) Pull tractor (C800301) Cut-sheet feeder (option C806371) Black ribbon cartridge (#8750) Life expectancy at 14 dots/character: 3 million characters MTBF: Color ribbon cartridge (S015073) Life expectancy at 14 dots/character: Black - 1 million characters Magenta, Cyan - 0.7 million characters Yellow - 0.5 million characters 4,000...: Input frequency 49.5 to 60.5 Hz range: (3621 ,QNý-HWý3ULQWHUV t Never feed labels backward through the printer; t Insert envelopes long side first; they can easily peel off the backing and jam the...
... them only with optional pull tractor unit) Pull tractor (C800301) Cut-sheet feeder (option C806371) Black ribbon cartridge (#8750) Life expectancy at 14 dots/character: 3 million characters MTBF: Color ribbon cartridge (S015073) Life expectancy at 14 dots/character: Black - 1 million characters Magenta, Cyan - 0.7 million characters Yellow - 0.5 million characters 4,000...: Input frequency 49.5 to 60.5 Hz range: (3621 ,QNý-HWý3ULQWHUV t Never feed labels backward through the printer; t Insert envelopes long side first; they can easily peel off the backing and jam the...

Product Information Guide
Page 6
Open the printer cover to the upright position, then pull it up to exit without making changes. ,QVWDOOLQJýWKHý5LEERQý&DUWULGJHý Before installing the ribbon cartridge, make all of your desired setting, press PAUSE. 8. When the control panel lights match your changes. 9. ...Any changes you have made remain in effect until you want to make sure the printer is not plugged into an electrical outlet...
Open the printer cover to the upright position, then pull it up to exit without making changes. ,QVWDOOLQJýWKHý5LEERQý&DUWULGJHý Before installing the ribbon cartridge, make all of your desired setting, press PAUSE. 8. When the control panel lights match your changes. 9. ...Any changes you have made remain in effect until you want to make sure the printer is not plugged into an electrical outlet...
Product Information Guide
Page 7
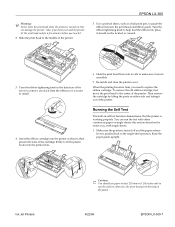
...-sheet position. Turn the ribbon tightening knob to help feed the ribbon into the printer slots. 6. Insert the ribbon cartridge into the printer as a ball point pen, to make sure it moves smoothly. 7. Re-install and close the printer cover. You can damage the printer. this can run the ... lever is pushed back to the middle of the printer. 5. Turn the ribbon-tightening knob in self test function demonstrates that the printer is working properly. To remove the old ribbon cartridge, first move the print head while the printer is turned on the platen. (3621 Raise the...
...-sheet position. Turn the ribbon tightening knob to help feed the ribbon into the printer slots. 6. Insert the ribbon cartridge into the printer as a ball point pen, to make sure it moves smoothly. 7. Re-install and close the printer cover. You can damage the printer. this can run the ... lever is pushed back to the middle of the printer. 5. Turn the ribbon-tightening knob in self test function demonstrates that the printer is working properly. To remove the old ribbon cartridge, first move the print head while the printer is turned on the platen. (3621 Raise the...
Product Information Guide
Page 11
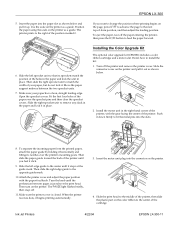
... the motor unit in place. 10 5 0 ,QVWDOOLQJýWKHý&RORUý8SJUDGHý.LWý The optional color upgrade kit (C832081) includes a color ribbon cartridge and a motor unit. Slide the left sprocket unit so that its notches over the sprocket pins and then close the sprocket covers. Insert the... motor unit plug into the slots. 8. Slide the left edge guide to fit the metal pins into the connector on the printer. To separate the incoming paper from the printed paper, attach the paper guide by holding it stops at the guide mark. Push it begins printing...
... the motor unit in place. 10 5 0 ,QVWDOOLQJýWKHý&RORUý8SJUDGHý.LWý The optional color upgrade kit (C832081) includes a color ribbon cartridge and a motor unit. Slide the left sprocket unit so that its notches over the sprocket pins and then close the sprocket covers. Insert the... motor unit plug into the slots. 8. Slide the left edge guide to fit the metal pins into the connector on the printer. To separate the incoming paper from the printed paper, attach the paper guide by holding it stops at the guide mark. Push it begins printing...
Product Information Guide
Page 12
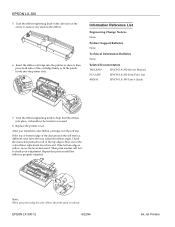
... the plastic hooks into the printer slots. ,QIRUPDWLRQý5HIHUHQFHý/LVW Engineering Change Notices None Product Support Bulletins None Technical Information Bulletins None Related Documentation TM-LX300 EPSON LX-300 Service Manual PL-LX300 EPSON LX-300 Parts Price List 4002661 EPSON LX-300 User's Guide 7. (3621ý/;ðêíí 5. Turn the ribbon-tightening knob to remove any...
... the plastic hooks into the printer slots. ,QIRUPDWLRQý5HIHUHQFHý/LVW Engineering Change Notices None Product Support Bulletins None Technical Information Bulletins None Related Documentation TM-LX300 EPSON LX-300 Service Manual PL-LX300 EPSON LX-300 Parts Price List 4002661 EPSON LX-300 User's Guide 7. (3621ý/;ðêíí 5. Turn the ribbon-tightening knob to remove any...
User Manual
Page 4
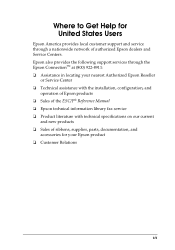
... installation, configuration, and operation of Epson products t Sales of the ESC/P® Reference Manual t Epson technical information library fax service t Product literature with technical specifications on our current and new products t Sales of authorized Epson dealers and Service Centers. Epson also provides the following support services through a nationwide network of ribbons, supplies, parts, documentation, and...
... installation, configuration, and operation of Epson products t Sales of the ESC/P® Reference Manual t Epson technical information library fax service t Product literature with technical specifications on our current and new products t Sales of authorized Epson dealers and Service Centers. Epson also provides the following support services through a nationwide network of ribbons, supplies, parts, documentation, and...
User Manual
Page 8
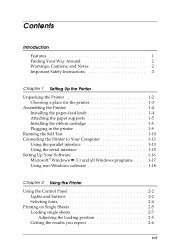
..., Cautions, and Notes 0-2 Important Safety Instructions 0-3 Chapter 1 Setting Up the Printer Unpacking the Printer 1-2 Choosing a place for the printer 1-3 Assembling the Printer 1-4 Installing the paper-feed knob 1-4 Attaching the paper supports 1-5 Installing the ribbon cartridge 1-5 Plugging in the printer 1-9 Running the Self Test 1-10 Connecting the Printer to Your Computer 1-13 Using the parallel interface 1-13 Using...
..., Cautions, and Notes 0-2 Important Safety Instructions 0-3 Chapter 1 Setting Up the Printer Unpacking the Printer 1-2 Choosing a place for the printer 1-3 Assembling the Printer 1-4 Installing the paper-feed knob 1-4 Attaching the paper supports 1-5 Installing the ribbon cartridge 1-5 Plugging in the printer 1-9 Running the Self Test 1-10 Connecting the Printer to Your Computer 1-13 Using the parallel interface 1-13 Using...
User Manual
Page 12
...cpi draft mode. Print up to a color ribbon cartridge. t Pull Tractor (C80030V) for printing continuous paper and multi-part forms (used in the pull-tractor position in conjunction with the standard tractor in your work environment. This printer fits neatly into available space in the push ... to 66 lines on A4-size or 62 lines on single sheets without removing the continuous paper supply. Introduction Features Your Epson® 9-pin dot matrix printer offers these outstanding features: t High-speed printing. Three buttons and three lights give you can get custom results with ease...
...cpi draft mode. Print up to a color ribbon cartridge. t Pull Tractor (C80030V) for printing continuous paper and multi-part forms (used in the pull-tractor position in conjunction with the standard tractor in your work environment. This printer fits neatly into available space in the push ... to 66 lines on A4-size or 62 lines on single sheets without removing the continuous paper supply. Introduction Features Your Epson® 9-pin dot matrix printer offers these outstanding features: t High-speed printing. Three buttons and three lights give you can get custom results with ease...
User Manual
Page 16
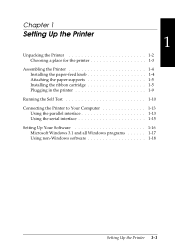
Chapter 1 Setting Up the Printer 1 Unpacking the Printer 1-2 Choosing a place for the printer 1-3 Assembling the Printer 1-4 Installing the paper-feed knob 1-4 Attaching the paper supports 1-5 Installing the ribbon cartridge 1-5 Plugging in the printer 1-9 Running the Self Test 1-10 Connecting the Printer to Your Computer 1-13 Using the parallel interface 1-13 Using the serial interface 1-15 Setting Up Your Software 1-16 Microsoft Windows 3.1 and all Windows programs 1-17 Using non-Windows software 1-18 Setting Up the Printer 1-1
Chapter 1 Setting Up the Printer 1 Unpacking the Printer 1-2 Choosing a place for the printer 1-3 Assembling the Printer 1-4 Installing the paper-feed knob 1-4 Attaching the paper supports 1-5 Installing the ribbon cartridge 1-5 Plugging in the printer 1-9 Running the Self Test 1-10 Connecting the Printer to Your Computer 1-13 Using the parallel interface 1-13 Using the serial interface 1-15 Setting Up Your Software 1-16 Microsoft Windows 3.1 and all Windows programs 1-17 Using non-Windows software 1-18 Setting Up the Printer 1-1
User Manual
Page 17
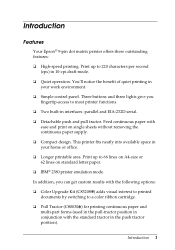
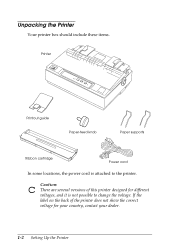
c Caution: There are several versions of the printer does not show the correct voltage for different voltages, and it is attached to change the voltage. Unpacking the Printer Your printer box should include these items. Printer Printout guide Paper-feed knob Paper supports Ribbon cartridge Power cord In some locations, the power cord is not possible to the printer. If the label on the back of this printer designed for your country, contact your dealer. 1-2 Setting Up the Printer
c Caution: There are several versions of the printer does not show the correct voltage for different voltages, and it is attached to change the voltage. Unpacking the Printer Your printer box should include these items. Printer Printout guide Paper-feed knob Paper supports Ribbon cartridge Power cord In some locations, the power cord is not possible to the printer. If the label on the back of this printer designed for your country, contact your dealer. 1-2 Setting Up the Printer
User Manual
Page 20
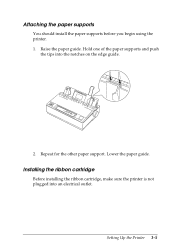
Lower the paper guide. Installing the ribbon cartridge Before installing the ribbon cartridge, make sure the printer is not plugged into the notches on the edge guide. 2. Hold one of the paper supports and push the tips into an electrical outlet. Attaching the paper supports You should install the paper supports before you begin using the printer. 1. Repeat for the other paper support. Raise the paper guide. Setting Up the Printer 1-5
Lower the paper guide. Installing the ribbon cartridge Before installing the ribbon cartridge, make sure the printer is not plugged into the notches on the edge guide. 2. Hold one of the paper supports and push the tips into an electrical outlet. Attaching the paper supports You should install the paper supports before you begin using the printer. 1. Repeat for the other paper support. Raise the paper guide. Setting Up the Printer 1-5
User Manual
Page 22
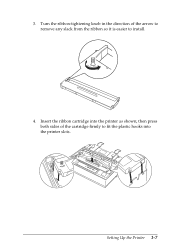
Insert the ribbon cartridge into the printer slots. Turn the ribbon-tightening knob in the direction of the cartridge firmly to install. 4. Setting Up the Printer 1-7 then press both sides of the arrow to remove any slack from the ribbon so it is easier to fit the plastic hooks into the printer as shown; 3.
Insert the ribbon cartridge into the printer slots. Turn the ribbon-tightening knob in the direction of the cartridge firmly to install. 4. Setting Up the Printer 1-7 then press both sides of the arrow to remove any slack from the ribbon so it is easier to fit the plastic hooks into the printer as shown; 3.
User Manual
Page 23
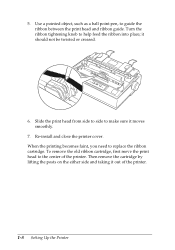
... the either side and taking it out of the printer. Use a pointed object, such as a ball point pen, to replace the ribbon cartridge. When the printing becomes faint, you need to guide the ribbon between the print head and ribbon guide. To remove the old ribbon cartridge, first move the print head to help feed...
... the either side and taking it out of the printer. Use a pointed object, such as a ball point pen, to replace the ribbon cartridge. When the printing becomes faint, you need to guide the ribbon between the print head and ribbon guide. To remove the old ribbon cartridge, first move the print head to help feed...
User Manual
Page 64
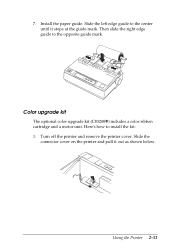
Then slide the right edge guide to install the kit: 1. Slide the connector cover on the printer and pull it stops at the guide mark. Turn off the printer and remove the printer cover. Using the Printer 2-31 Install the paper guide. Color upgrade kit The optional color upgrade kit (C83208V) includes a color ribbon cartridge and a motor unit. 7. Here's how to the opposite guide mark. Slide the left edge guide to the center until it out as shown below.
Then slide the right edge guide to install the kit: 1. Slide the connector cover on the printer and pull it stops at the guide mark. Turn off the printer and remove the printer cover. Using the Printer 2-31 Install the paper guide. Color upgrade kit The optional color upgrade kit (C83208V) includes a color ribbon cartridge and a motor unit. 7. Here's how to the opposite guide mark. Slide the left edge guide to the center until it out as shown below.
User Manual
Page 65
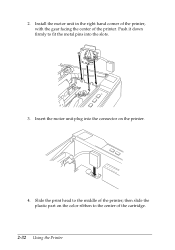
2. Insert the motor unit plug into the connector on the color ribbon to fit the metal pins into the slots. 3. Slide the print head to the middle of the printer. Install the motor unit in the right hand corner of the printer, with the gear facing the center of the printer; then slide the plastic part on the printer. 4. Push it down firmly to the center of the cartridge. 2-32 Using the Printer
2. Insert the motor unit plug into the connector on the color ribbon to fit the metal pins into the slots. 3. Slide the print head to the middle of the printer. Install the motor unit in the right hand corner of the printer, with the gear facing the center of the printer; then slide the plastic part on the printer. 4. Push it down firmly to the center of the cartridge. 2-32 Using the Printer
User Manual
Page 66
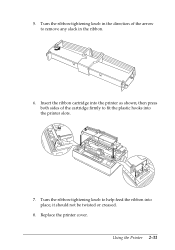
then press both sides of the arrow to fit the plastic hooks into the printer slots. 7. Turn the ribbon-tightening knob in the direction of the cartridge firmly to remove any slack in the ribbon. 6. Turn the ribbon-tightening knob to help feed the ribbon into the printer as shown; Insert the ribbon cartridge into place; Using the Printer 2-33 Replace the printer cover. it should not be twisted or creased. 8. 5.
then press both sides of the arrow to fit the plastic hooks into the printer slots. 7. Turn the ribbon-tightening knob in the direction of the cartridge firmly to remove any slack in the ribbon. 6. Turn the ribbon-tightening knob to help feed the ribbon into the printer as shown; Insert the ribbon cartridge into place; Using the Printer 2-33 Replace the printer cover. it should not be twisted or creased. 8. 5.
User Manual
Page 67
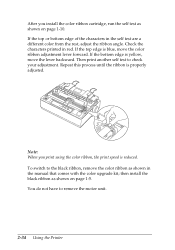
...edge is yellow, move the color ribbon adjustment lever forward. Note: When you install the color ribbon cartridge, run the self test as shown on page 1-5. To switch to remove the motor unit. 2-34 Using the Printer You do not have to the black ribbon, remove the color ribbon as shown on page 1-10. ...Repeat this process until the ribbon is reduced. If the top or bottom edge of the characters in red. Then print...
...edge is yellow, move the color ribbon adjustment lever forward. Note: When you install the color ribbon cartridge, run the self test as shown on page 1-5. To switch to remove the motor unit. 2-34 Using the Printer You do not have to the black ribbon, remove the color ribbon as shown on page 1-10. ...Repeat this process until the ribbon is reduced. If the top or bottom edge of the characters in red. Then print...


