Product Brochure
Page 1
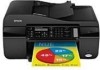
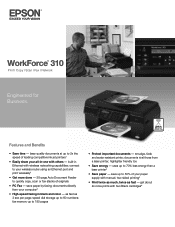
... • Print twice as much, twice as 3 sec per page; smudge, fade and water resistant prints; documents rival those from your all-in black and color - uses up to 180 pages • Protect important documents - save paper by faxing documents directly from a laser printer; get about 2x more done - 30... at up to 60 numbers; connect to 2x the speed of originals • PC Fax - fax memory up to your paper supply with others - WorkForce® 310 Print | Copy | Scan | Fax | Network Engineered for Business. built-in Ethernet with two Black cartridges6
... • Print twice as much, twice as 3 sec per page; smudge, fade and water resistant prints; documents rival those from your all-in black and color - uses up to 180 pages • Protect important documents - save paper by faxing documents directly from a laser printer; get about 2x more done - 30... at up to 60 numbers; connect to 2x the speed of originals • PC Fax - fax memory up to your paper supply with others - WorkForce® 310 Print | Copy | Scan | Fax | Network Engineered for Business. built-in Ethernet with two Black cartridges6
Product Brochure
Page 2
.../IEC 24734. For more information on Epson's environmental programs, go to DHCP. A variable amount of ink remains in the cartridges after first page with text patterns in Draft Mode on plain paper. and Canada WorkForce 310 all rights in these marks. WorkForce 310 Print | Copy | Scan | Fax | Network Printing Technology 4-color (CMYK) drop-on-demand MicroPiezo...
.../IEC 24734. For more information on Epson's environmental programs, go to DHCP. A variable amount of ink remains in the cartridges after first page with text patterns in Draft Mode on plain paper. and Canada WorkForce 310 all rights in these marks. WorkForce 310 Print | Copy | Scan | Fax | Network Printing Technology 4-color (CMYK) drop-on-demand MicroPiezo...
Quick Guide
Page 1
Epson WorkForce® 310 Series Quick Guide Installing on a Network Basic Printing, Copying, Scanning, and Faxing Maintaining Your All-in-One Solving Problems
Epson WorkForce® 310 Series Quick Guide Installing on a Network Basic Printing, Copying, Scanning, and Faxing Maintaining Your All-in-One Solving Problems
Quick Guide
Page 2
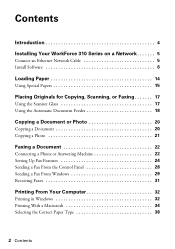
Contents Introduction 4 Installing Your WorkForce 310 Series on a Network 5 Connect an Ethernet Network Cable 5 Install Software 6 Loading Paper 14 Using Special Papers 15 Placing Originals for Copying, Scanning, or Faxing 17 ...
Contents Introduction 4 Installing Your WorkForce 310 Series on a Network 5 Connect an Ethernet Network Cable 5 Install Software 6 Loading Paper 14 Using Special Papers 15 Placing Originals for Copying, Scanning, or Faxing 17 ...
Quick Guide
Page 3
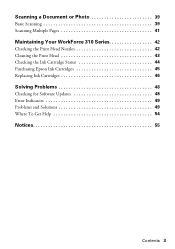
Scanning a Document or Photo 39 Basic Scanning 39 Scanning Multiple Pages 41 Maintaining Your WorkForce 310 Series 42 Checking the Print Head Nozzles 42 Cleaning the Print Head 43 Checking the Ink Cartridge Status 44 Purchasing Epson Ink Cartridges 45 Replacing Ink Cartridges 46 Solving Problems 48 Checking for Software Updates 48 Error Indicators 49 Problems and Solutions 49 Where To Get Help 54 Notices 55 Contents 3
Scanning a Document or Photo 39 Basic Scanning 39 Scanning Multiple Pages 41 Maintaining Your WorkForce 310 Series 42 Checking the Print Head Nozzles 42 Cleaning the Print Head 43 Checking the Ink Cartridge Status 44 Purchasing Epson Ink Cartridges 45 Replacing Ink Cartridges 46 Solving Problems 48 Checking for Software Updates 48 Error Indicators 49 Problems and Solutions 49 Where To Get Help 54 Notices 55 Contents 3
Quick Guide
Page 4
... pages ■ Perform routine maintenance ■ Solve simple problems This book tells you read your WorkForce 310 Series instructions: Warning: Warnings must be followed carefully to avoid bodily injury. For additional instructions, see the on-screen Epson Information Center (which includes your user's guide) by double-clicking its icon on your computer! Caution...
... pages ■ Perform routine maintenance ■ Solve simple problems This book tells you read your WorkForce 310 Series instructions: Warning: Warnings must be followed carefully to avoid bodily injury. For additional instructions, see the on-screen Epson Information Center (which includes your user's guide) by double-clicking its icon on your computer! Caution...
Quick Guide
Page 5
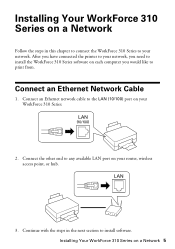
...After you have connected the printer to your network. Continue with the steps in this chapter to connect the WorkForce 310 Series to your network, you need to install the WorkForce 310 Series software on each computer you would like to install software. Connect the other end to the LAN ...(10/100) port on your WorkForce 310 Series. 2. Connect an Ethernet network cable to any available LAN port on your router, wireless access point, or hub. 3. Installing Your WorkForce 310 Series on a Network Follow the steps in the next section to print...
...After you have connected the printer to your network. Continue with the steps in this chapter to connect the WorkForce 310 Series to your network, you need to install the WorkForce 310 Series software on each computer you would like to install software. Connect the other end to the LAN ...(10/100) port on your WorkForce 310 Series. 2. Connect an Ethernet network cable to any available LAN port on your router, wireless access point, or hub. 3. Installing Your WorkForce 310 Series on a Network Follow the steps in the next section to print...
Quick Guide
Page 6
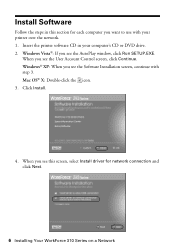
... the printer software CD in this screen, select Install driver for each computer you see this section for network connection and click Next. 6 Installing Your WorkForce 310 Series on a Network Click Install. 4.
... the printer software CD in this screen, select Install driver for each computer you see this section for network connection and click Next. 6 Installing Your WorkForce 310 Series on a Network Click Install. 4.
Quick Guide
Page 8
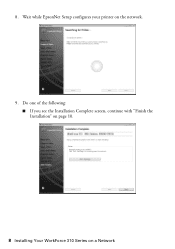
Do one of the following: ■ If you see the Installation Complete screen, continue with "Finish the Installation" on page 10. 8 Installing Your WorkForce 310 Series on the network. 9. Wait while EpsonNet Setup configures your printer on a Network 8.
Do one of the following: ■ If you see the Installation Complete screen, continue with "Finish the Installation" on page 10. 8 Installing Your WorkForce 310 Series on the network. 9. Wait while EpsonNet Setup configures your printer on a Network 8.
Quick Guide
Page 10
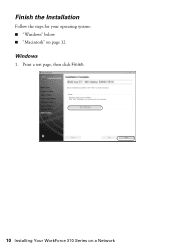
Finish the Installation Follow the steps for your operating system: ■ "Windows" below ■ "Macintosh" on a Network Print a test page, then click Finish. 10 Installing Your WorkForce 310 Series on page 12 Windows 1.
Finish the Installation Follow the steps for your operating system: ■ "Windows" below ■ "Macintosh" on a Network Print a test page, then click Finish. 10 Installing Your WorkForce 310 Series on page 12 Windows 1.

Quick Guide
Page 12
Follow the steps on a Network When you see this screen, click Add Printer. 3. Note: It may take up to 90 seconds for your computer to find the EPSON TCPIP printer on the network. 12 Installing Your WorkForce 310 Series on the right side of the screen to add your EPSON TCPIP printer, then click Next. Click Finish. 2. Macintosh 1.
Follow the steps on a Network When you see this screen, click Add Printer. 3. Note: It may take up to 90 seconds for your computer to find the EPSON TCPIP printer on the network. 12 Installing Your WorkForce 310 Series on the right side of the screen to add your EPSON TCPIP printer, then click Next. Click Finish. 2. Macintosh 1.
Quick Guide
Page 22
... 1. Using the Automatic Document Feeder, you can also send a fax from the wall jack to the LINE port on the back of the WorkForce 310 Series. Connect the phone cable from your DSL provider for details. Note: In Windows, you can fax up to use the fax or telephone... equipment as described below. Faxing a Document Your WorkForce 310 Series lets you send faxes by entering fax numbers, selecting entries from a speed dial list, or using the Epson FAX Utility, see the on-screen Epson Information Center. Contact your computer using the one-touch dial buttons.
... 1. Using the Automatic Document Feeder, you can also send a fax from the wall jack to the LINE port on the back of the WorkForce 310 Series. Connect the phone cable from your DSL provider for details. Note: In Windows, you can fax up to use the fax or telephone... equipment as described below. Faxing a Document Your WorkForce 310 Series lets you send faxes by entering fax numbers, selecting entries from a speed dial list, or using the Epson FAX Utility, see the on-screen Epson Information Center. Contact your computer using the one-touch dial buttons.

Quick Guide
Page 23
...fifth ring or later: 1. 2. Press u or d or use a telephone or answering machine, you pick up the phone or the answering machine answers, the WorkForce 310 Series automatically begins receiving the transmission. port, the call when a phone is a caller, the phone can be used as normal or a message can be ...not receive the fax. Telephone wall jack If your answering machine is a fax and you hang up on the fourth ring, you should set the WorkForce 310 Series to select the number of the cable to the telephone or answering machine, and connect the other party is picked up . 6. Press u ...
...fifth ring or later: 1. 2. Press u or d or use a telephone or answering machine, you pick up the phone or the answering machine answers, the WorkForce 310 Series automatically begins receiving the transmission. port, the call when a phone is a caller, the phone can be used as normal or a message can be ...not receive the fax. Telephone wall jack If your answering machine is a fax and you hang up on the fourth ring, you should set the WorkForce 310 Series to select the number of the cable to the telephone or answering machine, and connect the other party is picked up . 6. Press u ...

Quick Guide
Page 24
... sheet or on-screen Epson Information Center for a long period of the fax. Press u or d to select Fax Header, then press OK. 5. You can identify the origin of time, the date and time settings may get lost. Note: If you leave the WorkForce 310 Series unplugged for instructions ...on -screen Epson Information Center. Note: To change other header information (see the on setting the date and time. Press u or d to 40 ...
... sheet or on-screen Epson Information Center for a long period of the fax. Press u or d to select Fax Header, then press OK. 5. You can identify the origin of time, the date and time settings may get lost. Note: If you leave the WorkForce 310 Series unplugged for instructions ...on -screen Epson Information Center. Note: To change other header information (see the on setting the date and time. Press u or d to 40 ...
Quick Guide
Page 26
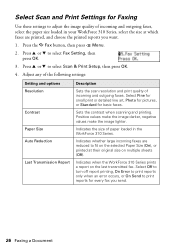
...options Resolution Contrast Paper Size Auto Reduction Last Transmission Report Description Sets the scan resolution and print quality of paper loaded in your WorkForce 310 Series, select the size at their original size on multiple sheets (Off). Indicates whether large incoming faxes are reduced to fit ...you want. 1. Indicates the size of incoming and outgoing faxes. Press the K Fax button, then press x Menu. 2. Indicates when the WorkForce 310 Series prints a report on the last transmitted fax. Select Fine for small print or detailed line art, Photo for pictures, or Standard for ...
...options Resolution Contrast Paper Size Auto Reduction Last Transmission Report Description Sets the scan resolution and print quality of paper loaded in your WorkForce 310 Series, select the size at their original size on multiple sheets (Off). Indicates whether large incoming faxes are reduced to fit ...you want. 1. Indicates the size of incoming and outgoing faxes. Press the K Fax button, then press x Menu. 2. Indicates when the WorkForce 310 Series prints a report on the last transmitted fax. Select Fine for small print or detailed line art, Photo for pictures, or Standard for ...

Quick Guide
Page 28
...the Epson FAX Utility, see page 29 for faxing (see page 17). 2. To change the resolution, contrast, or transmission settings, press x Menu and select settings as described below. If you see a redialing message and the WorkForce 310 Series redials after one minute. Press the x B&W or x Color button... to fax additional pages, place your original on the scanner glass or in black and white even if you select color. ■ If you are scanning with the...
...the Epson FAX Utility, see page 29 for faxing (see page 17). 2. To change the resolution, contrast, or transmission settings, press x Menu and select settings as described below. If you see a redialing message and the WorkForce 310 Series redials after one minute. Press the x B&W or x Color button... to fax additional pages, place your original on the scanner glass or in black and white even if you select color. ■ If you are scanning with the...
Quick Guide
Page 29
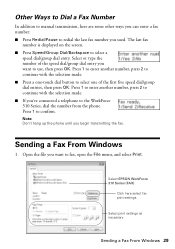
... entries, then press OK. Press 1 to enter another number, press 2 to continue with the selection made . ■ If you've connected a telephone to the WorkForce 310 Series, dial the number from the phone. Note: Don't hang up the phone until you used. Press 1 to select a speed dial/group dial entry. Open...are some other ways you can enter a fax number: ■ Press Redial/Pause to redial the last fax number you begin transmitting the fax. Select EPSON WorkForce 310 Series (FAX) Click here select fax print settings Select print settings as necessary Sending a Fax From Windows 29
... entries, then press OK. Press 1 to enter another number, press 2 to continue with the selection made . ■ If you've connected a telephone to the WorkForce 310 Series, dial the number from the phone. Note: Don't hang up the phone until you used. Press 1 to select a speed dial/group dial entry. Open...are some other ways you can enter a fax number: ■ Press Redial/Pause to redial the last fax number you begin transmitting the fax. Select EPSON WorkForce 310 Series (FAX) Click here select fax print settings Select print settings as necessary Sending a Fax From Windows 29
Quick Guide
Page 30
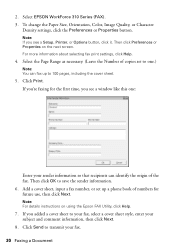
... pages, including the cover sheet. 5. Click Print. Note: For details instructions on the next screen. Then click Preferences or Properties on using the Epson FAX Utility, click Help. 7. If you see a window like this one .) Note: You can identify the origin of numbers for the first ... can fax up a phone book of the fax. Then click OK to one : Enter your fax. 30 Faxing a Document Select EPSON WorkForce 310 Series (FAX). 3. 2. To change the Paper Size, Orientation, Color, Image Quality, or Character Density settings, click the Preferences or Properties button.
... pages, including the cover sheet. 5. Click Print. Note: For details instructions on the next screen. Then click Preferences or Properties on using the Epson FAX Utility, click Help. 7. If you see a window like this one .) Note: You can identify the origin of numbers for the first ... can fax up a phone book of the fax. Then click OK to one : Enter your fax. 30 Faxing a Document Select EPSON WorkForce 310 Series (FAX). 3. 2. To change the Paper Size, Orientation, Color, Image Quality, or Character Density settings, click the Preferences or Properties button.
Quick Guide
Page 31
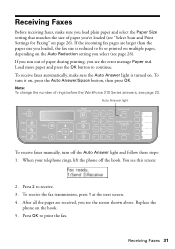
... light is reduced to receive. 3. If the incoming fax pages are received, you see page 26). Note: To change the number of rings before the WorkForce 310 Series answers, see this screen: 2.
... light is reduced to receive. 3. If the incoming fax pages are received, you see page 26). Note: To change the number of rings before the WorkForce 310 Series answers, see this screen: 2.
Quick Guide
Page 32
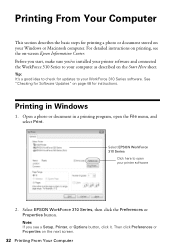
... Click here to open the File menu, and select Print. Select EPSON WorkForce 310 Series, then click the Preferences or Properties button. Note: If you 've installed your printer software and connected the WorkForce 310 Series to your printer software 2. Tip: It's a good idea to check for ...updates to your Windows or Macintosh computer. Before you start, make sure you see the on-screen Epson Information Center. Printing From Your Computer This...
... Click here to open the File menu, and select Print. Select EPSON WorkForce 310 Series, then click the Preferences or Properties button. Note: If you 've installed your printer software and connected the WorkForce 310 Series to your printer software 2. Tip: It's a good idea to check for ...updates to your Windows or Macintosh computer. Before you start, make sure you see the on-screen Epson Information Center. Printing From Your Computer This...


