
User Manual
Page 3
... of this product or unauthorized modifications, repairs, or alterations to this product or third parties for damages resulting from the use of Epson America, Inc. Action Printer is a trademark and EPSON Connection is any damages or problems arising from the use of International Business Machines Corporation. CompuServe is a registered trademark of CompuServe Information...
... of this product or unauthorized modifications, repairs, or alterations to this product or third parties for damages resulting from the use of Epson America, Inc. Action Printer is a trademark and EPSON Connection is any damages or problems arising from the use of International Business Machines Corporation. CompuServe is a registered trademark of CompuServe Information...

User Manual
Page 9
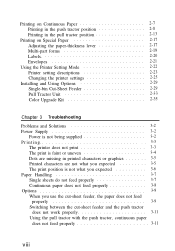
... to the serial interface 1-15 Setting Up Your Software 1-16 Microsoft Windows 3.1 and all Windows programs 1-17 Using non-Windows software 1-18 Chapter 2 Using the Printer Using the Control Panel 2-2 Lights and buttons 2-2 Selecting fonts 2-4 Printing on Single Sheets 2-5 Loading single sheets 2-5 Getting the results you expect 2-6 vii
... to the serial interface 1-15 Setting Up Your Software 1-16 Microsoft Windows 3.1 and all Windows programs 1-17 Using non-Windows software 1-18 Chapter 2 Using the Printer Using the Control Panel 2-2 Lights and buttons 2-2 Selecting fonts 2-4 Printing on Single Sheets 2-5 Loading single sheets 2-5 Getting the results you expect 2-6 vii
User Manual
Page 10
...Adjusting the paper-thickness lever 2-17 Multi-part forms 2-19 Labels 2-20 Envelopes 2-21 Using the Printer Setting Mode 2-22 Printer setting descriptions 2-23 Changing the printer settings 2-25 Installing and Using Options 2-29 Single-bin Cut-Sheet Feeder 2-29 Pull Tractor Unit ... Chapter 3 Troubleshooting Problems and Solutions 3-2 Power Supply 3-2 Power is not being supplied 3-2 Printing 3-3 The printer does not print 3-3 The print is faint or uneven 3-4 Dots are missing in printed characters or graphics 3-5 Printed characters are not what you expected 3-5 The print position...
...Adjusting the paper-thickness lever 2-17 Multi-part forms 2-19 Labels 2-20 Envelopes 2-21 Using the Printer Setting Mode 2-22 Printer setting descriptions 2-23 Changing the printer settings 2-25 Installing and Using Options 2-29 Single-bin Cut-Sheet Feeder 2-29 Pull Tractor Unit ... Chapter 3 Troubleshooting Problems and Solutions 3-2 Power Supply 3-2 Power is not being supplied 3-2 Printing 3-3 The printer does not print 3-3 The print is faint or uneven 3-4 Dots are missing in printed characters or graphics 3-5 Printed characters are not what you expected 3-5 The print position...
User Manual
Page 11
... Printing Paper Mechanical Electrical Environmental Safety approvals Interface Specifications Parallel interface Serial interface Command Summary Sending printer commands Using the command summary General operation Paper feeding Page format Print position motion Font selection Font enhancement Spacing Character handling Bit image Graphics Color ...
... Printing Paper Mechanical Electrical Environmental Safety approvals Interface Specifications Parallel interface Serial interface Command Summary Sending printer commands Using the command summary General operation Paper feeding Page format Print position motion Font selection Font enhancement Spacing Character handling Bit image Graphics Color ...
User Manual
Page 12
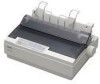
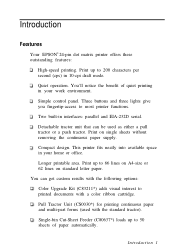
.... Pull Tractor Unit (CS0030*) for printing continuous paper and multi-part forms (used as either a pull tractor or a push tractor. Introduction Features Your EPSON® 24-pin dot matrix printer offers these outstanding features: High-speed printing. Quiet operation. Print up to 200 characters per second (cps) in your home or office. Print up...
.... Pull Tractor Unit (CS0030*) for printing continuous paper and multi-part forms (used as either a pull tractor or a push tractor. Introduction Features Your EPSON® 24-pin dot matrix printer offers these outstanding features: High-speed printing. Quiet operation. Print up to 200 characters per second (cps) in your home or office. Print up...
User Manual
Page 13
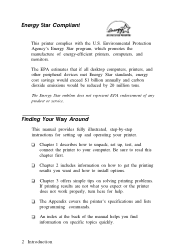
... index at the back of the manual helps you expect or the printer does not work properly, turn here for setting up , test, and connect the printer to install options. The Appendix covers the printer's specifications and lists programming commands. Finding Your Way Around This manual...you want and how to your printer. The Energy Star emblem does not represent EPA endorsement of energy-efficient printers, computers, and monitors. Energy Star Compliant This printer complies with the U.S. The EPA estimates that if all desktop computers, printers, and other peripheral devices met ...
... index at the back of the manual helps you expect or the printer does not work properly, turn here for setting up , test, and connect the printer to install options. The Appendix covers the printer's specifications and lists programming commands. Finding Your Way Around This manual...you want and how to your printer. The Energy Star emblem does not represent EPA endorsement of energy-efficient printers, computers, and monitors. Energy Star Compliant This printer complies with the U.S. The EPA estimates that if all desktop computers, printers, and other peripheral devices met ...

User Manual
Page 14
Introduction 3 Warnings, Cautions, and Notes Warnings must be followed carefully to your printer. Notes contain important information and useful tips on the operation. of your equipment. Cautions must be observed to avoid damage to avoid bodily injury.
Introduction 3 Warnings, Cautions, and Notes Warnings must be followed carefully to your printer. Notes contain important information and useful tips on the operation. of your equipment. Cautions must be observed to avoid damage to avoid bodily injury.

User Manual
Page 15
... clean it . Use the type of the grounding-type plug. This printer may be walked on the label. Follow all of power available, consult your printer near or over a radiator or heat register. Do not place the printer on the printer. If you set up your obsolete outlet, Do not defeat the purpose... of power source indicated on . 4 Introduction Placing the printer on it , and use your dealer or local power company. Do not use a damp cloth for the ventilation necessary to ensure reliable operation and ...
... clean it . Use the type of the grounding-type plug. This printer may be walked on the label. Follow all of power available, consult your printer near or over a radiator or heat register. Do not place the printer on the printer. If you set up your obsolete outlet, Do not defeat the purpose... of power source indicated on . 4 Introduction Placing the printer on it , and use your dealer or local power company. Do not use a damp cloth for the ventilation necessary to ensure reliable operation and ...

User Manual
Page 16
...that could expose you use an extension cord, make sure that the total of all servicing in those compartments to repair the printer yourself. Unplug the printer from the wall outlet and have it repaired by a qualified service person under the following conditions: When the power cord or... not exceed the extension cord's ampere rating. Refer all products plugged into your printer because they may result in damage and will often require extensive work by a qualified technician to restore the printer to normal operation. If you to dangerous voltage points or other controls may touch...
...that could expose you use an extension cord, make sure that the total of all servicing in those compartments to repair the printer yourself. Unplug the printer from the wall outlet and have it repaired by a qualified service person under the following conditions: When the power cord or... not exceed the extension cord's ampere rating. Refer all products plugged into your printer because they may result in damage and will often require extensive work by a qualified technician to restore the printer to normal operation. If you to dangerous voltage points or other controls may touch...
User Manual
Page 17
Chapter 1 Setting Up the Printer Unpacking the Printer 1-2 Choosing a Place for the Printer 1-3 Assembling the Printer 1-4 Installing the knob 1-4 Attaching the paper supports 1-5 Installing the ribbon cartridge 1-6 Plugging in the printer 1-9 Running the Self Test 1-10 Connecting the Printer to Your Computer 1-13 Connecting to the parallel interface 1-14 Connecting to the serial interface 1-15 Setting Up Your Software 1-16 Microsoft Windows 3.1 and all Windows programs . . . . 1-17 Using non-Windows software 1-18 Setting Up the Printer 1-1
Chapter 1 Setting Up the Printer Unpacking the Printer 1-2 Choosing a Place for the Printer 1-3 Assembling the Printer 1-4 Installing the knob 1-4 Attaching the paper supports 1-5 Installing the ribbon cartridge 1-6 Plugging in the printer 1-9 Running the Self Test 1-10 Connecting the Printer to Your Computer 1-13 Connecting to the parallel interface 1-14 Connecting to the serial interface 1-15 Setting Up Your Software 1-16 Microsoft Windows 3.1 and all Windows programs . . . . 1-17 Using non-Windows software 1-18 Setting Up the Printer 1-1

User Manual
Page 18
Unpacking the Printer Your printer box should include these items. Printout guide Knob Paper supports In some locations, the power cord is attached to the printer. 1-2 Setting Up the Printer
Unpacking the Printer Your printer box should include these items. Printout guide Knob Paper supports In some locations, the power cord is attached to the printer. 1-2 Setting Up the Printer
User Manual
Page 19
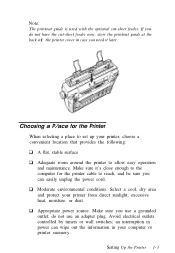
...the power cord. If you do not use a grounded outlet; Choosing a P/ace for the printer cable to reach, and be sure you can wipe out the information in your computer or printer memory. Moderate environmental conditions. Avoid electrical outlets controlled by timers or wall switches; Setting Up ...the Printer 1-3 Make sure you use an adapter plug. Note: The printout guide is used with ...
...the power cord. If you do not use a grounded outlet; Choosing a P/ace for the printer cable to reach, and be sure you can wipe out the information in your computer or printer memory. Moderate environmental conditions. Avoid electrical outlets controlled by timers or wall switches; Setting Up ...the Printer 1-3 Make sure you use an adapter plug. Note: The printout guide is used with ...
User Manual
Page 20
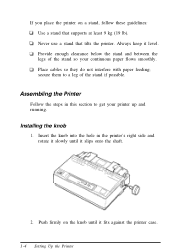
Always keep it slips onto the shaft. 2. Assembling the Printer Follow the steps in the printer's right side and rotate it slowly until it fits against the printer case. 1-4 Setting Up the Printer Place cables so they do not interfere with paper feeding; secure them to get your continuous paper flows ...smoothly. Insert the knob into the hole in this section to a leg of the stand so your printer up and running. If you place the printer on the knob until it level. Installing the knob 1. Provide enough clearance below the stand and between the legs ...
Always keep it slips onto the shaft. 2. Assembling the Printer Follow the steps in the printer's right side and rotate it slowly until it fits against the printer case. 1-4 Setting Up the Printer Place cables so they do not interfere with paper feeding; secure them to get your continuous paper flows ...smoothly. Insert the knob into the hole in this section to a leg of the stand so your printer up and running. If you place the printer on the knob until it level. Installing the knob 1. Provide enough clearance below the stand and between the legs ...
User Manual
Page 21
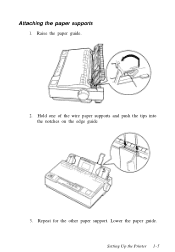
Repeat for the other paper support. Raise the paper guide. 2. Hold one of the wire paper supports and push the tips into the notches on the edge guide 3. Lower the paper guide. Setting Up the Printer 1-5 Attaching the paper supports 1.
Repeat for the other paper support. Raise the paper guide. 2. Hold one of the wire paper supports and push the tips into the notches on the edge guide 3. Lower the paper guide. Setting Up the Printer 1-5 Attaching the paper supports 1.
User Manual
Page 22
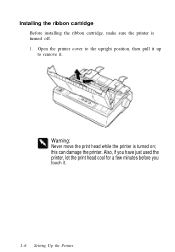
this can damage the printer. Also, if you have just used the printer, let the print head cool for a few minutes before you touch it . Open the printer cover to the upright position, then pull it up to remove it . 1-6 Setting Up the Printer Warning: Never move the print head while the printer is turned off. 1. Installing the ribbon cartridge Before installing the ribbon cartridge, make sure the printer is turned on;
this can damage the printer. Also, if you have just used the printer, let the print head cool for a few minutes before you touch it . Open the printer cover to the upright position, then pull it up to remove it . 1-6 Setting Up the Printer Warning: Never move the print head while the printer is turned off. 1. Installing the ribbon cartridge Before installing the ribbon cartridge, make sure the printer is turned on;
User Manual
Page 23
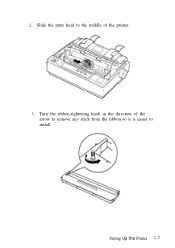
Setting Up the Printer 1-7 2. Slide the print head to install. Turn the ribbon-tightening knob in the direction of the arrow to remove any slack from the ribbon so it is easier to the middle of the printer. 3.
Setting Up the Printer 1-7 2. Slide the print head to install. Turn the ribbon-tightening knob in the direction of the arrow to remove any slack from the ribbon so it is easier to the middle of the printer. 3.
User Manual
Page 24
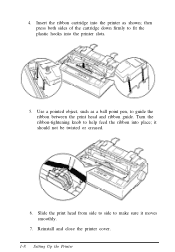
it moves smoothly. 7. then press both sides of the cartridge down firmly to help feed the ribbon into the printer slots. 5. Slide the print head from side to side to guide the ribbon between the print head and ribbon guide. 4. Turn the ribbon-tightening knob to fit the plastic hooks into place; Reinstall and close the printer cover. 1-8 Setting Up the Printer Insert the ribbon cartridge into the printer as a ball point pen, to make sure it should not be twisted or creased. 6. Use a pointed object, such as shown;
it moves smoothly. 7. then press both sides of the cartridge down firmly to help feed the ribbon into the printer slots. 5. Slide the print head from side to side to guide the ribbon between the print head and ribbon guide. 4. Turn the ribbon-tightening knob to fit the plastic hooks into place; Reinstall and close the printer cover. 1-8 Setting Up the Printer Insert the ribbon cartridge into the printer as a ball point pen, to make sure it should not be twisted or creased. 6. Use a pointed object, such as shown;
User Manual
Page 25
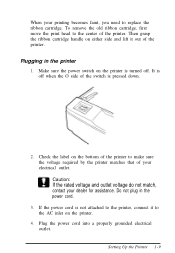
...properly grounded electrical outlet. Make sure the power switch on the bottom of the printer to the center of the switch is not attached to the printer, connect it out of your electrical outlet. Do not plug in the printer 1. If the power cord is pressed down. 2. To remove the old ribbon... move the print head to make sure the voltage required by the printer matches that of the printer. It is turned off when the O side of the printer. When your printing becomes faint, you need to the AC inlet on the printer. 4. Plugging in the power cord. 3. Then grasp the ribbon cartridge...
...properly grounded electrical outlet. Make sure the power switch on the bottom of the printer to the center of the switch is not attached to the printer, connect it out of your electrical outlet. Do not plug in the printer 1. If the power cord is pressed down. 2. To remove the old ribbon... move the print head to make sure the voltage required by the printer matches that of the printer. It is turned off when the O side of the printer. When your printing becomes faint, you need to the AC inlet on the printer. 4. Plugging in the power cord. 3. Then grasp the ribbon cartridge...

User Manual
Page 26
Caution: You should use paper at least 210 mm (8.3 inches) wide to the single-sheet position. Raise the paper guide upright. 1-10 Setting Up the Printer otherwise, the print head prints directly on the platen. 1. Make sure the printer is turned off and the paper-release lever is working properly. Running the Self Test The built-in self test function demonstrates that the printer is pushed back to run the test with single sheets. this section describes the easier way, with either continuous paper or single sheets; You can run the self test;
Caution: You should use paper at least 210 mm (8.3 inches) wide to the single-sheet position. Raise the paper guide upright. 1-10 Setting Up the Printer otherwise, the print head prints directly on the platen. 1. Make sure the printer is turned off and the paper-release lever is working properly. Running the Self Test The built-in self test function demonstrates that the printer is pushed back to run the test with single sheets. this section describes the easier way, with either continuous paper or single sheets; You can run the self test;

User Manual
Page 27
2. Next, adjust the right edge guide to match the width of paper. 3. The beeper sounds three times, indicating the printer is out of your paper. Slide the left edge guide until it locks in place at the triangular guide mark. Release the button after the Pause light flashes. Setting Up the Printer 1-11 While holding down the LF/FF button, turn on the printer.
2. Next, adjust the right edge guide to match the width of paper. 3. The beeper sounds three times, indicating the printer is out of your paper. Slide the left edge guide until it locks in place at the triangular guide mark. Release the button after the Pause light flashes. Setting Up the Printer 1-11 While holding down the LF/FF button, turn on the printer.


