User Manual
Page 10
... Printing in the push tractor position 2-8 Printing in the pull tractor position 2-13 Printing on Special Paper 2-17 Adjusting the paper-thickness lever 2-17 Multi-part forms 2-19 Labels 2-20 Envelopes 2-21 Using the Printer Setting Mode 2-22 Printer setting descriptions 2-23 Changing the printer settings 2-25 Installing and Using Options 2-29 Single-bin Cut-Sheet Feeder 2-29 Pull Tractor Unit 2-33 Color Upgrade Kit 2-35 Chapter 3 Troubleshooting Problems and Solutions 3-2 Power Supply 3-2 Power is not being supplied 3-2 Printing 3-3 The printer does not print 3-3 The print...
... Printing in the push tractor position 2-8 Printing in the pull tractor position 2-13 Printing on Special Paper 2-17 Adjusting the paper-thickness lever 2-17 Multi-part forms 2-19 Labels 2-20 Envelopes 2-21 Using the Printer Setting Mode 2-22 Printer setting descriptions 2-23 Changing the printer settings 2-25 Installing and Using Options 2-29 Single-bin Cut-Sheet Feeder 2-29 Pull Tractor Unit 2-33 Color Upgrade Kit 2-35 Chapter 3 Troubleshooting Problems and Solutions 3-2 Power Supply 3-2 Power is not being supplied 3-2 Printing 3-3 The printer does not print 3-3 The print...
User Manual
Page 12
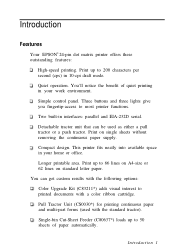
... used with a color ribbon cartridge. You'll notice the benefit of paper automatically. Two built-in your home or office. Single-bin Cut-Sheet Feeder (C80637*) loads up to 66 lines on A4-size or 62 lines on single sheets without removing the continuous paper supply. Print up to 50 sheets of quiet printing in interfaces: parallel and EIA-232D serial. This printer fits neatly into available space in 10-cpi draft mode...
... used with a color ribbon cartridge. You'll notice the benefit of paper automatically. Two built-in your home or office. Single-bin Cut-Sheet Feeder (C80637*) loads up to 66 lines on A4-size or 62 lines on single sheets without removing the continuous paper supply. Print up to 50 sheets of quiet printing in interfaces: parallel and EIA-232D serial. This printer fits neatly into available space in 10-cpi draft mode...
User Manual
Page 21
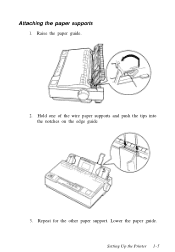
Lower the paper guide. Raise the paper guide. 2. Attaching the paper supports 1. Repeat for the other paper support. Hold one of the wire paper supports and push the tips into the notches on the edge guide 3. Setting Up the Printer 1-5
Lower the paper guide. Raise the paper guide. 2. Attaching the paper supports 1. Repeat for the other paper support. Hold one of the wire paper supports and push the tips into the notches on the edge guide 3. Setting Up the Printer 1-5

User Manual
Page 28
... printer cover helps the paper feed properly. 5. Slide a sheet of a typical self-test printout: ?@ABCDEFGHIJKLMNOPQRSTUVWXYZ[\]^_'abcd =>?@ABCDEFGHIJKLMNOPQRSTUVWXYZ[\]^_'abcde >?@ABCDEFGHIJKLMNOPQRSTUVWXYZ[\]^_'abcdef ?@ABCDEFGHIJKLMNOPQRSTUVWXYZ[\]^_'abcdefg @ABCDEFGHIJKLMNOPQRSTUVWXYZ[\l]^_'abcdefgh ABCDEFGHIJKLMNOPQRSTUVWXYZ[\]^_'abcdefghi BCDEFGHIJKLMNOPQRSTUVWXYZ[\]^_'abcdefghij Notes If the self test did not print satisfactorily, see Chapter 3. To stop printing temporarily, press the Pause button. 6. To end the self test, make sure the printer is not printing. The printer loads...
... printer cover helps the paper feed properly. 5. Slide a sheet of a typical self-test printout: ?@ABCDEFGHIJKLMNOPQRSTUVWXYZ[\]^_'abcd =>?@ABCDEFGHIJKLMNOPQRSTUVWXYZ[\]^_'abcde >?@ABCDEFGHIJKLMNOPQRSTUVWXYZ[\]^_'abcdef ?@ABCDEFGHIJKLMNOPQRSTUVWXYZ[\]^_'abcdefg @ABCDEFGHIJKLMNOPQRSTUVWXYZ[\l]^_'abcdefgh ABCDEFGHIJKLMNOPQRSTUVWXYZ[\]^_'abcdefghi BCDEFGHIJKLMNOPQRSTUVWXYZ[\]^_'abcdefghij Notes If the self test did not print satisfactorily, see Chapter 3. To stop printing temporarily, press the Pause button. 6. To end the self test, make sure the printer is not printing. The printer loads...
User Manual
Page 33
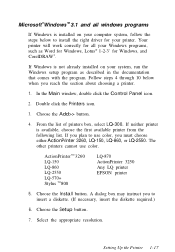
Choose the Add>> button. 4. The other printers cannot use color, you must choose either ActionPrinter 3260, LQ-150, LQ-860, or LQ-2550. Setting Up the Printer 1-17 Follow steps 4 through 10 below to install the right driver for Windows, and CorelDRAW®. Double click the Printers icon. 3. Select the appropriate resolution. In the Main window, double click the Control Panel icon. 2. A dialog box may instruct you reach the...
Choose the Add>> button. 4. The other printers cannot use color, you must choose either ActionPrinter 3260, LQ-150, LQ-860, or LQ-2550. Setting Up the Printer 1-17 Follow steps 4 through 10 below to install the right driver for Windows, and CorelDRAW®. Double click the Printers icon. 3. Select the appropriate resolution. In the Main window, double click the Control Panel icon. 2. A dialog box may instruct you reach the...
User Manual
Page 37
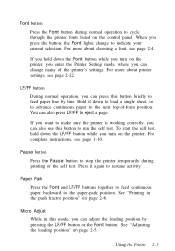
... button During normal operation, you can adjust the loading position by line. Hold it again to eject a page. You can press this button to feed paper line by pressing the LF/FF button or the Font button. To start the self test, hold down the LF/FF button while you turn on the control panel. See "Printing in this mode, you can change to cycle through the printer fonts listed on the printer, you enter the Printer Setting mode...
... button During normal operation, you can adjust the loading position by line. Hold it again to eject a page. You can press this button to feed paper line by pressing the LF/FF button or the Font button. To start the self test, hold down the LF/FF button while you turn on the control panel. See "Printing in this mode, you can change to cycle through the printer fonts listed on the printer, you enter the Printer Setting mode...
User Manual
Page 40
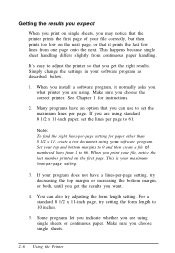
... paper other than 8 1/2 x 11, create a test document using your top and bottom margins to 0 and then create a file of your software program as described below. 1. Many programs have a lines-per page. When you print your maximum lines-per-page setting. 3. If your program does not have an option that you can also try setting the form length to 10 inches. 5. It's easy to adjust...
... paper other than 8 1/2 x 11, create a test document using your top and bottom margins to 0 and then create a file of your software program as described below. 1. Many programs have a lines-per page. When you print your maximum lines-per-page setting. 3. If your program does not have an option that you can also try setting the form length to 10 inches. 5. It's easy to adjust...
User Manual
Page 51
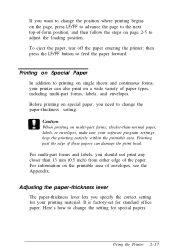
... information on special paper, you should not print any closer than -normal paper, labels, or envelopes, make sure your software program settings keep the printing entirely within the printable area. Here's how to feed the paper forward. For multi-part forms and labels, you need to adjust the loading position. It is factory-set for standard office paper. To eject the paper, tear off the paper entering the printer; Printing past the edge...
... information on special paper, you should not print any closer than -normal paper, labels, or envelopes, make sure your software program settings keep the printing entirely within the printable area. Here's how to feed the paper forward. For multi-part forms and labels, you need to adjust the loading position. It is factory-set for standard office paper. To eject the paper, tear off the paper entering the printer; Printing past the edge...

User Manual
Page 57
... the paper perforation to Off. Because most software programs set this feature only if your program does not provide them. You can easily tear off the printed pages. Character table Character tables contain the characters and symbols used in the Printer Setting mode. This feature does not affect single-sheet paper. Using the Printer 2-23 Auto tear off When you should use the tractor to 8 1/2, 11, 12, or 70/6 (the length of character tables. Your printer includes...
... the paper perforation to Off. Because most software programs set this feature only if your program does not provide them. You can easily tear off the printed pages. Character table Character tables contain the characters and symbols used in the Printer Setting mode. This feature does not affect single-sheet paper. Using the Printer 2-23 Auto tear off When you should use the tractor to 8 1/2, 11, 12, or 70/6 (the length of character tables. Your printer includes...

User Manual
Page 58
... printer operates as the print direction for precise vertical alignment of print dots. If possible, choose an EPSON ESC/ P 2 printer in your printed text is accompanied by your printer. If your software programs. This will allow you select ESC/P 2TM, the printer emulates an EPSON ESC / P 2 printer. When you to use the most advanced font and graphics handling available. (Emulation means that the printer can use high-resolution 24-pin graphics commands. The default setting is...
... printer operates as the print direction for precise vertical alignment of print dots. If possible, choose an EPSON ESC/ P 2 printer in your printed text is accompanied by your printer. If your software programs. This will allow you select ESC/P 2TM, the printer emulates an EPSON ESC / P 2 printer. When you to use the most advanced font and graphics handling available. (Emulation means that the printer can use high-resolution 24-pin graphics commands. The default setting is...
User Manual
Page 59
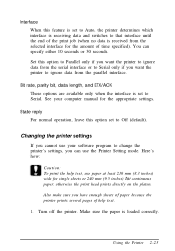
... the platen. Turn off the printer. You can use paper at least 210 mm (8.3 inches) wide for single sheets or 240 mm (9.5 inches) for continuous paper; Changing the printer settings If you cannot use your computer manual for the amount of time specified). Make sure the paper is received from the parallel interface. Bit rate, parity bit, data length, and ETX/ACK These options are available only when the interface is set to Off (default...
... the platen. Turn off the printer. You can use paper at least 210 mm (8.3 inches) wide for single sheets or 240 mm (9.5 inches) for continuous paper; Changing the printer settings If you cannot use your computer manual for the amount of time specified). Make sure the paper is received from the parallel interface. Bit rate, parity bit, data length, and ETX/ACK These options are available only when the interface is set to Off (default...
User Manual
Page 65
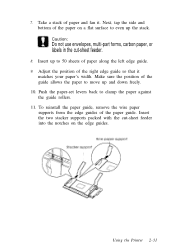
... edge guides. Adjust the position of paper along the left edge guide. 9. Make sure the position of the guide allows the paper to move up to 50 sheets of the right edge guide so that it . To reinstall the paper guide, remove the wire paper supports from the edge guides of paper and fan it matches your paper's width. 7. Insert the two stacker supports packed with the cut -sheet feeder. 8. Using the Printer 2-31 Push the paper-set levers...
... edge guides. Adjust the position of paper along the left edge guide. 9. Make sure the position of the guide allows the paper to move up to 50 sheets of the right edge guide so that it . To reinstall the paper guide, remove the wire paper supports from the edge guides of paper and fan it matches your paper's width. 7. Insert the two stacker supports packed with the cut -sheet feeder. 8. Using the Printer 2-31 Push the paper-set levers...

User Manual
Page 67
... switch between continuous paper and cut -sheet feeder, press both release tabs and pull out the paper guide. Install the built-in tractor in the pull tractor position. Pull Tractor Unit An additional pull tractor (C80030*) is especially useful with continuous pre-printed forms, multi-part forms, and labels. 1. Load continuous paper on page 2-12 for details. Slide the left edge guide of the push tractor. (See "Printing on Continuous Paper" on the printer. Install the optional tractor in the push tractor position. Turn...
... switch between continuous paper and cut -sheet feeder, press both release tabs and pull out the paper guide. Install the built-in tractor in the pull tractor position. Pull Tractor Unit An additional pull tractor (C80030*) is especially useful with continuous pre-printed forms, multi-part forms, and labels. 1. Load continuous paper on page 2-12 for details. Slide the left edge guide of the push tractor. (See "Printing on Continuous Paper" on the printer. Install the optional tractor in the push tractor position. Turn...
User Manual
Page 73
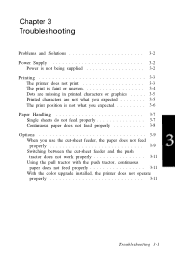
... print position is not what you expected 3-6 Paper Handling 3-7 Single sheets do not feed properly 3-7 Continuous paper does not feed properly 3-8 Options 3-9 When you use the cut-sheet feeder, the paper does not feed properly 3-9 Switching between the cut-sheet feeder and the push tractor does not work properly 3-11 Using the pull tractor with the push tractor, continuous paper does not feed properly 3-11 With the color upgrade installed, the printer does not operate properly 3-11 Troubleshooting...
... print position is not what you expected 3-6 Paper Handling 3-7 Single sheets do not feed properly 3-7 Continuous paper does not feed properly 3-8 Options 3-9 When you use the cut-sheet feeder, the paper does not feed properly 3-9 Switching between the cut-sheet feeder and the push tractor does not work properly 3-11 Using the pull tractor with the push tractor, continuous paper does not feed properly 3-11 With the color upgrade installed, the printer does not operate properly 3-11 Troubleshooting...
User Manual
Page 77
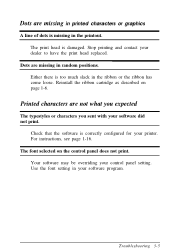
... font selected on page 1-6. Troubleshooting 3-5 Dots are not what you expected The typestyles or characters you sent with your software did not print. Dots are missing in your software program. Your software may be overriding your dealer to have the print head replaced. The print head is too much slack in the printout. Either there is damaged. Reinstall the ribbon cartridge as described on the control panel does not print. Use...
... font selected on page 1-6. Troubleshooting 3-5 Dots are not what you expected The typestyles or characters you sent with your software did not print. Dots are missing in your software program. Your software may be overriding your dealer to have the print head replaced. The print head is too much slack in the printout. Either there is damaged. Reinstall the ribbon cartridge as described on the control panel does not print. Use...
User Manual
Page 78
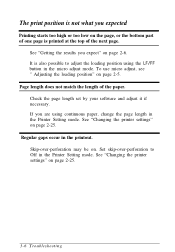
... in the printout. Set skip-over -perforation may be on page 2-6. Skip-over -perforation to adjust the loading position using continuous paper, change the page length in the micro adjust mode. If you expect" on . The print position is not what you expected Printing starts too high or too low on page 2-25. 3-6 Troubleshooting See "Changing the printer settings" on the page, or the bottom part of one page is printed at the top of...
... in the printout. Set skip-over -perforation may be on page 2-6. Skip-over -perforation to adjust the loading position using continuous paper, change the page length in the micro adjust mode. If you expect" on . The print position is not what you expected Printing starts too high or too low on page 2-25. 3-6 Troubleshooting See "Changing the printer settings" on the page, or the bottom part of one page is printed at the top of...

User Manual
Page 85
Appendix Printer Specifications A-2 Printing A-2 Paper A-4 Mechanical A-6 Electrical A-7 Environmental A-7 Safety approvals A-8 Interface Specifications A-8 Parallel interface A-8 Serial interface A-8 Command Summary A-10 Sending printer commands A-10 Using the command summary A-10 General operation A-11 Paper feeding A-11 Page format A-11 Print position motion A-12 Font selection A-13 Font enhancement A-14 Spacing A-15 Character handling A-16 Bit image A-18 Graphics A-19 Color printing A-19 Character Tables A-20 Appendix A-1
Appendix Printer Specifications A-2 Printing A-2 Paper A-4 Mechanical A-6 Electrical A-7 Environmental A-7 Safety approvals A-8 Interface Specifications A-8 Parallel interface A-8 Serial interface A-8 Command Summary A-10 Sending printer commands A-10 Using the command summary A-10 General operation A-11 Paper feeding A-11 Page format A-11 Print position motion A-12 Font selection A-13 Font enhancement A-14 Spacing A-15 Character handling A-16 Bit image A-18 Graphics A-19 Color printing A-19 Character Tables A-20 Appendix A-1

User Manual
Page 104
The rest of the tables show only the characters for hex codes 00 through FF. The tables with the Printer Setting mode or by using a command. All tables except the italic character table are available in certain areas only. Character Tables These character tables are selected with an asterisk (*) after the table name are the same as the PC437 table for hex codes 80 through 7F, so only the PC437 table is shown completely. PC437 (USA, standard Europe) A-20 Appendix
The rest of the tables show only the characters for hex codes 00 through FF. The tables with the Printer Setting mode or by using a command. All tables except the italic character table are available in certain areas only. Character Tables These character tables are selected with an asterisk (*) after the table name are the same as the PC437 table for hex codes 80 through 7F, so only the PC437 table is shown completely. PC437 (USA, standard Europe) A-20 Appendix
User Manual
Page 113
Index A Adjusting loading position, 2-5 paper-thickness lever, 2-17 AGM, 2-22, 2-24 Assembling printer, 1-4-9 Attaching paper supports, 1-5 Auto line feed, 2-22, 2-24 tear off, 2-22-23 B Bit rate, 2-22, 2-25 Buttons, 2-2-3 C Changing printer settings, 2-25-28 Character handling, A-16 table, 2-22-23 Choosing a place for the printer, 1-3 Color Upgrade Kit, 1, 2-35-38 Command summary, A-10-19 Connecting printer to computer, 1-13-16 Continuous paper, 2-7-17 Control panel, 2-2-4 Cut-sheet feeder, 2-29-33 D Data length, 2-22, 2-25 E Envelopes, 2-21 ETX/ACK, 2-22, 2-25 F Features...
Index A Adjusting loading position, 2-5 paper-thickness lever, 2-17 AGM, 2-22, 2-24 Assembling printer, 1-4-9 Attaching paper supports, 1-5 Auto line feed, 2-22, 2-24 tear off, 2-22-23 B Bit rate, 2-22, 2-25 Buttons, 2-2-3 C Changing printer settings, 2-25-28 Character handling, A-16 table, 2-22-23 Choosing a place for the printer, 1-3 Color Upgrade Kit, 1, 2-35-38 Command summary, A-10-19 Connecting printer to computer, 1-13-16 Continuous paper, 2-7-17 Control panel, 2-2-4 Cut-sheet feeder, 2-29-33 D Data length, 2-22, 2-25 E Envelopes, 2-21 ETX/ACK, 2-22, 2-25 F Features...

User Manual
Page 114
...17 Micro Adjust, 2-3 Movable ribbon guide, 2-36 Multi-part forms, 2-19 N Non-Windows software, 1-18 O Options installing and using, 2-29-39 troubleshooting, 3-9-12 P Page length, 2-22-23 Paper continuous, 2-7-17 printing on special, 2-19-21 single sheet, 2-5-6 Paperhandling, troubleshooting, 3-7-9 Paper Park, 2-3 Paper-thickness lever, adjusting 2-17 Parallel interface, 1-13-14 Parity bit, 2-22, 2-25 Pause button, 2-3 light, 2-2 Plugging in the printer, 1-9 Power supply, troubleshooting, 3-2-3 Printer assembling, 1-4-9 changing the settings, 2-25-28 choosing a place for, 1-3 commands, sending...
...17 Micro Adjust, 2-3 Movable ribbon guide, 2-36 Multi-part forms, 2-19 N Non-Windows software, 1-18 O Options installing and using, 2-29-39 troubleshooting, 3-9-12 P Page length, 2-22-23 Paper continuous, 2-7-17 printing on special, 2-19-21 single sheet, 2-5-6 Paperhandling, troubleshooting, 3-7-9 Paper Park, 2-3 Paper-thickness lever, adjusting 2-17 Parallel interface, 1-13-14 Parity bit, 2-22, 2-25 Pause button, 2-3 light, 2-2 Plugging in the printer, 1-9 Power supply, troubleshooting, 3-2-3 Printer assembling, 1-4-9 changing the settings, 2-25-28 choosing a place for, 1-3 commands, sending...


