User's Guide
Page 39
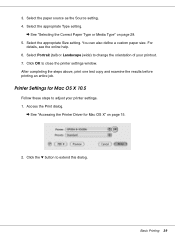
Select the appropriate Size setting. After completing the steps above, print one test copy and examine the results before printing an entire job. Printer Settings for Mac OS X" on page 29. 5. 3. Select the appropriate Type setting. & See "Selecting the Correct Paper Type or Media Type" ...as the Source setting. 4. Select Portrait (tall) or Landscape (wide) to adjust your printout. 7. Click the d button to close the printer settings window. Access the Print dialog. & See "Accessing the Printer Driver for Mac OS X 10.5 Follow these steps to change the orientation of your...
Select the appropriate Size setting. After completing the steps above, print one test copy and examine the results before printing an entire job. Printer Settings for Mac OS X" on page 29. 5. 3. Select the appropriate Type setting. & See "Selecting the Correct Paper Type or Media Type" ...as the Source setting. 4. Select Portrait (tall) or Landscape (wide) to adjust your printout. 7. Click the d button to close the printer settings window. Access the Print dialog. & See "Accessing the Printer Driver for Mac OS X 10.5 Follow these steps to change the orientation of your...
User's Guide
Page 41
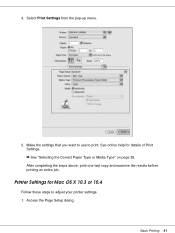
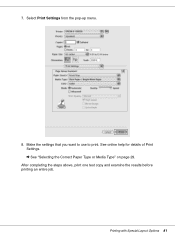
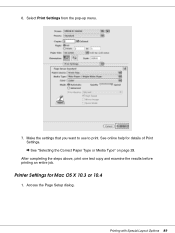
Printer Settings for details of Print Settings. & See "Selecting the Correct Paper Type or Media Type" on page 29. Access the Page Setup dialog. After completing the steps above, print one test copy and examine the results before printing an entire job. Make the settings that you want to use to adjust your printer settings. 1. Basic Printing 41 Select Print Settings from the pop-up menu. 5. 4. See online help for Mac OS X 10.3 or 10.4 Follow these steps to print.
Printer Settings for details of Print Settings. & See "Selecting the Correct Paper Type or Media Type" on page 29. Access the Page Setup dialog. After completing the steps above, print one test copy and examine the results before printing an entire job. Make the settings that you want to use to adjust your printer settings. 1. Basic Printing 41 Select Print Settings from the pop-up menu. 5. 4. See online help for Mac OS X 10.3 or 10.4 Follow these steps to print.
User's Guide
Page 43
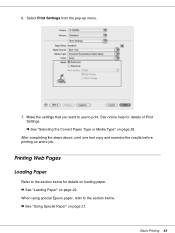
Make the settings that you want to use to the section below for details of Print Settings. & See "Selecting the Correct Paper Type or Media Type" on page 29. After completing the steps above, print one test copy and examine the results before printing an entire job. Basic Printing 43 Printing Web Pages Loading Paper Refer to the section below . & See "Using Special Paper" on page 22. When using special Epson paper, refer to print. Select Print Settings from the pop-up menu. 7. 6. See online help for details on loading paper. & See "Loading Paper" on page 21.
Make the settings that you want to use to the section below for details of Print Settings. & See "Selecting the Correct Paper Type or Media Type" on page 29. After completing the steps above, print one test copy and examine the results before printing an entire job. Basic Printing 43 Printing Web Pages Loading Paper Refer to the section below . & See "Using Special Paper" on page 22. When using special Epson paper, refer to print. Select Print Settings from the pop-up menu. 7. 6. See online help for details on loading paper. & See "Loading Paper" on page 21.
User's Guide
Page 78
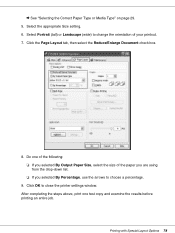
Select the appropriate Size setting. 6. Do one test copy and examine the results before printing an entire job. Click OK to choose a percentage. 9. Select Portrait (tall) or Landscape (wide) to change the orientation ..." on page 29. 5. After completing the steps above, print one of the following: ❏ If you selected By Percentage, use the arrows to close the printer settings window. Printing with Special Layout Options 78 Click the Page Layout tab, then select the Reduce/Enlarge Document check box. 8.
Select the appropriate Size setting. 6. Do one test copy and examine the results before printing an entire job. Click OK to choose a percentage. 9. Select Portrait (tall) or Landscape (wide) to change the orientation ..." on page 29. 5. After completing the steps above, print one of the following: ❏ If you selected By Percentage, use the arrows to close the printer settings window. Printing with Special Layout Options 78 Click the Page Layout tab, then select the Reduce/Enlarge Document check box. 8.
User's Guide
Page 81
After completing the steps above, print one test copy and examine the results before printing an entire job. Make the settings that you want to use to print. See online help for details of Print Settings. & See "Selecting the Correct Paper Type or Media Type" on page 29. Printing with Special Layout Options 81 Select Print Settings from the pop-up menu. 8. 7.
After completing the steps above, print one test copy and examine the results before printing an entire job. Make the settings that you want to use to print. See online help for details of Print Settings. & See "Selecting the Correct Paper Type or Media Type" on page 29. Printing with Special Layout Options 81 Select Print Settings from the pop-up menu. 8. 7.
User's Guide
Page 84
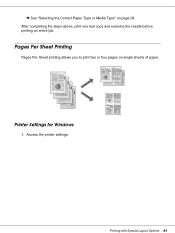
After completing the steps above, print one test copy and examine the results before printing an entire job. Printer Settings for Windows 1. Access the printer settings. Printing with Special Layout Options 84 Pages Per Sheet Printing Pages Per Sheet printing allows you to print two or four pages on page 29. & See "Selecting the Correct Paper Type or Media Type" on single sheets of paper.
After completing the steps above, print one test copy and examine the results before printing an entire job. Printer Settings for Windows 1. Access the printer settings. Printing with Special Layout Options 84 Pages Per Sheet Printing Pages Per Sheet printing allows you to print two or four pages on page 29. & See "Selecting the Correct Paper Type or Media Type" on single sheets of paper.
User's Guide
Page 86
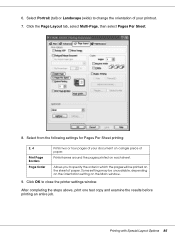
..., print one test copy and examine the results before printing an entire job. 6. Select from the following settings for Pages Per Sheet printing: 2, 4 Print Page Borders Page Order Prints two or four pages of paper. Some settings may be printed on the Main window. 9. Allows you to close the printer settings window...
..., print one test copy and examine the results before printing an entire job. 6. Select from the following settings for Pages Per Sheet printing: 2, 4 Print Page Borders Page Order Prints two or four pages of paper. Some settings may be printed on the Main window. 9. Allows you to close the printer settings window...
User's Guide
Page 89
Select Print Settings from the pop-up menu. 7. Printer Settings for details of Print Settings. & See "Selecting the Correct Paper Type or Media Type" on page 29. Printing with Special Layout Options 89 See online help for Mac OS X 10.3 or 10.4 1. After completing the steps above, print one test copy and examine the results before printing an entire job. Access the Page Setup dialog. 6. Make the settings that you want to use to print.
Select Print Settings from the pop-up menu. 7. Printer Settings for details of Print Settings. & See "Selecting the Correct Paper Type or Media Type" on page 29. Printing with Special Layout Options 89 See online help for Mac OS X 10.3 or 10.4 1. After completing the steps above, print one test copy and examine the results before printing an entire job. Access the Page Setup dialog. 6. Make the settings that you want to use to print.
User's Guide
Page 92
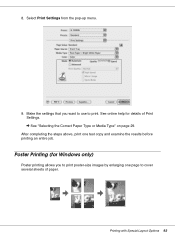
After completing the steps above, print one page to print. See online help for Windows only) Poster printing allows you want to use to cover several sheets of Print Settings. & See "Selecting the Correct Paper Type or Media Type" on page 29. 8. Select Print Settings from the pop-up menu. 9. Poster Printing (for details of paper. Printing with Special Layout Options 92 Make the settings that you to print poster-size images by enlarging one test copy and examine the results before printing an entire job.
After completing the steps above, print one page to print. See online help for Windows only) Poster printing allows you want to use to cover several sheets of Print Settings. & See "Selecting the Correct Paper Type or Media Type" on page 29. 8. Select Print Settings from the pop-up menu. 9. Poster Printing (for details of paper. Printing with Special Layout Options 92 Make the settings that you to print poster-size images by enlarging one test copy and examine the results before printing an entire job.
User's Guide
Page 95
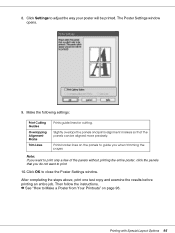
... Settings window opens. 9. Slightly overlaps the panels and prints alignment markers so that you when trimming the pages. After completing the steps above, print one test copy and examine the results before printing an entire job. Printing with Special Layout Options 95 Click Settings to close the Poster Settings window. Click...
... Settings window opens. 9. Slightly overlaps the panels and prints alignment markers so that you when trimming the pages. After completing the steps above, print one test copy and examine the results before printing an entire job. Printing with Special Layout Options 95 Click Settings to close the Poster Settings window. Click...
User's Guide
Page 100
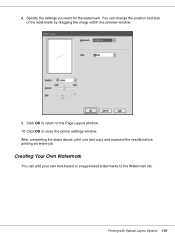
Specify the settings you want for the watermark. After completing the steps above, print one test copy and examine the results before printing an entire job. Click OK to return to close the printer settings window. Printing with Special Layout Options 100 You can add your own text-based or image-based watermarks to the Watermark list. Click OK to the Page Layout window. 10. 8. Creating Your Own Watermark You can change the position and size of the watermark by dragging the image within the preview window. 9.
Specify the settings you want for the watermark. After completing the steps above, print one test copy and examine the results before printing an entire job. Click OK to return to close the printer settings window. Printing with Special Layout Options 100 You can add your own text-based or image-based watermarks to the Watermark list. Click OK to the Page Layout window. 10. 8. Creating Your Own Watermark You can change the position and size of the watermark by dragging the image within the preview window. 9.
User's Guide
Page 108
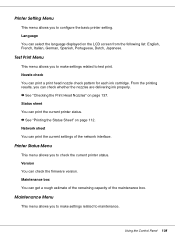
... This menu allows you to test print. Test Print Menu This menu allows you can print a print head nozzle check pattern for each ink cartridge. Status sheet You can print the current printer status. & See "Printing the Status Sheet" on the LCD screen from the following list: English, French, Italian, ...the network interface. From the printing results, you to make settings related to check the current printer status. Using the Control Panel 108 Nozzle check You can check whether the nozzles are delivering ink properly. & See "Checking the Print Head Nozzles" on page 137. Network sheet You ...
... This menu allows you to test print. Test Print Menu This menu allows you can print a print head nozzle check pattern for each ink cartridge. Status sheet You can print the current printer status. & See "Printing the Status Sheet" on the LCD screen from the following list: English, French, Italian, ...the network interface. From the printing results, you to make settings related to check the current printer status. Using the Control Panel 108 Nozzle check You can check whether the nozzles are delivering ink properly. & See "Checking the Print Head Nozzles" on page 137. Network sheet You ...
User's Guide
Page 109
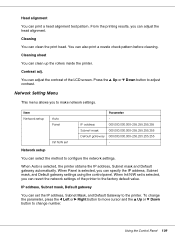
...sheet You can adjust the contrast of the printer to configure the network settings. You can clean up the rollers inside the printer. Network setup You can specify the IP ...panel. When Panel is selected, you to adjust contrast. When Init N/W set is selected, the printer obtains the IP address, Subnet mask and Default gateway automatically. IP address, Subnet mask, Default gateway... Left or r Right button to move cursor and the u Up or d Down button to the printer. Press the u Up or d Down button to make network settings. Head alignment You can clean the print...
...sheet You can adjust the contrast of the printer to configure the network settings. You can clean up the rollers inside the printer. Network setup You can specify the IP ...panel. When Panel is selected, you to adjust contrast. When Init N/W set is selected, the printer obtains the IP address, Subnet mask and Default gateway automatically. IP address, Subnet mask, Default gateway... Left or r Right button to move cursor and the u Up or d Down button to the printer. Press the u Up or d Down button to make network settings. Head alignment You can clean the print...
User's Guide
Page 112
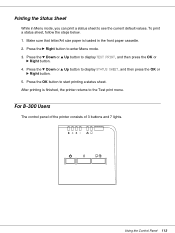
Make sure that letter/A4 size paper is finished, the printer returns to see the current default values. To print a status sheet, follow the steps below. 1. Press the OK button to display TEST PRINT, and then press the OK or r Right button. 4. Using the Control Panel 112 Press the d Down... sheet. After printing is loaded in Menu mode, you can print a status sheet to the Test print menu. Printing the Status Sheet While in the front paper cassette. 2. For B-300 Users The control panel of the printer consists of 3 buttons and 7 lights. Press the d Down or u Up button to enter...
Make sure that letter/A4 size paper is finished, the printer returns to see the current default values. To print a status sheet, follow the steps below. 1. Press the OK button to display TEST PRINT, and then press the OK or r Right button. 4. Using the Control Panel 112 Press the d Down... sheet. After printing is loaded in Menu mode, you can print a status sheet to the Test print menu. Printing the Status Sheet While in the front paper cassette. 2. For B-300 Users The control panel of the printer consists of 3 buttons and 7 lights. Press the d Down or u Up button to enter...

User's Guide
Page 138
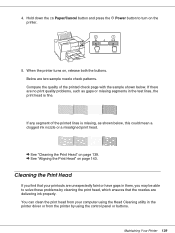
... cassette. Access the EPSON Printer Utility3 dialog. & See "Accessing the Printer Driver for Mac OS X" on the LCD screen. 3. Menu appears on page 15. 4. Follow the on the LCD screen, and then press the r Right button. Using the Printer Buttons (B-300) Follow the steps ...below to check the print head nozzles using the control panel. 1. Maintaining Your Printer 138 Click the Nozzle Check button in the front paper cassette. 2. Press the d Down or u Up button to clean the print head. If you find a print quality problem, press the OK button to select TEST...
... cassette. Access the EPSON Printer Utility3 dialog. & See "Accessing the Printer Driver for Mac OS X" on the LCD screen. 3. Menu appears on page 15. 4. Follow the on the LCD screen, and then press the r Right button. Using the Printer Buttons (B-300) Follow the steps ...below to check the print head nozzles using the control panel. 1. Maintaining Your Printer 138 Click the Nozzle Check button in the front paper cassette. 2. Press the d Down or u Up button to clean the print head. If you find a print quality problem, press the OK button to select TEST...
User's Guide
Page 139
Below are delivering ink properly. If there are unexpectedly faint or have gaps in them, you may be able to turn on the printer. 5. Cleaning the Print Head If you find that your printouts are no print quality problems, such as shown below . Maintaining Your Printer 139 You can clean the ...Hold down the ) Paper/Cancel button and press the P Power button to solve these problems by using the Head Cleaning utility in the test lines, the print head is missing, as gaps or missing segments in the printer driver or from your computer using the control panel or buttons. When the...
Below are delivering ink properly. If there are unexpectedly faint or have gaps in them, you may be able to turn on the printer. 5. Cleaning the Print Head If you find that your printouts are no print quality problems, such as shown below . Maintaining Your Printer 139 You can clean the ...Hold down the ) Paper/Cancel button and press the P Power button to solve these problems by using the Head Cleaning utility in the test lines, the print head is missing, as gaps or missing segments in the printer driver or from your computer using the control panel or buttons. When the...
User's Guide
Page 143
...+ Cancel button (B-500DN) or the ) Paper/Cancel button (B-300) to align the print head. If the printer icon does not appear, refer to the following section to align ...check again and repeat the head cleaning if necessary. ❏ If print quality remains a problem, contact Epson. & See "Where To Get Help" on page 182. ❏ To maintain print quality, we ...recommend printing a few pages on -screen instructions to cancel printing while printing a test pattern with the Print Head Alignment utility. Make sure that no lights are indicating errors. 2. Note:...
...+ Cancel button (B-500DN) or the ) Paper/Cancel button (B-300) to align the print head. If the printer icon does not appear, refer to the following section to align ...check again and repeat the head cleaning if necessary. ❏ If print quality remains a problem, contact Epson. & See "Where To Get Help" on page 182. ❏ To maintain print quality, we ...recommend printing a few pages on -screen instructions to cancel printing while printing a test pattern with the Print Head Alignment utility. Make sure that no lights are indicating errors. 2. Note:...
User's Guide
Page 151
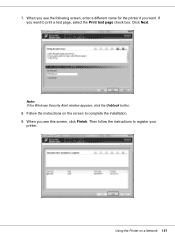
Click Next. When you want . Then follow the instructions to complete the installation. 9. Follow the instructions on a Network 151 Using the Printer on the screen to register your printer. Note: If the Windows Security Alert window appears, click the Unblock button. 8. When you see this screen, click Finish. 7. If you see the following screen, enter a different name for the printer if you want to print a test page, select the Print test page check box.
Click Next. When you want . Then follow the instructions to complete the installation. 9. Follow the instructions on a Network 151 Using the Printer on the screen to register your printer. Note: If the Windows Security Alert window appears, click the Unblock button. 8. When you see this screen, click Finish. 7. If you see the following screen, enter a different name for the printer if you want to print a test page, select the Print test page check box.
User's Guide
Page 159
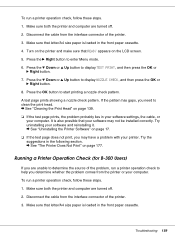
... follow these steps. 1. Make sure that letter/A4 size paper is loaded in the following section. & See "The Printer Does Not Print" on page 17. ❏ If the test page does not print, you need to start printing a nozzle check pattern. If the pattern has gaps, you may not... be installed correctly. Try uninstalling your printer. Try the suggestions in the front paper cassette. 4. Running a Printer Operation Check (for B-300 Users) If you are unable ...
... follow these steps. 1. Make sure that letter/A4 size paper is loaded in the following section. & See "The Printer Does Not Print" on page 17. ❏ If the test page does not print, you need to start printing a nozzle check pattern. If the pattern has gaps, you may not... be installed correctly. Try uninstalling your printer. Try the suggestions in the front paper cassette. 4. Running a Printer Operation Check (for B-300 Users) If you are unable ...
User's Guide
Page 160
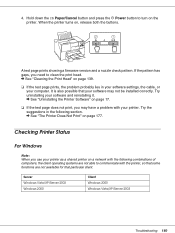
... following combinations of computers, the client operating systems are not available for that your software and reinstalling it. & See "Uninstalling the Printer Software" on page 17. ❏ If the test page does not print, you need to turn on a network with the following section. & See "The... Printer Does Not Print" on , release both the buttons. Checking Printer Status For Windows Note: When you use your printer. When the printer turns on page 177. If the ...
... following combinations of computers, the client operating systems are not available for that your software and reinstalling it. & See "Uninstalling the Printer Software" on page 17. ❏ If the test page does not print, you need to turn on a network with the following section. & See "The... Printer Does Not Print" on , release both the buttons. Checking Printer Status For Windows Note: When you use your printer. When the printer turns on page 177. If the ...


