
Product Support Bulletin(s)
Page 8
... Options" under Video in the SETUP program. A. A serial mouse plugs directly into the serial port and doesn't use a television set up an I/O expansion slot in the APEX 200? PSB No: S- 0098 Page: 5 of IBM PC (8 - The Apex 13" color monitor is an IBM PC-compatible, 16 color, RGB, dual function monitor which can be configured for a wide variety of 8 Q. A. disk controller takes up for IBM/AT compatibility. What kind of mouse works...
... Options" under Video in the SETUP program. A. A serial mouse plugs directly into the serial port and doesn't use a television set up an I/O expansion slot in the APEX 200? PSB No: S- 0098 Page: 5 of IBM PC (8 - The Apex 13" color monitor is an IBM PC-compatible, 16 color, RGB, dual function monitor which can be configured for a wide variety of 8 Q. A. disk controller takes up for IBM/AT compatibility. What kind of mouse works...
Product Support Bulletin(s)
Page 11
... Network adapters with the APEX 200? To ensure correct operation, always start up the system using 3COM, IBM Token - Q. The APEX 200 has been tested in the network environment using the lower 8MHz CPU speed, then switch to the higher speed to use an alternate IRQ other than IRQ2 by setting the jumpers on the network adapter board. Some adapter boards are compatible with Novell Netware. Q. It can be used as a file server be used both as a server...
... Network adapters with the APEX 200? To ensure correct operation, always start up the system using 3COM, IBM Token - Q. The APEX 200 has been tested in the network environment using the lower 8MHz CPU speed, then switch to the higher speed to use an alternate IRQ other than IRQ2 by setting the jumpers on the network adapter board. Some adapter boards are compatible with Novell Netware. Q. It can be used as a file server be used both as a server...
Product Support Bulletin(s)
Page 12
... any add-on that requires a device driver (CD-ROM, local area network, etc.), obviously the necessary device driver(s) must be loaded. In most consistent results, use the absolute minimal boot configuration that's allowed by the hardware being tested. For the most cases, the computer should be started using an MS-DOS boot diskette that's 'clean' - in the CONFIG.SYS file. EPSON Product Support Bulletin Subject: Proper Method for Running...
... any add-on that requires a device driver (CD-ROM, local area network, etc.), obviously the necessary device driver(s) must be loaded. In most consistent results, use the absolute minimal boot configuration that's allowed by the hardware being tested. For the most cases, the computer should be started using an MS-DOS boot diskette that's 'clean' - in the CONFIG.SYS file. EPSON Product Support Bulletin Subject: Proper Method for Running...
User Manual
Page 11
... and CMOS RAM Check B-2 RAM Check B-3 Keyboard Controller and Keyboard Check B-3 Display Card Check B-4 Optional RAM Check B-4 Diskette Drive Seek Check B-4 Hard Disk Controller and Hard Disk Check B-5 Appendix C Performing System Diagnostics Starting System Diagnostics C-1 Modifying the DEVICE LIST C-3 Selecting a Test C-5 Resuming From an Error C-6 System Board Check C-7 Memory Check C-8 Keyboard Check C-8 Monochrome Display Adapter and CRT Check C- 10 Monochrome Adapter Check C- 11 Attribute Check C-11 Character Set Check C-12 Video Check C-12 Sync Check C-13 Run All...
... and CMOS RAM Check B-2 RAM Check B-3 Keyboard Controller and Keyboard Check B-3 Display Card Check B-4 Optional RAM Check B-4 Diskette Drive Seek Check B-4 Hard Disk Controller and Hard Disk Check B-5 Appendix C Performing System Diagnostics Starting System Diagnostics C-1 Modifying the DEVICE LIST C-3 Selecting a Test C-5 Resuming From an Error C-6 System Board Check C-7 Memory Check C-8 Keyboard Check C-8 Monochrome Display Adapter and CRT Check C- 10 Monochrome Adapter Check C- 11 Attribute Check C-11 Character Set Check C-12 Video Check C-12 Sync Check C-13 Run All...
User Manual
Page 15
... favorite software programs. The Apex 200 computer is powerful, versatile, and easy to the MGA card in the computer. The HELP program lets you 'll find a complete reference manual for managing data on the screen about any MS-DOS command. it is a file management utility that make MS-DOS easier to run many of six internal option slots, an MGA (multi-graphics adapter) card, and built-in serial and...
... favorite software programs. The Apex 200 computer is powerful, versatile, and easy to the MGA card in the computer. The HELP program lets you 'll find a complete reference manual for managing data on the screen about any MS-DOS command. it is a file management utility that make MS-DOS easier to run many of six internal option slots, an MGA (multi-graphics adapter) card, and built-in serial and...
User Manual
Page 16
... to install option cards in case you encounter any problems while using MS-DOS with your computer. Chapter 5 describes how to run diagnostic checks. Appendix B provides information on the power-on diagnostics. Computer. you can add an internal modem card to set up your disks and disk drives. How to Use This Manual This manual explains how to provide data communications. Chapter 4 provides basic instructions for the Apex 200\20 and Apex 200\40. The instructions...
... to install option cards in case you encounter any problems while using MS-DOS with your computer. Chapter 5 describes how to run diagnostic checks. Appendix B provides information on the power-on diagnostics. Computer. you can add an internal modem card to set up your disks and disk drives. How to Use This Manual This manual explains how to provide data communications. Chapter 4 provides basic instructions for the Apex 200\20 and Apex 200\40. The instructions...

User Manual
Page 34
... on the monitor, printer, and any of the computer. If there is working correctly. Do not attempt to your equipment. Only remove the cover to turn off the power, disconnect all cables, and wait five seconds before you switch it on to make sure everything is a hardware problem you remove the computer's cover. Always turn on the front panel lights up. Follow these steps to install and remove optional devices.
... on the monitor, printer, and any of the computer. If there is working correctly. Do not attempt to your equipment. Only remove the cover to turn off the power, disconnect all cables, and wait five seconds before you switch it on to make sure everything is a hardware problem you remove the computer's cover. Always turn on the front panel lights up. Follow these steps to install and remove optional devices.
User Manual
Page 35
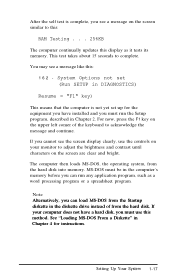
System Options not set up for instructions. MS-DOS must be in DIAGNOSTICS) Resume = "F1" key) This means that the computer is complete, you see a message like this method. Note Alternatively, you can run the Setup program, described in Chapter 4 for the equipment you have a hard disk, you cannot see the screen display clearly, use this : 1 6 2 - This test takes about 15 seconds to acknowledge the...
System Options not set up for instructions. MS-DOS must be in DIAGNOSTICS) Resume = "F1" key) This means that the computer is complete, you see a message like this method. Note Alternatively, you can run the Setup program, described in Chapter 4 for the equipment you have a hard disk, you cannot see the screen display clearly, use this : 1 6 2 - This test takes about 15 seconds to acknowledge the...
User Manual
Page 41
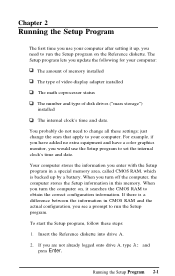
...: The amount of memory installed The type of video display adapter installed The math coprocessor status The number and type of disk drives ("mass storage") installed The internal clock's time and date. Running the Setup Program 2-1 For example, if you have added no extra equipment and have a color graphics monitor, you turn the computer on the Reference diskette. You probably do not need to run the Setup program. just change the ones that...
...: The amount of memory installed The type of video display adapter installed The math coprocessor status The number and type of disk drives ("mass storage") installed The internal clock's time and date. Running the Setup Program 2-1 For example, if you have added no extra equipment and have a color graphics monitor, you turn the computer on the Reference diskette. You probably do not need to run the Setup program. just change the ones that...
User Manual
Page 42
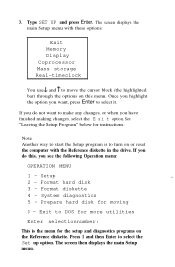
... drive. Setup 2 - Prepare hard disk for instructions. 3. Once you highlight the option you see the following Operation menu: OPERATION MENU 1 - If you do this menu. Format hard disk 3 - System diagnostics 5 - Press 1 and then Enter to make any changes, or when you do not want , press Enter to move the cursor block (the highlighted bar) through the options on this , you want to select the Set up option. The screen then displays the main Setup menu...
... drive. Setup 2 - Prepare hard disk for instructions. 3. Once you highlight the option you see the following Operation menu: OPERATION MENU 1 - If you do this menu. Format hard disk 3 - System diagnostics 5 - Press 1 and then Enter to make any changes, or when you do not want , press Enter to move the cursor block (the highlighted bar) through the options on this , you want to select the Set up option. The screen then displays the main Setup menu...
User Manual
Page 47
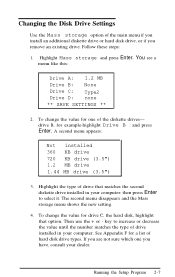
... drive. drive B, for a list of hard disk drive types. then press Enter to increase or decrease the value until the number matches the type of drive installed in your computer; Running the Setup Program 2-7 Follow these steps: 1. Highlight Mass storage and press Enter. The second menu disappears and the Mass storage menu shows the new setting. 4. Changing the Disk Drive Settings Use the Mass storage option of the main menu if you install an additional diskette drive or hard disk drive...
... drive. drive B, for a list of hard disk drive types. then press Enter to increase or decrease the value until the number matches the type of drive installed in your computer; Running the Setup Program 2-7 Follow these steps: 1. Highlight Mass storage and press Enter. The second menu disappears and the Mass storage menu shows the new setting. 4. Changing the Disk Drive Settings Use the Mass storage option of the main menu if you install an additional diskette drive or hard disk drive...
User Manual
Page 117
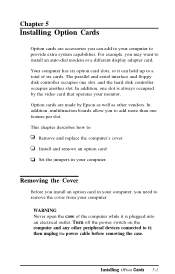
... occupied by Epson as well as other peripheral devices connected to a total of the computer while it ; This chapter describes how to: Remove and replace the computer's cover Install and remove an option card Set the jumpers in your computer, you to install an auto-dial modem or a different display adapter card. The parallel and serial interface and floppy disk controller occupies one feature per slot. Turn off the power switch on the...
... occupied by Epson as well as other peripheral devices connected to a total of the computer while it ; This chapter describes how to: Remove and replace the computer's cover Install and remove an option card Set the jumpers in your computer, you to install an auto-dial modem or a different display adapter card. The parallel and serial interface and floppy disk controller occupies one feature per slot. Turn off the power switch on the...

User Manual
Page 139
... solve the problem, and you have access to make sure the program is set up for the type of which are using . Troubleshooting 6-5 If you are using an Apex monitor, call your diskette drive. Repeat the operation that supports graphics but you are running either the Monochrome Display Adapter and CRT Check or the Color Graphics Display Adapter and CRT Check, both of monitor you have . If you bought the monitor. Remove the...
... solve the problem, and you have access to make sure the program is set up for the type of which are using . Troubleshooting 6-5 If you are using an Apex monitor, call your diskette drive. Repeat the operation that supports graphics but you are running either the Monochrome Display Adapter and CRT Check or the Color Graphics Display Adapter and CRT Check, both of monitor you have . If you bought the monitor. Remove the...
User Manual
Page 148
... disk drives installed. Some option cards work at either 8 MHz or 12 MHz. See Chapter 5 for instructions. 6. If you used the option card to add an external device to the option card connector on the back panel? Did you perform the correct setup procedures for the software you use the proper cable to connect the device to your computer-for instructions. 4. If necessary, see if your computer? If you changed : The amount of memory installed The type of video display adapter installed...
... disk drives installed. Some option cards work at either 8 MHz or 12 MHz. See Chapter 5 for instructions. 6. If you used the option card to add an external device to the option card connector on the back panel? Did you perform the correct setup procedures for the software you use the proper cable to connect the device to your computer-for instructions. 4. If necessary, see if your computer? If you changed : The amount of memory installed The type of video display adapter installed...
User Manual
Page 170
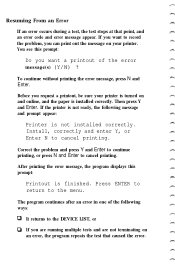
... is installed correctly. Correct the problem and press Y and Enter to continue printing, or press N and Enter to the DEVICE LIST, or If you want to the menu. Then press Y and Enter. Install, correctly and enter Y, or Enter N to cancel printing. You see this prompt: Printout is finished. After printing the error message, the program displays this prompt: Do you are running multiple tests and...
... is installed correctly. Correct the problem and press Y and Enter to continue printing, or press N and Enter to the DEVICE LIST, or If you want to the menu. Then press Y and Enter. Install, correctly and enter Y, or Enter N to cancel printing. You see this prompt: Printout is finished. After printing the error message, the program displays this prompt: Do you are running multiple tests and...
User Manual
Page 174
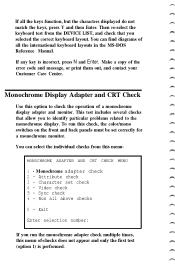
... first test (option 1) is incorrect, press N and Enter. To run the monochrome adapter check multiple times, this option to the monochrome display. Monochrome adapter check 2 - Character set correctly for a monochrome monitor. You can find diagrams of a monochrome display adapter and monitor. Sync check 6 - This test includes several checks that you selected the correct keyboard layout. Video check 5 - Exit Enter selection number: If you to identify particular problems related to check the operation...
... first test (option 1) is incorrect, press N and Enter. To run the monochrome adapter check multiple times, this option to the monochrome display. Monochrome adapter check 2 - Character set correctly for a monochrome monitor. You can find diagrams of a monochrome display adapter and monitor. Sync check 6 - This test includes several checks that you selected the correct keyboard layout. Video check 5 - Exit Enter selection number: If you to identify particular problems related to check the operation...

User Manual
Page 199
... KEYBOARD LOCKING ERROR Monochrome display adapter and CRT 401 V-RAM ERROR 402 VIDEO SIGNAL ERROR 403 ATTRIBUTE ERROR 404 CHARACTER SET ERROR Color graphics adapter and CRT 501 V-RAM ERROR 503 ATTRIBUTE ERROR 504 CHARACTER SET ERROR 505 40-COLUMN CHARACTER SET ERROR 506 COLOR GRAPHICS ERROR 507 640X200 GRAPHICS MODE ERROR 508 SCREEN PAGING ERROR 509 LIGHT PEN ERROR 510 COLOR VIDEO ERROR Floppy disk drives and controller 601 FLOPPY DISK CONTROLLER ERROR 602 SEQUENTIAL SEEK ERROR 603 RANDOM SEEK ERROR 604 WRITE ERROR 605 READ ERROR 606 DISK CHANGE...
... KEYBOARD LOCKING ERROR Monochrome display adapter and CRT 401 V-RAM ERROR 402 VIDEO SIGNAL ERROR 403 ATTRIBUTE ERROR 404 CHARACTER SET ERROR Color graphics adapter and CRT 501 V-RAM ERROR 503 ATTRIBUTE ERROR 504 CHARACTER SET ERROR 505 40-COLUMN CHARACTER SET ERROR 506 COLOR GRAPHICS ERROR 507 640X200 GRAPHICS MODE ERROR 508 SCREEN PAGING ERROR 509 LIGHT PEN ERROR 510 COLOR VIDEO ERROR Floppy disk drives and controller 601 FLOPPY DISK CONTROLLER ERROR 602 SEQUENTIAL SEEK ERROR 603 RANDOM SEEK ERROR 604 WRITE ERROR 605 READ ERROR 606 DISK CHANGE...

User Manual
Page 213
... true: The hard disk is increasing with a hard disk, it for use FDISK and SELECT, your hard disk must have been using, you are using an Epson drive, it has already been formatted. You should not need to format the partition for MS-DOS and install MS-DOS on your hard disk is new and has never been formatted. This appendix explains how to perform part or all...
... true: The hard disk is increasing with a hard disk, it for use FDISK and SELECT, your hard disk must have been using, you are using an Epson drive, it has already been formatted. You should not need to format the partition for MS-DOS and install MS-DOS on your hard disk is new and has never been formatted. This appendix explains how to perform part or all...
User Manual
Page 247
...-13 cable socket, 1-12 check, C-8-10 connecting, 1-12-13 connector pin assignments, A-8 controller and keyboard check, B-3 layout, A-3 locking, 6-3 problems, 6-3 special keys, 3-2-3 L Loading MS-DOS, 1-17,4-2-3 Loop-back connectors, A-9 M Main memory, A-1 Mass storage, A-2 Math coprocessor, 2-6, A-1 check, C-25 Memory, check, C-8 main, 2-3-4 MENU program, 1-10, 4-36-37 MGA card, Intro-1, 1-2, 1-5-6, 2-4, 5-4, 6-4, A-2 MKDIR (MD), 4-22 MODE, 1-10 Modems, connecting, 1-7 Monitors, back panel monitor switch, 1-5-7 connecting, 1-5-7 problems, 6-4-5 selecting type, 1-5-7 Monochrome Display Adapter...
...-13 cable socket, 1-12 check, C-8-10 connecting, 1-12-13 connector pin assignments, A-8 controller and keyboard check, B-3 layout, A-3 locking, 6-3 problems, 6-3 special keys, 3-2-3 L Loading MS-DOS, 1-17,4-2-3 Loop-back connectors, A-9 M Main memory, A-1 Mass storage, A-2 Math coprocessor, 2-6, A-1 check, C-25 Memory, check, C-8 main, 2-3-4 MENU program, 1-10, 4-36-37 MGA card, Intro-1, 1-2, 1-5-6, 2-4, 5-4, 6-4, A-2 MKDIR (MD), 4-22 MODE, 1-10 Modems, connecting, 1-7 Monitors, back panel monitor switch, 1-5-7 connecting, 1-5-7 problems, 6-4-5 selecting type, 1-5-7 Monochrome Display Adapter...
User Manual
Page 249
...-back connector pin assignments, A-9 port pin assignments, A-8 Setting up, 1-1-21 Setup menu, 2-2 Setup program, 2-1-11 display type, 2-4-6 mass storage, 2-7-8 math coprocessor, 2-6 memory, 2-3-4 real-time clock, 2-8-10 Software problems, 6-11-12 Speaker, A-2 Special keys, 3-2-3 Specifications, A-1-9 Speed, changing, 3-1 Subdirectories, see Directories SUBST, 4-22 Switches, command, 4-8 SYS, 6-.10 System, board check, C-7 device check, B-1-2 diskettes, 1-18-21, 4-5-6 T TIME, 2-9 Time, setting, 2-8-10 Timer and CMOS RAM Check, B-2 Tracks, 3-7 TREE, 4-24-25 Troubleshooting, 6-1-14 Turning off...
...-back connector pin assignments, A-9 port pin assignments, A-8 Setting up, 1-1-21 Setup menu, 2-2 Setup program, 2-1-11 display type, 2-4-6 mass storage, 2-7-8 math coprocessor, 2-6 memory, 2-3-4 real-time clock, 2-8-10 Software problems, 6-11-12 Speaker, A-2 Special keys, 3-2-3 Specifications, A-1-9 Speed, changing, 3-1 Subdirectories, see Directories SUBST, 4-22 Switches, command, 4-8 SYS, 6-.10 System, board check, C-7 device check, B-1-2 diskettes, 1-18-21, 4-5-6 T TIME, 2-9 Time, setting, 2-8-10 Timer and CMOS RAM Check, B-2 Tracks, 3-7 TREE, 4-24-25 Troubleshooting, 6-1-14 Turning off...


