
User Manual
Page 7
... shock. When the power cord or plug is used with this product, make sure that could result in a risk of all servicing in the User's Manual, do not attempt to service personnel. 13. B. If liquid has been spilled into the extension cord does not exceed the extension cord ampere rating. D. E. If...
... shock. When the power cord or plug is used with this product, make sure that could result in a risk of all servicing in the User's Manual, do not attempt to service personnel. 13. B. If liquid has been spilled into the extension cord does not exceed the extension cord ampere rating. D. E. If...

User Manual
Page 11
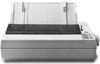
Finding Your Way Around This manual provides illustrated, step-by-step instructions for choosing the right interface are ... Chapters 2 and 3 include important information on paper handling and the day-to use of your printer. • Chapter 1 contains information on these options, see Chapter 4. For detailed information on unpacking, setting up, testing, ...C806121) The cut -sheet feeder, a pull tractor unit, or a roll paper holder to supplement the printer's built-in Chapter 4. Interface Boards Optional interface boards are given in parallel interface. Guidelines for setting up...
Finding Your Way Around This manual provides illustrated, step-by-step instructions for choosing the right interface are ... Chapters 2 and 3 include important information on paper handling and the day-to use of your printer. • Chapter 1 contains information on these options, see Chapter 4. For detailed information on unpacking, setting up, testing, ...C806121) The cut -sheet feeder, a pull tractor unit, or a roll paper holder to supplement the printer's built-in Chapter 4. Interface Boards Optional interface boards are given in parallel interface. Guidelines for setting up...
User Manual
Page 18
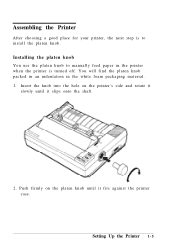
Insert the knob into the hole on the platen knob until it fits against the printer case. Assembling the Printer After choosing a good place for your printer, the next step is turned off. Push firmly on the printer's side and rotate it slowly until it slips onto the shaft. 2. You will find the platen knob packed in an indentation in the printer when the printer is to install the platen knob. Setting Up the Printer 1 - 5 Installing the platen knob You use the platen knob to manually feed paper in the white foam packaging material. 1.
Insert the knob into the hole on the platen knob until it fits against the printer case. Assembling the Printer After choosing a good place for your printer, the next step is turned off. Push firmly on the printer's side and rotate it slowly until it slips onto the shaft. 2. You will find the platen knob packed in an indentation in the printer when the printer is to install the platen knob. Setting Up the Printer 1 - 5 Installing the platen knob You use the platen knob to manually feed paper in the white foam packaging material. 1.

User Manual
Page 30
...LOAD/EJECT button again. Press the ON LINE button to correct the problem. To eject the paper, set the printer off line.) Then load a new sheet by pressing the ON LINE button) and then press the FORM FEED ...a document or print the last few lines of more firmly. If your software has not been set the printer on , press the ON LINE button once to load the paper. Paper Handling 2-3 Slide the paper down... page. Press the LOAD/EJECT button once to take the printer off line (by following steps 4, 5, and 6 above. Using Single Sheets 4. If this manual for printing on the next.
...LOAD/EJECT button again. Press the ON LINE button to correct the problem. To eject the paper, set the printer off line.) Then load a new sheet by pressing the ON LINE button) and then press the FORM FEED ...a document or print the last few lines of more firmly. If your software has not been set the printer on , press the ON LINE button once to load the paper. Paper Handling 2-3 Slide the paper down... page. Press the LOAD/EJECT button once to take the printer off line (by following steps 4, 5, and 6 above. Using Single Sheets 4. If this manual for printing on the next.

User Manual
Page 51
Even if you select a graphics character set using the ESC t command. For italics, see your software manual or the description of DIP switches 1-6, 1-7, and 1-8. You can still print ordinary text and italics. The graphics character table depends on the settings of the ... of the ESC 6 or ESC 7 commands lets you wish to select the italic character table. Note: • To change the DIP switch and turn the printer back on. • Use of a DIP switch, first turn off to print character graphics as characters (ESC 6) or control codes (ESC 7). 3-12 Using the...
Even if you select a graphics character set using the ESC t command. For italics, see your software manual or the description of DIP switches 1-6, 1-7, and 1-8. You can still print ordinary text and italics. The graphics character table depends on the settings of the ... of the ESC 6 or ESC 7 commands lets you wish to select the italic character table. Note: • To change the DIP switch and turn the printer back on. • Use of a DIP switch, first turn off to print character graphics as characters (ESC 6) or control codes (ESC 7). 3-12 Using the...

User Manual
Page 74
... the upper case as described next. Fit the hinges of the upper case into the openings in the #8143 interface manual.) 5. then partially lower the upper case. CAUTION: Take care not to 9600 BPS (Bits Per Second). (Make sure you can select baud rates from 75 ... pinch the FG wire between the upper and lower cases. If you have the #8143 interface board, you use the bit rate selection table for printers with buffers in the lower case; Attaching the upper case 1. Interface Boards 4. Using the...
... the upper case as described next. Fit the hinges of the upper case into the openings in the #8143 interface manual.) 5. then partially lower the upper case. CAUTION: Take care not to 9600 BPS (Bits Per Second). (Make sure you can select baud rates from 75 ... pinch the FG wire between the upper and lower cases. If you have the #8143 interface board, you use the bit rate selection table for printers with buffers in the lower case; Attaching the upper case 1. Interface Boards 4. Using the...


