User Manual
Page 8
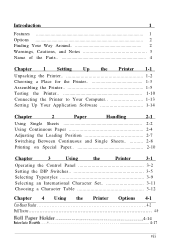
... Software 1-14 Chapter 2 Paper Handling 2-1 Using Single Sheets 2-2 Using Continuous Paper 2-4 Adjusting the Loading Position 2-7 Switching Between Continuous and Single Sheets 2-8 Printing on Special Paper 2-10 Chapter 3 Using the Printer 3-1 Operating the Control Panel 3-2 Setting the DIP Switches 3-5 Selecting Typestyles 3-9 Selecting an International Character Set 3-11 Choosing a Character Table 3-12 Chapter 4 Using the...
... Software 1-14 Chapter 2 Paper Handling 2-1 Using Single Sheets 2-2 Using Continuous Paper 2-4 Adjusting the Loading Position 2-7 Switching Between Continuous and Single Sheets 2-8 Printing on Special Paper 2-10 Chapter 3 Using the Printer 3-1 Operating the Control Panel 3-2 Setting the DIP Switches 3-5 Selecting Typestyles 3-9 Selecting an International Character Set 3-11 Choosing a Character Table 3-12 Chapter 4 Using the...

User Manual
Page 16
... outlet; Setting Up the Printer 1-3 Avoid electrical outlets controlled by wall switches or automatic timers. CAUTION: Avoid locations that might cause fluctuations in line voltage. do not use an adapter plug. Choosing a Place for the Printer When selecting a place to set up your printer. Accidental interruption of power ...sources of electromagnetic interference such as loudspeakers or the base units of your computer or your printer, be sure to keep the following in mind: • Place the printer on the same circuit with large motors or other appliances that are subject to allow ...
... outlet; Setting Up the Printer 1-3 Avoid electrical outlets controlled by wall switches or automatic timers. CAUTION: Avoid locations that might cause fluctuations in line voltage. do not use an adapter plug. Choosing a Place for the Printer When selecting a place to set up your printer. Accidental interruption of power ...sources of electromagnetic interference such as loudspeakers or the base units of your computer or your printer, be sure to keep the following in mind: • Place the printer on the same circuit with large motors or other appliances that are subject to allow ...

User Manual
Page 25
Press the LOAD/EJECT or LINE FEED button to start the self test. The test prints list of DIP switch settings first, followed by a series of a typical self test printed in Near Letter Quality mode. 0123456789:;?@ABCDEFGHIJK r'&&.()*+,-./0123456789:;?@ABCDEFGHIJKL 0123456789:;?@ABCDEFGHIJKLM 0123456789:;?@ABCDEFGHIJKLMN1 ...stop the test, press the ON LINE button. Turning the power on . Here is not printing. To end the self test, be sure the printer is part of characters. 7. The self test continues until the paper runs out or you wish to load paper. 6. Note: To resume the test...
Press the LOAD/EJECT or LINE FEED button to start the self test. The test prints list of DIP switch settings first, followed by a series of a typical self test printed in Near Letter Quality mode. 0123456789:;?@ABCDEFGHIJK r'&&.()*+,-./0123456789:;?@ABCDEFGHIJKL 0123456789:;?@ABCDEFGHIJKLM 0123456789:;?@ABCDEFGHIJKLMN1 ...stop the test, press the ON LINE button. Turning the power on . Here is not printing. To end the self test, be sure the printer is part of characters. 7. The self test continues until the paper runs out or you wish to load paper. 6. Note: To resume the test...

User Manual
Page 28
Chapter 2 Paper Handling Using Single Sheets 2-2 Loading the paper 2-2 Printing multiple-page documents 2-3 Using Continuous Paper 2-4 Positioning y o u r continuous paper supply 2-4 Loading continuous paper 2-4 Adjusting t h e Loading Position 2-7 Switching Between Continuous and Single Sheets 2-8 Switching t o single sheets 2-8 Switching back t o continuous paper 2 - 9 Printing o n Special Paper T h e paper-thickness lever Multi-part forms Labels Envelope 2-10 2-10 2-11 2-11 2-12 Paper Handling 2-1
Chapter 2 Paper Handling Using Single Sheets 2-2 Loading the paper 2-2 Printing multiple-page documents 2-3 Using Continuous Paper 2-4 Positioning y o u r continuous paper supply 2-4 Loading continuous paper 2-4 Adjusting t h e Loading Position 2-7 Switching Between Continuous and Single Sheets 2-8 Switching t o single sheets 2-8 Switching back t o continuous paper 2 - 9 Printing o n Special Paper T h e paper-thickness lever Multi-part forms Labels Envelope 2-10 2-10 2-11 2-11 2-12 Paper Handling 2-1

User Manual
Page 35
... right edge guide to singlesheet printing without removing the continuous paper from the tractor. If the printer is on line. 2-8 Paper Handling Push the paper-release lever back to single sheets 1. Switching to the single-sheet position. 5. Press the LOAD/EJECT button to eject labels. •... Never feed labels backward through the printer. Press the LOAD/EJECT button to automatically feed the singlesheet paper to set the printer off line. 2. Then, press the ON LINE button to the loading position. Switching between the edge guides until it locks in place next...
... right edge guide to singlesheet printing without removing the continuous paper from the tractor. If the printer is on line. 2-8 Paper Handling Push the paper-release lever back to single sheets 1. Switching to the single-sheet position. 5. Press the LOAD/EJECT button to eject labels. •... Never feed labels backward through the printer. Press the LOAD/EJECT button to automatically feed the singlesheet paper to set the printer off line. 2. Then, press the ON LINE button to the loading position. Switching between the edge guides until it locks in place next...

User Manual
Page 36
Slide the edge guides together so that the single sheet is ejected and the printer is off line. 2. Switching Between Continuous and Single Sheets Switching back to the continuous paper position. 5. Pull the paper release lever forward to continuous paper 1. Make sure that they meet at the center of the printer. 4. Press the LOAD/EJECT button to feed the continuous paper to set the printer on line so it can accept data. Press the ON LINE button to the loading position. 6. Lower the paper guide onto the back of the paper's width. 3. Paper Handling 2-9
Slide the edge guides together so that the single sheet is ejected and the printer is off line. 2. Switching Between Continuous and Single Sheets Switching back to the continuous paper position. 5. Pull the paper release lever forward to continuous paper 1. Make sure that they meet at the center of the printer. 4. Press the LOAD/EJECT button to feed the continuous paper to set the printer on line so it can accept data. Press the ON LINE button to the loading position. 6. Lower the paper guide onto the back of the paper's width. 3. Paper Handling 2-9
User Manual
Page 40
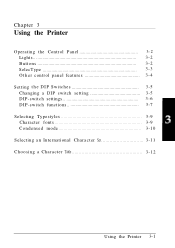
Chapter 3 Using the Printer Operating the Control Panel 3- 2 Lights 3-2 Buttons 3-2 SelecType 3-3 O t h e r control panel features 3-4 Setting t h e D I P Switches 3-5 Changing a DIP switch setting 3-5 DIP-switch settings 3-6 DIP-switch functions 3-7 Selecting Typestyles 3-9 Character fonts 3-9 Condensed mode 3-10 Selecting a n International Character Set 3-11 Choosing a Character Table 3-12 Using the Printer 3-1
Chapter 3 Using the Printer Operating the Control Panel 3- 2 Lights 3-2 Buttons 3-2 SelecType 3-3 O t h e r control panel features 3-4 Setting t h e D I P Switches 3-5 Changing a DIP switch setting 3-5 DIP-switch settings 3-6 DIP-switch functions 3-7 Selecting Typestyles 3-9 Character fonts 3-9 Condensed mode 3-10 Selecting a n International Character Set 3-11 Choosing a Character Table 3-12 Using the Printer 3-1
User Manual
Page 41
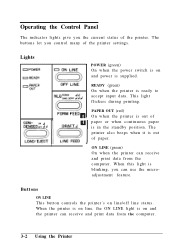
... receive and print data from the computer. 3-2 Using the Printer READY (green) On when the printer is supplied. PAPER OUT (red) On when the printer is on line, the ON LINE light is out of paper. Lights POWER (green) On when the power switch is on line/off line status. Buttons ON LINE This... button controls the printer's on and power is ready to accept...
... receive and print data from the computer. 3-2 Using the Printer READY (green) On when the printer is supplied. PAPER OUT (red) On when the printer is on line, the ON LINE light is out of paper. Lights POWER (green) On when the power switch is on line/off line status. Buttons ON LINE This... button controls the printer's on and power is ready to accept...

User Manual
Page 43
...micro-adjustment function allows you check that paper is loaded and the printer is operating properly and prints out the current DIP switch settings. Data dump: The data dump mode allows advanced users to take the printer off the printer. 3-4 Using the Printer See the section on adjusting the loading position in Chapter 2 ... in this button to several special functions. then turn off line; In the condensed mode all codes it . See the section on the printer. Then hold down the FORM FEED and LINE FEED buttons and turn off data dump mode, press the ON LINE button to find the ...
...micro-adjustment function allows you check that paper is loaded and the printer is operating properly and prints out the current DIP switch settings. Data dump: The data dump mode allows advanced users to take the printer off the printer. 3-4 Using the Printer See the section on adjusting the loading position in Chapter 2 ... in this button to several special functions. then turn off line; In the condensed mode all codes it . See the section on the printer. Then hold down the FORM FEED and LINE FEED buttons and turn off data dump mode, press the ON LINE button to find the ...
User Manual
Page 44
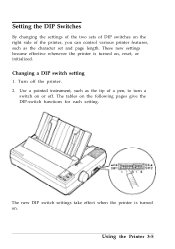
.... Changing a DIP switch setting 1. The tables on , reset, or initialized. Turn off . These new settings become effective whenever the printer is turned on. The new DIP switch settings take effect when the printer is turned on the following pages give the DIP-switch functions for each setting.... Setting the DIP Switches By changing the settings of the two sets of...
.... Changing a DIP switch setting 1. The tables on , reset, or initialized. Turn off . These new settings become effective whenever the printer is turned on. The new DIP switch settings take effect when the printer is turned on the following pages give the DIP-switch functions for each setting.... Setting the DIP Switches By changing the settings of the two sets of...

User Manual
Page 45
The current settings appear on your self test printout. Setting the DIP Switches DIP switch settings The tables below show the settings for each DIP switch function. See Table 1 characters and See Table 2 DIP Switch 2 2-1 Short tear-off 2-2 Cut-sheet feeder mode 2-3 Skip-over-perforation 2-4 Auto line feed ON Invalid ON ON ON Table 1 Page length Page length SW1-3 11 inches OFF 12 inches ON 8.5 inches OFF 11.7 inches ON SW1-4 OFF OFF ON ON OFF Valid OFF OFF OFF 3-6 Using the Printer
The current settings appear on your self test printout. Setting the DIP Switches DIP switch settings The tables below show the settings for each DIP switch function. See Table 1 characters and See Table 2 DIP Switch 2 2-1 Short tear-off 2-2 Cut-sheet feeder mode 2-3 Skip-over-perforation 2-4 Auto line feed ON Invalid ON ON ON Table 1 Page length Page length SW1-3 11 inches OFF 12 inches ON 8.5 inches OFF 11.7 inches ON SW1-4 OFF OFF ON ON OFF Valid OFF OFF OFF 3-6 Using the Printer
User Manual
Page 46
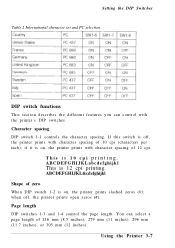
...cdefghijkl Shape of zero When DIP switch 1-2 is 10 cpi printing. when off , the printer prints with character spacing of 10 cpi (characters per inch); Using the Printer 3-7 Setting the DIP Switches Table 2 International character set and PC selection DIP switch functions This section describes the different...), 279 mm (11 inches), 296 mm (11.7 inches), or 305 mm (12 inches). This is on , the printer prints with the printer's DIP switches. ABCDEFGHIJKLabcdefghijkl This is off , the printer prints open zeros (0). You can control with character spacing of 12 cpi. Page length DIP...
...cdefghijkl Shape of zero When DIP switch 1-2 is 10 cpi printing. when off , the printer prints with character spacing of 10 cpi (characters per inch); Using the Printer 3-7 Setting the DIP Switches Table 2 International character set and PC selection DIP switch functions This section describes the different...), 279 mm (11 inches), 296 mm (11.7 inches), or 305 mm (12 inches). This is on , the printer prints with the printer's DIP switches. ABCDEFGHIJKLabcdefghijkl This is off , the printer prints open zeros (0). You can control with character spacing of 12 cpi. Page length DIP...
User Manual
Page 47
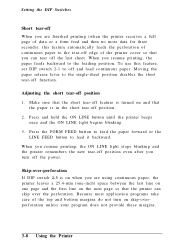
...position even after you turn on skip-overperforation unless your program does not provide these margins. 3-8 Using the Printer Setting the DIP Switches Short tear-off When you are using continuous paper, the printer leaves a 25.4-mm (one-inch) space between the last line on one page and the first line ...form feed and then no more data for three seconds), this feature, set DIP switch 2-1 to the loading position. Adjusting the short tear-off the last sheet. Press and hold the ON LINE button until the printer beeps once and the ON LINE light begins blinking. 3. Moving the paper release lever...
...position even after you turn on skip-overperforation unless your program does not provide these margins. 3-8 Using the Printer Setting the DIP Switches Short tear-off When you are using continuous paper, the printer leaves a 25.4-mm (one-inch) space between the last line on one page and the first line ...form feed and then no more data for three seconds), this feature, set DIP switch 2-1 to the loading position. Adjusting the short tear-off the last sheet. Press and hold the ON LINE button until the printer beeps once and the ON LINE light begins blinking. 3. Moving the paper release lever...
User Manual
Page 48
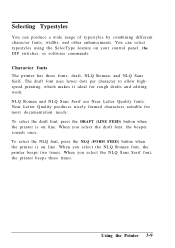
... for rough drafts and editing work. Selecting Typestyles You can select typestyles using the SelecType feature on your control panel, the DIP switches, or software commands. Character fonts The printer has three fonts: draft, NLQ Roman, and NLQ Sans Serif. To select the NLQ font, press the NLQ (FORM FEED) ...button when the printer is on line. You can produce a wide range of typestyles by combining different character fonts, widths, and other enhancements. When you select the NLQ...
... for rough drafts and editing work. Selecting Typestyles You can select typestyles using the SelecType feature on your control panel, the DIP switches, or software commands. Character fonts The printer has three fonts: draft, NLQ Roman, and NLQ Sans Serif. To select the NLQ font, press the NLQ (FORM FEED) ...button when the printer is on line. You can produce a wide range of typestyles by combining different character fonts, widths, and other enhancements. When you select the NLQ...

User Manual
Page 50
... available through the ESC R command. Using the Printer 3-11 Selecting an International Character Set International character sets provide you wish to select an international character set . The table also shows the characters that differ in other languages. Note: If you with DIP switches 1-6, 1-7, and 1-8 when DIP switch 1-5 is turned on, use the ESC...
... available through the ESC R command. Using the Printer 3-11 Selecting an International Character Set International character sets provide you wish to select an international character set . The table also shows the characters that differ in other languages. Note: If you with DIP switches 1-6, 1-7, and 1-8 when DIP switch 1-5 is turned on, use the ESC...

User Manual
Page 51
... 8. Then change the setting of the ESC 4 command in Chapter 8. For italics, see your software manual or the description of a DIP switch, first turn the printer back on the settings of the ESC 6 or ESC 7 commands lets you wish to select the graphics character tables. Graphics character sets Settings ... (ESC 6) or control codes (ESC 7). 3-12 Using the Printer The characters in each character set when you select whether to print hex codes 90 to select the italic character table. Note: • To change the DIP switch and turn off to 9E and FF as they are shown in...
... 8. Then change the setting of the ESC 4 command in Chapter 8. For italics, see your software manual or the description of a DIP switch, first turn the printer back on the settings of the ESC 6 or ESC 7 commands lets you wish to select the graphics character tables. Graphics character sets Settings ... (ESC 6) or control codes (ESC 7). 3-12 Using the Printer The characters in each character set when you select whether to print hex codes 90 to select the italic character table. Note: • To change the DIP switch and turn off to 9E and FF as they are shown in...

User Manual
Page 52
S h e e t F e e d e r 4 - 2 Installing the cut-sheet feeder 4 - 2 Paper handling 4 - 4 Switching between the cut-sheet feeder a n d p u s h tractor 4 - 6 Single sheet insertion 4 - 7 Removing the cut sheet feeder 4-8 Pull Tractor Installing the pull tractor Paper handling Removing the pull tractor 4-9 4-9 4-10 4-12 Roll Paper Holder Installing the roll paper holder Paper handling Removing the roll paper holder 4-14 4-14 4-15 4-16 Interface Boards 4 - 1 7 Installing an interface board 4 - 1 7 Using the Printer Options 4-1 Chapter 4 Using the Printer Options C u t -
S h e e t F e e d e r 4 - 2 Installing the cut-sheet feeder 4 - 2 Paper handling 4 - 4 Switching between the cut-sheet feeder a n d p u s h tractor 4 - 6 Single sheet insertion 4 - 7 Removing the cut sheet feeder 4-8 Pull Tractor Installing the pull tractor Paper handling Removing the pull tractor 4-9 4-9 4-10 4-12 Roll Paper Holder Installing the roll paper holder Paper handling Removing the roll paper holder 4-14 4-14 4-15 4-16 Interface Boards 4 - 1 7 Installing an interface board 4 - 1 7 Using the Printer Options 4-1 Chapter 4 Using the Printer Options C u t -

User Manual
Page 54
Using the Printer Options 4-3 Turn on the cut sheet feeder mode by setting DIP switch 2-2 to the printer. 7. Attach the cut -sheet feeder in both hands and fit its notches over the pins of the printer. 6. Turn on . 8. Cut-Sheet Feeder 4. Hold the assembled cut -sheet feeder cover to on the printer. Push the paper release lever to the single-sheet position. 5.
Using the Printer Options 4-3 Turn on the cut sheet feeder mode by setting DIP switch 2-2 to the printer. 7. Attach the cut -sheet feeder in both hands and fit its notches over the pins of the printer. 6. Turn on . 8. Cut-Sheet Feeder 4. Hold the assembled cut -sheet feeder cover to on the printer. Push the paper release lever to the single-sheet position. 5.

User Manual
Page 57
...sheet position 4-6 Using the Printer Options The printer feeds the continuous paper backward to continuous paper 1. Switching to advance any printed sheets remain in the continuous paper position. Press the LOAD/EJECT button. Place the paper-release lever in the printer, press the ON LINE ... continuous paper. 2. The paper is still attached to eject. 2. Cut-Sheet Feeder Switching between the cut-sheet feeder and push tractor You can easily come off their backing and jam the printer. 4. CAUTION: To prevent paper feeding problem, when printing multiple pages, fold the first...
...sheet position 4-6 Using the Printer Options The printer feeds the continuous paper backward to continuous paper 1. Switching to advance any printed sheets remain in the continuous paper position. Press the LOAD/EJECT button. Place the paper-release lever in the printer, press the ON LINE ... continuous paper. 2. The paper is still attached to eject. 2. Cut-Sheet Feeder Switching between the cut-sheet feeder and push tractor You can easily come off their backing and jam the printer. 4. CAUTION: To prevent paper feeding problem, when printing multiple pages, fold the first...
User Manual
Page 58
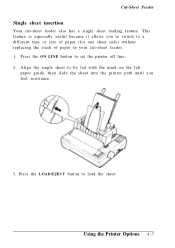
Press the ON LINE button to be fed with the mark on the left paper guide, then slide the sheet into the printer path until you to switch to load the sheet. Using the Printer Options 4-7 Align the single sheet to set the printer off line. 2. This feature is especially useful because it allows you feel resistance. 3. Press the LOAD/EJECT button to a different type or size of paper (for one sheet only) without replacing the stack of paper in your cut -sheet feeder also has a single sheet loading feature. Cut-Sheet Feeder Single sheet insertion Your cut -sheet feeder. 1.
Press the ON LINE button to be fed with the mark on the left paper guide, then slide the sheet into the printer path until you to switch to load the sheet. Using the Printer Options 4-7 Align the single sheet to set the printer off line. 2. This feature is especially useful because it allows you feel resistance. 3. Press the LOAD/EJECT button to a different type or size of paper (for one sheet only) without replacing the stack of paper in your cut -sheet feeder also has a single sheet loading feature. Cut-Sheet Feeder Single sheet insertion Your cut -sheet feeder. 1.

