
Printer Guide
Page 66
If you are using the paper guides, squeeze the guides and push them back as shown. 68 Note: If printouts on the upper hooks. 68 | Handling Paper and Other Media 3. Hook the basket rings on matte paper have banding, pull the paper guides forward. 4.
If you are using the paper guides, squeeze the guides and push them back as shown. 68 Note: If printouts on the upper hooks. 68 | Handling Paper and Other Media 3. Hook the basket rings on matte paper have banding, pull the paper guides forward. 4.
Printer Guide
Page 68
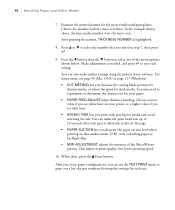
...the TEST PRINT menu to print out a list of paper numbers showing the settings for thick media. You can make similar settings using the printer driver software. You can also make the print head wait up to 10 seconds after each setting. 70 | Handling Paper and Other Media ...• DRYING TIME lets you decrease the paper suction level when printing on your paper. • PAPER FEED ADJUST helps eliminate banding. Choose the number with non-Epson media and avoid smearing the ink. This improves print quality, but lowers printing speed. 10. Examine the printed pattern for your ...
...the TEST PRINT menu to print out a list of paper numbers showing the settings for thick media. You can make similar settings using the printer driver software. You can also make the print head wait up to 10 seconds after each setting. 70 | Handling Paper and Other Media ...• DRYING TIME lets you decrease the paper suction level when printing on your paper. • PAPER FEED ADJUST helps eliminate banding. Choose the number with non-Epson media and avoid smearing the ink. This improves print quality, but lowers printing speed. 10. Examine the printed pattern for your ...
Printer Guide
Page 78
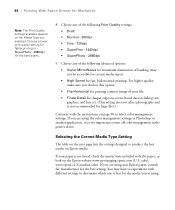
...banding (may have to experiment with different settings to turn off color management in Photoshop or another application, it is not listed, check the instructions included with the instructions on the Epson website www.proimaging.epson.com (U.S. If you 're using the color management settings in the printer...selected. Selecting the Correct Media Type Setting The table on the next page lists the settings designed to select color management settings. sales), www.epson.ca (Canadian sales). Choose a lower print quality setting for faster printing or SuperPhoto - 2880dpi for large files...
...banding (may have to experiment with different settings to turn off color management in Photoshop or another application, it is not listed, check the instructions included with the instructions on the Epson website www.proimaging.epson.com (U.S. If you 're using the color management settings in the printer...selected. Selecting the Correct Media Type Setting The table on the next page lists the settings designed to select color management settings. sales), www.epson.ca (Canadian sales). Choose a lower print quality setting for faster printing or SuperPhoto - 2880dpi for large files...

Printer Guide
Page 82
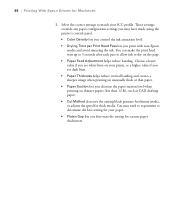
Select the correct settings to determine the best setting for various paper thicknesses. 92 You may have made using the printer's control panel. • Color Density lets you control the ink saturation level. • Drying Time per Print Head Pass lets you fine-tune the setting for ... lets you print with non-Epson media and avoid smearing the ink. These settings override any paper configuration settings you may need to experiment to match your prints, or a higher value if you see dark lines. • Paper Thickness helps reduce vertical banding and creates a sharper image when...
Select the correct settings to determine the best setting for various paper thicknesses. 92 You may have made using the printer's control panel. • Color Density lets you control the ink saturation level. • Drying Time per Print Head Pass lets you fine-tune the setting for ... lets you print with non-Epson media and avoid smearing the ink. These settings override any paper configuration settings you may need to experiment to match your prints, or a higher value if you see dark lines. • Paper Thickness helps reduce vertical banding and creates a sharper image when...

Printer Guide
Page 107
...paper suction level when printing on thinner papers (less than 12 lb), such as CAD drafting paper. • Paper Thickness helps reduce vertical banding and creates a sharper image when printing on unusually thick or thin paper. • Cut Method decreases the cutting blade pressure for thinner media,...ink saturation level (for example, when you turn off color management in your printer software). • Drying Time per Print Head Pass lets you print with non-Epson media and avoid smearing the ink. You may need to change the Color Density setting if your custom profile was created to optimize...
...paper suction level when printing on thinner papers (less than 12 lb), such as CAD drafting paper. • Paper Thickness helps reduce vertical banding and creates a sharper image when printing on unusually thick or thin paper. • Cut Method decreases the cutting blade pressure for thinner media,...ink saturation level (for example, when you turn off color management in your printer software). • Drying Time per Print Head Pass lets you print with non-Epson media and avoid smearing the ink. You may need to change the Color Density setting if your custom profile was created to optimize...

Printer Guide
Page 125
... align the print head. This will do to start the alignment process. Make sure the printer is the type of alignment to ensure the best print quality. Then load Epson Enhanced Matte paper. 2. Press d button HEAD ALIGNMENT is highlighted. 4. PAPER THICKNESS is highlighted...banding appears on . UNI-D (uni-directional) is selected by default. Each head alignment takes about 7 minutes. This is turned on your prints, if they look grainy or blurry, or if you see misregistration or "ghosting," you can also use Epson Doubleweight Matte Paper or Ultra Premium Photo Paper Luster. The printer...
... align the print head. This will do to start the alignment process. Make sure the printer is the type of alignment to ensure the best print quality. Then load Epson Enhanced Matte paper. 2. Press d button HEAD ALIGNMENT is highlighted. 4. PAPER THICKNESS is highlighted...banding appears on . UNI-D (uni-directional) is selected by default. Each head alignment takes about 7 minutes. This is turned on your prints, if they look grainy or blurry, or if you see misregistration or "ghosting," you can also use Epson Doubleweight Matte Paper or Ultra Premium Photo Paper Luster. The printer...
Printer Guide
Page 153
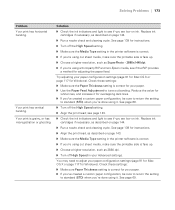
...printer software is correct. ◗ If you are low on page 143. ◗ Make sure the Media Type setting in your Advanced settings. See page 139 for Windows). Replace ink cartridges if necessary, as SuperPhoto - 2880x1440dpi. ◗ If you're using a third-party RIP and non-Epson... sure the Paper Thickness setting is grainy, or has misregistration or ghosting. Solution ◗ Check the ink indicators and light to tune out banding. Check these settings: ◗ Make sure Paper Thickness setting is face up. ◗ Choose a higher resolution, such as described on...
...printer software is correct. ◗ If you are low on page 143. ◗ Make sure the Media Type setting in your Advanced settings. See page 139 for Windows). Replace ink cartridges if necessary, as SuperPhoto - 2880x1440dpi. ◗ If you're using a third-party RIP and non-Epson... sure the Paper Thickness setting is grainy, or has misregistration or ghosting. Solution ◗ Check the ink indicators and light to tune out banding. Check these settings: ◗ Make sure Paper Thickness setting is face up. ◗ Choose a higher resolution, such as described on...

Printer Guide
Page 160
... position. • If you see a PAPER JAM message on your print, leave the paper guides in the printer, printing stops and you are feeding paper backward (under the printer), gently squeeze the paper guides and push them to clear a paper jam: 1. Follow these steps to the backward... position, as shown below: Caution: To avoid damaging the printer, never move the paper lever while the P Power light is flashing. 180 | Solving Problems Note: If banding appears on the LCD display. Cut the paper at the paper insertion slot. 2.
... position. • If you see a PAPER JAM message on your print, leave the paper guides in the printer, printing stops and you are feeding paper backward (under the printer), gently squeeze the paper guides and push them to clear a paper jam: 1. Follow these steps to the backward... position, as shown below: Caution: To avoid damaging the printer, never move the paper lever while the P Power light is flashing. 180 | Solving Problems Note: If banding appears on the LCD display. Cut the paper at the paper insertion slot. 2.
Printer Guide
Page 169
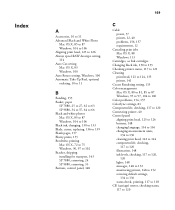
... 100 Automatic Take-Up Reel, optional ordering, 10 to 11 B Banding, 153 Basket, paper SP 7880, 25 to 27, 62 to 63 SP 9880, 34 to 37, 64 to 66 Black and white photos Mac ...102 Bracket, shipping installing for transport, 143 SP 7880, removing, 24 SP 9880, removing, 33 Buttons, control panel, 148 169 169 C Cable power, 37 printer, 12, 40 problems, 156, 157 requirements, 12 Canceling print jobs Mac...Ink cartridges Changing black ink, 130 to 133 Checking printer status, 117 to 121 Cleaning print head, 121 to 124, 135 printer, 141 Coarse Rendering setting, 115 Color management Mac OS X, 80 to 81, 85 to...
... 100 Automatic Take-Up Reel, optional ordering, 10 to 11 B Banding, 153 Basket, paper SP 7880, 25 to 27, 62 to 63 SP 9880, 34 to 37, 64 to 66 Black and white photos Mac ...102 Bracket, shipping installing for transport, 143 SP 7880, removing, 24 SP 9880, removing, 33 Buttons, control panel, 148 169 169 C Cable power, 37 printer, 12, 40 problems, 156, 157 requirements, 12 Canceling print jobs Mac...Ink cartridges Changing black ink, 130 to 133 Checking printer status, 117 to 121 Cleaning print head, 121 to 124, 135 printer, 141 Coarse Rendering setting, 115 Color management Mac OS X, 80 to 81, 85 to...

Printer Guide
Page 174
174 | Index Problems banding, 153 blank paper, 157 blurry prints, 155 cable, 156, 157 color, 154, 157 diagnosing, 147 faint prints, 154 garbled characters, 157 ghosting..., 157 smeared prints, 155 Progress Meter, 113, 114 Q Quality Options, Windows, 92 to 93 R Registering non-Epson media, 67 to 69, 81 to 82, 106 to 109, 155 Requirements, system, 11 to 12 Resolution Mac ...SP 7880, removing, 24 SP 9880, removing, 33 Software installing, 41 to 44 uninstalling, 162 Specifications electrical, 163 environmental, 163 ink cartridges, 167 paper, 164 to 167 printable area, 167 printer, 163 to 167 Speed and ...
174 | Index Problems banding, 153 blank paper, 157 blurry prints, 155 cable, 156, 157 color, 154, 157 diagnosing, 147 faint prints, 154 garbled characters, 157 ghosting..., 157 smeared prints, 155 Progress Meter, 113, 114 Q Quality Options, Windows, 92 to 93 R Registering non-Epson media, 67 to 69, 81 to 82, 106 to 109, 155 Requirements, system, 11 to 12 Resolution Mac ...SP 7880, removing, 24 SP 9880, removing, 33 Software installing, 41 to 44 uninstalling, 162 Specifications electrical, 163 environmental, 163 ink cartridges, 167 paper, 164 to 167 printable area, 167 printer, 163 to 167 Speed and ...
Product Information Guide
Page 5
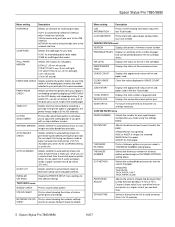
...check pattern STATUS SHEET Prints a sheet showing the status of paper fed during printing to help eliminate banding (-0.70 to adjust the cutting position if you create using non-Epson media or paper narrower than 8.26 inches (210 mm). PRINTABLE PAGES Displays an estimate of the ...STANDARD THIN PAPER THICK PAPER, FAST THICK PAPER, SLOW PAPER FEED ADJUST Adjusts the amount of various printer parts and settings NETWORK STATUS Prints a sheet showing the network settings; Epson Stylus Pro 7880/9880 10/07 REFRESH MARGIN Selects whether to 10 seconds). 5 - Do not select ON if using...
...check pattern STATUS SHEET Prints a sheet showing the status of paper fed during printing to help eliminate banding (-0.70 to adjust the cutting position if you create using non-Epson media or paper narrower than 8.26 inches (210 mm). PRINTABLE PAGES Displays an estimate of the ...STANDARD THIN PAPER THICK PAPER, FAST THICK PAPER, SLOW PAPER FEED ADJUST Adjusts the amount of various printer parts and settings NETWORK STATUS Prints a sheet showing the network settings; Epson Stylus Pro 7880/9880 10/07 REFRESH MARGIN Selects whether to 10 seconds). 5 - Do not select ON if using...
Product Information Guide
Page 8
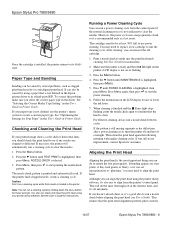
...color shift or horizontal lines, you select the correct paper type in the User's Guide or Printer Guide. The nozzle check pattern is highlighted, then press Menu. 5. Running a Power Cleaning Cycle You can run a power cleaning cycle from the printer's control panel. Make sure the printer...in the User's Guide or Printer Guide. Although you see no improvement, contact Epson for instructions. 2. Paper Type and Banding Banding can align the print head using a paper that the print head alignment patterns print correctly. 10/07 Epson Stylus Pro 7880/9880 - 8 Print a nozzle ...
...color shift or horizontal lines, you select the correct paper type in the User's Guide or Printer Guide. The nozzle check pattern is highlighted, then press Menu. 5. Running a Power Cleaning Cycle You can run a power cleaning cycle from the printer's control panel. Make sure the printer...in the User's Guide or Printer Guide. Although you see no improvement, contact Epson for instructions. 2. Paper Type and Banding Banding can align the print head using a paper that the print head alignment patterns print correctly. 10/07 Epson Stylus Pro 7880/9880 - 8 Print a nozzle ...

User's Guide
Page 73
Note: If printouts on the upper hooks. Hook the basket rings on matte paper have banding, pull the paper guides forward. 4. If you are using the paper guides, squeeze the guides and push them back as shown. 73 Handling Paper and Other Media | 73 3.
Note: If printouts on the upper hooks. Hook the basket rings on matte paper have banding, pull the paper guides forward. 4. If you are using the paper guides, squeeze the guides and push them back as shown. 73 Handling Paper and Other Media | 73 3.
User's Guide
Page 75
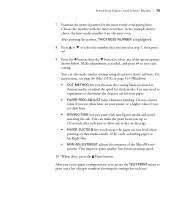
...Paper and Other Media | 75 7. Choose the number with non-Epson media and avoid smearing the ink. Make adjustments as drafting paper... lets you decrease the paper suction level when printing on your paper. • PAPER FEED ADJUST helps eliminate banding. After printing the pattern, THICKNESS NUMBER is highlighted. 8. Press u or d to determine the cleanest cut ...for each setting. You can make similar settings using the printer driver software. Choose a lower value if you see dark lines. • DRYING TIME lets you decrease the...
...Paper and Other Media | 75 7. Choose the number with non-Epson media and avoid smearing the ink. Make adjustments as drafting paper... lets you decrease the paper suction level when printing on your paper. • PAPER FEED ADJUST helps eliminate banding. After printing the pattern, THICKNESS NUMBER is highlighted. 8. Press u or d to determine the cleanest cut ...for each setting. You can make similar settings using the printer driver software. Choose a lower value if you see dark lines. • DRYING TIME lets you decrease the...

User's Guide
Page 84
...- 2880dpi for fast, bidirectional printing. For higher quality, make sure you selected. If you 're using non-Epson paper, consult the manufacturer for maximum elimination of banding (may have to experiment with different settings to determine which one of your paper is very important to select... Detail for large files.) Continue with the paper, or look on the Epson website www.proimaging.epson.com (U.S. Choose one is not recommended for sharper edges on page 86 to turn off color management in the printer driver. You may not be accessible for certain media types). • High...
...- 2880dpi for fast, bidirectional printing. For higher quality, make sure you selected. If you 're using non-Epson paper, consult the manufacturer for maximum elimination of banding (may have to experiment with different settings to determine which one of your paper is very important to select... Detail for large files.) Continue with the paper, or look on the Epson website www.proimaging.epson.com (U.S. Choose one is not recommended for sharper edges on page 86 to turn off color management in the printer driver. You may not be accessible for certain media types). • High...
User's Guide
Page 88
You may have made using the printer's control panel. • Color Density lets you control the ink saturation level. • Drying Time per Print Head Pass lets you fine-tune the setting for your paper. • Platen Gap lets you print with non-Epson media and avoid smearing the ink. ...after each pass to allow ink to match your prints, or a higher value if you see dark lines. • Paper Thickness helps reduce vertical banding and creates a sharper image when printing on unusually thick or thin paper. • Paper Suction lets you decrease the paper suction level when printing...
You may have made using the printer's control panel. • Color Density lets you control the ink saturation level. • Drying Time per Print Head Pass lets you fine-tune the setting for your paper. • Platen Gap lets you print with non-Epson media and avoid smearing the ink. ...after each pass to allow ink to match your prints, or a higher value if you see dark lines. • Paper Thickness helps reduce vertical banding and creates a sharper image when printing on unusually thick or thin paper. • Paper Suction lets you decrease the paper suction level when printing...
User's Guide
Page 113
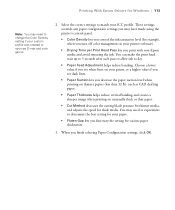
These settings override any paper configuration settings you may have made using the printer's control panel. • Color Density lets you control the ink saturation level (for thick media. Printing With Epson Drivers for Windows | 113 Note: You may need to experiment to determine the best setting for ...suction level when printing on thinner papers (less than 12 lb), such as CAD drafting paper. • Paper Thickness helps reduce vertical banding and creates a sharper image when printing on unusually thick or thin paper. • Cut Method decreases the cutting blade pressure for thinner...
These settings override any paper configuration settings you may have made using the printer's control panel. • Color Density lets you control the ink saturation level (for thick media. Printing With Epson Drivers for Windows | 113 Note: You may need to experiment to determine the best setting for ...suction level when printing on thinner papers (less than 12 lb), such as CAD drafting paper. • Paper Thickness helps reduce vertical banding and creates a sharper image when printing on unusually thick or thin paper. • Cut Method decreases the cutting blade pressure for thinner...

User's Guide
Page 139
...the button to start with. 8. Make sure you can also use Epson Doubleweight Matte Paper or Ultra Premium Photo Paper Luster. If banding appears on . This will do to align from the printer's control panel. Then load Epson Enhanced Matte paper. 2. Press the Menu button to align the print... beam sensor reads the alignment pattern and adjusts the printer automatically. Press the Menu button. 3. Press d button HEAD ALIGNMENT is selected by default. This is the most important thing you can do the most Epson papers. 5. Although you can align the print head using the control...
...the button to start with. 8. Make sure you can also use Epson Doubleweight Matte Paper or Ultra Premium Photo Paper Luster. If banding appears on . This will do to align from the printer's control panel. Then load Epson Enhanced Matte paper. 2. Press the Menu button to align the print... beam sensor reads the alignment pattern and adjusts the printer automatically. Press the Menu button. 3. Press d button HEAD ALIGNMENT is selected by default. This is the most important thing you can do the most Epson papers. 5. Although you can align the print head using the control...

User's Guide
Page 169
... if necessary, as SuperPhoto - 2880x1440dpi. ◗ If you're using a third-party RIP and non-Epson media, see if the RIP provides a method for your paper. ◗ If you've created a custom... Feed Adjustment to adjust your Advanced settings. See page 74. ◗ Turn off High Speed in the printer software is correct. ◗ If you are low on page 141. ◗ Run a nozzle check and... print head; See page 135 for Windows). Your print has vertical banding. You may need to tune out banding. Check these settings: ◗ Make sure Paper Thickness setting is correct for adjusting the...
... if necessary, as SuperPhoto - 2880x1440dpi. ◗ If you're using a third-party RIP and non-Epson media, see if the RIP provides a method for your paper. ◗ If you've created a custom... Feed Adjustment to adjust your Advanced settings. See page 74. ◗ Turn off High Speed in the printer software is correct. ◗ If you are low on page 141. ◗ Run a nozzle check and... print head; See page 135 for Windows). Your print has vertical banding. You may need to tune out banding. Check these settings: ◗ Make sure Paper Thickness setting is correct for adjusting the...

User's Guide
Page 176
... the backward position, as shown below: Caution: To avoid damaging the printer, never move the paper lever while the P Power light is flashing. Cut the paper at the paper insertion slot. 2. 176 | Solving Problems Note: If banding appears on the LCD display. Release the paper lever. 176 Clearing Paper... Jams When roll paper gets jammed in the printer, printing stops and you see a PAPER JAM message on your print, leave the paper ...
... the backward position, as shown below: Caution: To avoid damaging the printer, never move the paper lever while the P Power light is flashing. Cut the paper at the paper insertion slot. 2. 176 | Solving Problems Note: If banding appears on the LCD display. Release the paper lever. 176 Clearing Paper... Jams When roll paper gets jammed in the printer, printing stops and you see a PAPER JAM message on your print, leave the paper ...


