Printer Guide
Page 6
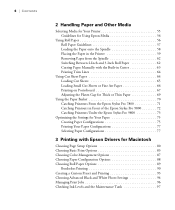
... in Front of the Epson Stylus Pro 9800 72 Catching Printouts Under the Epson Stylus Pro 9800 73 Optimizing the Settings for Your Paper 75 Creating Paper Configurations 75 Printing Your Paper Configurations 77 Selecting Paper Configurations 77 3 Printing with Epson Drivers for Macintosh Choosing Page Setup Options 80 Choosing Basic Print Options 83 Choosing Color Management Options 87 Choosing...
... in Front of the Epson Stylus Pro 9800 72 Catching Printouts Under the Epson Stylus Pro 9800 73 Optimizing the Settings for Your Paper 75 Creating Paper Configurations 75 Printing Your Paper Configurations 77 Selecting Paper Configurations 77 3 Printing with Epson Drivers for Macintosh Choosing Page Setup Options 80 Choosing Basic Print Options 83 Choosing Color Management Options 87 Choosing...

Printer Guide
Page 7
Contents | 7 4 Printing with Epson Drivers for Windows Choosing Basic Print Options 100 Choosing... 114 Setting Monitoring Preferences and Optimizing Print Speed . . . . . 115 5 Maintaining and Transporting the Printer Checking Printer Status and Part Life 120 Printing Status Information 120 Viewing Status Information 121 Checking and Cleaning the Print Head ... the Printer Driver Information 135 Changing the Date and Time 136 Using Maintenance Mode 136 Replacing the Paper Cutter Blade 138 Removing the Old Blade 138 Installing the New Cutter Blade 140 Replacing the Maintenance Tank 141 ...
Contents | 7 4 Printing with Epson Drivers for Windows Choosing Basic Print Options 100 Choosing... 114 Setting Monitoring Preferences and Optimizing Print Speed . . . . . 115 5 Maintaining and Transporting the Printer Checking Printer Status and Part Life 120 Printing Status Information 120 Viewing Status Information 121 Checking and Cleaning the Print Head ... the Printer Driver Information 135 Changing the Date and Time 136 Using Maintenance Mode 136 Replacing the Paper Cutter Blade 138 Removing the Old Blade 138 Installing the New Cutter Blade 140 Replacing the Maintenance Tank 141 ...
Printer Guide
Page 10
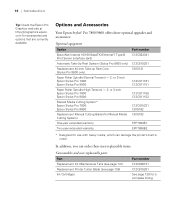
Options and Accessories Your Epson Stylus® Pro 7800/9800 offers these user-replaceable items: Consumables and user-replaceable parts Part Replacement Ink Maintenance Tank (see page 141) Replacement Printer Cutter Blade (see page 138) Ink Cartridges Part number C12C890191 C12C815291 See page... and options that are currently available. 10 | Introduction Tip: Check the Epson Pro Graphics web site at http://prographics.epson. or 3-inch Epson Stylus Pro 7800: Epson Stylus Pro 9800: Paper Roller Spindle (High Tension) - 2- In addition, you can damage the printer's built-in cutter.
Options and Accessories Your Epson Stylus® Pro 7800/9800 offers these user-replaceable items: Consumables and user-replaceable parts Part Replacement Ink Maintenance Tank (see page 141) Replacement Printer Cutter Blade (see page 138) Ink Cartridges Part number C12C890191 C12C815291 See page... and options that are currently available. 10 | Introduction Tip: Check the Epson Pro Graphics web site at http://prographics.epson. or 3-inch Epson Stylus Pro 7800: Epson Stylus Pro 9800: Paper Roller Spindle (High Tension) - 2- In addition, you can damage the printer's built-in cutter.
Printer Guide
Page 24
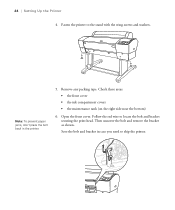
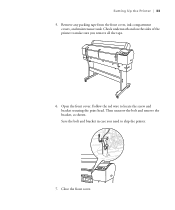
Follow the red wire to ship the printer. 1-24 Then unscrew the bolt and remove the bracket as shown. 24 | Setting Up the Printer 4. Check these areas: • the front cover • the ink compartment covers • the maintenance tank (on the right side near the bottom) 6. Note: To prevent paper jams, don't place the bolt back in case you need to locate the bolt and bracket securing the print head. Save the bolt and bracket in the printer. 5. Remove any packing tape. Open the front cover. Fasten the printer to the stand with the wing screws and washers.
Follow the red wire to ship the printer. 1-24 Then unscrew the bolt and remove the bracket as shown. 24 | Setting Up the Printer 4. Check these areas: • the front cover • the ink compartment covers • the maintenance tank (on the right side near the bottom) 6. Note: To prevent paper jams, don't place the bolt back in case you need to locate the bolt and bracket securing the print head. Save the bolt and bracket in the printer. 5. Remove any packing tape. Open the front cover. Fasten the printer to the stand with the wing screws and washers.
Printer Guide
Page 33
Check underneath and on the sides of the printer to ship the printer. 7. Save the bolt and bracket in case you need to make sure you remove all the tape. 6. Open the front cover. Close the front cover. 1-33 Then unscrew the bolt and remove the bracket, as shown. Remove any packing tape from the front cover, ink compartment covers, and maintenance tank. Follow the red wire to locate the screw and bracket securing the print head. Setting Up the Printer | 33 5.
Check underneath and on the sides of the printer to ship the printer. 7. Save the bolt and bracket in case you need to make sure you remove all the tape. 6. Open the front cover. Close the front cover. 1-33 Then unscrew the bolt and remove the bracket, as shown. Remove any packing tape from the front cover, ink compartment covers, and maintenance tank. Follow the red wire to locate the screw and bracket securing the print head. Setting Up the Printer | 33 5.

Printer Guide
Page 97
...Ink Levels and the Maintenance Tank The Epson Printer Utility lets you 're finished, close the print job window, then close your printer window or the Print Center window. You can monitor the progress of your print job or do one of the maintenance tank (7800) or tanks (9800). Double-click the ...Applications folder on the printer and holding it for instructions. 1. You see the Epson Printer Utility menu: 3-97 When you check the levels of ink in the printer and the level of the following: •...
...Ink Levels and the Maintenance Tank The Epson Printer Utility lets you 're finished, close the print job window, then close your printer window or the Print Center window. You can monitor the progress of your print job or do one of the maintenance tank (7800) or tanks (9800). Double-click the ...Applications folder on the printer and holding it for instructions. 1. You see the Epson Printer Utility menu: 3-97 When you check the levels of ink in the printer and the level of the following: •...

Printer Guide
Page 98
To recheck the ink levels, click the Update button. 98 | Printing with Epson Drivers for Macintosh 4. Click the EPSON StatusMonitor icon. To close the Status Monitor, click OK. 3-98 The software checks the amount of ink in the printer and maintenance tank(s) and displays the StatusMonitor window: 5.
To recheck the ink levels, click the Update button. 98 | Printing with Epson Drivers for Macintosh 4. Click the EPSON StatusMonitor icon. To close the Status Monitor, click OK. 3-98 The software checks the amount of ink in the printer and maintenance tank(s) and displays the StatusMonitor window: 5.
Printer Guide
Page 119
...Printer The Epson Stylus Pro 7800/9800 requires little maintenance to the features described in this chapter, you can also use the menu system on the CD-ROM that came with your printer. 119 For more information, see the electronic Reference Guide included on the printer to fine-tune a variety of printer... • Changing the date and time • Performing additional maintenance tasks • Replacing the paper cutter blade • Replacing the maintenance tank • Cleaning the printer • Transporting or storing the printer In addition to keep working at its best.
...Printer The Epson Stylus Pro 7800/9800 requires little maintenance to the features described in this chapter, you can also use the menu system on the CD-ROM that came with your printer. 119 For more information, see the electronic Reference Guide included on the printer to fine-tune a variety of printer... • Changing the date and time • Performing additional maintenance tasks • Replacing the paper cutter blade • Replacing the maintenance tank • Cleaning the printer • Transporting or storing the printer In addition to keep working at its best.
Printer Guide
Page 120
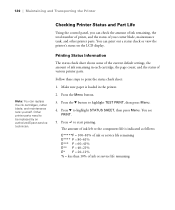
...is loaded in each cartridge, the page count, and the status of ink remaining in the printer. 2. You can replace the ink cartridges, cutter blade, and maintenance tank yourself. Press the Menu button. 3. Press to highlight STATUS SHEET, then press Menu. ...maintenance tank, and other printer parts. Press d to start printing. You see PRINT. 5. 120 | Maintaining and Transporting the Printer Note: You can print out a status check or view the printer's status on the LCD display. Other printer parts need to be replaced by an authorized Epson service technician. Checking Printer...
...is loaded in each cartridge, the page count, and the status of ink remaining in the printer. 2. You can replace the ink cartridges, cutter blade, and maintenance tank yourself. Press the Menu button. 3. Press to highlight STATUS SHEET, then press Menu. ...maintenance tank, and other printer parts. Press d to start printing. You see PRINT. 5. 120 | Maintaining and Transporting the Printer Note: You can print out a status check or view the printer's status on the LCD display. Other printer parts need to be replaced by an authorized Epson service technician. Checking Printer...
Printer Guide
Page 121
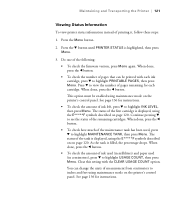
... USAGE COUNT, then press Menu. When done, press the l button. • To check the amount of the maintenance tank has been used (in centimeters), press d to highlight MAINTENANCE TANK, then press Menu. Press the d button until PRINTER STATUS is filled, the percentage drops. When done, press the l button. Clear this setting with each cartridge. Press...
... USAGE COUNT, then press Menu. When done, press the l button. • To check the amount of the maintenance tank has been used (in centimeters), press d to highlight MAINTENANCE TANK, then press Menu. Press the d button until PRINTER STATUS is filled, the percentage drops. When done, press the l button. Clear this setting with each cartridge. Press...

Printer Guide
Page 132
...Ink 1. You will need to reduce the amount of ink, don't switch cartridges more often than necessary. Changing the black ink cartridge also consumes color ink. The Conversion Kit includes three special cartridges (yellow, magenta, and cyan), which are used . Since it was interrupted. The amount of ...and Epson Velvet Fine Art Paper. If MAINT TANK FULL or MAINT TANK NEAR FULL appears on the LCD, you need to use the Black Ink Conversion Kit (included with your printer) and the new black ink cartridge (either Matte or Photo) that you plan to . Press the d button until MAINTENANCE is...
...Ink 1. You will need to reduce the amount of ink, don't switch cartridges more often than necessary. Changing the black ink cartridge also consumes color ink. The Conversion Kit includes three special cartridges (yellow, magenta, and cyan), which are used . Since it was interrupted. The amount of ...and Epson Velvet Fine Art Paper. If MAINT TANK FULL or MAINT TANK NEAR FULL appears on the LCD, you need to use the Black Ink Conversion Kit (included with your printer) and the new black ink cartridge (either Matte or Photo) that you plan to . Press the d button until MAINTENANCE is...

Printer Guide
Page 141
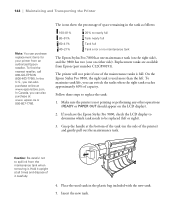
...the system during the initial ink charge and manual and automatic print head cleaning. When the tank is almost full, the message MAINTENANCE TANK NEAR FULL appears on the LCD display. Maintaining and Transporting the Printer | 141 2. Push down on the side pin while turning the latch to the home...3. Close the front cover when you to do so. When the tank is completely full, the printer stops working and MAINTENANCE TANK FULL appears on the control panel, shown below. You can check how much space remains in the maintenance tank by viewing its status using the menu (see page 121) or ...
...the system during the initial ink charge and manual and automatic print head cleaning. When the tank is almost full, the message MAINTENANCE TANK NEAR FULL appears on the LCD display. Maintaining and Transporting the Printer | 141 2. Push down on the side pin while turning the latch to the home...3. Close the front cover when you to do so. When the tank is completely full, the printer stops working and MAINTENANCE TANK FULL appears on the control panel, shown below. You can check how much space remains in the maintenance tank by viewing its status using the menu (see page 121) or ...
Printer Guide
Page 142
... the printer) and gently pull out the maintenance tank. Hold it . Follow these steps to spill ink from the maintenance tank when removing it upright at www.epsonstore.com. In Canada, you have the Epson Stylus Pro 9800, check the LCD display to determine which tank needs to nearly full Tank nearly full Tank full Tank error or no maintenance tank The Epson Stylus Pro 7800 has one maintenance tank...
... the printer) and gently pull out the maintenance tank. Hold it . Follow these steps to spill ink from the maintenance tank when removing it upright at www.epsonstore.com. In Canada, you have the Epson Stylus Pro 9800, check the LCD display to determine which tank needs to nearly full Tank nearly full Tank full Tank error or no maintenance tank The Epson Stylus Pro 7800 has one maintenance tank...
Printer Guide
Page 152
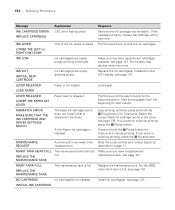
...MAINTENANCE REQUEST A printer part may decline when ink is almost full. see page 135. INK OUT INSTALL NEW CARTRIDGE Ink cartridge(s) are nearly empty (printing continues). LEVER RELEASED Paper is installed. described on the LCD display; MAINT TANK NEAR FULL REPLACE THE MAINTENANCE TANK The maintenance tank...option in the driver A non-Epson ink cartridge is not loaded. Make sure you have a replacement maintenance tank; MANT TANK FULL REPLACE THE MAINTENANCE TANK The maintenance tank is full; For the 9800, note which tank is full. NO CARTRIDGE Ink ...
...MAINTENANCE REQUEST A printer part may decline when ink is almost full. see page 135. INK OUT INSTALL NEW CARTRIDGE Ink cartridge(s) are nearly empty (printing continues). LEVER RELEASED Paper is installed. described on the LCD display; MAINT TANK NEAR FULL REPLACE THE MAINTENANCE TANK The maintenance tank...option in the driver A non-Epson ink cartridge is not loaded. Make sure you have a replacement maintenance tank; MANT TANK FULL REPLACE THE MAINTENANCE TANK The maintenance tank is full; For the 9800, note which tank is full. NO CARTRIDGE Ink ...

Printer Guide
Page 153
...Load roll paper as described on ; PRINTER ERROR RESTART THE PRINTER You tried to print while an error Press the P Power button to turn it in and turn off and then back on page 65. For the 9800, note which tank is almost finished. The cutter may be...printer off the condition was not cut evenly. PAPER CUT ERROR REMOVE UNCUT PAPER Roll paper was present. Release the paper lever and finish cutting the paper. Select YES and follow the instructions to the locked position. PAPER EJECT ERROR Paper remains in the printer. MAINTENANCE TANK Make sure the maintenance tank...
...Load roll paper as described on ; PRINTER ERROR RESTART THE PRINTER You tried to print while an error Press the P Power button to turn it in and turn off and then back on page 65. For the 9800, note which tank is almost finished. The cutter may be...printer off the condition was not cut evenly. PAPER CUT ERROR REMOVE UNCUT PAPER Roll paper was present. Release the paper lever and finish cutting the paper. Select YES and follow the instructions to the locked position. PAPER EJECT ERROR Paper remains in the printer. MAINTENANCE TANK Make sure the maintenance tank...
Printer Guide
Page 171
... and white photos, 94 to 96 borderless printing, 80 to 82, 90 to 91 canceling print jobs, 97 checking ink levels, 97 to 98 color management, 87, 94 to 96 custom preset, 93 installing software, 43 to 48 margins, printing without, 80 to 82, 90 to 91 monitoring ..., 80 to 83 paper configuration settings, 88 to 89 Printer Utility, 97 roll paper settings, 89 to 91 Status Monitor, 97 to 98 system requirements, 12 uninstalling software, 164 -171 Index | 171 Maintenance, 119 to 143 Maintenance menu, 125, 138 Maintenance mode, 136 Maintenance tank checking status, 120 to 122 ordering, 10 replacing, 141...
... and white photos, 94 to 96 borderless printing, 80 to 82, 90 to 91 canceling print jobs, 97 checking ink levels, 97 to 98 color management, 87, 94 to 96 custom preset, 93 installing software, 43 to 48 margins, printing without, 80 to 82, 90 to 91 monitoring ..., 80 to 83 paper configuration settings, 88 to 89 Printer Utility, 97 roll paper settings, 89 to 91 Status Monitor, 97 to 98 system requirements, 12 uninstalling software, 164 -171 Index | 171 Maintenance, 119 to 143 Maintenance menu, 125, 138 Maintenance mode, 136 Maintenance tank checking status, 120 to 122 ordering, 10 replacing, 141...

Product Brochure
Page 8
...V Approx. 55 W or less (operating) Normal is 42:30 Acoustic Noise Level Approximately 50 dB(A) according to ISO 7779 Printer Language/Drivers Epson ESC/P2 raster photographic drivers standard Optional PANTONE licensed and SWOP certified PostScript Language Level 3 Compatible RIP by ColorBurst (included only ... SP7800 Media input Cut-sheet size SP9800 Media input Cut-sheet size Media core compatibility Max. Epson Stylus Pro 7800 and 9800 Print Engine Specifications Printing Method 8-channel Print Head Technology 8-color (C, Lc, M, Lm, Y, Lk, LLk + PK or MK) pigment-based Variable-sized...
...V Approx. 55 W or less (operating) Normal is 42:30 Acoustic Noise Level Approximately 50 dB(A) according to ISO 7779 Printer Language/Drivers Epson ESC/P2 raster photographic drivers standard Optional PANTONE licensed and SWOP certified PostScript Language Level 3 Compatible RIP by ColorBurst (included only ... SP7800 Media input Cut-sheet size SP9800 Media input Cut-sheet size Media core compatibility Max. Epson Stylus Pro 7800 and 9800 Print Engine Specifications Printing Method 8-channel Print Head Technology 8-color (C, Lc, M, Lm, Y, Lk, LLk + PK or MK) pigment-based Variable-sized...

Product Information Guide
Page 1
... 49 to 61 Hz 1.0 A at 120 V 0.5 A at 220 V Epson Stylus Pro 7800: Approx. 50 W or less (ISO 10561 Letter Pattern) 6 W or less in sleep mode 1 W or less in power off mode Epson Stylus Pro 9800: Approx. 55 W or less (ISO 10561 Letter Pattern) 6 W or less in sleep mode 1 W or less in power off mode Maintenance tank 8/05 Epson Stylus Pro 7800 and 9800 - 1
... 49 to 61 Hz 1.0 A at 120 V 0.5 A at 220 V Epson Stylus Pro 7800: Approx. 50 W or less (ISO 10561 Letter Pattern) 6 W or less in sleep mode 1 W or less in power off mode Epson Stylus Pro 9800: Approx. 55 W or less (ISO 10561 Letter Pattern) 6 W or less in sleep mode 1 W or less in power off mode Maintenance tank 8/05 Epson Stylus Pro 7800 and 9800 - 1
Product Information Guide
Page 3
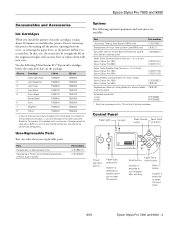
... black, or you can order these user-replaceable parts: Part Relacement Ink Maintenance Tank Replacement Printer Cutter Blade (replaces the printer's built-in the original cartridges and you install the printer's first ink cartridges, it takes about 20% of printer purchase. Epson Stylus Pro 7800 and 9800 Consumables and Accessories Ink Cartridges When you may not be purchased within 12...
... black, or you can order these user-replaceable parts: Part Relacement Ink Maintenance Tank Replacement Printer Cutter Blade (replaces the printer's built-in the original cartridges and you install the printer's first ink cartridges, it takes about 20% of printer purchase. Epson Stylus Pro 7800 and 9800 Consumables and Accessories Ink Cartridges When you may not be purchased within 12...
Product Information Guide
Page 4
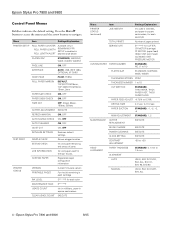
... PAPER Registered paper configuration information PRINTER STATUS VERSION PRINTABLE PAGES Current firmware version For the ink remaining in each cartridge INK LEVEL E*****F for each color MAINTENANCE TANK E*****F USAGE COUNT Ink in ...COLOR, BI-D ALL 4 - PAPER SUCTION STANDARD, -1, -2, -3, -4 M/W ADJUSTMENT STANDARD, 1, 2 MAINTENANCE CUTTER REPLACEMENT EXECUTE BK INK CHANGE EXECUTE POWER CLEANING EXECUTE CLOCK SETTING EXECUTE CONTRAST ADJUSTMENT -20 to +20 HEAD ALIGNMENT PAPER THICKNESS STANDARD, 0.1 mm to 0.70% DRYING TIME 0. 0 sec. Epson Stylus Pro 7800 and 9800...
... PAPER Registered paper configuration information PRINTER STATUS VERSION PRINTABLE PAGES Current firmware version For the ink remaining in each cartridge INK LEVEL E*****F for each color MAINTENANCE TANK E*****F USAGE COUNT Ink in ...COLOR, BI-D ALL 4 - PAPER SUCTION STANDARD, -1, -2, -3, -4 M/W ADJUSTMENT STANDARD, 1, 2 MAINTENANCE CUTTER REPLACEMENT EXECUTE BK INK CHANGE EXECUTE POWER CLEANING EXECUTE CLOCK SETTING EXECUTE CONTRAST ADJUSTMENT -20 to +20 HEAD ALIGNMENT PAPER THICKNESS STANDARD, 0.1 mm to 0.70% DRYING TIME 0. 0 sec. Epson Stylus Pro 7800 and 9800...


