
Network Guide
Page 31
...network interface. You can distinguish the network interface by its MAC address. Displays the port type setting, either the paper or ink is open, or an error has occurred. The printer status is idle or printing. Network Screens General information Items Administrator Name Location Interface Card Model Name MAC Address Hardware Version... the password to the network interface Displays the current Ethernet speed and duplex setting. Yellow indicates that either Auto, MDI, or MDI-X The background color of the printer attached to protect settings. Red indicates that the...
...network interface. You can distinguish the network interface by its MAC address. Displays the port type setting, either the paper or ink is open, or an error has occurred. The printer status is idle or printing. Network Screens General information Items Administrator Name Location Interface Card Model Name MAC Address Hardware Version... the password to the network interface Displays the current Ethernet speed and duplex setting. Yellow indicates that either Auto, MDI, or MDI-X The background color of the printer attached to protect settings. Red indicates that the...
Printer Guide
Page 5
... Requirements 12 Important Safety Instructions 13 Ink Cartridge Safety Instructions 15 Printer Parts 16 1 Setting Up the Printer Unpacking and Assembling the Epson Stylus Pro 7880 17 Unpacking and Assembling the Stand 18 Unpacking the Printer 20 Mounting the Printer on the Stand 22 Attaching the Paper Basket 25 Unpacking and Assembling the Epson Stylus Pro 9880 27 Unpacking and Assembling the...
... Requirements 12 Important Safety Instructions 13 Ink Cartridge Safety Instructions 15 Printer Parts 16 1 Setting Up the Printer Unpacking and Assembling the Epson Stylus Pro 7880 17 Unpacking and Assembling the Stand 18 Unpacking the Printer 20 Mounting the Printer on the Stand 22 Attaching the Paper Basket 25 Unpacking and Assembling the Epson Stylus Pro 9880 27 Unpacking and Assembling the...
Printer Guide
Page 7
Contents | 7 4 Printing With Epson Drivers for Windows Sizing Images for Borderless Printing on Roll Paper 90 Choosing Basic Print Options 91 Selecting the Correct Media Type Setting 93 Choosing Color Management Options 95 Choosing Roll Paper Options 97 Choosing Cut Sheet Paper Options...Cleaning the Print Head 123 Running a Power Cleaning Cycle 124 Aligning the Print Head 125 Replacing Ink Cartridges 126 Switching Black Ink Cartridges 130 Draining the Old Ink 130 Installing the New Black Ink Cartridge 132 Updating the Printer Driver Information 133 Changing the Date and Time 134 7
Contents | 7 4 Printing With Epson Drivers for Windows Sizing Images for Borderless Printing on Roll Paper 90 Choosing Basic Print Options 91 Selecting the Correct Media Type Setting 93 Choosing Color Management Options 95 Choosing Roll Paper Options 97 Choosing Cut Sheet Paper Options...Cleaning the Print Head 123 Running a Power Cleaning Cycle 124 Aligning the Print Head 125 Replacing Ink Cartridges 126 Switching Black Ink Cartridges 130 Draining the Old Ink 130 Installing the New Black Ink Cartridge 132 Updating the Printer Driver Information 133 Changing the Date and Time 134 7
Printer Guide
Page 8
...New Cutter Blade 138 Replacing the Maintenance Tank 139 Cleaning the Printer 141 Transporting or Storing the Printer 142 Preparing the Printer for Shipment 143 Moving the Printer on the Stand 145 Setting Up the Printer After Transportation 146 6 Solving Problems Diagnosing Problems 147 Checking ... 158 Fixing Paper Eject Problems 159 Clearing Paper Jams 160 Uninstalling and Reinstalling the Printer Driver 162 A Specifications Environmental 163 Electrical 163 Dimensions and Weight 164 Printer Interfaces 164 Safety Approvals 164 Media 164 Roll Paper 164 Cut Sheets 165 Printable ...
...New Cutter Blade 138 Replacing the Maintenance Tank 139 Cleaning the Printer 141 Transporting or Storing the Printer 142 Preparing the Printer for Shipment 143 Moving the Printer on the Stand 145 Setting Up the Printer After Transportation 146 6 Solving Problems Diagnosing Problems 147 Checking ... 158 Fixing Paper Eject Problems 159 Clearing Paper Jams 160 Uninstalling and Reinstalling the Printer Driver 162 A Specifications Environmental 163 Electrical 163 Dimensions and Weight 164 Printer Interfaces 164 Safety Approvals 164 Media 164 Roll Paper 164 Cut Sheets 165 Printable ...
Printer Guide
Page 9
... provides important information on setting up and using your equipment. Notes contain important information about the printer, drivers, and utility software. You can read the guide using the Epson® printer drivers, and replacing ink cartridges. Warnings, Cautions, Notes, and Tips Please follow these guidelines as you how to maintain your CD-ROM, if...
... provides important information on setting up and using your equipment. Notes contain important information about the printer, drivers, and utility software. You can read the guide using the Epson® printer drivers, and replacing ink cartridges. Warnings, Cautions, Notes, and Tips Please follow these guidelines as you how to maintain your CD-ROM, if...

Printer Guide
Page 10
... and user-replaceable parts Part Replacement Ink Maintenance Tank (see page 157) Replacement Printer Cutter Blade (see page 154) Ink Cartridges Part number C12C890191 C12C815291 See page 145 for a complete list. 12 or 3-inch Epson Stylus Pro 7880: Epson Stylus Pro 9880: Paper Roller Spindle (High Tension) - 2- or 3-inch Epson Stylus Pro 7880: Epson Stylus Pro 9880: Manual Media Cutting System* Epson Stylus Pro 7880: Epson Stylus Pro 9880: Replacement Manual Cutting Blade (for...
... and user-replaceable parts Part Replacement Ink Maintenance Tank (see page 157) Replacement Printer Cutter Blade (see page 154) Ink Cartridges Part number C12C890191 C12C815291 See page 145 for a complete list. 12 or 3-inch Epson Stylus Pro 7880: Epson Stylus Pro 9880: Paper Roller Spindle (High Tension) - 2- or 3-inch Epson Stylus Pro 7880: Epson Stylus Pro 9880: Manual Media Cutting System* Epson Stylus Pro 7880: Epson Stylus Pro 9880: Replacement Manual Cutting Blade (for...

Printer Guide
Page 11
...change without notice. Dial (888) 377-6611, 6 AM to 6 PM, Pacific Time, Monday through the Epson PreferredSM Limited Warranty Plan. Macintosh System Requirements To use your printer in either a stand-alone or per-to-peer network environment, your questions. Introduction | 13 Tip: If .... You can download drivers, firmware, and documentation, get FAQs and troubleshooting advice, or e-mail Epson with your printer. You can purchase optional equipment and genuine Epson ink and paper from an Epson Professional Imaging Authorized Reseller. You'll also need your Unit ID number, call (562) 276-...
...change without notice. Dial (888) 377-6611, 6 AM to 6 PM, Pacific Time, Monday through the Epson PreferredSM Limited Warranty Plan. Macintosh System Requirements To use your printer in either a stand-alone or per-to-peer network environment, your questions. Introduction | 13 Tip: If .... You can download drivers, firmware, and documentation, get FAQs and troubleshooting advice, or e-mail Epson with your printer. You can purchase optional equipment and genuine Epson ink and paper from an Epson Professional Imaging Authorized Reseller. You'll also need your Unit ID number, call (562) 276-...
Printer Guide
Page 13
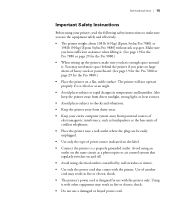
... not use the equipment safely and effectively. • The printer weighs about 108 lb (49 kg) [Epson Stylus Pro 7880] or 198 lb (90 kg) [Epson Stylus Pro 9880] without ink or paper. The printer will not operate properly if it is designed for the Pro 9880.) • When setting up the printer, make sure you use a damaged or frayed power cord...
... not use the equipment safely and effectively. • The printer weighs about 108 lb (49 kg) [Epson Stylus Pro 7880] or 198 lb (90 kg) [Epson Stylus Pro 9880] without ink or paper. The printer will not operate properly if it is designed for the Pro 9880.) • When setting up the printer, make sure you use a damaged or frayed power cord...
Printer Guide
Page 15
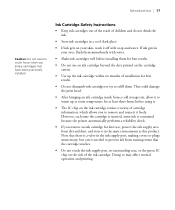
... port, making covers or plugs unnecessary, but care is consumed because the printer automatically performs a reliability check. • If you remove an ink cartridge for later use, protect the ink supply area from dirt and dust, and store it freely. Doing so may affect normal operation and printing. ...8226; The IC chip on your skin, wash it off with soap and water. Ink Cartridge Safety Instructions • Keep ink cartridges out of the reach of children and do not drink the ink. • Store ink cartridges in the same environment as this product. Introduction | 17 Caution: Do not ...
... port, making covers or plugs unnecessary, but care is consumed because the printer automatically performs a reliability check. • If you remove an ink cartridge for later use, protect the ink supply area from dirt and dust, and store it freely. Doing so may affect normal operation and printing. ...8226; The IC chip on your skin, wash it off with soap and water. Ink Cartridge Safety Instructions • Keep ink cartridges out of the reach of children and do not drink the ink. • Store ink cartridges in the same environment as this product. Introduction | 17 Caution: Do not ...
Printer Guide
Page 16
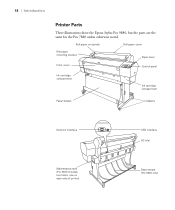
18 | Introduction Printer Parts These illustrations show the Epson Stylus Pro 9880, but the parts are the same for the Pro 7880 unless otherwise noted. Roll paper on spindle Roll paper cover Roll paper mounting bracket Paper lever Front cover Control panel Ink cartridge compartment Ink cartridge compartment Paper basket Casters Network interface Maintenance tank (Pro 9880 includes two tanks, one on each side of printer) 18 USB interface AC inlet Paper straps (Pro 9880 only)
18 | Introduction Printer Parts These illustrations show the Epson Stylus Pro 9880, but the parts are the same for the Pro 7880 unless otherwise noted. Roll paper on spindle Roll paper cover Roll paper mounting bracket Paper lever Front cover Control panel Ink cartridge compartment Ink cartridge compartment Paper basket Casters Network interface Maintenance tank (Pro 9880 includes two tanks, one on each side of printer) 18 USB interface AC inlet Paper straps (Pro 9880 only)

Printer Guide
Page 17
... direct sunlight, excessive heat, moisture, or dust. The following information: • Unpacking and assembling the Pro 7880 and Pro 9880 • Connecting the power cord • Installing ink • Connecting to your printer and its stand. (If you have the Epson Stylus Pro 9880, see page 29 instead.) Before you begin, make sure you have sufficient space to...
... direct sunlight, excessive heat, moisture, or dust. The following information: • Unpacking and assembling the Pro 7880 and Pro 9880 • Connecting the power cord • Installing ink • Connecting to your printer and its stand. (If you have the Epson Stylus Pro 9880, see page 29 instead.) Before you begin, make sure you have sufficient space to...
Printer Guide
Page 21
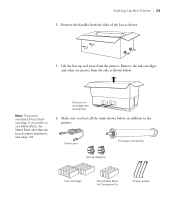
... Kit 23 2 Paper guides If you have all the items shown below . Remove ink cartridges and accessories # " 4. Remove the ink cartridges and other accessories from the printer. See page 144. Setting Up the Printer | 23 2. Remove the handles from the sides of the box as shown below , in addition to use Matte Black, the...
... Kit 23 2 Paper guides If you have all the items shown below . Remove ink cartridges and accessories # " 4. Remove the ink cartridges and other accessories from the printer. See page 144. Setting Up the Printer | 23 2. Remove the handles from the sides of the box as shown below , in addition to use Matte Black, the...

Printer Guide
Page 24
Note: To prevent paper jams, don't place the bolt back in case you need to ship the printer. Check these areas: • the front cover • the ink compartment covers • the maintenance tank (on the right side near the bottom) 6. Open the front cover. Save the bolt and bracket in the printer. 5. 26 | Setting Up the Printer 4. Then unscrew the bolt and remove the bracket as shown. Bolt 26 Remove any packing tape. Fasten the printer to locate the bolt and bracket securing the print head. Follow the red wire to the stand with the wing screws and washers.
Note: To prevent paper jams, don't place the bolt back in case you need to ship the printer. Check these areas: • the front cover • the ink compartment covers • the maintenance tank (on the right side near the bottom) 6. Open the front cover. Save the bolt and bracket in the printer. 5. 26 | Setting Up the Printer 4. Then unscrew the bolt and remove the bracket as shown. Bolt 26 Remove any packing tape. Fasten the printer to locate the bolt and bracket securing the print head. Follow the red wire to the stand with the wing screws and washers.
Printer Guide
Page 30
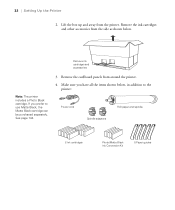
See page 144. 3. Remove ink cartridges and accessories # " Note: The printer includes a Photo Black cartridge. If you have all the items shown below . Remove the cardboard panels from the side as shown below , in addition to...Black cartridge can be purchased separately. Make sure you prefer to the printer: Power cord Spindle adapters Roll paper and spindle 8 Ink cartridges Photo/Matte Black Ink Conversion Kit 5 Paper guides 32 Remove the ink cartridges and other accessories from around the printer. 4. 32 | Setting Up the Printer 2. Lift the box up and away from the...
See page 144. 3. Remove ink cartridges and accessories # " Note: The printer includes a Photo Black cartridge. If you have all the items shown below . Remove the cardboard panels from the side as shown below , in addition to...Black cartridge can be purchased separately. Make sure you prefer to the printer: Power cord Spindle adapters Roll paper and spindle 8 Ink cartridges Photo/Matte Black Ink Conversion Kit 5 Paper guides 32 Remove the ink cartridges and other accessories from around the printer. 4. 32 | Setting Up the Printer 2. Lift the box up and away from the...

Printer Guide
Page 33
Setting Up the Printer | 35 5. Bolt 35 Check underneath and on the sides of the printer to make sure you need to locate the screw and bracket securing the print head. Follow the red wire to ship the printer. Open the front cover. Remove any packing tape from the front cover, ink compartment covers, and maintenance tank. Save the bolt and bracket in case you remove all the tape. 6. Then unscrew the bolt and remove the bracket, as shown.
Setting Up the Printer | 35 5. Bolt 35 Check underneath and on the sides of the printer to make sure you need to locate the screw and bracket securing the print head. Follow the red wire to ship the printer. Open the front cover. Remove any packing tape from the front cover, ink compartment covers, and maintenance tank. Save the bolt and bracket in case you remove all the tape. 6. Then unscrew the bolt and remove the bracket, as shown.
Printer Guide
Page 38
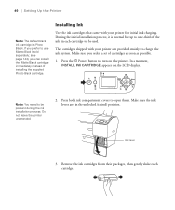
... INK CARTRIDGE appears on the printer. Make sure the ink levers are provided mainly to charge the ink system. Make sure you prefer to use Matte Black (sold separately; Ink lever 3. Do not leave the printer unattended. 2. Press both ink compartment covers to open them. Remove the ink cartridges... from their packages, then gently shake each cartridge to be present during the ink installation process. During the initial...
... INK CARTRIDGE appears on the printer. Make sure the ink levers are provided mainly to charge the ink system. Make sure you prefer to use Matte Black (sold separately; Ink lever 3. Do not leave the printer unattended. 2. Press both ink compartment covers to open them. Remove the ink cartridges... from their packages, then gently shake each cartridge to be present during the ink installation process. During the initial...
Printer Guide
Page 39
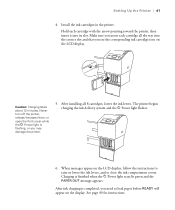
... insert it into the correct slot and that you see the corresponding ink cartridge icon on the display. After ink charging is flashing, or you need to close the ink compartment covers. Never turn off the printer, release the paper lever, or open the front cover while the P Power light ...is completed, you may damage the printer. 5. Charging is finished when the P Power light stays lit green and the PAPER OUT message appears. Install the ink cartridges in the printer. When messages appear on the LCD display, follow the instructions to raise or...
... insert it into the correct slot and that you see the corresponding ink cartridge icon on the display. After ink charging is flashing, or you need to close the ink compartment covers. Never turn off the printer, release the paper lever, or open the front cover while the P Power light ...is completed, you may damage the printer. 5. Charging is finished when the P Power light stays lit green and the PAPER OUT message appears. Install the ink cartridges in the printer. When messages appear on the LCD display, follow the instructions to raise or...
Printer Guide
Page 68
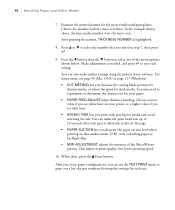
...for thinner media, or adjust the speed for each one. 70 70 | Handling Paper and Other Media 7. Choose the number with non-Epson media and avoid smearing the ink. For instructions, see white lines on thin media (under number 4 are the most even. Choose a lower value if you see page...similar settings using the printer driver software. After printing the pattern, THICKNESS NUMBER is highlighted. 8. This improves print quality, but lowers printing speed. 10. In the example shown above, the lines under 12 lb), such as needed, and press to save each pass to allow ink to select the ...
...for thinner media, or adjust the speed for each one. 70 70 | Handling Paper and Other Media 7. Choose the number with non-Epson media and avoid smearing the ink. For instructions, see white lines on thin media (under number 4 are the most even. Choose a lower value if you see page...similar settings using the printer driver software. After printing the pattern, THICKNESS NUMBER is highlighted. 8. This improves print quality, but lowers printing speed. 10. In the example shown above, the lines under 12 lb), such as needed, and press to save each pass to allow ink to select the ...

Printer Guide
Page 79
... Piezo Pro Matte Canvas Textured Fine Art Paper Textured Fine Art Paper UltraSmooth Fine Art Paper UltraSmooth Fine Art Paper Canvas Canvas Doubleweight Matte Paper Doubleweight Matte Paper Singleweight Matte Paper Singleweight Matte Paper Presentation Paper Matte Photo Quality Ink Jet ...Paper Enhanced Matte Paper Enhanced Matte Paper Ultra Premium Presentation Paper Matte Somerset® Velvet (roll paper only) 89 Printing With Epson Drivers for Macintosh | 89 For this media Select this...
... Piezo Pro Matte Canvas Textured Fine Art Paper Textured Fine Art Paper UltraSmooth Fine Art Paper UltraSmooth Fine Art Paper Canvas Canvas Doubleweight Matte Paper Doubleweight Matte Paper Singleweight Matte Paper Singleweight Matte Paper Presentation Paper Matte Photo Quality Ink Jet ...Paper Enhanced Matte Paper Enhanced Matte Paper Ultra Premium Presentation Paper Matte Somerset® Velvet (roll paper only) 89 Printing With Epson Drivers for Macintosh | 89 For this media Select this...
Printer Guide
Page 81
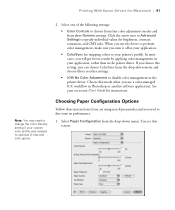
... the driver to your application, rather than in the printer driver. Printing With Epson Drivers for instructions. In most cases, you turn it off in your application. • ColorSync for brightness, contrast, saturation, and CMY inks. See your custom color profile was created to disable color management in Photoshop or another software application. When you...
... the driver to your application, rather than in the printer driver. Printing With Epson Drivers for instructions. In most cases, you turn it off in your application. • ColorSync for brightness, contrast, saturation, and CMY inks. See your custom color profile was created to disable color management in Photoshop or another software application. When you...


