Printer Guide
Page 7
Contents | 7 4 Printing With Epson Drivers for Windows Sizing Images for Borderless Printing on Roll Paper 90 Choosing Basic Print Options 91 Selecting the Correct Media Type Setting 93 Choosing Color Management Options 95 Choosing Roll Paper Options 97 Choosing Cut Sheet... the Printer Checking Printer Status and Part Life 117 Printing Status Information 118 Viewing Status Information 118 Checking Printer Status From the Printer Driver 120 Checking and Cleaning the Print Head 121 Running the Nozzle Check and Head Cleaning Utilities 121 Checking and Cleaning the Print Head Using ...
Contents | 7 4 Printing With Epson Drivers for Windows Sizing Images for Borderless Printing on Roll Paper 90 Choosing Basic Print Options 91 Selecting the Correct Media Type Setting 93 Choosing Color Management Options 95 Choosing Roll Paper Options 97 Choosing Cut Sheet... the Printer Checking Printer Status and Part Life 117 Printing Status Information 118 Viewing Status Information 118 Checking Printer Status From the Printer Driver 120 Checking and Cleaning the Print Head 121 Running the Nozzle Check and Head Cleaning Utilities 121 Checking and Cleaning the Print Head Using ...
Printer Guide
Page 9
...-loading paper, replacing ink cartridges and other components, cleaning and aligning the print head, and using the Epson® printer drivers, and replacing ink cartridges. Tips contain additional hints on how to avoid bodily injury. 11 Introduction This Printer Guide provides important information on setting up and using Adobe® Reader® (also supplied on...
...-loading paper, replacing ink cartridges and other components, cleaning and aligning the print head, and using the Epson® printer drivers, and replacing ink cartridges. Tips contain additional hints on how to avoid bodily injury. 11 Introduction This Printer Guide provides important information on setting up and using Adobe® Reader® (also supplied on...

Printer Guide
Page 14
...button. When you press this product contain Perchlorate Material - liquid has entered the printer; special handling may damage the printer. • Do not insert objects through the slots. This ensures that the print head is safely capped. • If you may apply, See www.dtsc.ca.gov.../hazardouswaste/perchlorate. 16 the printer does not operate normally or exhibits a distinct change in the printer's case. • Do not put your hand inside the printer during printing. • Do not move the print head by hand unless instructed to do so by an Epson service technician;
...button. When you press this product contain Perchlorate Material - liquid has entered the printer; special handling may damage the printer. • Do not insert objects through the slots. This ensures that the print head is safely capped. • If you may apply, See www.dtsc.ca.gov.../hazardouswaste/perchlorate. 16 the printer does not operate normally or exhibits a distinct change in the printer's case. • Do not put your hand inside the printer during printing. • Do not move the print head by hand unless instructed to do so by an Epson service technician;
Printer Guide
Page 15
... and do not drink the ink. • Store ink cartridges in your eyes, flush them immediately with soap and water. This could damage the print head. • After bringing an ink cartridge inside from staining items that the cartridge touches. • Do not touch the ink supply port, its ...supply area from dirt and dust, and store it in the ink supply port, making covers or plugs unnecessary, but care is consumed because the printer automatically performs a reliability check. • If you to warm up at room temperature for at least three hours before installing them . Note that...
... and do not drink the ink. • Store ink cartridges in your eyes, flush them immediately with soap and water. This could damage the print head. • After bringing an ink cartridge inside from staining items that the cartridge touches. • Do not touch the ink supply port, its ...supply area from dirt and dust, and store it in the ink supply port, making covers or plugs unnecessary, but care is consumed because the printer automatically performs a reliability check. • If you to warm up at room temperature for at least three hours before installing them . Note that...

Printer Guide
Page 24
Fasten the printer to locate the bolt and bracket securing the print head. Note: To prevent paper jams, don't place the bolt back in case you need to ship the printer. Check these areas: • the front cover • the ink compartment covers • the maintenance tank (on the right side near the bottom) 6. Then unscrew the bolt and remove the bracket as shown. Bolt 26 26 | Setting Up the Printer 4. Open the front cover. Follow the red wire to the stand with the wing screws and washers. Save the bolt and bracket in the printer. 5. Remove any packing tape.
Fasten the printer to locate the bolt and bracket securing the print head. Note: To prevent paper jams, don't place the bolt back in case you need to ship the printer. Check these areas: • the front cover • the ink compartment covers • the maintenance tank (on the right side near the bottom) 6. Then unscrew the bolt and remove the bracket as shown. Bolt 26 26 | Setting Up the Printer 4. Open the front cover. Follow the red wire to the stand with the wing screws and washers. Save the bolt and bracket in the printer. 5. Remove any packing tape.

Printer Guide
Page 33
Remove any packing tape from the front cover, ink compartment covers, and maintenance tank. Save the bolt and bracket in case you remove all the tape. 6. Follow the red wire to ship the printer. Then unscrew the bolt and remove the bracket, as shown. Bolt 35 Check underneath and on the sides of the printer to make sure you need to locate the screw and bracket securing the print head. Open the front cover. Setting Up the Printer | 35 5.
Remove any packing tape from the front cover, ink compartment covers, and maintenance tank. Save the bolt and bracket in case you remove all the tape. 6. Follow the red wire to ship the printer. Then unscrew the bolt and remove the bracket, as shown. Bolt 35 Check underneath and on the sides of the printer to make sure you need to locate the screw and bracket securing the print head. Open the front cover. Setting Up the Printer | 35 5.
Printer Guide
Page 46
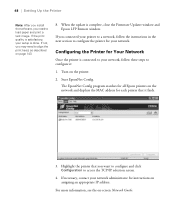
The EpsonNet Config program searches for all Epson printers on the network and displays the MAC address for each printer that you want to configure and click Configuration to load paper and print a test image. If the print quality is satisfactory, your network, follow the instructions ...Epson LFP Remote window. Turn on -screen Network Guide. 48 Highlight the printer that it : 1. If you may need to access the TCP/IP selection screen. 4. For more information, see the on the printer. 2. If not, you connected your printer to a network, follow these steps to align the print head...
The EpsonNet Config program searches for all Epson printers on the network and displays the MAC address for each printer that you want to configure and click Configuration to load paper and print a test image. If the print quality is satisfactory, your network, follow the instructions ...Epson LFP Remote window. Turn on -screen Network Guide. 48 Highlight the printer that it : 1. If you may need to access the TCP/IP selection screen. 4. For more information, see the on the printer. 2. If not, you connected your printer to a network, follow these steps to align the print head...
Printer Guide
Page 68
...create paper configurations, you decrease the paper suction level when printing on thin media (under number 4 are the most evenly overlapping lines. You can make similar settings using the printer driver software. 70 | Handling Paper and Other Media 7. Choose the number with non-Epson media and avoid smearing the ink. You may need... a higher value if you see white lines on the page. • PAPER SUCTION lets you can also make the print head wait up to 10 seconds after each pass to allow ink to determine the cleanest cut for each setting. Press the l button, then the d ...
...create paper configurations, you decrease the paper suction level when printing on thin media (under number 4 are the most evenly overlapping lines. You can make similar settings using the printer driver software. 70 | Handling Paper and Other Media 7. Choose the number with non-Epson media and avoid smearing the ink. You may need... a higher value if you see white lines on the page. • PAPER SUCTION lets you can also make the print head wait up to 10 seconds after each pass to allow ink to determine the cleanest cut for each setting. Press the l button, then the d ...

Printer Guide
Page 82
... the page. • Paper Feed Adjustment helps reduce banding. 92 | Printing With Epson Drivers for various paper thicknesses. 92 You may have made using the printer's control panel. • Color Density lets you control the ink saturation level. • Drying Time per Print Head Pass lets you fine-tune the setting for Macintosh 2. Select the correct...
... the page. • Paper Feed Adjustment helps reduce banding. 92 | Printing With Epson Drivers for various paper thicknesses. 92 You may have made using the printer's control panel. • Color Density lets you control the ink saturation level. • Drying Time per Print Head Pass lets you fine-tune the setting for Macintosh 2. Select the correct...

Printer Guide
Page 107
... was created to optimize D-max and color gamut. 2. When you print with non-Epson media and avoid smearing the ink. Printing With Epson Drivers for Windows | 117 Note: You may need to experiment to determine the best setting for your prints, or a higher value if you ...paper configuration settings you may have made using the printer's control panel. • Color Density lets you control the ink saturation level (for example, when you turn off color management in your printer software). • Drying Time per Print Head Pass lets you finish selecting Paper Configuration settings, ...
... was created to optimize D-max and color gamut. 2. When you print with non-Epson media and avoid smearing the ink. Printing With Epson Drivers for Windows | 117 Note: You may need to experiment to determine the best setting for your prints, or a higher value if you ...paper configuration settings you may have made using the printer's control panel. • Color Density lets you control the ink saturation level (for example, when you turn off color management in your printer software). • Drying Time per Print Head Pass lets you finish selecting Paper Configuration settings, ...

Printer Guide
Page 114
... print head stops for Windows Optimizing Print Speed You can use the Speed and Progress utility to the right. • Show Progress Meter lets you control whether or not the Progress Meter is displayed when you send a print job. • Disable EPSON Status Monitor 3 disables the printer ...software utilities. Click the Utility tab, then click the Speed and Progress button. Printing will take longer to deselect it. 2.
... print head stops for Windows Optimizing Print Speed You can use the Speed and Progress utility to the right. • Show Progress Meter lets you control whether or not the Progress Meter is displayed when you send a print job. • Disable EPSON Status Monitor 3 disables the printer ...software utilities. Click the Utility tab, then click the Speed and Progress button. Printing will take longer to deselect it. 2.

Printer Guide
Page 117
... maintenance tank, and other printer parts. This chapter describes the following routine procedures: • Checking printer status and part life • Checking and cleaning the print head • Aligning the print head • Replacing ink cartridges...print out a status check (described in the next section), or view the printer's status on the LCD display (see page 136) or a printer driver screen (see the electronic User's Guide included on the printer to fine-tune a variety of your printer. 135 Chapter 6: Maintaining and Transporting the Printer The Epson Stylus Pro 7880 and Pro...
... maintenance tank, and other printer parts. This chapter describes the following routine procedures: • Checking printer status and part life • Checking and cleaning the print head • Aligning the print head • Replacing ink cartridges...print out a status check (described in the next section), or view the printer's status on the LCD display (see page 136) or a printer driver screen (see the electronic User's Guide included on the printer to fine-tune a variety of your printer. 135 Chapter 6: Maintaining and Transporting the Printer The Epson Stylus Pro 7880 and Pro...

Printer Guide
Page 119
... done, press l. • To check the amount of ink used (in milliliters) and paper used (in square centimeters). For the last 10 print jobs saved in the printer, you see the ink used (in milliliters) and paper used , press d to highlight MAINTENANCE TANK, then press Menu. When done, press l.... CLEAR USAGE COUNT option. The most recent job is for instructions.) • To check the amount of the carriage motor, paper feed motor, print head, cleaning unit, and pressure motor. The status of the first cartridge is displayed, using the symbols described on page 138. Note: The EDM ...
... done, press l. • To check the amount of ink used (in milliliters) and paper used (in square centimeters). For the last 10 print jobs saved in the printer, you see the ink used (in milliliters) and paper used , press d to highlight MAINTENANCE TANK, then press Menu. When done, press l.... CLEAR USAGE COUNT option. The most recent job is for instructions.) • To check the amount of the carriage motor, paper feed motor, print head, cleaning unit, and pressure motor. The status of the first cartridge is displayed, using the symbols described on page 138. Note: The EDM ...

Printer Guide
Page 121
... windows: Note: You can run a cleaning cycle by clicking the Utility button in the printer. 2. Select your printer software to run . Checking and Cleaning the Print Head If your printed image shows a color shift or horizontal lines, you added a shortcut icon for three seconds. See page 125... 142 for your Applications folder. If you should check the print head to add the icon. You can also run a cleaning cycle to access the printer utilities: • Mac OS X: Open the EPSON Printer Utility2 in your printer and select Properties. Tip: On a Macintosh, you can also...
... windows: Note: You can run a cleaning cycle by clicking the Utility button in the printer. 2. Select your printer software to run . Checking and Cleaning the Print Head If your printed image shows a color shift or horizontal lines, you added a shortcut icon for three seconds. See page 125... 142 for your Applications folder. If you should check the print head to add the icon. You can also run a cleaning cycle to access the printer utilities: • Mac OS X: Open the EPSON Printer Utility2 in your printer and select Properties. Tip: On a Macintosh, you can also...

Printer Guide
Page 122
... on the screen. Press the d button until TEST PRINT is selected. 140 Right-click your printer icon and select Printing Preferences. If the printer finds clogged nozzles, it runs a cleaning cycle. Checking and Cleaning the Print Head Using the Control Panel Follow these steps to have the printer check the print head nozzles and clean them if necessary. 1. Double...
... on the screen. Press the d button until TEST PRINT is selected. 140 Right-click your printer icon and select Printing Preferences. If the printer finds clogged nozzles, it runs a cleaning cycle. Checking and Cleaning the Print Head Using the Control Panel Follow these steps to have the printer check the print head nozzles and clean them if necessary. 1. Double...

Printer Guide
Page 123
... at least 3 seconds. NOZZLE CHECK is loaded in the printer. 3. Maintaining and Transporting the Printer | 141 Caution: Don't run a cleaning cycle while thick media is selected. 6. If the printer finds clogged nozzles, it . • If the pattern looks good, as shown below , the print head is highlighted, then press Menu. 3. Press the Menu button. Press...
... at least 3 seconds. NOZZLE CHECK is loaded in the printer. 3. Maintaining and Transporting the Printer | 141 Caution: Don't run a cleaning cycle while thick media is selected. 6. If the printer finds clogged nozzles, it . • If the pattern looks good, as shown below , the print head is highlighted, then press Menu. 3. Press the Menu button. Press...
Printer Guide
Page 124
... thick media is not on the LCD display to confirm that the head is highlighted, then press Menu. 5. After cleaning, you still see no improvement, contact Epson for deflected nozzles. 142 | Maintaining and Transporting the Printer Caution: Don't run a nozzle check between cycles. Press the d...printer off and leave it is highlighted, then press Menu. Print a nozzle check to use power cleaning. Press the Menu button. 4. Press d until MAINTENANCE is clean. If you can run the cleaning cycle. Note: You must use at least 50% full to make sure the print head...
... thick media is not on the LCD display to confirm that the head is highlighted, then press Menu. 5. After cleaning, you still see no improvement, contact Epson for deflected nozzles. 142 | Maintaining and Transporting the Printer Caution: Don't run a nozzle check between cycles. Press the d...printer off and leave it is highlighted, then press Menu. Print a nozzle check to use power cleaning. Press the Menu button. 4. Press d until MAINTENANCE is clean. If you can run the cleaning cycle. Note: You must use at least 50% full to make sure the print head...

Printer Guide
Page 125
...is the type of alignment to save the setting. 6. Press the Menu button to align the print head using the printer utility software, it 's all automatic. Make sure you can also use Epson Doubleweight Matte Paper or Ultra Premium Photo Paper Luster. Press the Menu button. 3. UNI-D (... shortest time, and it 's also easy to start with. 8. Make sure the printer is the most Epson papers. 5. Each head alignment takes about 7 minutes. Aligning the Print Head Aligning the print head is turned on your prints, if they look grainy or blurry, or if you see misregistration or "ghosting,"...
...is the type of alignment to save the setting. 6. Press the Menu button to align the print head using the printer utility software, it 's all automatic. Make sure you can also use Epson Doubleweight Matte Paper or Ultra Premium Photo Paper Luster. Press the Menu button. 3. UNI-D (... shortest time, and it 's also easy to start with. 8. Make sure the printer is the most Epson papers. 5. Each head alignment takes about 7 minutes. Aligning the Print Head Aligning the print head is turned on your prints, if they look grainy or blurry, or if you see misregistration or "ghosting,"...
Printer Guide
Page 136
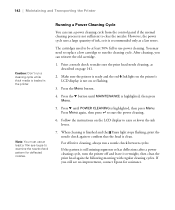
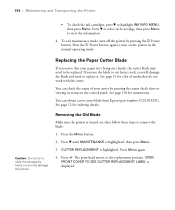
Press the P Power button again to turn off the printer by printing the status check sheet or viewing its status on the control panel. See page 136 for ordering details. Removing the Old Blade Make sure the printer is displayed. 154 To exit maintenance mode, turn on , then...you use the blade to cut cleanly, the cutter blade may damage the printer. Press the Menu button. 2. Press d until MAINTENANCE is highlighted. You can obtain a new cutter blade from Epson (part number C12C815291). The print head moves to highlight INK INFO MENU, then press Menu. See page 51 ...
Press the P Power button again to turn off the printer by printing the status check sheet or viewing its status on the control panel. See page 136 for ordering details. Removing the Old Blade Make sure the printer is displayed. 154 To exit maintenance mode, turn on , then...you use the blade to cut cleanly, the cutter blade may damage the printer. Press the Menu button. 2. Press d until MAINTENANCE is highlighted. You can obtain a new cutter blade from Epson (part number C12C815291). The print head moves to highlight INK INFO MENU, then press Menu. See page 51 ...

Printer Guide
Page 139
...Tank The maintenance tank stores ink that gets flushed from the system during the initial ink charge and manual and automatic print head cleaning. When the tank is completely full, the printer stops working and MAINTENANCE TANK FULL appears on the LCD display. Maintenance tank icon (2 tank icons appear on the..., the message MAINTENANCE TANK NEAR FULL appears on the LCD. Maintaining and Transporting the Printer | 157 2. Push down on the side pin while turning the latch to the home position and READY appears on the Pro 9880 LCD display) 157 Close the front cover when you to do so.
...Tank The maintenance tank stores ink that gets flushed from the system during the initial ink charge and manual and automatic print head cleaning. When the tank is completely full, the printer stops working and MAINTENANCE TANK FULL appears on the LCD display. Maintenance tank icon (2 tank icons appear on the..., the message MAINTENANCE TANK NEAR FULL appears on the LCD. Maintaining and Transporting the Printer | 157 2. Push down on the side pin while turning the latch to the home position and READY appears on the Pro 9880 LCD display) 157 Close the front cover when you to do so.


