
Reference Guide
Page 10
... Problems 409 Paper Handling Problems 410 Problems Printing in the PostScript 3 Mode (EPL-6200 only) . . .411 Windows Users 411 10 Developer Cartridge 319 Photoconductor Unit 327 Chapter 10 Cleaning and Transporting the Printer Cleaning the Printer 334 Cleaning the printer case 334 Cleaning the inside the printer 381 Paper jam - MP tray (EPL-6200 only 386 Paper jam -
... Problems 409 Paper Handling Problems 410 Problems Printing in the PostScript 3 Mode (EPL-6200 only) . . .411 Windows Users 411 10 Developer Cartridge 319 Photoconductor Unit 327 Chapter 10 Cleaning and Transporting the Printer Cleaning the Printer 334 Cleaning the printer case 334 Cleaning the inside the printer 381 Paper jam - MP tray (EPL-6200 only 386 Paper jam -

Reference Guide
Page 11
...Printer 434 General 434 Environmental 435 Standards and approvals 435 Mechanical 436 Electrical 437 PostScript 438 Interfaces 439 Parallel interface 439 USB interface 440 Ethernet interface 440 Options and Consumables 440 500-Sheet Lower Paper Cassette Unit A4 (C12C802042) (EPL-6200 only 440 Duplex Unit (C12C802051) (EPL...-6200 only 441 Memory module (EPL-6200 only 442 Developer Cartridge (S050166 442 Developer Cartridge (S050167 443 Photoconductor unit (S051099 443 Appendix B Symbol Sets (EPL-6200 ...
...Printer 434 General 434 Environmental 435 Standards and approvals 435 Mechanical 436 Electrical 437 PostScript 438 Interfaces 439 Parallel interface 439 USB interface 440 Ethernet interface 440 Options and Consumables 440 500-Sheet Lower Paper Cassette Unit A4 (C12C802042) (EPL-6200 only 440 Duplex Unit (C12C802051) (EPL...-6200 only 441 Memory module (EPL-6200 only 442 Developer Cartridge (S050166 442 Developer Cartridge (S050167 443 Photoconductor unit (S051099 443 Appendix B Symbol Sets (EPL-6200 ...

Reference Guide
Page 17
... environment to light any longer than necessary. When you remove the photoconductor unit from exposure to prevent damage from your skin can explode and cause injury. ❏ When removing or installing a photoconductor unit, protect the light-sensitive drum from the printer, always place the unit on the printed page and may shorten the service life of...
... environment to light any longer than necessary. When you remove the photoconductor unit from exposure to prevent damage from your skin can explode and cause injury. ❏ When removing or installing a photoconductor unit, protect the light-sensitive drum from the printer, always place the unit on the printed page and may shorten the service life of...

Reference Guide
Page 32
...1 Photoconductor Unit (S051099) The photoconductor unit contains a light-sensitive drum that 1 permanently fixes the toner onto paper. Developer Cartridge (S050167) 1 1 This cartridge includes the toner that is used to create the image on paper. Consumable products 1 Developer Cartridge (S050166) (EPL-6200...life of printing. 1 1 1 1 1 Product Information 32 This unit requires replacement after approximately 20,000 pages of the cartridge is approximately 3,000 printed pages. The printer comes with this cartridge already installed, while EPL-6200L is packaged with this...
...1 Photoconductor Unit (S051099) The photoconductor unit contains a light-sensitive drum that 1 permanently fixes the toner onto paper. Developer Cartridge (S050167) 1 1 This cartridge includes the toner that is used to create the image on paper. Consumable products 1 Developer Cartridge (S050166) (EPL-6200...life of printing. 1 1 1 1 1 Product Information 32 This unit requires replacement after approximately 20,000 pages of the cartridge is approximately 3,000 printed pages. The printer comes with this cartridge already installed, while EPL-6200L is packaged with this...

Reference Guide
Page 81
... overlay data 3 The overlay data is available only for Form Name data. 3 Resetting the photoconductor counter 3 After replacing a photoconductor unit, reset the photoconductor counter by application to make the same overlay with the current printer settings such as in step 12 in "Creating an overlay" on page 78. 3 2. Send the same data that you made...
... overlay data 3 The overlay data is available only for Form Name data. 3 Resetting the photoconductor counter 3 After replacing a photoconductor unit, reset the photoconductor counter by application to make the same overlay with the current printer settings such as in step 12 in "Creating an overlay" on page 78. 3 2. Send the same data that you made...
Reference Guide
Page 118
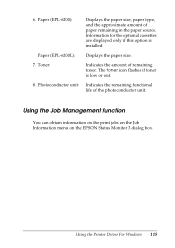
.... 3 Paper (EPL-6200L): 7. Toner: Displays the paper size. 3 Indicates the amount of paper remaining in the paper source. Photoconductor unit: Indicates the remaining functional life of the photoconductor unit. 3 Using the Job Management function 3 You can obtain information on the print jobs on the Job Information menu on the EPSON Status Monitor 3 dialog box. 3 3 3 3 3 3 Using the Printer Driver...
.... 3 Paper (EPL-6200L): 7. Toner: Displays the paper size. 3 Indicates the amount of paper remaining in the paper source. Photoconductor unit: Indicates the remaining functional life of the photoconductor unit. 3 Using the Job Management function 3 You can obtain information on the print jobs on the Job Information menu on the EPSON Status Monitor 3 dialog box. 3 3 3 3 3 3 Using the Printer Driver...
Reference Guide
Page 203
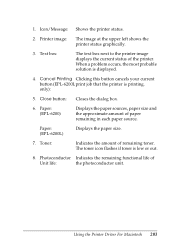
...Cancel Printing Clicking this button cancels your current button (EPL-6200L print job that the printer is displayed. 4 4. Toner: 4 Displays the ...printer image 4 displays the current status of Unit life: the photoconductor unit. 4 4 4 4 Using the Printer Driver For Macintosh 203 Photoconductor Indicates the remaining functional life of the printer. When a problem occurs, the most probable solution is printing. only): 4 5. The toner icon flashes if toner is low or out. 8. Icon/Message: Shows the printer status. 4 2. Paper: (EPL-6200) Paper: (EPL-6200L...
...Cancel Printing Clicking this button cancels your current button (EPL-6200L print job that the printer is displayed. 4 4. Toner: 4 Displays the ...printer image 4 displays the current status of Unit life: the photoconductor unit. 4 4 4 4 Using the Printer Driver For Macintosh 203 Photoconductor Indicates the remaining functional life of the printer. When a problem occurs, the most probable solution is printing. only): 4 5. The toner icon flashes if toner is low or out. 8. Icon/Message: Shows the printer status. 4 2. Paper: (EPL-6200) Paper: (EPL-6200L...
Reference Guide
Page 297
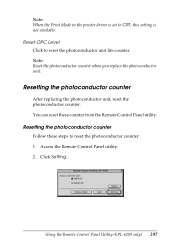
... the photoconductor counter: 1. Resetting the photoconductor counter 7 Follow these counter from the Remote Control Panel utility. Note: 7 When the Print Mode in the printer driver is not available. Access the Remote Control Panel utility. 7 2. Click Setting. 7 7 7 7 Using the Remote Control Panel Utility (EPL-6200 only) 297 Reset OPC Level 7 Click to reset the photoconductor unit life...
... the photoconductor counter: 1. Resetting the photoconductor counter 7 Follow these counter from the Remote Control Panel utility. Note: 7 When the Print Mode in the printer driver is not available. Access the Remote Control Panel utility. 7 2. Click Setting. 7 7 7 7 Using the Remote Control Panel Utility (EPL-6200 only) 297 Reset OPC Level 7 Click to reset the photoconductor unit life...

Reference Guide
Page 321
Always keep toner away from your skin or 9 clothes, wash it up. The cartridge needs to be inserted into the photoconductor unit's casing and then installed into the printer. If toner gets on your eyes. Because the fine particles can cause a fire or explosion if they may explode and cause injury. ... ❏ Keep developer cartridges out of the reach of children. 9 9 ❏ Do not dispose of used developer cartridges in this procedure show the EPL-6200. 9 9 9 9 Replacing Consumable Products 321 w Warning: ❏ Do not touch the toner in developer cartridges.
Always keep toner away from your skin or 9 clothes, wash it up. The cartridge needs to be inserted into the photoconductor unit's casing and then installed into the printer. If toner gets on your eyes. Because the fine particles can cause a fire or explosion if they may explode and cause injury. ... ❏ Keep developer cartridges out of the reach of children. 9 9 ❏ Do not dispose of used developer cartridges in this procedure show the EPL-6200. 9 9 9 9 Replacing Consumable Products 321 w Warning: ❏ Do not touch the toner in developer cartridges.
Reference Guide
Page 323
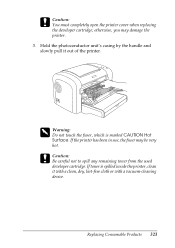
... marked CAUTION Hot 9 9 Surface. c Caution: You must completely open the printer cover when replacing the developer cartridge; Hold the photoconductor unit's casing by the handle and 9 slowly pull it out of the printer. 9 9 9 9 w Warning: Do not touch the fuser, which is spilled inside the printer, clean 9 it with a clean, dry, lint-free cloth or with...
... marked CAUTION Hot 9 9 Surface. c Caution: You must completely open the printer cover when replacing the developer cartridge; Hold the photoconductor unit's casing by the handle and 9 slowly pull it out of the printer. 9 9 9 9 w Warning: Do not touch the fuser, which is spilled inside the printer, clean 9 it with a clean, dry, lint-free cloth or with...
Reference Guide
Page 324
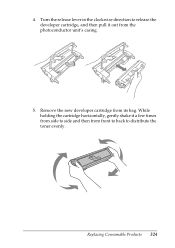
Turn the release lever in the clockwise direction to release the developer cartridge, and then pull it a few times 9 from side to side and then from front to back to distribute the toner evenly. 9 9 9 9 9 Replacing Consumable Products 324 Remove the new developer cartridge from the photoconductor unit's casing. 9 9 9 9 9 5. While 9 holding the cartridge horizontally, gently shake it out from its bag. 4.
Turn the release lever in the clockwise direction to release the developer cartridge, and then pull it a few times 9 from side to side and then from front to back to distribute the toner evenly. 9 9 9 9 9 Replacing Consumable Products 324 Remove the new developer cartridge from the photoconductor unit's casing. 9 9 9 9 9 5. While 9 holding the cartridge horizontally, gently shake it out from its bag. 4.

Reference Guide
Page 326
Slide it gently into the opening until it clicks into place. 9 9 9 9 Replacing Consumable Products 326 Hold the photoconductor unit's casing by its handle and 9 insert it locks into place, making sure that the pins on both sides of the developer cartridge are aligned with the grooves on the casing. 9 9 9 9 9 9 8. 7. Carefully insert the developer cartridge into the 9 photoconductor unit's casing until it into the printer.
Slide it gently into the opening until it clicks into place. 9 9 9 9 Replacing Consumable Products 326 Hold the photoconductor unit's casing by its handle and 9 insert it locks into place, making sure that the pins on both sides of the developer cartridge are aligned with the grooves on the casing. 9 9 9 9 9 9 8. 7. Carefully insert the developer cartridge into the 9 photoconductor unit's casing until it into the printer.
Reference Guide
Page 327
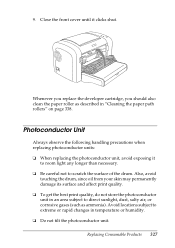
...permanently damage its surface and affect print quality. 9 ❏ To get the best print quality, do not store the photoconductor unit in an area subject to direct sunlight, dust, salty air, or 9 corrosive gases (such as described in "Cleaning... the paper path rollers" on page 338. 9 Photoconductor Unit 9 Always observe the following handling precautions when 9 replacing photoconductor units: 9 ❏ When replacing the photoconductor unit, avoid exposing it clicks shut. 9 9 9 9 9 Whenever you replace the developer cartridge, you...
...permanently damage its surface and affect print quality. 9 ❏ To get the best print quality, do not store the photoconductor unit in an area subject to direct sunlight, dust, salty air, or 9 corrosive gases (such as described in "Cleaning... the paper path rollers" on page 338. 9 Photoconductor Unit 9 Always observe the following handling precautions when 9 replacing photoconductor units: 9 ❏ When replacing the photoconductor unit, avoid exposing it clicks shut. 9 9 9 9 9 Whenever you replace the developer cartridge, you...
Reference Guide
Page 328
... casing, and therefore, requires that the developer cartridge be temporarily removed when you need to replace the photoconductor unit: Note: 9 ❏ The photoconductor unit is not an independent unit that you install 9 directly into the printer. The unit also houses the developer cartridge in this procedure show the EPL-6200. 9 1. Dispose of it may explode and cause injury.
... casing, and therefore, requires that the developer cartridge be temporarily removed when you need to replace the photoconductor unit: Note: 9 ❏ The photoconductor unit is not an independent unit that you install 9 directly into the printer. The unit also houses the developer cartridge in this procedure show the EPL-6200. 9 1. Dispose of it may explode and cause injury.

Reference Guide
Page 329
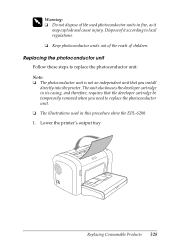
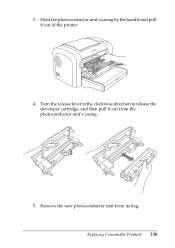
2. otherwise, you . 9 9 9 9 9 c Caution: You must completely open the printer cover when replacing 9 the photoconductor unit; Open the front cover by placing your fingers on the grooves 9 on both sides of the cover as shown below, and then pull the cover towards you may damage the printer. 9 9 9 9 9 Replacing Consumable Products 329
2. otherwise, you . 9 9 9 9 9 c Caution: You must completely open the printer cover when replacing 9 the photoconductor unit; Open the front cover by placing your fingers on the grooves 9 on both sides of the cover as shown below, and then pull the cover towards you may damage the printer. 9 9 9 9 9 Replacing Consumable Products 329
Reference Guide
Page 330
Remove the new photoconductor unit from the 9 photoconductor unit's casing. 9 9 9 9 9 5. Hold the photoconductor unit's casing by the handle and pull it out from its bag. 9 Replacing Consumable Products 330 Turn the release lever in the clockwise direction to release the developer cartridge, and then pull it out of the printer. 9 9 9 9 9 4. 3.
Remove the new photoconductor unit from the 9 photoconductor unit's casing. 9 9 9 9 9 5. Hold the photoconductor unit's casing by the handle and pull it out from its bag. 9 Replacing Consumable Products 330 Turn the release lever in the clockwise direction to release the developer cartridge, and then pull it out of the printer. 9 9 9 9 9 4. 3.
Reference Guide
Page 331
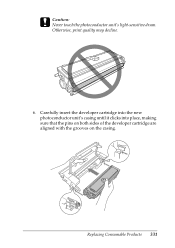
Carefully insert the developer cartridge into the new 9 photoconductor unit's casing until it clicks into place, making 9 sure that the pins on both sides of the developer cartridge are aligned with the grooves on the casing. 9 9 9 9 9 Replacing Consumable Products 331 Caution: c Never touch the photoconductor unit's light-sensitive drum. 9 Otherwise, print quality may decline. 9 9 9 9 6.
Carefully insert the developer cartridge into the new 9 photoconductor unit's casing until it clicks into place, making 9 sure that the pins on both sides of the developer cartridge are aligned with the grooves on the casing. 9 9 9 9 9 Replacing Consumable Products 331 Caution: c Never touch the photoconductor unit's light-sensitive drum. 9 Otherwise, print quality may decline. 9 9 9 9 6.
Reference Guide
Page 332
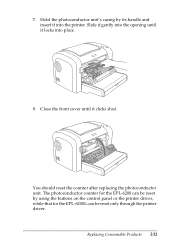
Slide it gently into the opening until it into place. 9 9 9 9 8. The photoconductor counter for the EPL-6200L can be reset only through the printer driver. 9 Replacing Consumable Products 332 Hold the photoconductor unit's casing by using the buttons on the control panel or the printer driver, while that for the EPL-6200 can be reset by its handle and 9 insert it clicks shut. 9 9 9 9 9 9 You should reset the counter after replacing the photoconductor unit. Close the front cover until it locks into the printer. 7.
Slide it gently into the opening until it into place. 9 9 9 9 8. The photoconductor counter for the EPL-6200L can be reset only through the printer driver. 9 Replacing Consumable Products 332 Hold the photoconductor unit's casing by using the buttons on the control panel or the printer driver, while that for the EPL-6200 can be reset by its handle and 9 insert it clicks shut. 9 9 9 9 9 9 You should reset the counter after replacing the photoconductor unit. Close the front cover until it locks into the printer. 7.
Reference Guide
Page 335
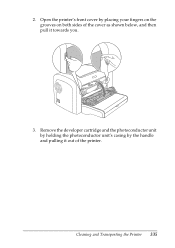
2. Remove the developer cartridge and the photoconductor unit by holding the photoconductor unit's casing by placing your fingers on the grooves on both sides of the cover as shown below, and then pull it out of the printer. 10 10 10 10 10 10 Cleaning and Transporting the Printer 335 Open the printer's front cover by the handle and pulling it towards you. 10 10 10 10 10 10 3.
2. Remove the developer cartridge and the photoconductor unit by holding the photoconductor unit's casing by placing your fingers on the grooves on both sides of the cover as shown below, and then pull it out of the printer. 10 10 10 10 10 10 Cleaning and Transporting the Printer 335 Open the printer's front cover by the handle and pulling it towards you. 10 10 10 10 10 10 3.
Reference Guide
Page 336
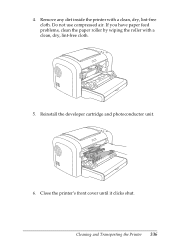
If you have paper feed problems, clean the paper roller by wiping the roller with a clean, dry, lint-free cloth. Close the printer's front cover until it clicks shut. 10 10 Cleaning and Transporting the Printer 336 Do not use compressed air. Remove any dirt inside the printer with a clean, dry, lint-free cloth. 10 10 10 10 10 5. Reinstall the developer cartridge and photoconductor unit. 10 10 10 10 10 6. 4.
If you have paper feed problems, clean the paper roller by wiping the roller with a clean, dry, lint-free cloth. Close the printer's front cover until it clicks shut. 10 10 Cleaning and Transporting the Printer 336 Do not use compressed air. Remove any dirt inside the printer with a clean, dry, lint-free cloth. 10 10 10 10 10 5. Reinstall the developer cartridge and photoconductor unit. 10 10 10 10 10 6. 4.

