
Reference Guide
Page 10
... jam problems 380 Paper jam - Developer Cartridge 319 Photoconductor Unit 327 Chapter 10 Cleaning and Transporting the Printer Cleaning the Printer 334 Cleaning the printer case 334 Cleaning the inside the printer 381 Paper jam - Duplex Unit (EPL-6200 only 391 Paper jam - MP tray (EPL-6200 only 386 Paper jam - MP tray (EPL-6200L only 389 Paper jam - manual...
... jam problems 380 Paper jam - Developer Cartridge 319 Photoconductor Unit 327 Chapter 10 Cleaning and Transporting the Printer Cleaning the Printer 334 Cleaning the printer case 334 Cleaning the inside the printer 381 Paper jam - Duplex Unit (EPL-6200 only 391 Paper jam - MP tray (EPL-6200 only 386 Paper jam - MP tray (EPL-6200L only 389 Paper jam - manual...

Reference Guide
Page 11
Macintosh Users 421 Problems Using Options (EPL-6200 only 426 Appendix A Technical Specifications Paper 429 Available paper types 429 Specifications 432 Printable area 433 Printer 434 General 434 Environmental 435 Standards and approvals 435 Mechanical 436 Electrical 437 ... Lower Paper Cassette Unit A4 (C12C802042) (EPL-6200 only 440 Duplex Unit (C12C802051) (EPL-6200 only 441 Memory module (EPL-6200 only 442 Developer Cartridge (S050166 442 Developer Cartridge (S050167 443 Photoconductor unit (S051099 443 Appendix B Symbol Sets (EPL-6200 only) Introduction to Symbol Sets 445 ...
Macintosh Users 421 Problems Using Options (EPL-6200 only 426 Appendix A Technical Specifications Paper 429 Available paper types 429 Specifications 432 Printable area 433 Printer 434 General 434 Environmental 435 Standards and approvals 435 Mechanical 436 Electrical 437 ... Lower Paper Cassette Unit A4 (C12C802042) (EPL-6200 only 440 Duplex Unit (C12C802051) (EPL-6200 only 441 Memory module (EPL-6200 only 442 Developer Cartridge (S050166 442 Developer Cartridge (S050167 443 Photoconductor unit (S051099 443 Appendix B Symbol Sets (EPL-6200 only) Introduction to Symbol Sets 445 ...

Reference Guide
Page 16
... they come into contact with soap and water to clean it on a clean, smooth surface. ❏ Do not turn the developer cartridge upside down or stand it up. otherwise, print quality will decline. ❏ When handling the developer cartridge, always place it on its ends. ❏ Do not attempt to modify or take the...
... they come into contact with soap and water to clean it on a clean, smooth surface. ❏ Do not turn the developer cartridge upside down or stand it up. otherwise, print quality will decline. ❏ When handling the developer cartridge, always place it on its ends. ❏ Do not attempt to modify or take the...

Reference Guide
Page 17
... gases (such as they can explode and cause injury. When you remove the photoconductor unit from condensation. ❏ Do not dispose of developer cartridges or photoconductor units in fire, as ammonia). Dispose of the drum. Avoid touching the drum, since oils from exposure to local regulations. 17... in temperature or humidity. ❏ Wait for at least one hour before using a developer cartridge or a photoconductor unit after moving it from a cool to a warm environment to prevent damage from the printer, always place the unit on the printed page and may shorten the service life of ...
... gases (such as they can explode and cause injury. When you remove the photoconductor unit from condensation. ❏ Do not dispose of developer cartridges or photoconductor units in fire, as ammonia). Dispose of the drum. Avoid touching the drum, since oils from exposure to local regulations. 17... in temperature or humidity. ❏ Wait for at least one hour before using a developer cartridge or a photoconductor unit after moving it from a cool to a warm environment to prevent damage from the printer, always place the unit on the printed page and may shorten the service life of ...

Reference Guide
Page 29
... lights, see "Status and Error Lights (EPL-6200 only)" on in 1 the print buffer (the section of toner. When the printer is not ready, this light is empty. Flashes to indicate error situations. 1 f Data On when data is processing data. b Toner c Paper On when the printer's developer 1 cartridge has run out of memory reserved for...
... lights, see "Status and Error Lights (EPL-6200 only)" on in 1 the print buffer (the section of toner. When the printer is not ready, this light is empty. Flashes to indicate error situations. 1 f Data On when data is processing data. b Toner c Paper On when the printer's developer 1 cartridge has run out of memory reserved for...

Reference Guide
Page 32
... Product Information 32 The printer comes with a cartridge that prints approximately 1,500 pages. 1 Photoconductor Unit (S051099) The photoconductor unit contains a light-sensitive drum that 1 permanently fixes the toner onto paper. Developer Cartridge (S050167) 1 1 This cartridge includes the toner that ...the cartridge is approximately 6,000 printed pages. Note: 1 The EPL-6200 comes with this cartridge already installed, while EPL-6200L is packaged with this unit already installed. Consumable products 1 Developer Cartridge (S050166) (EPL-6200 only) 1 This cartridge includes ...
... Product Information 32 The printer comes with a cartridge that prints approximately 1,500 pages. 1 Photoconductor Unit (S051099) The photoconductor unit contains a light-sensitive drum that 1 permanently fixes the toner onto paper. Developer Cartridge (S050167) 1 1 This cartridge includes the toner that ...the cartridge is approximately 6,000 printed pages. Note: 1 The EPL-6200 comes with this cartridge already installed, while EPL-6200L is packaged with this unit already installed. Consumable products 1 Developer Cartridge (S050166) (EPL-6200 only) 1 This cartridge includes ...

Reference Guide
Page 200
... 3 alias in the Chooser so that monitors 4 your printer and gives you with EPSON Status 4 Monitor 3 4 About the EPSON Status Monitor 3 4 The EPSON Status Monitor 3 is a utility program that necessary information can find out the amount of remaining toner or the remaining functional life of the developer cartridge through 4 this utility. If a print error occurs, the...
... 3 alias in the Chooser so that monitors 4 your printer and gives you with EPSON Status 4 Monitor 3 4 About the EPSON Status Monitor 3 4 The EPSON Status Monitor 3 is a utility program that necessary information can find out the amount of remaining toner or the remaining functional life of the developer cartridge through 4 this utility. If a print error occurs, the...
Reference Guide
Page 319
... may be used with the EPL-6200. ❏ The developer cartridge (S050167) that prints up to 6,000 9 pages. If the printer has been in use, the fuser and surrounding areas may explode and cause injury. Replacing Consumable Products 319 Dispose of them according to local regulations. 9 Developer Cartridge 9 The two types of developer cartridges are replacing consumables. 9 ❏...
... may be used with the EPL-6200. ❏ The developer cartridge (S050167) that prints up to 6,000 9 pages. If the printer has been in use, the fuser and surrounding areas may explode and cause injury. Replacing Consumable Products 319 Dispose of them according to local regulations. 9 Developer Cartridge 9 The two types of developer cartridges are replacing consumables. 9 ❏...

Reference Guide
Page 320
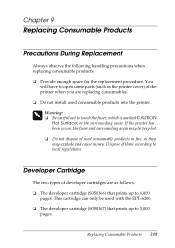
... is displayed on the EPSON Status Monitor 3 screen, replace the developer cartridge. 9 Always observe the following handling precautions when replacing developer cartridges: ❏ Installing a genuine consumable product is 9 flashing on the EPL-6200L, the printer has run out of toner. You need to 1,500 pages. The developer cartridge included with the EPL-6200L prints up to replace the developer cartridge when a notice message is...
... is displayed on the EPSON Status Monitor 3 screen, replace the developer cartridge. 9 Always observe the following handling precautions when replacing developer cartridges: ❏ Installing a genuine consumable product is 9 flashing on the EPL-6200L, the printer has run out of toner. You need to 1,500 pages. The developer cartridge included with the EPL-6200L prints up to replace the developer cartridge when a notice message is...

Reference Guide
Page 321
... the developer cartridge: 9 9 Note: ❏ The developer cartridge is not an independent unit that you install directly into the printer. 9 ❏ The illustrations used developer cartridges in fire, as they may explode and cause injury. If toner gets on your eyes. Dispose of used in developer cartridges. w Warning: ❏ Do not touch the toner in this procedure show the EPL...
... the developer cartridge: 9 9 Note: ❏ The developer cartridge is not an independent unit that you install directly into the printer. 9 ❏ The illustrations used developer cartridges in fire, as they may explode and cause injury. If toner gets on your eyes. Dispose of used in developer cartridges. w Warning: ❏ Do not touch the toner in this procedure show the EPL...
Reference Guide
Page 323
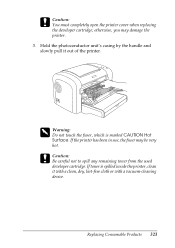
... not to spill any remaining toner from the used 9 developer cartridge. otherwise, you may be very hot. Hold the photoconductor unit's casing by the handle and 9 slowly pull it out of the printer. 9 9 9 9 w Warning: Do not touch the fuser, which is spilled inside the printer, clean 9 it with a clean, dry, lint-free cloth or...
... not to spill any remaining toner from the used 9 developer cartridge. otherwise, you may be very hot. Hold the photoconductor unit's casing by the handle and 9 slowly pull it out of the printer. 9 9 9 9 w Warning: Do not touch the fuser, which is spilled inside the printer, clean 9 it with a clean, dry, lint-free cloth or...
Reference Guide
Page 324
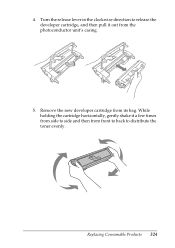
Remove the new developer cartridge from the photoconductor unit's casing. 9 9 9 9 9 5. Turn the release lever in the clockwise direction to release the developer cartridge, and then pull it a few times 9 from side to side and then from front to back to distribute the toner evenly. 9 9 9 9 9 Replacing Consumable Products 324 While 9 holding the cartridge horizontally, gently shake it out from its bag. 4.
Remove the new developer cartridge from the photoconductor unit's casing. 9 9 9 9 9 5. Turn the release lever in the clockwise direction to release the developer cartridge, and then pull it a few times 9 from side to side and then from front to back to distribute the toner evenly. 9 9 9 9 9 Replacing Consumable Products 324 While 9 holding the cartridge horizontally, gently shake it out from its bag. 4.
Reference Guide
Page 325
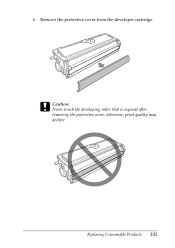
otherwise, print quality may decline. 9 9 9 9 9 9 Replacing Consumable Products 325 Remove the protective cover from the developer cartridge. 9 9 9 9 9 c Caution: Never touch the developing roller that is exposed after 9 removing the protective cover; 6.
otherwise, print quality may decline. 9 9 9 9 9 9 Replacing Consumable Products 325 Remove the protective cover from the developer cartridge. 9 9 9 9 9 c Caution: Never touch the developing roller that is exposed after 9 removing the protective cover; 6.

Reference Guide
Page 326
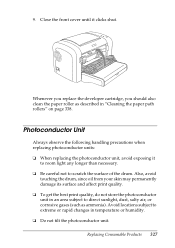
7. Hold the photoconductor unit's casing by its handle and 9 insert it into place. 9 9 9 9 Replacing Consumable Products 326 Slide it gently into the opening until it locks into the printer. Carefully insert the developer cartridge into the 9 photoconductor unit's casing until it clicks into place, making sure that the pins on both sides of the developer cartridge are aligned with the grooves on the casing. 9 9 9 9 9 9 8.
7. Hold the photoconductor unit's casing by its handle and 9 insert it into place. 9 9 9 9 Replacing Consumable Products 326 Slide it gently into the opening until it locks into the printer. Carefully insert the developer cartridge into the 9 photoconductor unit's casing until it clicks into place, making sure that the pins on both sides of the developer cartridge are aligned with the grooves on the casing. 9 9 9 9 9 9 8.
Reference Guide
Page 327
... 9 Always observe the following handling precautions when 9 replacing photoconductor units: 9 ❏ When replacing the photoconductor unit, avoid exposing it clicks shut. 9 9 9 9 9 Whenever you replace the developer cartridge, you should also clean the paper roller as ammonia).
... 9 Always observe the following handling precautions when 9 replacing photoconductor units: 9 ❏ When replacing the photoconductor unit, avoid exposing it clicks shut. 9 9 9 9 9 Whenever you replace the developer cartridge, you should also clean the paper roller as ammonia).
Reference Guide
Page 328
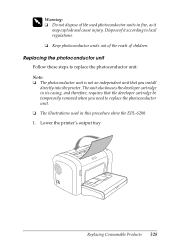
...9 Follow these steps to replace the photoconductor unit: Note: 9 ❏ The photoconductor unit is not an independent unit that the developer cartridge be temporarily removed when you need to local 9 regulations. ❏ Keep photoconductor units out of the reach of it may explode ...and cause injury. The unit also houses the developer cartridge in its casing, and therefore, requires that you install 9 directly into the printer. Lower the printer's output tray. 9 9 9 9 9 9 Replacing Consumable Products 328 w Warning: ❏ Do...
...9 Follow these steps to replace the photoconductor unit: Note: 9 ❏ The photoconductor unit is not an independent unit that the developer cartridge be temporarily removed when you need to local 9 regulations. ❏ Keep photoconductor units out of the reach of it may explode ...and cause injury. The unit also houses the developer cartridge in its casing, and therefore, requires that you install 9 directly into the printer. Lower the printer's output tray. 9 9 9 9 9 9 Replacing Consumable Products 328 w Warning: ❏ Do...
Reference Guide
Page 330
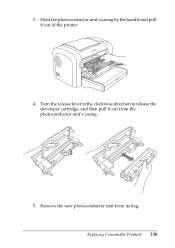
Hold the photoconductor unit's casing by the handle and pull it out from its bag. 9 Replacing Consumable Products 330 Remove the new photoconductor unit from the 9 photoconductor unit's casing. 9 9 9 9 9 5. Turn the release lever in the clockwise direction to release the developer cartridge, and then pull it out of the printer. 9 9 9 9 9 4. 3.
Hold the photoconductor unit's casing by the handle and pull it out from its bag. 9 Replacing Consumable Products 330 Remove the new photoconductor unit from the 9 photoconductor unit's casing. 9 9 9 9 9 5. Turn the release lever in the clockwise direction to release the developer cartridge, and then pull it out of the printer. 9 9 9 9 9 4. 3.
Reference Guide
Page 331
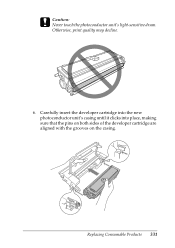
Caution: c Never touch the photoconductor unit's light-sensitive drum. 9 Otherwise, print quality may decline. 9 9 9 9 6. Carefully insert the developer cartridge into the new 9 photoconductor unit's casing until it clicks into place, making 9 sure that the pins on both sides of the developer cartridge are aligned with the grooves on the casing. 9 9 9 9 9 Replacing Consumable Products 331
Caution: c Never touch the photoconductor unit's light-sensitive drum. 9 Otherwise, print quality may decline. 9 9 9 9 6. Carefully insert the developer cartridge into the new 9 photoconductor unit's casing until it clicks into place, making 9 sure that the pins on both sides of the developer cartridge are aligned with the grooves on the casing. 9 9 9 9 9 Replacing Consumable Products 331
Reference Guide
Page 335
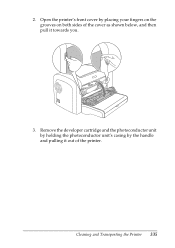
Remove the developer cartridge and the photoconductor unit by holding the photoconductor unit's casing by placing your fingers on the grooves on both sides of the cover as shown below, and then pull it out of the printer. 10 10 10 10 10 10 Cleaning and Transporting the Printer 335 2. Open the printer's front cover by the handle and pulling it towards you. 10 10 10 10 10 10 3.
Remove the developer cartridge and the photoconductor unit by holding the photoconductor unit's casing by placing your fingers on the grooves on both sides of the cover as shown below, and then pull it out of the printer. 10 10 10 10 10 10 Cleaning and Transporting the Printer 335 2. Open the printer's front cover by the handle and pulling it towards you. 10 10 10 10 10 10 3.
Reference Guide
Page 336
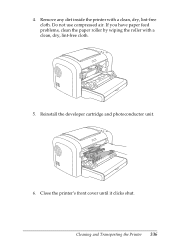
If you have paper feed problems, clean the paper roller by wiping the roller with a clean, dry, lint-free cloth. Close the printer's front cover until it clicks shut. 10 10 Cleaning and Transporting the Printer 336 Do not use compressed air. 4. Reinstall the developer cartridge and photoconductor unit. 10 10 10 10 10 6. Remove any dirt inside the printer with a clean, dry, lint-free cloth. 10 10 10 10 10 5.
If you have paper feed problems, clean the paper roller by wiping the roller with a clean, dry, lint-free cloth. Close the printer's front cover until it clicks shut. 10 10 Cleaning and Transporting the Printer 336 Do not use compressed air. 4. Reinstall the developer cartridge and photoconductor unit. 10 10 10 10 10 6. Remove any dirt inside the printer with a clean, dry, lint-free cloth. 10 10 10 10 10 5.

