Product Brochure
Page 2
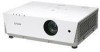
Epson PowerLite 6100i Specifications Projection System Epson 3LCD technology Projection Method Front/rear/ceiling mount LCD Driving method Pixel number Native resolution Aspect ratio Pixel arrangement Epson Poly-silicon TFT Active Matrix 786,432 dots x 3 (1024 x 768) LCDs XGA 4:3 (supports 16:9) Cross stripe Projection...Quick Setup Sheet, User's Manual, PrivateLine support card, password protection sticker Product/Accessory Part Numbers Epson PowerLite 6100i projector Replacement lamp High efficiency air filter (standard) Smoke filter (optional) Universal ceiling mount Suspension adapter...
Epson PowerLite 6100i Specifications Projection System Epson 3LCD technology Projection Method Front/rear/ceiling mount LCD Driving method Pixel number Native resolution Aspect ratio Pixel arrangement Epson Poly-silicon TFT Active Matrix 786,432 dots x 3 (1024 x 768) LCDs XGA 4:3 (supports 16:9) Cross stripe Projection...Quick Setup Sheet, User's Manual, PrivateLine support card, password protection sticker Product/Accessory Part Numbers Epson PowerLite 6100i projector Replacement lamp High efficiency air filter (standard) Smoke filter (optional) Universal ceiling mount Suspension adapter...
Quick Setup
Page 2
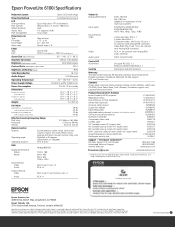
..., Monday through Friday Canada: (905) 709-3839, 6 AM to get product updates, special promotions, and customer-only offers. Quick Setup Epson PowerLite 6100i Using the remote control 1 If this key lets you toggle between the LCD screen and the projector, or display on top of the other. Zoom in XXX CPD-21896 Electronic Support Services...
..., Monday through Friday Canada: (905) 709-3839, 6 AM to get product updates, special promotions, and customer-only offers. Quick Setup Epson PowerLite 6100i Using the remote control 1 If this key lets you toggle between the LCD screen and the projector, or display on top of the other. Zoom in XXX CPD-21896 Electronic Support Services...
User's Guide
Page 31
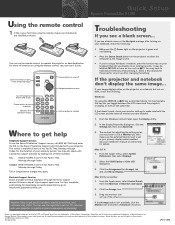
... have to hold down the Fn key while pressing it . Allow a few seconds for the projector to make sure both the LCD screen and the external monitor port are connected correctly, as . It may be labelled CRT/LCD or with an icon such as described in Chapter 1. ■ Make sure the P Power... computer at the same time. If you're using a PC notebook, press the function key on your keyboard that lets you toggle between the LCD screen and the projector, or display on both screens, you display on remote control to select the correct source. (Allow a few seconds for the...
... have to hold down the Fn key while pressing it . Allow a few seconds for the projector to make sure both the LCD screen and the external monitor port are connected correctly, as . It may be labelled CRT/LCD or with an icon such as described in Chapter 1. ■ Make sure the P Power... computer at the same time. If you're using a PC notebook, press the function key on your keyboard that lets you toggle between the LCD screen and the projector, or display on both screens, you display on remote control to select the correct source. (Allow a few seconds for the...

User's Guide
Page 32
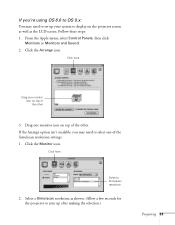
From the Control Panel, open the Display utility. you 're using Macintosh OS X: You may need to set as the LCD screen. If you may need to display on the projector screen as well as your computer's documentation or online help for adjusting the settings varies by brand; Click the Arrange tab. Make...
From the Control Panel, open the Display utility. you 're using Macintosh OS X: You may need to set as the LCD screen. If you may need to display on the projector screen as well as your computer's documentation or online help for adjusting the settings varies by brand; Click the Arrange tab. Make...
User's Guide
Page 33
... 3. Click here Select a Simulscan resolution 2. Select a Simulscan resolution as the LCD screen. Follow these steps: 1. Click the Monitor icon. If you may need to select one monitor icon on the projector screen as well as shown. (Allow a few seconds for the projector to sync up your system to display on top of the...
... 3. Click here Select a Simulscan resolution 2. Select a Simulscan resolution as the LCD screen. Follow these steps: 1. Click the Monitor icon. If you may need to select one monitor icon on the projector screen as well as shown. (Allow a few seconds for the projector to sync up your system to display on top of the...
User's Guide
Page 53
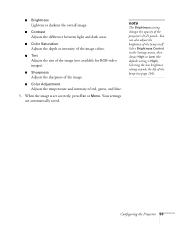
... opacity of the lamp itself. You can also adjust the brightness of the projector's LCD panels. Select Brightness Control in the Settings menu, then choose High or Low (the default setting is set correctly, press Esc or Menu. Configuring the Projector 53 Selecting the low brightness setting extends the life of red, green...
... opacity of the lamp itself. You can also adjust the brightness of the projector's LCD panels. Select Brightness Control in the Settings menu, then choose High or Low (the default setting is set correctly, press Esc or Menu. Configuring the Projector 53 Selecting the low brightness setting extends the life of red, green...

User's Guide
Page 103
... most systems, the key lets you toggle between the LCD screen and the projector, or display on the projector screen as well as , or it . Click the Arrange tab. 5. Click the Arrange icon. 3. This lets you display on both the LCD screen and external monitor port are enabled. Select one monitor... icon on top of the listed Simulscan resolutions. (Allow a few seconds for the projector to make sure that lets you display on your notebook's manual or ...
... most systems, the key lets you toggle between the LCD screen and the projector, or display on the projector screen as well as , or it . Click the Arrange tab. 5. Click the Arrange icon. 3. This lets you display on both the LCD screen and external monitor port are enabled. Select one monitor... icon on top of the listed Simulscan resolutions. (Allow a few seconds for the projector to make sure that lets you display on your notebook's manual or ...
User's Guide
Page 105
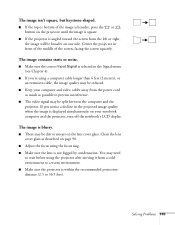
...ring. ■ Make sure the lens is blurry. ■ There may be dirt or smears on page 90. ■ Adjust the focus using the projector after moving it from the power cord as much as described on the lens cover glass. Solving Problems 105 The image isn't square, but keystone... the top or bottom of the screen, facing the screen squarely. You may be reduced. ■ Keep your notebook computer and the projector, turn off the notebook's LCD display. The image is not fogged by condensation. Clean the lens cover glass as possible to 36.5 feet). The image contains static or...
...ring. ■ Make sure the lens is blurry. ■ There may be dirt or smears on page 90. ■ Adjust the focus using the projector after moving it from the power cord as much as described on the lens cover glass. Solving Problems 105 The image isn't square, but keystone... the top or bottom of the screen, facing the screen squarely. You may be reduced. ■ Keep your notebook computer and the projector, turn off the notebook's LCD display. The image is not fogged by condensation. Clean the lens cover glass as possible to 36.5 feet). The image contains static or...

User's Guide
Page 115
... General Type of display Size of LCD panels Resolution (native format) Color reproduction Brightness Contrast ratio Image size Projection distance Projection methods Internal sound system Optical aspect ratio Zoom ratio Noise level Keystone correction Poly-silicon TFT active matrix Diagonal: 0.8 inch 1024 × 768 pixels (XGA) 24 bit, 16.7 million colors 3500...
... General Type of display Size of LCD panels Resolution (native format) Color reproduction Brightness Contrast ratio Image size Projection distance Projection methods Internal sound system Optical aspect ratio Zoom ratio Noise level Keystone correction Poly-silicon TFT active matrix Diagonal: 0.8 inch 1024 × 768 pixels (XGA) 24 bit, 16.7 million colors 3500...
User's Guide
Page 129
... number of hours used, 63, 101 ordering, 12 replacing, 93 to 95 specifications, 116 status light, 99 to 100 timer, resetting, 95 Language setting, 60 LCD panels, 115 Lens access door, 34 cover glass, cleaning, 90 Lights, status, 99 to 100 Logo creating, 65 to 67 displaying, 59, 67 to 68... 57 Signal, 54 to 56 using, 50 to 51 Message setting, 58 Monitor, connecting external, 24 Monitoring projector EMP Monitor, 76 to 84 HP OpenView, 73 Moving projector, 95 Multi-screen setting, 60 N Network managing projector remotely, 73 to 88 settings, 61 to 62 New Hardware Wizard, 29 No Signal message, 31, 102...
... number of hours used, 63, 101 ordering, 12 replacing, 93 to 95 specifications, 116 status light, 99 to 100 timer, resetting, 95 Language setting, 60 LCD panels, 115 Lens access door, 34 cover glass, cleaning, 90 Lights, status, 99 to 100 Logo creating, 65 to 67 displaying, 59, 67 to 68... 57 Signal, 54 to 56 using, 50 to 51 Message setting, 58 Monitor, connecting external, 24 Monitoring projector EMP Monitor, 76 to 84 HP OpenView, 73 Moving projector, 95 Multi-screen setting, 60 N Network managing projector remotely, 73 to 88 settings, 61 to 62 New Hardware Wizard, 29 No Signal message, 31, 102...


