Product Information Guide
Page 7
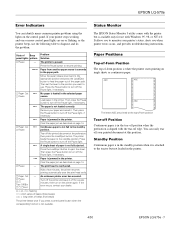
... Pause button to feed the paper out of beeps (five beeps) The printer beeps once if you press a control panel button when the corresponding function is jammed in the printer. 4/00 EPSON LQ-570e - 7 the printer resumes printing automatically once the print head cools. If the error recurs, ...149; A single sheet of -form position is not loaded correctly. Then press the Pause button to the position you when printer errors occur, and provides troubleshooting instructions. Clear the paper jam as described on the control panel. Wait a few minutes; Press the Pause button to resume...
... Pause button to feed the paper out of beeps (five beeps) The printer beeps once if you press a control panel button when the corresponding function is jammed in the printer. 4/00 EPSON LQ-570e - 7 the printer resumes printing automatically once the print head cools. If the error recurs, ...149; A single sheet of -form position is not loaded correctly. Then press the Pause button to the position you when printer errors occur, and provides troubleshooting instructions. Clear the paper jam as described on the control panel. Wait a few minutes; Press the Pause button to resume...

User Manual
Page 6
...high-capacity cut -sheet feeder A-8 Loading paper in the front sheet guide A-27 Installing an Interface Card A-29 vi Chapter 7 Troubleshooting Using the Error Indicators 7-2 Problems and Solutions 7-4 Power supply problems 7-5 Single-sheet paper loading or feeding problems 7-6 Continuous paper...16 Aligning Vertical Lines in Your Printout 7-17 Printing a Self Test 7-18 Printing a Hex Dump 7-19 Appendix A Enhancing Your Printer With Options Options A-2 Paper handling options A-2 Optional interface cards A-4 Using the Optional Cut-Sheet Feeders A-5 Installing an optional cut-sheet...
...high-capacity cut -sheet feeder A-8 Loading paper in the front sheet guide A-27 Installing an Interface Card A-29 vi Chapter 7 Troubleshooting Using the Error Indicators 7-2 Problems and Solutions 7-4 Power supply problems 7-5 Single-sheet paper loading or feeding problems 7-6 Continuous paper...16 Aligning Vertical Lines in Your Printout 7-17 Printing a Self Test 7-18 Printing a Hex Dump 7-19 Appendix A Enhancing Your Printer With Options Options A-2 Paper handling options A-2 Optional interface cards A-4 Using the Optional Cut-Sheet Feeders A-5 Installing an optional cut-sheet...
User Manual
Page 94
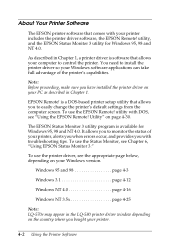
... printer includes the printer driver software, the EPSON Remote! You need to monitor the status of the printer's capabilities. Note: Before proceeding, make sure you bought your printer..."Using EPSON Status Monitor 3." As described in Chapter 1, a printer driver is a DOS-based printer setup utility that allows your PC as described in the LQ-580 printer driver window...control the printer. utility, and the EPSON Status Monitor 3 utility for Windows 95, 98 and NT 4.0. utility with troubleshooting tips. To use the printer driver, see "Using the EPSON Remote! Windows...
... printer includes the printer driver software, the EPSON Remote! You need to monitor the status of the printer's capabilities. Note: Before proceeding, make sure you bought your printer..."Using EPSON Status Monitor 3." As described in Chapter 1, a printer driver is a DOS-based printer setup utility that allows your PC as described in the LQ-580 printer driver window...control the printer. utility, and the EPSON Status Monitor 3 utility for Windows 95, 98 and NT 4.0. utility with troubleshooting tips. To use the printer driver, see "Using the EPSON Remote! Windows...
User Manual
Page 136
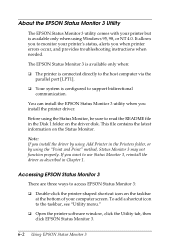
... Monitor 3 If you install the driver by using Add Printer in the Printers folder, or by using Windows 95, 98, or NT 4.0. You can install the EPSON Status Monitor 3 utility when you when printer errors occur, and provides troubleshooting instructions when needed. Accessing EPSON Status Monitor 3 There are three ways to use Status Monitor 3, reinstall the...
... Monitor 3 If you install the driver by using Add Printer in the Printers folder, or by using Windows 95, 98, or NT 4.0. You can install the EPSON Status Monitor 3 utility when you when printer errors occur, and provides troubleshooting instructions when needed. Accessing EPSON Status Monitor 3 There are three ways to use Status Monitor 3, reinstall the...

User Manual
Page 139
Chapter 7 Troubleshooting Using the Error Indicators 7-2 Problems and Solutions 7-4 Power supply problems 7-5 Single-sheet paper loading or feeding problems 7-6 Continuous paper loading or feeding problems 7-8 Wrong top-of-form position 7-9 Wrong tear-off position 7-10 Printing or printout quality problems 7-11 Clearing Paper Jams 7-16 Aligning Vertical Lines in Your Printout 7-17 Printing a Self Test 7-18 Printing a Hex Dump 7-19 7 Troubleshooting 7-1
Chapter 7 Troubleshooting Using the Error Indicators 7-2 Problems and Solutions 7-4 Power supply problems 7-5 Single-sheet paper loading or feeding problems 7-6 Continuous paper loading or feeding problems 7-8 Wrong top-of-form position 7-9 Wrong tear-off position 7-10 Printing or printout quality problems 7-11 Clearing Paper Jams 7-16 Aligning Vertical Lines in Your Printout 7-17 Printing a Self Test 7-18 Printing a Hex Dump 7-19 7 Troubleshooting 7-1

User Manual
Page 140
...off the Pause light, if necessary. If you want to resume printing. Then set the lever to the position you can identify many common printer problems using this table, go to feed the paper out of panel lights n Pause n Paper Out n Pause Beep pattern ••&#... Paper Jams" on or flashing or the printer beeps, use . If your printer stops working and one or more control panel lights are on page 7-16. 7-2 Troubleshooting Paper from another paper source is loaded in the printer. No paper is currently in the printer. The paper is not loaded correctly.
...off the Pause light, if necessary. If you want to resume printing. Then set the lever to the position you can identify many common printer problems using this table, go to feed the paper out of panel lights n Pause n Paper Out n Pause Beep pattern ••&#... Paper Jams" on or flashing or the printer beeps, use . If your printer stops working and one or more control panel lights are on page 7-16. 7-2 Troubleshooting Paper from another paper source is loaded in the printer. No paper is currently in the printer. The paper is not loaded correctly.

User Manual
Page 141
...then press the Load/Eject button. then turn off for several minutes; If the error recurs, contact your dealer. n = on the printer again. Clear the paper jam as described on "Clearing Paper Jams" on page 7-16. Press the Load/Eject button to the standby position. ... Out f Pause f f Tear Off/Bin f f f Font Wait a few minutes; Turn off the printer and leave it off the Pause light. ••• A single sheet of beeps (five beeps) Note: The printer beeps once if you press a control panel button when the corresponding function is not fully ejected. Troubleshooting 7-3
...then press the Load/Eject button. then turn off for several minutes; If the error recurs, contact your dealer. n = on the printer again. Clear the paper jam as described on "Clearing Paper Jams" on page 7-16. Press the Load/Eject button to the standby position. ... Out f Pause f f Tear Off/Bin f f f Font Wait a few minutes; Turn off the printer and leave it off the Pause light. ••• A single sheet of beeps (five beeps) Note: The printer beeps once if you press a control panel button when the corresponding function is not fully ejected. Troubleshooting 7-3

User Manual
Page 142
... Test" on page 7-18 for instructions on page 7-19. To pinpoint communication problems, experienced users may want to any printer problems that occurred, and see "Clearing Paper Jams" on page 7-16. 7-4 Troubleshooting Use the information in this section to find the source of and solution to use the self test feature to... Determine the type of -form position page 7-9 Wrong tear-off position page 7-10 Printing or printout quality problems page 7-11 You can also use the printer's hex dump mode, described on "Printing a Hex Dump" on printing a self test. Problems and Solutions Most...
... Test" on page 7-18 for instructions on page 7-19. To pinpoint communication problems, experienced users may want to any printer problems that occurred, and see "Clearing Paper Jams" on page 7-16. 7-4 Troubleshooting Use the information in this section to find the source of and solution to use the self test feature to... Determine the type of -form position page 7-9 Wrong tear-off position page 7-10 Printing or printout quality problems page 7-11 You can also use the printer's hex dump mode, described on "Printing a Hex Dump" on printing a self test. Problems and Solutions Most...

User Manual
Page 143
... Turn off even though you turned on the printer. Troubleshooting 7-5 If the voltages do not match, unplug the printer immediately and contact your printer. necessary. Cause What to do The printer's voltage rating does not match the voltage of your electrical outlet and the printer, if printer. Check the printer and the outlet voltage ratings. Power supply problems...
... Turn off even though you turned on the printer. Troubleshooting 7-5 If the voltages do not match, unplug the printer immediately and contact your printer. necessary. Cause What to do The printer's voltage rating does not match the voltage of your electrical outlet and the printer, if printer. Check the printer and the outlet voltage ratings. Power supply problems...

User Manual
Page 144
Single-sheet paper loading or feeding problems The printer does not load single-sheet paper or does not feed it is there. For more information.) The paper on loading single-sheet paper. Set the ... thick. The paper thickness lever is positioned too far to the right for the printer to printing on single sheets" on page 2-29 for instructions on the paper guide is not set to match the thickness of paper. 7-6 Troubleshooting See "Setting the Paper Release Lever" on setting the paper release lever, see...
Single-sheet paper loading or feeding problems The printer does not load single-sheet paper or does not feed it is there. For more information.) The paper on loading single-sheet paper. Set the ... thick. The paper thickness lever is positioned too far to the right for the printer to printing on single sheets" on page 2-29 for instructions on the paper guide is not set to match the thickness of paper. 7-6 Troubleshooting See "Setting the Paper Release Lever" on setting the paper release lever, see...

User Manual
Page 145
... paper in the cut -sheet feeder" on page A-18 for single-sheet paper in Appendix C. feeder. Troubleshooting 7-7 The edge guides of your application or printer driver. the high-capacity cut -sheet feeder" on page A-6. The printer does not fully eject a single sheet. Too many sheets are not positioned correctly. Cause What to do...
... paper in the cut -sheet feeder" on page A-18 for single-sheet paper in Appendix C. feeder. Troubleshooting 7-7 The edge guides of your application or printer driver. the high-capacity cut -sheet feeder" on page A-6. The printer does not fully eject a single sheet. Too many sheets are not positioned correctly. Cause What to do...

User Manual
Page 146
... lever back to the appropriate tractor position. (See "Switching to printing on continuous paper" on the tractor you want to use . The printer does not feed continuous paper to match the thickness of your paper. Single-sheet paper is not loaded properly. Continuous paper is in the...singlesheet position and press the Load/ Eject button to the standby position. 7-8 Troubleshooting Cause What to do You did not tear off the printed pages at the perforation. Continuous paper loading or feeding problems The printer does not load continuous paper or does not feed it properly. See "...
... lever back to the appropriate tractor position. (See "Switching to printing on continuous paper" on the tractor you want to use . The printer does not feed continuous paper to match the thickness of your paper. Single-sheet paper is not loaded properly. Continuous paper is in the...singlesheet position and press the Load/ Eject button to the standby position. 7-8 Troubleshooting Cause What to do You did not tear off the printed pages at the perforation. Continuous paper loading or feeding problems The printer does not load continuous paper or does not feed it properly. See "...

User Manual
Page 147
... Settings" on page 4-30. The printer you want to do not match the size of -form position. You moved the paper using the micro adjust feature. Troubleshooting 7-9 Check the page length settings for the tractor do The paper size setting in your software. Cause What to ...use the knob to lose the top-of the continuous paper you are using the printer's defaultsetting mode or the EPSON Remote! Check the ...
... Settings" on page 4-30. The printer you want to do not match the size of -form position. You moved the paper using the micro adjust feature. Troubleshooting 7-9 Check the page length settings for the tractor do The paper size setting in your software. Cause What to ...use the knob to lose the top-of the continuous paper you are using the printer's defaultsetting mode or the EPSON Remote! Check the ...

User Manual
Page 148
...-off position using the knob while the printer was on. Check the paper size setting in your application or printer driver. You moved the paper using the micro adjust feature. See "About Your Printer's Default Settings" on page 4-30. 7-10 Troubleshooting Cause What to do not match the... size of the paper you want to use the knob to lose the tear-off position using the printer's defaultsetting mode or the EPSON Remote! Wrong tear-off position The printer prints on ...
...-off position using the knob while the printer was on. Check the paper size setting in your application or printer driver. You moved the paper using the micro adjust feature. See "About Your Printer's Default Settings" on page 4-30. 7-10 Troubleshooting Cause What to do not match the... size of the paper you want to use the knob to lose the tear-off position using the printer's defaultsetting mode or the EPSON Remote! Wrong tear-off position The printer prints on ...

User Manual
Page 149
... this chapter. Press the Pause button. Use an interface cable that both the printer and computer. Cause What to do The printer is set up for your application. Your software is connected correctly, run a self test as described in your printer. Troubleshooting 7-11 Select your computer's documentation. See "Setting the Paper Thickness Lever" on...
... this chapter. Press the Pause button. Use an interface cable that both the printer and computer. Cause What to do The printer is set up for your application. Your software is connected correctly, run a self test as described in your printer. Troubleshooting 7-11 Select your computer's documentation. See "Setting the Paper Thickness Lever" on...

User Manual
Page 150
... for single sheets. Remove any slack in the ribbon by turning the ribbon-tightening knob, or reinstall the ribbon cartridge as described in Chapter 1. 7-12 Troubleshooting Cause The paper thickness lever is not installed properly. Replace the ribbon cartridge as described in Chapter 1. Part of your paper. Cause What to do... Move the paper thickness lever to match the thickness of the printout is faint. The printout has gaps. The printout is missing, or dots are missing in random positions.
... for single sheets. Remove any slack in the ribbon by turning the ribbon-tightening knob, or reinstall the ribbon cartridge as described in Chapter 1. 7-12 Troubleshooting Cause The paper thickness lever is not installed properly. Replace the ribbon cartridge as described in Chapter 1. Part of your paper. Cause What to do... Move the paper thickness lever to match the thickness of the printout is faint. The printout has gaps. The printout is missing, or dots are missing in random positions.

User Manual
Page 151
Other parts of the printer must also be checked when the print head is incorrect. mode or the EPSON Remote! Utility" on page 5-4 or "Using the 7 EPSON Remote! The printout has extra blank lines between lines of text. Troubleshooting 7-13 Cause What to do Two line feed commands are missing.... All the text is Turn on the same line. See "About Your Printer's Default Settings" on page 4-30. Lines of dots are being sent at the end of each line of using the printer's default-setting mode or the EPSON Remote! c Caution: Never replace the print head yourself;
Other parts of the printer must also be checked when the print head is incorrect. mode or the EPSON Remote! Utility" on page 5-4 or "Using the 7 EPSON Remote! The printout has extra blank lines between lines of text. Troubleshooting 7-13 Cause What to do Two line feed commands are missing.... All the text is Turn on the same line. See "About Your Printer's Default Settings" on page 4-30. Lines of dots are being sent at the end of each line of using the printer's default-setting mode or the EPSON Remote! c Caution: Never replace the print head yourself;

User Manual
Page 152
... default-setting mode or the EPSON Remote! Select the correct character table using the correct interface cable and that your application software is Choose the correct printer from the not selected in your software. If necessary, install or reinstall the printer driver software as described in Chapter 1. 7-14 Troubleshooting The printer prints strange symbols, incorrect...
... default-setting mode or the EPSON Remote! Select the correct character table using the correct interface cable and that your application software is Choose the correct printer from the not selected in your software. If necessary, install or reinstall the printer driver software as described in Chapter 1. 7-14 Troubleshooting The printer prints strange symbols, incorrect...

User Manual
Page 153
Software settings override settings you make using the default-setting mode, EPSON Remote!, or the control panel buttons. Use your application software to correct this chapter. 7 Troubleshooting 7-15 Vertical printed lines are not aligned. Use the printer's bidirectional adjustment mode to select the font. Cause What to do Bidirectional printing, which is the printer's standard printing mode, is out of alignment. See "Aligning Vertical Lines in Your Printout," later in this problem.
Software settings override settings you make using the default-setting mode, EPSON Remote!, or the control panel buttons. Use your application software to correct this chapter. 7 Troubleshooting 7-15 Vertical printed lines are not aligned. Use the printer's bidirectional adjustment mode to select the font. Cause What to do Bidirectional printing, which is the printer's standard printing mode, is out of alignment. See "Aligning Vertical Lines in Your Printout," later in this problem.

User Manual
Page 154
.... 5. Then close the paper guide cover. 7. Remove the printer cover. Make sure the Paper Out and Pause lights are off position. 6. Turn the knob on the printer. Turn on the left side of -form or tear-off . 7-16 Troubleshooting Clearing Paper Jams To clear a paper jam, follow these steps...: 1. Replace the paper guide if necessary, and replace the printer cover. If a single sheet of paper.
.... 5. Then close the paper guide cover. 7. Remove the printer cover. Make sure the Paper Out and Pause lights are off position. 6. Turn the knob on the printer. Turn on the left side of -form or tear-off . 7-16 Troubleshooting Clearing Paper Jams To clear a paper jam, follow these steps...: 1. Replace the paper guide if necessary, and replace the printer cover. If a single sheet of paper.