
Quick Reference Guide
Page 7
... the LCD screen to see which cartridge is low, and make sure the printer is on the LCD screen, the cartridge is from the printer. Epson UltraChrome® HDR ink cartridges Ink Bay Left Right Slot no. 1 2 3 4 5 6 7 8 9 10 11 Cartridge Green (GR) Light Light Black (LLK) Yellow (Y) Light Cyan...) Vivid Magenta (VM) Light Black (LK) Cyan (C) Photo Black (PK) Part no. If ink gets in your ink levels. Checking Ink Levels and Replacing Ink Cartridges Before you begin a large print job, you should check your eyes, flush them thoroughly with water. 6 When one of the icons has an...
... the LCD screen to see which cartridge is low, and make sure the printer is on the LCD screen, the cartridge is from the printer. Epson UltraChrome® HDR ink cartridges Ink Bay Left Right Slot no. 1 2 3 4 5 6 7 8 9 10 11 Cartridge Green (GR) Light Light Black (LLK) Yellow (Y) Light Cyan...) Vivid Magenta (VM) Light Black (LK) Cyan (C) Photo Black (PK) Part no. If ink gets in your ink levels. Checking Ink Levels and Replacing Ink Cartridges Before you begin a large print job, you should check your eyes, flush them thoroughly with water. 6 When one of the icons has an...
Quick Reference Guide
Page 8
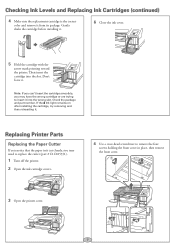
...holding the front cover in place, then remove the front cover. 3 Open the printer cover. 7 Replacing Printer Parts Replacing the Paper Cutter If you notice that the paper isn't cut cleanly, you may need to replace the cutter (part # C1C815351). 1 Turn off the printer. 2 Open the ink cartridge covers. 4..., try removing and then reinserting it from its package. Check the package and part number. Checking Ink Levels and Replacing Ink Cartridges (continued) 4 Make sure the replacement cartridge is the correct color and remove it . Then insert the cartridge into the wrong slot.
...holding the front cover in place, then remove the front cover. 3 Open the printer cover. 7 Replacing Printer Parts Replacing the Paper Cutter If you notice that the paper isn't cut cleanly, you may need to replace the cutter (part # C1C815351). 1 Turn off the printer. 2 Open the ink cartridge covers. 4..., try removing and then reinserting it from its package. Check the package and part number. Checking Ink Levels and Replacing Ink Cartridges (continued) 4 Make sure the replacement cartridge is the correct color and remove it . Then insert the cartridge into the wrong slot.

Quick Reference Guide
Page 9
... or Borderfree). Note: The printer will not 8 print if the tank is sharp. Note: If optional SpectroProofer is full. Replacing the Maintenance Tanks The Epson Stylus Pro 4900 has two maintenance tanks: Ink (part# T619000) and Borderfree (part# T619100). Caution: Do not tilt the tank or ink may spill... out. 4 Place the used tank in until it without replacing the front cover. 10 Close the printer cover and ink ...
... or Borderfree). Note: The printer will not 8 print if the tank is sharp. Note: If optional SpectroProofer is full. Replacing the Maintenance Tanks The Epson Stylus Pro 4900 has two maintenance tanks: Ink (part# T619000) and Borderfree (part# T619100). Caution: Do not tilt the tank or ink may spill... out. 4 Place the used tank in until it without replacing the front cover. 10 Close the printer cover and ink ...
Users Guide
Page 7
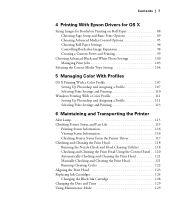
Contents | 7 4 Printing With Epson Drivers for OS X Sizing Images for Borderless Printing on Roll Paper 88 Choosing Page Setup and Basic Print Options 89 Choosing Advanced Media Control Options ... Automatically Checking and Cleaning the Print Head 121 Manually Checking and Cleaning the Print Head 121 Running Cleaning Cycles 122 Aligning the Print Head 123 Replacing Ink Cartridges 124 Changing the Black Ink Cartridge 128 Changing the Date and Time 129 Using Maintenance Mode 129 7
Contents | 7 4 Printing With Epson Drivers for OS X Sizing Images for Borderless Printing on Roll Paper 88 Choosing Page Setup and Basic Print Options 89 Choosing Advanced Media Control Options ... Automatically Checking and Cleaning the Print Head 121 Manually Checking and Cleaning the Print Head 121 Running Cleaning Cycles 122 Aligning the Print Head 123 Replacing Ink Cartridges 124 Changing the Black Ink Cartridge 128 Changing the Date and Time 129 Using Maintenance Mode 129 7

Users Guide
Page 8
... Paper Cutter 131 Removing the Old Cutter 131 Installing the New Cutter 133 Replacing the Maintenance Tanks 135 Replacing the Ink Maintenance Tank 136 Replacing the Borderfree Maintenance Tank 137 Cleaning the Printer 139 Transporting or Storing the Printer 139 Preparing the Printer for Shipment 140 Setting Up the Printer ...
... Paper Cutter 131 Removing the Old Cutter 131 Installing the New Cutter 133 Replacing the Maintenance Tanks 135 Replacing the Ink Maintenance Tank 136 Replacing the Borderfree Maintenance Tank 137 Cleaning the Printer 139 Transporting or Storing the Printer 139 Preparing the Printer for Shipment 140 Setting Up the Printer ...

Users Guide
Page 9
.... 9 Introduction This User's Guide provides important information on setting up and using your printer, loading paper, using the Epson printer drivers, and replacing ink cartridges. It also tells you use and printer maintenance-loading paper, replacing ink cartridges and other components, cleaning and aligning the print head, and using the printer's menu system.
.... 9 Introduction This User's Guide provides important information on setting up and using your printer, loading paper, using the Epson printer drivers, and replacing ink cartridges. It also tells you use and printer maintenance-loading paper, replacing ink cartridges and other components, cleaning and aligning the print head, and using the printer's menu system.

Users Guide
Page 10
... page 135) T619100 Replacement printer cutter blade (see page 131) C12C815351 Additional 2"/3" roll media spindle C12C811251 Ink cartridges See page 125 for accessories and options that are currently available. 10 | Introduction Tip: Check the Epson Pro Imaging website at www.proimaging.epson. Options and Accessories Your Epson Stylus® Pro 4900 offers these optional upgrades...
... page 135) T619100 Replacement printer cutter blade (see page 131) C12C815351 Additional 2"/3" roll media spindle C12C811251 Ink cartridges See page 125 for accessories and options that are currently available. 10 | Introduction Tip: Check the Epson Pro Imaging website at www.proimaging.epson. Options and Accessories Your Epson Stylus® Pro 4900 offers these optional upgrades...

Users Guide
Page 20
Check carefully for all packing materials and tape from the output tray. 4. Save the box and packaging in case you need to ship the printer. 5. Replace the paper tray and output tray. 20 Open the paper tray and top cover and remove all the tape inside the printer. 20 | Setting Up the Printer 3. Remove all packing materials and tape from inside and outside the printer, then close the top cover.
Check carefully for all packing materials and tape from the output tray. 4. Save the box and packaging in case you need to ship the printer. 5. Replace the paper tray and output tray. 20 Open the paper tray and top cover and remove all the tape inside the printer. 20 | Setting Up the Printer 3. Remove all packing materials and tape from inside and outside the printer, then close the top cover.

Users Guide
Page 42
Replace the output tray and adjust its length to fit your paper size. 42 42 | Handling Paper and Other Media 11. Push it firmly into the printer. 12. Insert the paper cassette.
Replace the output tray and adjust its length to fit your paper size. 42 42 | Handling Paper and Other Media 11. Push it firmly into the printer. 12. Insert the paper cassette.
Users Guide
Page 115
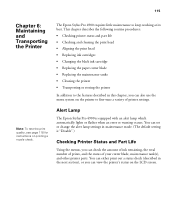
...printer settings. Note: To test the print quality, see page 118 for instructions on the LCD screen. 115 Alert Lamp The Epson Stylus Pro 4900 is "Disable".) Checking Printer Status and Part Life Using the menus, you can set or change the alert lamp settings in maintenance... Replacing the maintenance tanks • Cleaning the printer • Transporting or storing the printer In addition to the features described in the next section), or you can view the printer's status on printing a nozzle check. 115 Chapter 6: Maintaining and Transporting the Printer The Epson Stylus Pro 4900 ...
...printer settings. Note: To test the print quality, see page 118 for instructions on the LCD screen. 115 Alert Lamp The Epson Stylus Pro 4900 is "Disable".) Checking Printer Status and Part Life Using the menus, you can set or change the alert lamp settings in maintenance... Replacing the maintenance tanks • Cleaning the printer • Transporting or storing the printer In addition to the features described in the next section), or you can view the printer's status on printing a nozzle check. 115 Chapter 6: Maintaining and Transporting the Printer The Epson Stylus Pro 4900 ...

Users Guide
Page 116
... to select MAINTENANCE BOX, then press r. Other printer parts need to select STATUS SHEET, then press r. 5. Note: You can replace the ink cartridges, cutter blade, and maintenance tanks yourself. Press d to be replaced by an authorized service technician. The percentage of the maintenance tank. 1. The percentage remaining for instructions. When done, press...
... to select MAINTENANCE BOX, then press r. Other printer parts need to select STATUS SHEET, then press r. 5. Note: You can replace the ink cartridges, cutter blade, and maintenance tanks yourself. Press d to be replaced by an authorized service technician. The percentage of the maintenance tank. 1. The percentage remaining for instructions. When done, press...

Users Guide
Page 122
... report any color that has a clog and prompt if you can run several types of cleaning cycles from the control panel (or from the Epson LFP Remote Panel): normal cleaning, power cleaning, and cleaning each pair of ink colors. Run the power cleaning only if the normal cleaning process... 1. Make sure the printer is ready and the red B Ink Check light on the printer's control panel is selected, then press r. You may need to replace a low cartridge to start the cleaning cycle. • Clean all colors-Press d until MANUAL CLEANING is loaded in the printer. 4. 122 | Maintaining and ...
... report any color that has a clog and prompt if you can run several types of cleaning cycles from the control panel (or from the Epson LFP Remote Panel): normal cleaning, power cleaning, and cleaning each pair of ink colors. Run the power cleaning only if the normal cleaning process... 1. Make sure the printer is ready and the red B Ink Check light on the printer's control panel is selected, then press r. You may need to replace a low cartridge to start the cleaning cycle. • Clean all colors-Press d until MANUAL CLEANING is loaded in the printer. 4. 122 | Maintaining and ...

Users Guide
Page 124
... You can wait until the ink is expended, replace the cartridge, and then continue the job without any loss of print quality. If you don't open the front cover or turn off the printer during this process. 8. Make sure you do so, Epson recommends covering the openings with tape. 7. When ...done, press to the 11 ink cartridge slots on the printer. Replacing Ink Cartridges Before you begin a large print job, you should check your cartridges is low, ...
... You can wait until the ink is expended, replace the cartridge, and then continue the job without any loss of print quality. If you don't open the front cover or turn off the printer during this process. 8. Make sure you do so, Epson recommends covering the openings with tape. 7. When ...done, press to the 11 ink cartridge slots on the printer. Replacing Ink Cartridges Before you begin a large print job, you should check your cartridges is low, ...

Users Guide
Page 125
... recommend that is low or expended. 125 Then follow these steps: 1. You must replace the cartridge before you have a replacement cartridge. Make sure you can purchase genuine Epson ink and paper from an Epson Professional Imaging Authorized Reseller. The use genuine Epson cartridges and do not refill them. Note the color of the cartridge that...
... recommend that is low or expended. 125 Then follow these steps: 1. You must replace the cartridge before you have a replacement cartridge. Make sure you can purchase genuine Epson ink and paper from an Epson Professional Imaging Authorized Reseller. The use genuine Epson cartridges and do not refill them. Note the color of the cartridge that...

Users Guide
Page 126
... off. 3. Press the ink compartment cover to save your hands, wash them for transporting the printer, if necessary. 126 To prevent ink reporting errors, never replace the ink cartridges with water. 4. The cartridge pops out. If ink gets on your first set of expended cartridges so you can use them thoroughly... a good idea to open it . Remove the expended ink cartridge from the printer. Caution: Leave the expended cartridge in the cartridge you are ready to replace. Press in the printer until you want to replace it . 126 | Maintaining and Transporting the Printer 2.
... off. 3. Press the ink compartment cover to save your hands, wash them for transporting the printer, if necessary. 126 To prevent ink reporting errors, never replace the ink cartridges with water. 4. The cartridge pops out. If ink gets on your first set of expended cartridges so you can use them thoroughly... a good idea to open it . Remove the expended ink cartridge from the printer. Caution: Leave the expended cartridge in the cartridge you are ready to replace. Press in the printer until you want to replace it . 126 | Maintaining and Transporting the Printer 2.

Users Guide
Page 127
... wrong cartridge or are trying to its package. Once the cartridge is the correct color and remove it in the wrong slot. Make sure the replacement cartridge is installed, the printer returns to insert it in . Close the ink cover. Check the package and part number. Hold the cartridge with the...
... wrong cartridge or are trying to its package. Once the cartridge is the correct color and remove it in the wrong slot. Make sure the replacement cartridge is installed, the printer returns to insert it in . Close the ink cover. Check the package and part number. Hold the cartridge with the...

Users Guide
Page 131
Maintaining and Transporting the Printer | 131 Replacing the Paper Cutter If you notice that your paper isn't being cut cleanly, the cutter may need to remove the blade: 1. Open the ink cartridge covers. 2. Removing the Old Cutter Make sure the printer is turned off, then follow these steps to be replaced. See page 10 for ordering details. You can obtain a new cutter from Epson (part number C12C815351). Open the printer cover. 131
Maintaining and Transporting the Printer | 131 Replacing the Paper Cutter If you notice that your paper isn't being cut cleanly, the cutter may need to remove the blade: 1. Open the ink cartridge covers. 2. Removing the Old Cutter Make sure the printer is turned off, then follow these steps to be replaced. See page 10 for ordering details. You can obtain a new cutter from Epson (part number C12C815351). Open the printer cover. 131

Users Guide
Page 134
Close the printer cover and ink cartridge covers. 5. 134 | Maintaining and Transporting the Printer 2. Align the cutter cover, then press it in until it without replacing the front cover. 3. Note: If you are using the optional SpectroProofer, install it clicks into place. If your printer is not cutting accurately, use the Cutter Adjustment from the Maintenance Menu on the control panel. 134 Replace the front cover. 4.
Close the printer cover and ink cartridge covers. 5. 134 | Maintaining and Transporting the Printer 2. Align the cutter cover, then press it in until it without replacing the front cover. 3. Note: If you are using the optional SpectroProofer, install it clicks into place. If your printer is not cutting accurately, use the Cutter Adjustment from the Maintenance Menu on the control panel. 134 Replace the front cover. 4.

Users Guide
Page 135
...visit www.proimaging.epson. The Epson Stylus Pro 4900 has two maintenance tanks: Ink (part # T619000) and Borderfree (part # T619100). com (U.S. The printer will not print if one of space remaining in each maintenance tank when the LCD screen instructs you to be replaced (Ink or Borderfree...much space remains in the tanks. You need to replace each maintenance tank by printing a nozzle check sheet (see page 121). Replacing the Maintenance Tanks The maintenance tanks store ink that gets flushed from an Epson Professional Imaging authorized reseller. Turn off the printer. ...
...visit www.proimaging.epson. The Epson Stylus Pro 4900 has two maintenance tanks: Ink (part # T619000) and Borderfree (part # T619100). com (U.S. The printer will not print if one of space remaining in each maintenance tank when the LCD screen instructs you to be replaced (Ink or Borderfree...much space remains in the tanks. You need to replace each maintenance tank by printing a nozzle check sheet (see page 121). Replacing the Maintenance Tanks The maintenance tanks store ink that gets flushed from an Epson Professional Imaging authorized reseller. Turn off the printer. ...

Users Guide
Page 136
Hold it upright at all times and dispose of it carefully. 4. Pull out the maintenance tank as shown. 3. Insert the new tank, then close the cartridge cover. 136 136 | Maintaining and Transporting the Printer Caution: Be careful not to spill ink from the maintenance tank when removing it carefully. Replacing the Ink Maintenance Tank 1. Place the used tank in the plastic bag included with the new tank and dispose of it . Open the right ink cartridge cover. 2.
Hold it upright at all times and dispose of it carefully. 4. Pull out the maintenance tank as shown. 3. Insert the new tank, then close the cartridge cover. 136 136 | Maintaining and Transporting the Printer Caution: Be careful not to spill ink from the maintenance tank when removing it carefully. Replacing the Ink Maintenance Tank 1. Place the used tank in the plastic bag included with the new tank and dispose of it . Open the right ink cartridge cover. 2.

