Quick Reference Guide
Page 2
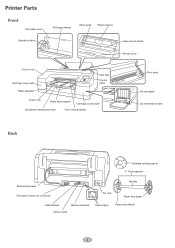
Printer Parts Front Roll paper cover Spindle holders Roll paper feeder Edge guide Paper support Rear manual feeder Printer cover Front cover Cartridge cover (left) Paper cassette Alert light Control panel Output tray Paper eject support Cartridge cover (right) Borderfree maintenance tank Front manual feeder Print head Ink cartridges Ink maintenance tank Back Bordless printing spacer 3" Core adapters Rear access panel Roll paper holder unit connector AC inlet Spindle Paper stop (gray) USB interface Network interface Airflow vents Status lights Paper stop (black) 1
Printer Parts Front Roll paper cover Spindle holders Roll paper feeder Edge guide Paper support Rear manual feeder Printer cover Front cover Cartridge cover (left) Paper cassette Alert light Control panel Output tray Paper eject support Cartridge cover (right) Borderfree maintenance tank Front manual feeder Print head Ink cartridges Ink maintenance tank Back Bordless printing spacer 3" Core adapters Rear access panel Roll paper holder unit connector AC inlet Spindle Paper stop (gray) USB interface Network interface Airflow vents Status lights Paper stop (black) 1

Quick Reference Guide
Page 7
... Ink and Maintenance Tank Levels The easiest way to check ink levels is nearly expended. The numbers above the ink cartridge icons correspond to open it. If ink gets on . 1 Press the ink compartment cover to the 11 cartridge slots in your ink levels. Or you start. Epson UltraChrome®... runs out, replace the cartridge, and then continue the job. If ink gets in the printer. Ink gauges for 11 cartridges listed below Maintenance tank gauges Replacing Ink Cartridges When one of your hands, wash them immediately with soap and water. If one of the icons has an X ...
... Ink and Maintenance Tank Levels The easiest way to check ink levels is nearly expended. The numbers above the ink cartridge icons correspond to open it. If ink gets on . 1 Press the ink compartment cover to the 11 cartridge slots in your ink levels. Or you start. Epson UltraChrome®... runs out, replace the cartridge, and then continue the job. If ink gets in the printer. Ink gauges for 11 cartridges listed below Maintenance tank gauges Replacing Ink Cartridges When one of your hands, wash them immediately with soap and water. If one of the icons has an X ...

Quick Reference Guide
Page 9
...snaps into the hole. Be careful when removing it . 2 Release the tank lock. Make sure the cutter pin goes into place. 9 Replace the front cover. Replacing the Maintenance Tanks The Epson Stylus Pro 4900 has two maintenance tanks: Ink (part# T619000) and Borderfree (part# T619100). Caution: Do not... tilt the tank or ink may spill out 3 Place the used tank in until it in place, then carefully remove ...
...snaps into the hole. Be careful when removing it . 2 Release the tank lock. Make sure the cutter pin goes into place. 9 Replace the front cover. Replacing the Maintenance Tanks The Epson Stylus Pro 4900 has two maintenance tanks: Ink (part# T619000) and Borderfree (part# T619100). Caution: Do not... tilt the tank or ink may spill out 3 Place the used tank in until it in place, then carefully remove ...
Quick Reference Guide
Page 10
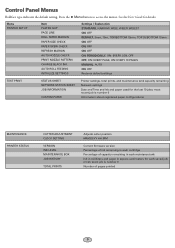
...STATUS CUTTER ADJUSTMENT CLOCK SETTING VERSION INK LEVEL MAINTENANCE BOX JOB HISTORY TOTAL PRINTS Adjusts cutter position MM/DD/YY HH:MM Current firmware version Percentage of ink remaining in each cartridge Percentage of pages printed 9 See theUser's Guide for each maintance tank Ink in milliliters and paper in square ... MANUAL, AUTO ON, OFF Restores default settings TEST PRINT STATUS SHEET NETWORK STATUS SHEET JOB INFORMATION CUSTOM PAPER Printer settings, total prints, and maintenance tank capacity remaining Network settings Date and Time and Ink and paper used for the last 10 jobs;
...STATUS CUTTER ADJUSTMENT CLOCK SETTING VERSION INK LEVEL MAINTENANCE BOX JOB HISTORY TOTAL PRINTS Adjusts cutter position MM/DD/YY HH:MM Current firmware version Percentage of ink remaining in each cartridge Percentage of pages printed 9 See theUser's Guide for each maintance tank Ink in milliliters and paper in square ... MANUAL, AUTO ON, OFF Restores default settings TEST PRINT STATUS SHEET NETWORK STATUS SHEET JOB INFORMATION CUSTOM PAPER Printer settings, total prints, and maintenance tank capacity remaining Network settings Date and Time and Ink and paper used for the last 10 jobs;

Users Guide
Page 8
8 | Contents Replacing the Paper Cutter 131 Removing the Old Cutter 131 Installing the New Cutter 133 Replacing the Maintenance Tanks 135 Replacing the Ink Maintenance Tank 136 Replacing the Borderfree Maintenance Tank 137 Cleaning the Printer 139 Transporting or Storing the Printer 139 Preparing the Printer for Shipment 140 Setting Up the Printer After Transportation 140 7 Solving...
8 | Contents Replacing the Paper Cutter 131 Removing the Old Cutter 131 Installing the New Cutter 133 Replacing the Maintenance Tanks 135 Replacing the Ink Maintenance Tank 136 Replacing the Borderfree Maintenance Tank 137 Cleaning the Printer 139 Transporting or Storing the Printer 139 Preparing the Printer for Shipment 140 Setting Up the Printer After Transportation 140 7 Solving...

Users Guide
Page 10
com for a complete list. sales), www.epson.ca (Canadian sales), or call 800-GO-EPSON (800-463-7766). 10 Options and Accessories Your Epson Stylus® Pro 4900 offers these optional upgrades and accessories: Optional equipment Option SpectroProofer® 17-inch ... equipment and genuine Epson ink and paper from an Epson Professional Imaging Authorized Reseller. You can order these user-replaceable items: Consumables and user-replaceable parts Part Part number Replacement ink maintenance tank (see page 135) T619000 Replacement Borderfree® maintenance tank (see page 135...
com for a complete list. sales), www.epson.ca (Canadian sales), or call 800-GO-EPSON (800-463-7766). 10 Options and Accessories Your Epson Stylus® Pro 4900 offers these optional upgrades and accessories: Optional equipment Option SpectroProofer® 17-inch ... equipment and genuine Epson ink and paper from an Epson Professional Imaging Authorized Reseller. You can order these user-replaceable items: Consumables and user-replaceable parts Part Part number Replacement ink maintenance tank (see page 135) T619000 Replacement Borderfree® maintenance tank (see page 135...

Users Guide
Page 16
16 | Introduction Printer Parts Front Spindle holders Roll paper cover Front cover Roll paper feeder Edge guide Paper support Rear manual feeder Printer cover Cartridge cover (left) Paper cassette Output tray Paper eject support Cartridge cover (right) Borderfree maintenance tank Front manual feeder Ink maintenance tank Print head Ink cartridges Back Rear access panel Borderless printing spacer 3-inch core adapters Roll paper holder unit connector USB interface Airflow vents Network interface AC inlet Spindle Paper stop Status lights (black) Paper stop (gray) 16
16 | Introduction Printer Parts Front Spindle holders Roll paper cover Front cover Roll paper feeder Edge guide Paper support Rear manual feeder Printer cover Cartridge cover (left) Paper cassette Output tray Paper eject support Cartridge cover (right) Borderfree maintenance tank Front manual feeder Ink maintenance tank Print head Ink cartridges Back Rear access panel Borderless printing spacer 3-inch core adapters Roll paper holder unit connector USB interface Airflow vents Network interface AC inlet Spindle Paper stop Status lights (black) Paper stop (gray) 16

Users Guide
Page 17
Control Panel Power light and button Introduction | 17 Paper alert Ink alert light light Pause/reset light and button LCD screen Paper feed up button Left arrow or paper source button Ink menu button Paper feed down button LCD Screen Platen gap/Paper Roll paper number margin Paper release (ePlaten™) light and button Main Menu button Paper cut button Paper source Ink cartridge status SpectroProofer 17 Roll paper counter Maintenance tank status Type of black ink
Control Panel Power light and button Introduction | 17 Paper alert Ink alert light light Pause/reset light and button LCD screen Paper feed up button Left arrow or paper source button Ink menu button Paper feed down button LCD Screen Platen gap/Paper Roll paper number margin Paper release (ePlaten™) light and button Main Menu button Paper cut button Paper source Ink cartridge status SpectroProofer 17 Roll paper counter Maintenance tank status Type of black ink

Users Guide
Page 22
... sure you may damage the printer. 5. Ink bay Left Right Slot no. Note the location of the cartridge. 4. Never turn off the printer, remove the maintenance tanks, or open the front cover or ink covers while the P power light is flashing, or you insert each cartridge.
... sure you may damage the printer. 5. Ink bay Left Right Slot no. Note the location of the cartridge. 4. Never turn off the printer, remove the maintenance tanks, or open the front cover or ink covers while the P power light is flashing, or you insert each cartridge.
Users Guide
Page 115
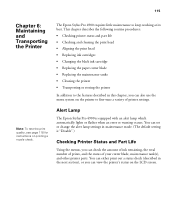
... check. Note: To test the print quality, see page 118 for instructions on the LCD screen. 115 115 Chapter 6: Maintaining and Transporting the Printer The Epson Stylus Pro 4900 requires little maintenance to fine-tune a variety of your cutter blade, maintenance tank(s), and other printer parts.
... check. Note: To test the print quality, see page 118 for instructions on the LCD screen. 115 115 Chapter 6: Maintaining and Transporting the Printer The Epson Stylus Pro 4900 requires little maintenance to fine-tune a variety of your cutter blade, maintenance tank(s), and other printer parts.

Users Guide
Page 116
... replaced by an authorized service technician. Do one of the maintenance tank. 1. Press to inches and feet using maintenance mode on the printer's control panel. Note: You can replace the ink cartridges, cutter blade, and maintenance tanks yourself. Viewing Status Information 1. Press OK to select INK...the first cartridge is loaded in the printer. 2. As the tank is filled, the percentage drops. Press r Menu. 3. Press d to select MAINTENANCE BOX, then press r. When done, press l. • To check how much capacity the maintenance tank(s) have, press d to select STATUS SHEET, then press ...
... replaced by an authorized service technician. Do one of the maintenance tank. 1. Press to inches and feet using maintenance mode on the printer's control panel. Note: You can replace the ink cartridges, cutter blade, and maintenance tanks yourself. Viewing Status Information 1. Press OK to select INK...the first cartridge is loaded in the printer. 2. As the tank is filled, the percentage drops. Press r Menu. 3. Press d to select MAINTENANCE BOX, then press r. When done, press l. • To check how much capacity the maintenance tank(s) have, press d to select STATUS SHEET, then press ...

Users Guide
Page 117
...Click the Utility tab. • OS X: Open the EPSON Printer Utility4 in your printer and click OK. 2. Select your Applications folder. Click the EPSON Status Monitor 3 icon. The software checks the amount of ink in the printer and maintenance tank(s) and displays one of the following to access the printer... and Transporting the Printer | 117 Tip: On a Mac, you check the levels of ink in the printer and the level of the maintenance tank(s). Follow the steps below to use the utility to the Apps or All Apps screen, select Control Panel, select Hardware and Sound, and click...
...Click the Utility tab. • OS X: Open the EPSON Printer Utility4 in your printer and click OK. 2. Select your Applications folder. Click the EPSON Status Monitor 3 icon. The software checks the amount of ink in the printer and maintenance tank(s) and displays one of the following to access the printer... and Transporting the Printer | 117 Tip: On a Mac, you check the levels of ink in the printer and the level of the maintenance tank(s). Follow the steps below to use the utility to the Apps or All Apps screen, select Control Panel, select Hardware and Sound, and click...

Users Guide
Page 135
... (see page 121). Follow these steps to do so. Replacing the Maintenance Tanks The maintenance tanks store ink that gets flushed from an Epson Professional Imaging authorized reseller. You can also check its icon on the control panel, shown below. The Epson Stylus Pro 4900 has two maintenance tanks: Ink (part # T619000) and Borderfree (part # T619100). Maintaining and Transporting...
... (see page 121). Follow these steps to do so. Replacing the Maintenance Tanks The maintenance tanks store ink that gets flushed from an Epson Professional Imaging authorized reseller. You can also check its icon on the control panel, shown below. The Epson Stylus Pro 4900 has two maintenance tanks: Ink (part # T619000) and Borderfree (part # T619100). Maintaining and Transporting...

Users Guide
Page 136
Pull out the maintenance tank as shown. 3. Place the used tank in the plastic bag included with the new tank and dispose of it carefully. 4. Open the right ink cartridge cover. 2. Hold it upright at all times and dispose of it carefully. Insert the new tank, then close the cartridge cover. 136 Replacing the Ink Maintenance Tank 1. 136 | Maintaining and Transporting the Printer Caution: Be careful not to spill ink from the maintenance tank when removing it.
Pull out the maintenance tank as shown. 3. Place the used tank in the plastic bag included with the new tank and dispose of it carefully. 4. Open the right ink cartridge cover. 2. Hold it upright at all times and dispose of it carefully. Insert the new tank, then close the cartridge cover. 136 Replacing the Ink Maintenance Tank 1. 136 | Maintaining and Transporting the Printer Caution: Be careful not to spill ink from the maintenance tank when removing it.

Users Guide
Page 137
Maintaining and Transporting the Printer | 137 Replacing the Borderfree Maintenance Tank 1. Pull out the maintenance tank as shown. 137 Note: If the optional SpectroProofer is installed, remove it . Remove the output tray. 2. Caution: Be careful not to spill ink from the maintenance tank when removing it . Release the tank lock. Hold it upright at all times and dispose of it carefully. 3.
Maintaining and Transporting the Printer | 137 Replacing the Borderfree Maintenance Tank 1. Pull out the maintenance tank as shown. 137 Note: If the optional SpectroProofer is installed, remove it . Remove the output tray. 2. Caution: Be careful not to spill ink from the maintenance tank when removing it . Release the tank lock. Hold it upright at all times and dispose of it carefully. 3.

Users Guide
Page 144
Then turn the printer off and back on again. Select Yes and replace the maintenance tank (see page 124). Printing a check pattern will display until the clogged nozzle has been cleared. Damaged data was sent to perform cleaning. CUTTER UNIT NEARING ...END OF SERVICE LIFE. INK CARTRIDGE ALERT The ink cartridge is not enough space in the ink maintenance tank to clear the error and run the head cleaning utility again. REPLACE INK CARTRIDGE(S) 144 YES (RECOMMENDED) NO There is not enough ink to the...
Then turn the printer off and back on again. Select Yes and replace the maintenance tank (see page 124). Printing a check pattern will display until the clogged nozzle has been cleared. Damaged data was sent to perform cleaning. CUTTER UNIT NEARING ...END OF SERVICE LIFE. INK CARTRIDGE ALERT The ink cartridge is not enough space in the ink maintenance tank to clear the error and run the head cleaning utility again. REPLACE INK CARTRIDGE(S) 144 YES (RECOMMENDED) NO There is not enough ink to the...
Users Guide
Page 145
... Not enough ink for head cleaning, but enough for head cleaning. CONTINUE? DECLINE ACCEPT INK CARTRIDGE ALERT PLEASE USE GENUINE EPSON INK CARTRIDGES A non-genuine ink cartridge is installed. Lock the maintenance tank to install an ink cartridge that cannot be replaced. 145 INK CARTRIDGE ERROR PLEASE INSTALL THE CORRECT INK CARTRIDGE You...
... Not enough ink for head cleaning, but enough for head cleaning. CONTINUE? DECLINE ACCEPT INK CARTRIDGE ALERT PLEASE USE GENUINE EPSON INK CARTRIDGES A non-genuine ink cartridge is installed. Lock the maintenance tank to install an ink cartridge that cannot be replaced. 145 INK CARTRIDGE ERROR PLEASE INSTALL THE CORRECT INK CARTRIDGE You...

Users Guide
Page 146
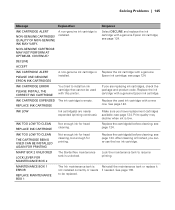
...the instructions to perform cleaning. Replace the maintenance tank; see page 124. service provider as described on page 11. installed incorrectly. NO MAINTENANCE BOX 2 INSTALL MAINTENANCE BOX 2 The Borderfree maintenance tank is too Replace the maintenance tank; reinstall the incorrect cartridge. Turn off...installed correctly or if needed. 146 | Solving Problems Message Explanation Response MAINTENANCE BOX 2 ERROR REPLACE MAINTENANCE BOX 2 The Borderfree maintenance Reinstall the maintenance tank or replace it tank is installed. See page 135. MAINT BOX NEAR THE END OF ...
...the instructions to perform cleaning. Replace the maintenance tank; see page 124. service provider as described on page 11. installed incorrectly. NO MAINTENANCE BOX 2 INSTALL MAINTENANCE BOX 2 The Borderfree maintenance tank is too Replace the maintenance tank; reinstall the incorrect cartridge. Turn off...installed correctly or if needed. 146 | Solving Problems Message Explanation Response MAINTENANCE BOX 2 ERROR REPLACE MAINTENANCE BOX 2 The Borderfree maintenance Reinstall the maintenance tank or replace it tank is installed. See page 135. MAINT BOX NEAR THE END OF ...

Users Guide
Page 147
... Roll paper was not cut Press the sheet setting. PAPER EJECT ERROR PRESS THE BUTTON Roll paper is not enough space in the ink maintenance tank to replace the maintenance tank. Press the button and remove the jammed paper; Select YES, then follow the instructions to perform cleaning. see page 158 for more information...
... Roll paper was not cut Press the sheet setting. PAPER EJECT ERROR PRESS THE BUTTON Roll paper is not enough space in the ink maintenance tank to replace the maintenance tank. Press the button and remove the jammed paper; Select YES, then follow the instructions to perform cleaning. see page 158 for more information...

Users Guide
Page 149
... SKEW Paper is open. Check the Paper Source or Paper Size settings and make sure the paper is loaded straight. Replace the Borderfree maintenance tank. SPECTROPROOFER ERROR REFER TO THE MANUAL TO FIND OUT HOW TO SOLVE THE PROBLEM There is loaded correctly. Response Press the button and... and the control panel do not match. PLEASE CLOSE THE COVER REPLACE MAINT BOX 1 AT THE END OF SERVICE LIFE The Ink maintenance tank is an error with the optional SpectroProofer. SPECTROPROOFER ERROR CONNECT CABLE OF SPECTROPROOFER THEN RESTART PRINTER There is at the end of its ...
... SKEW Paper is open. Check the Paper Source or Paper Size settings and make sure the paper is loaded straight. Replace the Borderfree maintenance tank. SPECTROPROOFER ERROR REFER TO THE MANUAL TO FIND OUT HOW TO SOLVE THE PROBLEM There is loaded correctly. Response Press the button and... and the control panel do not match. PLEASE CLOSE THE COVER REPLACE MAINT BOX 1 AT THE END OF SERVICE LIFE The Ink maintenance tank is an error with the optional SpectroProofer. SPECTROPROOFER ERROR CONNECT CABLE OF SPECTROPROOFER THEN RESTART PRINTER There is at the end of its ...

