
Printer Guide
Page 10
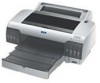
..., and manuals from EPSON® at www.epsonstore.com (U.S. In Canada, please call (800) 463-7766 for details. Options and Accessories Your EPSON Stylus® Pro 4000 offers these user-replaceable items: Consumables and user-replaceable parts Part Replacement Ink Maintenance Tank* Replacement Printer Cutter Blade...800) 873-7766, or you can order these optional upgrades and accessories: Optional equipment and software Option Part number EPSON Stylus Pro 4000 Printer Cabinet Stand C4000STAND Internal 10/100 BaseTX (Ethernet™) Type-B Print Server C12C824052 (interface card)* ...
..., and manuals from EPSON® at www.epsonstore.com (U.S. In Canada, please call (800) 463-7766 for details. Options and Accessories Your EPSON Stylus® Pro 4000 offers these user-replaceable items: Consumables and user-replaceable parts Part Replacement Ink Maintenance Tank* Replacement Printer Cutter Blade...800) 873-7766, or you can order these optional upgrades and accessories: Optional equipment and software Option Part number EPSON Stylus Pro 4000 Printer Cabinet Stand C4000STAND Internal 10/100 BaseTX (Ethernet™) Type-B Print Server C12C824052 (interface card)* ...
Product Information Guide
Page 5
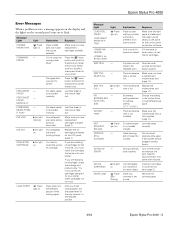
... and the paper source setting is not loaded straight. A printer part will not work. Cut sheet paper is the same on the control panel and printer software. See the documentation that came with your printer. Ink cartridge(s) not installed or ink lever raised. PAPER... in printer software is in the manual feed slot. Head cleaning did not clear the nozzles. Replace the ink cartridge(s) indicated on COMMAND - After you have replacement cartridges available. Make sure the maintenance tank is almost full. Remove the jammed paper. 4/04 Epson Stylus Pro 4000 - ...
... and the paper source setting is not loaded straight. A printer part will not work. Cut sheet paper is the same on the control panel and printer software. See the documentation that came with your printer. Ink cartridge(s) not installed or ink lever raised. PAPER... in printer software is in the manual feed slot. Head cleaning did not clear the nozzles. Replace the ink cartridge(s) indicated on COMMAND - After you have replacement cartridges available. Make sure the maintenance tank is almost full. Remove the jammed paper. 4/04 Epson Stylus Pro 4000 - ...

Service Manual
Page 7
EPSON Stylus Pro 4000 Chapter 4 Disassembly & Assembly 4.1 Introductory Information 197 4.1.1 Cautions 197 4.1.2 Tools 199 4.1.3 Screws 200 4.2 Disassembly Procedures 201 4.2.1 Basic Operations 202 4.2.2 Consumable Parts/ASF Cassette Removal 204 4.2.3 Panel Unit/Housing Removal 209 4.2.4 Circuit Board Removal 221 4.2.5 Printer... Rear Sensor Adjustment 399 5.3.22 Adjustment Image (for 8-color model 400 5.3.23 Adjustment Image (for 4-color model 409 5.4 Advanced Adjustment 413 5.4.1 Auto Bi-d Adjustment 413 5.4.2 Manual Bi-D Adjustment 414 5.4.3 Destination Setting 416 5.5 Check ...
EPSON Stylus Pro 4000 Chapter 4 Disassembly & Assembly 4.1 Introductory Information 197 4.1.1 Cautions 197 4.1.2 Tools 199 4.1.3 Screws 200 4.2 Disassembly Procedures 201 4.2.1 Basic Operations 202 4.2.2 Consumable Parts/ASF Cassette Removal 204 4.2.3 Panel Unit/Housing Removal 209 4.2.4 Circuit Board Removal 221 4.2.5 Printer... Rear Sensor Adjustment 399 5.3.22 Adjustment Image (for 8-color model 400 5.3.23 Adjustment Image (for 4-color model 409 5.4 Advanced Adjustment 413 5.4.1 Auto Bi-d Adjustment 413 5.4.2 Manual Bi-D Adjustment 414 5.4.3 Destination Setting 416 5.5 Check ...

Service Manual
Page 235
... have been assembled in problems that cannot be supplied as components defined in this manual or parts supplied as "Service Parts" is prohibited. (If this is required on-site. 2. EPSON Stylus Pro 4000 4.2.5 Printer Mechanism Disassembly This section describes disassembly steps for main components of parts that cannot be repaired except at the factory.) 1. C A U T IO N For the following reasons...
... have been assembled in problems that cannot be supplied as components defined in this manual or parts supplied as "Service Parts" is prohibited. (If this is required on-site. 2. EPSON Stylus Pro 4000 4.2.5 Printer Mechanism Disassembly This section describes disassembly steps for main components of parts that cannot be repaired except at the factory.) 1. C A U T IO N For the following reasons...

Service Manual
Page 356
...Head Rank ID { --- P.382 9 PG Adjustment { --- P.387 14 Auto Bi-d Adjustment { --- EPSON Stylus Pro 4000 5.1.4 Adjustment Items classified by Part/Unit Required adjustment items and execution order for 8-color machine and 4-color machine, respectively. P.417 6 Check Alignment { --- P.382 13 Printhead Slant Adjustment (CR) { ---...Paper) { --- Note "*1": RP = Replacement with new part "*2": RM = Removal only "*3": Refer to "P.400 and P.409" for each part/unit that has been replaced or removed is shown in the table below. P.413 21 Manual Bi-D { --- P.375 5 Check Nozzle { --- ...
...Head Rank ID { --- P.382 9 PG Adjustment { --- P.387 14 Auto Bi-d Adjustment { --- EPSON Stylus Pro 4000 5.1.4 Adjustment Items classified by Part/Unit Required adjustment items and execution order for 8-color machine and 4-color machine, respectively. P.417 6 Check Alignment { --- P.382 13 Printhead Slant Adjustment (CR) { ---...Paper) { --- Note "*1": RP = Replacement with new part "*2": RM = Removal only "*3": Refer to "P.400 and P.409" for each part/unit that has been replaced or removed is shown in the table below. P.413 21 Manual Bi-D { --- P.375 5 Check Nozzle { --- ...

Service Manual
Page 362
...Printer name Stylus Pro 4000 z Ink Config. Select the ink type currently installed. Click [Start]. Figure 5-2. Adjustment Program Startup Screen Figure 5-3. Revision B † Sequential Mode This is a guide mode for executing the required adjustments in this manual. † Operating Environment „ OS: Widows 98, Me, 2000, XP „ Port: USB port „ Printer... Individual Adjustment Mode Screen Adjustment Overview 362 EPSON Stylus Pro 4000 5.1.7 Adjustment Program Basic Operation This section ...part or unit is a mode for operating the adjustment...
...Printer name Stylus Pro 4000 z Ink Config. Select the ink type currently installed. Click [Start]. Figure 5-2. Adjustment Program Startup Screen Figure 5-3. Revision B † Sequential Mode This is a guide mode for executing the required adjustments in this manual. † Operating Environment „ OS: Widows 98, Me, 2000, XP „ Port: USB port „ Printer... Individual Adjustment Mode Screen Adjustment Overview 362 EPSON Stylus Pro 4000 5.1.7 Adjustment Program Basic Operation This section ...part or unit is a mode for operating the adjustment...

Service Manual
Page 363
EPSON Stylus Pro 4000 5.2 Mechanical Adjustment 5.2.1 CR Timing Belt Tension Adjustment...for sending and 2 seconds for returning. 3. CHECK P O IN T „ Move the whole area of the Carriage Unit moving parts through a return and back 5 times. Set the Carriage Unit in a position so the distance between the measurement microphone and timing belt...Mechanical Adjustment 363 Install the CR Timing Belt. z Weight: 1.2 z Width: 8.0 z Spam: 635 Revision B 5. Manually move the Carriage Unit through the returns. „ Try to the center of the Timing Belt. Bring the measurement microphone ...
EPSON Stylus Pro 4000 5.2 Mechanical Adjustment 5.2.1 CR Timing Belt Tension Adjustment...for sending and 2 seconds for returning. 3. CHECK P O IN T „ Move the whole area of the Carriage Unit moving parts through a return and back 5 times. Set the Carriage Unit in a position so the distance between the measurement microphone and timing belt...Mechanical Adjustment 363 Install the CR Timing Belt. z Weight: 1.2 z Width: 8.0 z Spam: 635 Revision B 5. Manually move the Carriage Unit through the returns. „ Try to the center of the Timing Belt. Bring the measurement microphone ...


