Printer Guide
Page 7
Contents | 7 4 Maintaining and Transporting the Printer 93 Checking Printer Status and Part Life 94 Printing Status Information 94 Viewing Status Information 95 Checking and Cleaning the Print Head 96 Running a Power Cleaning Cycle 98 Aligning the Print Head 99 Replacing Ink Cartridges 100 Performing Additional Maintenance Tasks 105 Changing the Date and Time 105...
Contents | 7 4 Maintaining and Transporting the Printer 93 Checking Printer Status and Part Life 94 Printing Status Information 94 Viewing Status Information 95 Checking and Cleaning the Print Head 96 Running a Power Cleaning Cycle 98 Aligning the Print Head 99 Replacing Ink Cartridges 100 Performing Additional Maintenance Tasks 105 Changing the Date and Time 105...

Printer Guide
Page 13
..., EPSON has determined that this product meets the ENERGY STAR guidelines for energy efficiency. The EPA ENERGY STAR Office Equipment program is a voluntary partnership with the paper sensors, causing paper jams and related problems. 13 You may need more space behind the printer if... make sure you use the equipment safely and effectively. • The printer weighs about 85 lb (without ink or paper), and should be lifted by power generation. Important Safety Instructions Before using your printer, read the following safety instructions to rapid changes in direct sunlight. Bright...
..., EPSON has determined that this product meets the ENERGY STAR guidelines for energy efficiency. The EPA ENERGY STAR Office Equipment program is a voluntary partnership with the paper sensors, causing paper jams and related problems. 13 You may need more space behind the printer if... make sure you use the equipment safely and effectively. • The printer weighs about 85 lb (without ink or paper), and should be lifted by power generation. Important Safety Instructions Before using your printer, read the following safety instructions to rapid changes in direct sunlight. Bright...
Printer Guide
Page 14
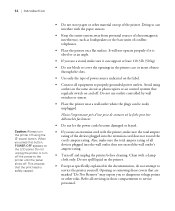
... loudspeakers or the base units of cordless telephones. • Place the printer on a flat surface. Also, make sure the total ampere rating of power source indicated on and off. Do not spill liquid on the printer. • Except as specifically explained in the printer case or insert objects through the slots. • Use only... block or cover the openings in the documentation, do not attempt to dangerous voltage points or other material on the LCD panel. Avoid using the P power button. Clean with the printer, make sure the total ampere rating of the...
... loudspeakers or the base units of cordless telephones. • Place the printer on a flat surface. Also, make sure the total ampere rating of power source indicated on and off. Do not spill liquid on the printer. • Except as specifically explained in the printer case or insert objects through the slots. • Use only... block or cover the openings in the documentation, do not attempt to dangerous voltage points or other material on the LCD panel. Avoid using the P power button. Clean with the printer, make sure the total ampere rating of the...

Printer Guide
Page 15
Introduction | 15 • Power down the printer from direct sunlight. If it off with water. • Keep ink cartridges out of the reach of the cartridge. Keep cartridges away from the control panel, unplug the printer, and refer servicing to refill them immediately with soap and water. Adjust only... a cool, dark location. • Do not dismantle the ink cartridges or try to qualified service personnel under the following conditions: If the power cord or plug is damaged; This may affect normal operation and printing. 15 This could result in damage to the print head. • ...
Introduction | 15 • Power down the printer from direct sunlight. If it off with water. • Keep ink cartridges out of the reach of the cartridge. Keep cartridges away from the control panel, unplug the printer, and refer servicing to refill them immediately with soap and water. Adjust only... a cool, dark location. • Do not dismantle the ink cartridges or try to qualified service personnel under the following conditions: If the power cord or plug is damaged; This may affect normal operation and printing. 15 This could result in damage to the print head. • ...

Printer Guide
Page 96
...power cleaning cycle. You can also use the printer's menus to see if any nozzles are clogged. Do one of the carriage motor, paper feed motor, print head, and cleaning unit. The status of the ink and printer...96 Press the Pause button to access the printer utilities: • Mac OS X: Open the EPSON Printer Utility in your Applications folder. Select SPro 4000, and click OK. • Mac OS...Print Head If your printed image shows a color shift or horizontal lines, you see your printer utility software. 96 | Maintaining and Transporting the Printer Note: You can run a cleaning cycle...
...power cleaning cycle. You can also use the printer's menus to see if any nozzles are clogged. Do one of the carriage motor, paper feed motor, print head, and cleaning unit. The status of the ink and printer...96 Press the Pause button to access the printer utilities: • Mac OS X: Open the EPSON Printer Utility in your Applications folder. Select SPro 4000, and click OK. • Mac OS...Print Head If your printed image shows a color shift or horizontal lines, you see your printer utility software. 96 | Maintaining and Transporting the Printer Note: You can run a cleaning cycle...

Printer Guide
Page 98
...then press Menu . 5. If the pattern is still missing segments after a few power cleaning cycles, turn the printer off and leave it is not on the LCD panel to clear the nozzles. Running a Power Cleaning Cycle You can reinsert the old cartridge. 1. Press the button until you ...is clean. 98 | Maintaining and Transporting the Printer Caution: Don't run the cleaning cycle. Note: You must use power cleaning. Press Menu again to use at least 50% full to start the power cleaning. 6. If you see no improvement, contact EPSON for assistance. 4-98 You may need to ...
...then press Menu . 5. If the pattern is still missing segments after a few power cleaning cycles, turn the printer off and leave it is not on the LCD panel to clear the nozzles. Running a Power Cleaning Cycle You can reinsert the old cartridge. 1. Press the button until you ...is clean. 98 | Maintaining and Transporting the Printer Caution: Don't run the cleaning cycle. Note: You must use power cleaning. Press Menu again to use at least 50% full to start the power cleaning. 6. If you see no improvement, contact EPSON for assistance. 4-98 You may need to ...
Printer Guide
Page 102
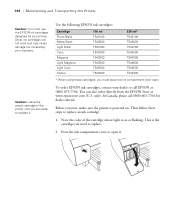
... follow these cartridges, you are ready to open . Note the color of the cartridge whose light is powered on or flashing. In Canada, please call EPSON at www.epsonstore.com (U.S. Other ink cartridges will not work and may cause damage not covered by your printer. only). Press the ink compartment cover to replace it...
... follow these cartridges, you are ready to open . Note the color of the cartridge whose light is powered on or flashing. In Canada, please call EPSON at www.epsonstore.com (U.S. Other ink cartridges will not work and may cause damage not covered by your printer. only). Press the ink compartment cover to replace it...

Printer Guide
Page 105
...maintenance mode allows you see MAINTENANCE, then press Menu again. 3. Press the button until you can use the maintenance mode to change printer defaults and run special procedures. You can use the maintenance mode to do the following format: MM/DD/YY HH:MM. Press the... 4-105 You can also use the Maintenance menu to set the date and time: 1. Maintaining and Transporting the Printer | 105 Performing Additional Maintenance Tasks In addition to running a power cleaning cycle and replacing the cutter blade, you see CLOCK SETTINGS, then press Menu . 4. Changing the Date ...
...maintenance mode allows you see MAINTENANCE, then press Menu again. 3. Press the button until you can use the maintenance mode to change printer defaults and run special procedures. You can use the maintenance mode to do the following format: MM/DD/YY HH:MM. Press the... 4-105 You can also use the Maintenance menu to set the date and time: 1. Maintaining and Transporting the Printer | 105 Performing Additional Maintenance Tasks In addition to running a power cleaning cycle and replacing the cutter blade, you see CLOCK SETTINGS, then press Menu . 4. Changing the Date ...

Printer Guide
Page 106
... you see the language you see LANGUAGE, then press the Menu button. Press the P Power button again to display EXEC. Press the button until you want, then press Menu again to select it (in the printer's buffer, press the Menu button to select the setting you see DEFAULT PANEL, then press... To print a hex dump of measurement, press the button until you see UNIT, then press the Menu button. Make sure the printer is turned off the printer by pressing the P Power button. Press the button to decrease the presure, or the button to print the last page. • To change the language ...
... you see the language you see LANGUAGE, then press the Menu button. Press the P Power button again to display EXEC. Press the button until you want, then press Menu again to select it (in the printer's buffer, press the Menu button to select the setting you see DEFAULT PANEL, then press... To print a hex dump of measurement, press the button until you see UNIT, then press the Menu button. Make sure the printer is turned off the printer by pressing the P Power button. Press the button to decrease the presure, or the button to print the last page. • To change the language ...

Printer Guide
Page 111
... inside . See page 134 for example, in the same building), raise the ink levers and have these items, contact EPSON to touch the gears inside the printer. Then unplug the power cord and disconnect the printer from the paper tray. Keep the ink cartridge compartment closed to prevent water from getting inside of the...
... inside . See page 134 for example, in the same building), raise the ink levers and have these items, contact EPSON to touch the gears inside the printer. Then unplug the power cord and disconnect the printer from the paper tray. Keep the ink cartridge compartment closed to prevent water from getting inside of the...
Printer Guide
Page 112
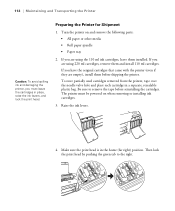
... the print head. If you are using 220 ml cartridges, remove them and install 110 ml cartridges. To store partially used cartridges removed from the printer, tape over the needle valve hole and place each cartridge in the home (far right) position. If you are using the 110 ml ink cartridges..., leave them installed. If you must be powered on and remove the following parts: • All paper or other media • Roll paper spindle • Paper tray 2. Be sure to the right. 4-112...
... the print head. If you are using 220 ml cartridges, remove them and install 110 ml cartridges. To store partially used cartridges removed from the printer, tape over the needle valve hole and place each cartridge in the home (far right) position. If you are using the 110 ml ink cartridges..., leave them installed. If you must be powered on and remove the following parts: • All paper or other media • Roll paper spindle • Paper tray 2. Be sure to the right. 4-112...
Printer Guide
Page 113
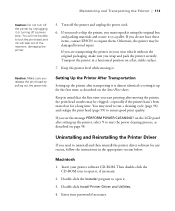
.... If you do not have these items, contact EPSON to request them. Double-click Install Printer Driver and Utilities. 4. If you are transporting the printer in the appropriate section below. If you see the message PERFORM POWER CLEANING? If you need to ship the printer, you start the power cleaning process, as described on a flat, stable...
.... If you do not have these items, contact EPSON to request them. Double-click Install Printer Driver and Utilities. 4. If you are transporting the printer in the appropriate section below. If you see the message PERFORM POWER CLEANING? If you need to ship the printer, you start the power cleaning process, as described on a flat, stable...
Printer Guide
Page 116
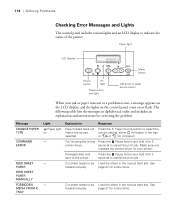
... panel includes various lights and an LCD display to indicate the status of the printer: Paper light LCD display Power Ink button light Pause button and light Menu button Left arrow or paper source button When your printer. The following table lists the messages in the manual feed slot. Cut sheet ...panel come on - - See page 27 for instructions. 5-116 See loaded manually. TRAY Light Paper light on or flash. You're using the wrong printer driver. Damaged data was sent to cancel the print job. Make sure you installed the correct driver for 3 seconds to the...
... panel includes various lights and an LCD display to indicate the status of the printer: Paper light LCD display Power Ink button light Pause button and light Menu button Left arrow or paper source button When your printer. The following table lists the messages in the manual feed slot. Cut sheet ...panel come on - - See page 27 for instructions. 5-116 See loaded manually. TRAY Light Paper light on or flash. You're using the wrong printer driver. Damaged data was sent to cancel the print job. Make sure you installed the correct driver for 3 seconds to the...

Printer Guide
Page 123
... for the media you're printing on. ◗ If you're printing on non-EPSON media, you can't turn off the power and unplug the power cord immediately. Contact EPSON for assistance. (See page 11 for details.) If none of your printer software is securely connected to WIDE or WIDER. Use your system. • The...
... for the media you're printing on. ◗ If you're printing on non-EPSON media, you can't turn off the power and unplug the power cord immediately. Contact EPSON for assistance. (See page 11 for details.) If none of your printer software is securely connected to WIDE or WIDER. Use your system. • The...

Printer Guide
Page 133
... at www.epsonstore.com (U.S. Then follow these steps to remove the two screws securing the optional interface cover. IMPORTANT: Unplug the printer from EPSON at (800) 873-7766, or you have the correct cable for deaer referral. Use a cross-head screwdriver to install the card: 1. ... supplies from its electrical outlet. Disconnect any interface cables from the power outlet, or you need a standard RJ-45 "straight-through" network cable. In Canada, please call (800) 463-7766 for connecting the printer. To connect to the printer and the card. 3. Not doing so may cause damage to...
... at www.epsonstore.com (U.S. Then follow these steps to remove the two screws securing the optional interface cover. IMPORTANT: Unplug the printer from EPSON at (800) 873-7766, or you have the correct cable for deaer referral. Use a cross-head screwdriver to install the card: 1. ... supplies from its electrical outlet. Disconnect any interface cables from the power outlet, or you need a standard RJ-45 "straight-through" network cable. In Canada, please call (800) 463-7766 for connecting the printer. To connect to the printer and the card. 3. Not doing so may cause damage to...

Printer Guide
Page 134
...card. 1. Make sure the card is connected to your network, you need to exchange your printer, you allow the card to secure it out of the Ethernet card. Turn off the printer and disconnect the power cord. 2. Use the two screws included with the print server for your computer's Ethernet ...port or hub. 8. Plug in firmly to your network. Turn on the printer and press the small black button on configuring it ....
...card. 1. Make sure the card is connected to your network, you need to exchange your printer, you allow the card to secure it out of the Ethernet card. Turn off the printer and disconnect the power cord. 2. Use the two screws included with the print server for your computer's Ethernet ...port or hub. 8. Plug in firmly to your network. Turn on the printer and press the small black button on configuring it ....

Printer Guide
Page 136
...;F) (120 hours at 140 °F) 20 to 85% RH 5 to 85% RH Electrical Specification Input voltage range Rated frequency range Input frequency range Rated current Power consumption Description 90 V to 264 V 50 to 60 Hz 49 to 61 Hz 1.0 A at 120 V 0.5 A at 220 V Approx. 50 W or less (ISO 10561 letter pattern...
...;F) (120 hours at 140 °F) 20 to 85% RH 5 to 85% RH Electrical Specification Input voltage range Rated frequency range Input frequency range Rated current Power consumption Description 90 V to 264 V 50 to 60 Hz 49 to 61 Hz 1.0 A at 120 V 0.5 A at 220 V Approx. 50 W or less (ISO 10561 letter pattern...

Printer Guide
Page 144
..., 40 to 42 custom size, 45 to 46, 60 custom size, creating, 81 cut sheet, 18 to 30 EPSON, 19, 31 handling, 17 to 42 heavy stock, 27 to 40 jams, 127 to 132 loading in tray, 18...26 loading manually, 27 to 30 Mac OS 9 options, 58 to 61 Mac OS X options, 44 to 46 non-EPSON, 40 to 42 ordering, 19, 31 printable area, 139 problems, 126 to 132 removing from spindle, 37 roll, ..., checking status, 94 to 96 PhotoEnhance, 66, 77, 85 Platen gap setting, 122 Posterboard, 27 to 40 Power cleaning cycle, 98 Power consumption, 136 Print head aligning, 99 to 100 checking status, 94 to 96 cleaning, 96 to 98, 105 ...
..., 40 to 42 custom size, 45 to 46, 60 custom size, creating, 81 cut sheet, 18 to 30 EPSON, 19, 31 handling, 17 to 42 heavy stock, 27 to 40 jams, 127 to 132 loading in tray, 18...26 loading manually, 27 to 30 Mac OS 9 options, 58 to 61 Mac OS X options, 44 to 46 non-EPSON, 40 to 42 ordering, 19, 31 printable area, 139 problems, 126 to 132 removing from spindle, 37 roll, ..., checking status, 94 to 96 PhotoEnhance, 66, 77, 85 Platen gap setting, 122 Posterboard, 27 to 40 Power cleaning cycle, 98 Power consumption, 136 Print head aligning, 99 to 100 checking status, 94 to 96 cleaning, 96 to 98, 105 ...

Printer Guide
Page 149
Ink light Left arrow or Paper Source button Hold for 3 seconds to clean the print head. Menu button Hold for 3 seconds to cancel a print job or reset the printer. Up arrow button Paper light Down arrow button 89 Control Panel Lights and Buttons Power Button Pause light and button Hold for 3 seconds to cut roll paper after printing.
Ink light Left arrow or Paper Source button Hold for 3 seconds to clean the print head. Menu button Hold for 3 seconds to cancel a print job or reset the printer. Up arrow button Paper light Down arrow button 89 Control Panel Lights and Buttons Power Button Pause light and button Hold for 3 seconds to cut roll paper after printing.

Product Information Guide
Page 2
...at 140 °F (60 °C) Capacity Freezing: 5 °F (-15 °C); indicate the lightfastness of color UltraChrome™ prints made by the Epson Stylus Pro 4000 printer will vary according to media, printed image, display conditions, light intensity, humidity, and atmospheric conditions. Ink lightfastness ... than 100 years under glass on specialty media, displayed indoors, under glass. Epson Stylus Pro 4000 Electrical Specification Input voltage range Rated frequency range Input frequency range Rated current Power consumption Description 90 to 264 V 50 to 60 Hz 49 to 61 Hz...
...at 140 °F (60 °C) Capacity Freezing: 5 °F (-15 °C); indicate the lightfastness of color UltraChrome™ prints made by the Epson Stylus Pro 4000 printer will vary according to media, printed image, display conditions, light intensity, humidity, and atmospheric conditions. Ink lightfastness ... than 100 years under glass on specialty media, displayed indoors, under glass. Epson Stylus Pro 4000 Electrical Specification Input voltage range Rated frequency range Input frequency range Rated current Power consumption Description 90 to 264 V 50 to 60 Hz 49 to 61 Hz...


