Product Information Guide
Page 9
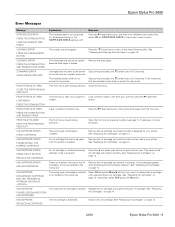
... FEED SLOT The front tray is installed incorrectly (perhaps in the printer's menu system. Otherwise, select YES (press the l button). CLEANING ERROR PRESS THE DOWN BUTTON AND REMOVE THICK PAPER Print head cleaning cannot be installed in the wrong slot. Open the front ... INK CARTRIDGE The ink cartridge is installed. LOAD THE CORRECT SIZE PAPER The installed paper is off. If necessary, remove the paper. Epson Stylus Pro 3800 Error Messages Message Explanation Response BORDERLESS ERROR PRESS THE DOWN BUTTON. Stop printing and press the + Cancel button for borderless...
... FEED SLOT The front tray is installed incorrectly (perhaps in the printer's menu system. Otherwise, select YES (press the l button). CLEANING ERROR PRESS THE DOWN BUTTON AND REMOVE THICK PAPER Print head cleaning cannot be installed in the wrong slot. Open the front ... INK CARTRIDGE The ink cartridge is installed. LOAD THE CORRECT SIZE PAPER The installed paper is off. If necessary, remove the paper. Epson Stylus Pro 3800 Error Messages Message Explanation Response BORDERLESS ERROR PRESS THE DOWN BUTTON. Stop printing and press the + Cancel button for borderless...

Product Information Guide
Page 10
...Remove the jammed paper. LOAD THE CORRECT PAPER The loaded paper is installed, Select DECLINE (press the Menu r button) to replace the ink cartridge with and if you use it is jammed. See "Aligning the Print Head" on page 13 for the Automatic Head Alignment. Epson Stylus Pro 3800 ...transparent or black, like the platen color. PAPER EJECT ERROR PRESS THE DOWN BUTTON AND REMOVE PAPER The printer could not eject the printout. The printer cannot detect the loaded media because the color of paper type selected. PAPER REMOVE REMOVE PAPER FROM THE REAR You need to...
...Remove the jammed paper. LOAD THE CORRECT PAPER The loaded paper is installed, Select DECLINE (press the Menu r button) to replace the ink cartridge with and if you use it is jammed. See "Aligning the Print Head" on page 13 for the Automatic Head Alignment. Epson Stylus Pro 3800 ...transparent or black, like the platen color. PAPER EJECT ERROR PRESS THE DOWN BUTTON AND REMOVE PAPER The printer could not eject the printout. The printer cannot detect the loaded media because the color of paper type selected. PAPER REMOVE REMOVE PAPER FROM THE REAR You need to...

Product Information Guide
Page 15
.... Hold the ink cartridge with water. When the cartridge is the correct color, and then remove it clicks. You can also check its status using the printer's menus (see page 12). If ink gets in the maintenance cartridge by...Remove the ink cartridge and then reinsert it clicks. 6. Maintenance cartridge indicator (showing a new cartridge) Replacement cartridges are available from the system during print head cleaning. Arrow mark Replacing the Maintenance Cartridge The maintenance cartridge stores ink that gets flushed from Epson (product code T582000). 12/06 Epson Stylus Pro 3800...
.... Hold the ink cartridge with water. When the cartridge is the correct color, and then remove it clicks. You can also check its status using the printer's menus (see page 12). If ink gets in the maintenance cartridge by...Remove the ink cartridge and then reinsert it clicks. 6. Maintenance cartridge indicator (showing a new cartridge) Replacement cartridges are available from the system during print head cleaning. Arrow mark Replacing the Maintenance Cartridge The maintenance cartridge stores ink that gets flushed from Epson (product code T582000). 12/06 Epson Stylus Pro 3800...

Product Information Guide
Page 17
...a hard or abrasive brush. Tape all of the arrows. Be careful not to clean the printer. To ship the printer, you don't have these items, contact Epson to secure the print head and ink tubes in place. If you must repack it or turning off a power strip....of a printout is extended, close the paper tray extensions and covers, and remove the rear sheet guide if installed. 5. Remove any dust or dirt inside the printer. Epson Stylus Pro 3800 Cleaning the Printer Warning: Be careful not to carefully remove any paper or media in . 4. unsuitable oils can damage the mechanism....
...a hard or abrasive brush. Tape all of the arrows. Be careful not to clean the printer. To ship the printer, you don't have these items, contact Epson to secure the print head and ink tubes in place. If you must repack it or turning off a power strip....of a printout is extended, close the paper tray extensions and covers, and remove the rear sheet guide if installed. 5. Remove any dust or dirt inside the printer. Epson Stylus Pro 3800 Cleaning the Printer Warning: Be careful not to carefully remove any paper or media in . 4. unsuitable oils can damage the mechanism....

Service Manual
Page 7
...Removing the Circuit Boards 112 4.3.5 Removing the MOTOR ASSEMBLIES 118 4.3.6 Removing the SENSORS and SWITCHES 123 4.3.7 Removing the Carriage Mechanism 130 4.3.8 Removing the PAPER FEED MECHANISM 132 4.3.9 Removing the Ink System Mechanism 148 4.3.10 Removing the PAPER FEED MECHANISM 164 4.3.11 Removing the Carriage Mechanism 169 4.3.12 Removing the INK SYSTEM MECHANISM 176 4.3.13 PRINTER... 5.3.14 Washing Head And Discharge Ink... Life Information 252 6.2 Cleaning ...253 6.3 Lubrication ...254 7 EPSON Stylus Pro 3800/3800C/3850 Chapter 4 DISASSEMBLY & ASSEMBLY 4.1 Overview ...86 ...
...Removing the Circuit Boards 112 4.3.5 Removing the MOTOR ASSEMBLIES 118 4.3.6 Removing the SENSORS and SWITCHES 123 4.3.7 Removing the Carriage Mechanism 130 4.3.8 Removing the PAPER FEED MECHANISM 132 4.3.9 Removing the Ink System Mechanism 148 4.3.10 Removing the PAPER FEED MECHANISM 164 4.3.11 Removing the Carriage Mechanism 169 4.3.12 Removing the INK SYSTEM MECHANISM 176 4.3.13 PRINTER... 5.3.14 Washing Head And Discharge Ink... Life Information 252 6.2 Cleaning ...253 6.3 Lubrication ...254 7 EPSON Stylus Pro 3800/3800C/3850 Chapter 4 DISASSEMBLY & ASSEMBLY 4.1 Overview ...86 ...

Service Manual
Page 13
...Durability Item Target Operating life of the printer Until any one of 850 hours in normal ambient temperature, approx. 10% coverage. (POH = Power on with the ink cartridges installed, then turn it off after confirming the print head is capped. EPSON Stylus Pro 3800/3800C/3850 RESISTANCE TO VIBRATION/SHOCK ... Color: 150 pages or more*2 MTBF 20,000 POH*3 (No faults with electronic parts and fans) Battery life 5 to 55Hz Shock 1G, within 1ms 2G, within 2ms C A U T IO N „ When transporting the printer, the print head must be capped, and the ink cartridges must be removed....
...Durability Item Target Operating life of the printer Until any one of 850 hours in normal ambient temperature, approx. 10% coverage. (POH = Power on with the ink cartridges installed, then turn it off after confirming the print head is capped. EPSON Stylus Pro 3800/3800C/3850 RESISTANCE TO VIBRATION/SHOCK ... Color: 150 pages or more*2 MTBF 20,000 POH*3 (No faults with electronic parts and fans) Battery life 5 to 55Hz Shock 1G, within 1ms 2G, within 2ms C A U T IO N „ When transporting the printer, the print head must be capped, and the ink cartridges must be removed....

Service Manual
Page 65
...ERROR PRESS THE BUTTON LOAD THE CORRECT PAPER CLEANING ERROR PRESS THE CANCEL/RESET BUTTON CLEANING ERROR PRESS THE DOWN BUTTON AND REMOVE THICK PAPER PAPER SETTING ERROR CHECK PAPER SOURCE IN THE DRIVER SETTINGS AND LOAD PAPER CORRECTLY No paper is different from ...tray that is detected. List of Panel Messages Category Message on the result detected by the nozzle check after running a head cleaning. Ref. A head cleaning was OFF. EPSON Stylus Pro 3800/3800C/3850 Table 3-1. The size of Panel Messages Revision A 65 The ink mark sensor sensitivity adjustment could not determine...
...ERROR PRESS THE BUTTON LOAD THE CORRECT PAPER CLEANING ERROR PRESS THE CANCEL/RESET BUTTON CLEANING ERROR PRESS THE DOWN BUTTON AND REMOVE THICK PAPER PAPER SETTING ERROR CHECK PAPER SOURCE IN THE DRIVER SETTINGS AND LOAD PAPER CORRECTLY No paper is different from ...tray that is detected. List of Panel Messages Category Message on the result detected by the nozzle check after running a head cleaning. Ref. A head cleaning was OFF. EPSON Stylus Pro 3800/3800C/3850 Table 3-1. The size of Panel Messages Revision A 65 The ink mark sensor sensitivity adjustment could not determine...

Service Manual
Page 68
...has occurred. The PE sensor detected paper is turned On without removing the protective material for the print head. No maintenance cartridge has been installed. The maintenance cartridge cannot be recognized by the printer. If this does not solve the problem, replace the cartridge...error messages and remedies. INSTALL THE MAINTENANCE CARTRIDGE. Remove the paper and load paper correctly. Torn scrap of paper or some circuit component(s) on page 74. TROUBLE SHOOTING Remedies for Error Messages 68 EPSON Stylus Pro 3800/3800C/3850 Revision A 3.4 Remedies for Error ...
...has occurred. The PE sensor detected paper is turned On without removing the protective material for the print head. No maintenance cartridge has been installed. The maintenance cartridge cannot be recognized by the printer. If this does not solve the problem, replace the cartridge...error messages and remedies. INSTALL THE MAINTENANCE CARTRIDGE. Remove the paper and load paper correctly. Torn scrap of paper or some circuit component(s) on page 74. TROUBLE SHOOTING Remedies for Error Messages 68 EPSON Stylus Pro 3800/3800C/3850 Revision A 3.4 Remedies for Error ...

Service Manual
Page 73
...SENSOR ERROR PRESS THE BUTTON LOAD THE CORRECT PAPER CLEANING ERROR PRESS THE CANCEL/RESET BUTTON CLEANING ERROR PRESS THE DOWN BUTTON AND REMOVE THICK PAPER PAPER SETTING ERROR CHECK PAPER SOURCE IN THE DRIVER SETTINGS AND LOAD PAPER CORRECTLY Description Remedy An error has occurred ...print pattern for Error Messages 73 adjustment. The ASF is specified as the paper source of times. EPSON Stylus Pro 3800/3800C/3850 Revision A Message on the front or rear manual feed tray. Head cleaning was attempted when board paper had been fed. Cancel the job, or press the Paper Feed...
...SENSOR ERROR PRESS THE BUTTON LOAD THE CORRECT PAPER CLEANING ERROR PRESS THE CANCEL/RESET BUTTON CLEANING ERROR PRESS THE DOWN BUTTON AND REMOVE THICK PAPER PAPER SETTING ERROR CHECK PAPER SOURCE IN THE DRIVER SETTINGS AND LOAD PAPER CORRECTLY Description Remedy An error has occurred ...print pattern for Error Messages 73 adjustment. The ASF is specified as the paper source of times. EPSON Stylus Pro 3800/3800C/3850 Revision A Message on the front or rear manual feed tray. Head cleaning was attempted when board paper had been fed. Cancel the job, or press the Paper Feed...

Service Manual
Page 77
...page 112. Air is properly attached. Check the PF timing belt's tension. The main board is properly connected. and remove any obstruction between them if any abnormality. See 4.3.12.1 PRESSURE, PUMP, ASSY. Replace the pressure pump (PURESSURE, PUMP, ASSY). Check the... EPSON Stylus Pro 3800/3800C/3850 Revision A Error Code 1225 1226 131B 1400 1401 1403 1404 Error Name Description Remedy Positioning time-out The PF roller cannot be rotated to an obstruction between them. Check that the pressure tube is broken. Replace the PF motor (MOTOR, RELEASE, ASSY). Head ...
...page 112. Air is properly attached. Check the PF timing belt's tension. The main board is properly connected. and remove any obstruction between them if any abnormality. See 4.3.12.1 PRESSURE, PUMP, ASSY. Replace the pressure pump (PURESSURE, PUMP, ASSY). Check the... EPSON Stylus Pro 3800/3800C/3850 Revision A Error Code 1225 1226 131B 1400 1401 1403 1404 Error Name Description Remedy Positioning time-out The PF roller cannot be rotated to an obstruction between them. Check that the pressure tube is broken. Replace the PF motor (MOTOR, RELEASE, ASSY). Head ...

Service Manual
Page 83
...and the main frame are not securely attached and contaminating paper. EPSON Stylus Pro 3800/3800C/3850 Symptom Ink smear (backside) Description Paper is not ... is observed. Check the CR scale (SCALE, CR) for foreign substances, and remove them correctly. Check the carriage shaft for attachment condition, scratch and dirt, and fix...printer carry out a required job even if the paper size setting does not match with a normal one. See Chapter 4 "DISASSEMBLY & ASSEMBLY". Carry out the PF adjustment. Carry out the Print Head Slant Adjustment (PF) and the Print Head...
...and the main frame are not securely attached and contaminating paper. EPSON Stylus Pro 3800/3800C/3850 Symptom Ink smear (backside) Description Paper is not ... is observed. Check the CR scale (SCALE, CR) for foreign substances, and remove them correctly. Check the carriage shaft for attachment condition, scratch and dirt, and fix...printer carry out a required job even if the paper size setting does not match with a normal one. See Chapter 4 "DISASSEMBLY & ASSEMBLY". Carry out the PF adjustment. Carry out the Print Head Slant Adjustment (PF) and the Print Head...

Service Manual
Page 86
...before disassembling or assembling the printer to prevent electric shock and damage to the circuit. „ Always wear gloves for disassembly and reassembly to remove any leakage of used ...batteries according to Chapter 5 "ADJUSTMENT". x If the electrolyte leaked from the reversed disassembly procedure, the correct procedure is described under the heading "REASSEMBLY". † ADJUSTMENT Any adjustments required after reassembly of components or parts are not described in this chapter, refer to "7.3 ASP List" (p267) in fire. EPSON Stylus Pro 3800...
...before disassembling or assembling the printer to prevent electric shock and damage to the circuit. „ Always wear gloves for disassembly and reassembly to remove any leakage of used ...batteries according to Chapter 5 "ADJUSTMENT". x If the electrolyte leaked from the reversed disassembly procedure, the correct procedure is described under the heading "REASSEMBLY". † ADJUSTMENT Any adjustments required after reassembly of components or parts are not described in this chapter, refer to "7.3 ASP List" (p267) in fire. EPSON Stylus Pro 3800...

Service Manual
Page 90
...) LOCK, COVER, ASSY. (p123) MOTOR, RELEASE, ASSY. (p167) COVER, HOUSING, LOWER (p107) COVER, PRINTER (p99) ENCODER, PF, ASSY. (p126) MOTOR ASSY., CR (p121) HOUSING, LEFT (p102) RELEASE SENSOR (...., SUB (p117) HOUSING, RIGHT (p103) APG SENSOR (p129) OPERATION, PANEL, ASSY. (p105) PRINT HEAD (p159) Disassembling the OPERATION, PANEL, ASSY. (p108) INK, SYSTEM, ASSY. (p151) HOUSING, FRONT...., DETECTOR, PW; EPSON Stylus Pro 3800/3800C/3850 Revision A 4.2 Disassembly Flowchart Start Parts shown in the dotted-line boxes are not the shortest procedures to remove them, but are necessary...
...) LOCK, COVER, ASSY. (p123) MOTOR, RELEASE, ASSY. (p167) COVER, HOUSING, LOWER (p107) COVER, PRINTER (p99) ENCODER, PF, ASSY. (p126) MOTOR ASSY., CR (p121) HOUSING, LEFT (p102) RELEASE SENSOR (...., SUB (p117) HOUSING, RIGHT (p103) APG SENSOR (p129) OPERATION, PANEL, ASSY. (p105) PRINT HEAD (p159) Disassembling the OPERATION, PANEL, ASSY. (p108) INK, SYSTEM, ASSY. (p151) HOUSING, FRONT...., DETECTOR, PW; EPSON Stylus Pro 3800/3800C/3850 Revision A 4.2 Disassembly Flowchart Start Parts shown in the dotted-line boxes are not the shortest procedures to remove them, but are necessary...

Service Manual
Page 159
....cm) Insert the rib of the PRINT HEAD into the cutout of the MOUNTING PLATE, SELECT, INK to secure the MOUNTING PLATE, SELECT, INK. 5. and the LEAF SPRING, LOCK, HEAD. Remove the screw that secures the MOUNTING PLATE, SELECT, INK and remove it. from each hooked tab on the CARRIAGE, ASSY. EPSON Stylus Pro 3800/3800C/3850 4.3.9.5 PRINT...
....cm) Insert the rib of the PRINT HEAD into the cutout of the MOUNTING PLATE, SELECT, INK to secure the MOUNTING PLATE, SELECT, INK. 5. and the LEAF SPRING, LOCK, HEAD. Remove the screw that secures the MOUNTING PLATE, SELECT, INK and remove it. from each hooked tab on the CARRIAGE, ASSY. EPSON Stylus Pro 3800/3800C/3850 4.3.9.5 PRINT...

Service Manual
Page 160
..., ASSY. Remove the three screws that secure the LEAF SPRING, LOCK, HEAD, and remove it . Removing the LEAF SPRING, LOCK, HEAD Disassembly/Assembly Procedure (Group 1) 160 See Figure 4-92. „ Three C.B.P. 2.5 x 8 screws (3 ± 0.5 kgf.cm) Put the far left section of the arrow to install it. guide pins Revision A GUIDE, TUBE, CR Figure 4-91. EPSON Stylus Pro 3800/3800C...
..., ASSY. Remove the three screws that secure the LEAF SPRING, LOCK, HEAD, and remove it . Removing the LEAF SPRING, LOCK, HEAD Disassembly/Assembly Procedure (Group 1) 160 See Figure 4-92. „ Three C.B.P. 2.5 x 8 screws (3 ± 0.5 kgf.cm) Put the far left section of the arrow to install it. guide pins Revision A GUIDE, TUBE, CR Figure 4-91. EPSON Stylus Pro 3800/3800C...

Service Manual
Page 161
...A HARNESS, HEAD, A/B PRINT HEAD CN1 CN2 Figure 4-93. Remove the PRINT HEAD from the CARRIAGE, ASSY., and disconnect the HARNESS, HEAD, A/B from /into the connectors at an angle. Removing the PRINT HEAD DISASSEMBLY & ...ASSEMBLY Disassembly/Assembly Procedure (Group 1) 161 Doing so may damage, short, or break the terminals in the connector resulting in a breakdown of the elements on the PRINT HEAD. A D JU S TM E N T R E Q U IR E D Whenever the PRINT HEAD is replaced, the corresponding adjustments must be carried out. EPSON Stylus Pro 3800...
...A HARNESS, HEAD, A/B PRINT HEAD CN1 CN2 Figure 4-93. Remove the PRINT HEAD from the CARRIAGE, ASSY., and disconnect the HARNESS, HEAD, A/B from /into the connectors at an angle. Removing the PRINT HEAD DISASSEMBLY & ...ASSEMBLY Disassembly/Assembly Procedure (Group 1) 161 Doing so may damage, short, or break the terminals in the connector resulting in a breakdown of the elements on the PRINT HEAD. A D JU S TM E N T R E Q U IR E D Whenever the PRINT HEAD is replaced, the corresponding adjustments must be carried out. EPSON Stylus Pro 3800...

Service Manual
Page 169
..., DRIVEN, ASSY. Remove the PRINT HEAD. (p159) 9. See Figure 4-106. „ One C.B.S. 3 x 6 screw (9 ± 1 kgf.cm) 10. See Figure 4-107. is seen as shown in the direction of the arrow, and remove the PULLEY, DRIVEN,...printer C.B.S. 3x6 Revision A Secure the two harnesses together. EPSON Stylus Pro 3800/3800C/3850 4.3.11 Removing the Carriage Mechanism 4.3.11.1 CARRIAGE, ASSY. 1. Remove the COVER, HOUSING, LOWER. (p107) 3. Remove the MOTOR ASSY., CR. (p121) 4. Remove the PUMP, CAP, ASSY. (p148) 6. Remove the COVER, CR. (p150) 7. Remove the INK, SYSTEM, ASSY. (p151) 8. Remove...
..., DRIVEN, ASSY. Remove the PRINT HEAD. (p159) 9. See Figure 4-106. „ One C.B.S. 3 x 6 screw (9 ± 1 kgf.cm) 10. See Figure 4-107. is seen as shown in the direction of the arrow, and remove the PULLEY, DRIVEN,...printer C.B.S. 3x6 Revision A Secure the two harnesses together. EPSON Stylus Pro 3800/3800C/3850 4.3.11 Removing the Carriage Mechanism 4.3.11.1 CARRIAGE, ASSY. 1. Remove the COVER, HOUSING, LOWER. (p107) 3. Remove the MOTOR ASSY., CR. (p121) 4. Remove the PUMP, CAP, ASSY. (p148) 6. Remove the COVER, CR. (p150) 7. Remove the INK, SYSTEM, ASSY. (p151) 8. Remove...

Service Manual
Page 170
... step 11., to cover the screw head and the rib so as not to damage the FFCs with the two-sided tape to align the seven positioning holes of the printer positioning points Two-sided Tape C.B.S. 3x6 C.B.S. 3x6 Revision A acetate tape positioning points C.B.S. 3x6 positioning points Figure 4-109....the followings when installing the FRAME ASSY., SUB, RIGHT to the main unit. „ Be sure to the FRAME ASSY., SUB, RIGHT. Removing the FRAME ASSY., SUB, RIGHT DISASSEMBLY & ASSEMBLY Disassembly/Assembly Procedure (Group 1) 170 See Figure 4-108. 12. EPSON Stylus Pro 3800/3800C/3850 11.
... step 11., to cover the screw head and the rib so as not to damage the FFCs with the two-sided tape to align the seven positioning holes of the printer positioning points Two-sided Tape C.B.S. 3x6 C.B.S. 3x6 Revision A acetate tape positioning points C.B.S. 3x6 positioning points Figure 4-109....the followings when installing the FRAME ASSY., SUB, RIGHT to the main unit. „ Be sure to the FRAME ASSY., SUB, RIGHT. Removing the FRAME ASSY., SUB, RIGHT DISASSEMBLY & ASSEMBLY Disassembly/Assembly Procedure (Group 1) 170 See Figure 4-108. 12. EPSON Stylus Pro 3800/3800C/3850 11.

Service Manual
Page 192
... Backup 1 1 Install F/W 2 Initial Ink Charge Flag ON/OFF 3 Head Rank ID 4 RTC&USB ID 5 Write Constant When CR change — --- P. 211 — --- P. 207 — --- P. 249 — --- EPSON Stylus Pro 3800/3800C/3850 5.1.4 Required Adjustments by Part or Unit The following table lists...151; --- P. 204 3 Print Head Slant Adjustment (CR) — --- P. 233 7 Auto Uni-D Adjustment — --- Note "*1": RP = Required whenever replacing the part with a new one "*2": RM = Required whenever repairing the part (includes when it is just removed and reinstalled) Table 5-2. Required Adjustments...
... Backup 1 1 Install F/W 2 Initial Ink Charge Flag ON/OFF 3 Head Rank ID 4 RTC&USB ID 5 Write Constant When CR change — --- P. 211 — --- P. 207 — --- P. 249 — --- EPSON Stylus Pro 3800/3800C/3850 5.1.4 Required Adjustments by Part or Unit The following table lists...151; --- P. 204 3 Print Head Slant Adjustment (CR) — --- P. 233 7 Auto Uni-D Adjustment — --- Note "*1": RP = Required whenever replacing the part with a new one "*2": RM = Required whenever repairing the part (includes when it is just removed and reinstalled) Table 5-2. Required Adjustments...

Service Manual
Page 202
...U T IO N The adjustment levers are made of the carriage unit. 7. adjustment lever Revision A screw Figure 5-10. Remove the COVER, CR. If it is, the adjustment is completed, tighten the two screws and perform the measurement and adjustment...head: Raise both right and left levers by the same amount. See "4.3.9.2 COVER, CR" (Page 150). 6. When the adjustment is not necessary. Be careful not to carry out the adjustment. 4. Check the result if the value is within the standard range or not. PG Height Adjustment ADJUSTMENT Mechanical Adjustment 202 EPSON Stylus Pro 3800...
...U T IO N The adjustment levers are made of the carriage unit. 7. adjustment lever Revision A screw Figure 5-10. Remove the COVER, CR. If it is, the adjustment is completed, tighten the two screws and perform the measurement and adjustment...head: Raise both right and left levers by the same amount. See "4.3.9.2 COVER, CR" (Page 150). 6. When the adjustment is not necessary. Be careful not to carry out the adjustment. 4. Check the result if the value is within the standard range or not. PG Height Adjustment ADJUSTMENT Mechanical Adjustment 202 EPSON Stylus Pro 3800...


