Getting Started - ColorBurst RIP installation
Page 6
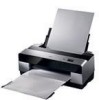
... list. In 10.4.x or 10.3.x, click Choose. 10. If you may need to add the printer. 5 Note: If the Windows server has a firewall enabled, you don't see your Windows Help for more information. 11. Select the name of the workgroup where the ColorBurst RIP Server is running . Then ...select the ColorBurst RIP driver under the Printer Model or Print Using list, select Other. 6. Click the button (Mac ...
... list. In 10.4.x or 10.3.x, click Choose. 10. If you may need to add the printer. 5 Note: If the Windows server has a firewall enabled, you don't see your Windows Help for more information. 11. Select the name of the workgroup where the ColorBurst RIP Server is running . Then ...select the ColorBurst RIP driver under the Printer Model or Print Using list, select Other. 6. Click the button (Mac ...

Printer Guide
Page 3
However, there is no guarantee that to which the receiver is connected. • Consult the dealer or an experienced radio/TV technician for help. If this equipment does cause interference to radio and television reception, which exceed the limits established by turning the equipment off and on a circuit different ...
However, there is no guarantee that to which the receiver is connected. • Consult the dealer or an experienced radio/TV technician for help. If this equipment does cause interference to radio and television reception, which exceed the limits established by turning the equipment off and on a circuit different ...
Printer Guide
Page 5
...9 Macintosh System Requirements 10 Windows System Requirements 10 Options and Supplies 11 Where To Get Help 12 Important Safety Instructions 12 Ink Cartridge Safety Instructions 14 1 Setting Up the Printer On a Network Connecting to the Network 15 Configuring the Network Interface 16 Installing the Software... 20 Installing the Software for Windows 22 Adding the Network Port 22 Installing the Printer Software 27 2 Handling Paper and Other Media Selecting Media for Your Printer 29 Guidelines for Using Epson Media 31 Choosing the Correct Paper Path 32 Loading Paper in the Auto Sheet ...
...9 Macintosh System Requirements 10 Windows System Requirements 10 Options and Supplies 11 Where To Get Help 12 Important Safety Instructions 12 Ink Cartridge Safety Instructions 14 1 Setting Up the Printer On a Network Connecting to the Network 15 Configuring the Network Interface 16 Installing the Software... 20 Installing the Software for Windows 22 Adding the Network Port 22 Installing the Printer Software 27 2 Handling Paper and Other Media Selecting Media for Your Printer 29 Guidelines for Using Epson Media 31 Choosing the Correct Paper Path 32 Loading Paper in the Auto Sheet ...

Printer Guide
Page 12
... or posterboard. • Place the printer on the installation, configuration, and operation of purchase. The printer will not operate properly if it . You'll need your printer serial number and proof of professional printing products through the Epson PreferredSM Protection Plan. Dial (888) ... up the printer, make sure you use the equipment safely and effectively. • The printer weighs about 43 pounds (20 kilograms) and should be easily unplugged. 12 12 | Introduction Tip: If you experience difficulty with your questions. Where To Get Help Epson provides technical support...
... or posterboard. • Place the printer on the installation, configuration, and operation of purchase. The printer will not operate properly if it . You'll need your printer serial number and proof of professional printing products through the Epson PreferredSM Protection Plan. Dial (888) ... up the printer, make sure you use the equipment safely and effectively. • The printer weighs about 43 pounds (20 kilograms) and should be easily unplugged. 12 12 | Introduction Tip: If you experience difficulty with your questions. Where To Get Help Epson provides technical support...
Printer Guide
Page 16
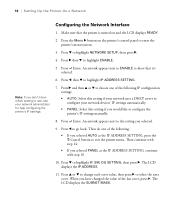
... following IP configuration settings: • AUTO: Select this setting if your network uses a DHCP server to configure your network administrator for help configuring the printer's IP settings. 7. Then do one of the following : • If you selected. 9. Press the Menu r button on and...r. Press Enter. An asterisk appears next to configure the printer's IP settings manually. 8. Press d to show that the printer is turned on the printer's control panel to exit the printer menu. 16 | Setting Up the Printer On a Network Configuring the Network Interface 1. An asterisk appears...
... following IP configuration settings: • AUTO: Select this setting if your network uses a DHCP server to configure your network administrator for help configuring the printer's IP settings. 7. Then do one of the following : • If you selected. 9. Press the Menu r button on and...r. Press Enter. An asterisk appears next to configure the printer's IP settings manually. 8. Press d to show that the printer is turned on the printer's control panel to exit the printer menu. 16 | Setting Up the Printer On a Network Configuring the Network Interface 1. An asterisk appears...
Printer Guide
Page 37
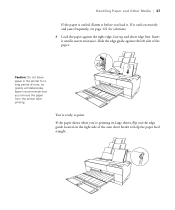
... load it meets resistance. Caution: Do not leave paper in the printer for solutions. 8. You're ready to help the paper feed straight. 2-37 Load the paper against the left side of the paper. Epson recommends that you remove the paper from the printer after printing. Insert it until it . If it curls excessively...
... load it meets resistance. Caution: Do not leave paper in the printer for solutions. 8. You're ready to help the paper feed straight. 2-37 Load the paper against the left side of the paper. Epson recommends that you remove the paper from the printer after printing. Insert it until it . If it curls excessively...

Printer Guide
Page 46
The printer prints a pattern similar to select PAPER FEED ADJUST A, then press r. Press l and then d to the following: Smallest gap 10. Press l and then d to print a paper thickness pattern. Adjusting this setting and the PAPER FEED ADJUST B can help eliminate banding. 13. Examine the printed pattern for the most even.) 11. After printing... the number that pattern number. (In the example shown above, the lines of pattern 4 are creating the configuration for the printable area (labelled A in the printer. Press u or d to save the setting. 12.
The printer prints a pattern similar to select PAPER FEED ADJUST A, then press r. Press l and then d to the following: Smallest gap 10. Press l and then d to print a paper thickness pattern. Adjusting this setting and the PAPER FEED ADJUST B can help eliminate banding. 13. Examine the printed pattern for the most even.) 11. After printing... the number that pattern number. (In the example shown above, the lines of pattern 4 are creating the configuration for the printable area (labelled A in the printer. Press u or d to save the setting. 12.
Printer Guide
Page 56
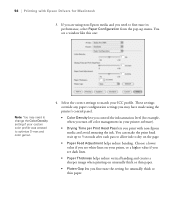
... vertical banding and creates a sharper image when printing on the page. • Paper Feed Adjustment helps reduce banding. These settings override any paper configuration settings you may need to fine-tune its performance, select Paper Configuration from the pop-up to 5... for unusually thick or thin paper. 3-56 56 | Printing with non-Epson media and avoid smearing the ink. Select the correct settings to optimize D-max and color gamut. 4. Choose a lower value if you see white lines on your printer software). • Drying Time per Print Head Pass lets you need to change the...
... vertical banding and creates a sharper image when printing on the page. • Paper Feed Adjustment helps reduce banding. These settings override any paper configuration settings you may need to fine-tune its performance, select Paper Configuration from the pop-up to 5... for unusually thick or thin paper. 3-56 56 | Printing with non-Epson media and avoid smearing the ink. Select the correct settings to optimize D-max and color gamut. 4. Choose a lower value if you see white lines on your printer software). • Drying Time per Print Head Pass lets you need to change the...

Printer Guide
Page 61
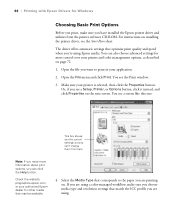
.... When you will add to the highlights of your print job or do one : 2. Click the icon for Macintosh | 61 • Highlight Point Shift helps reduce gloss differential by adding density to your black-and-white print. The closer you selected to add to resume printing 3. You see a screen like...your black-and-white print. Managing Print Jobs After you click Print, you can monitor the progress of images prone to gloss differential. • Tone color circle lets you customize the tone (hue) you select to adjust the tone. From here you can monitor the progress of the wheel, the more...
.... When you will add to the highlights of your print job or do one : 2. Click the icon for Macintosh | 61 • Highlight Point Shift helps reduce gloss differential by adding density to your black-and-white print. The closer you selected to add to resume printing 3. You see a screen like...your black-and-white print. Managing Print Jobs After you click Print, you can monitor the progress of images prone to gloss differential. • Tone color circle lets you customize the tone (hue) you select to adjust the tone. From here you can monitor the progress of the wheel, the more...
Printer Guide
Page 66
...the file you want to the paper you can click the Help button. Make sure your application. 2. Check the website prographics.epson.com or your printer and color management options, as described on installing the printer driver, see a Setup, Printer, or Options button, click it instead, and click Properties ... you the current settings, but you are using a color-managed workflow, make sure you have installed the Epson printer driver and utilities from here Note: If you need more control over your authorized Epson dealer for more information about print options, you are ...
...the file you want to the paper you can click the Help button. Make sure your application. 2. Check the website prographics.epson.com or your printer and color management options, as described on installing the printer driver, see a Setup, Printer, or Options button, click it instead, and click Properties ... you the current settings, but you are using a color-managed workflow, make sure you have installed the Epson printer driver and utilities from here Note: If you need more control over your authorized Epson dealer for more information about print options, you are ...

Printer Guide
Page 73
... made using the printer's control panel. • Color Density lets you control the ink saturation level (for Windows | 73 You see dark lines. • Paper Thickness helps reduce vertical banding and creates a sharper image when printing on the page. • Paper Feed Adjustment helps reduce banding. When... if you see a window like this one: 8. Then type a name for the group of custom settings. 10. Printing with Epson Drivers for example, when you turn off color management in your printer software). • Drying Time per Print Head Pass lets you may need to change the...
... made using the printer's control panel. • Color Density lets you control the ink saturation level (for Windows | 73 You see dark lines. • Paper Thickness helps reduce vertical banding and creates a sharper image when printing on the page. • Paper Feed Adjustment helps reduce banding. When... if you see a window like this one: 8. Then type a name for the group of custom settings. 10. Printing with Epson Drivers for example, when you turn off color management in your printer software). • Drying Time per Print Head Pass lets you may need to change the...

Printer Guide
Page 76
See page 78 for Windows • Highlight Point Shift helps reduce gloss differential by adding density to the highlights of the wheel, the more color you will add to your print jobs and cancel, pause, or restart them. The closer you select to the edge of images prone to gloss.... If you don't want the Progress Meter to appear, you can use the buttons to your black-and-white print. Managing Print Jobs Your printer comes with Epson Drivers for instructions. 4-76 You can also check your print job. Managing Prints Using the Progress Meter After you send a print job, the ...
See page 78 for Windows • Highlight Point Shift helps reduce gloss differential by adding density to the highlights of the wheel, the more color you will add to your print jobs and cancel, pause, or restart them. The closer you select to the edge of images prone to gloss.... If you don't want the Progress Meter to appear, you can use the buttons to your black-and-white print. Managing Print Jobs Your printer comes with Epson Drivers for instructions. 4-76 You can also check your print job. Managing Prints Using the Progress Meter After you send a print job, the ...

Printer Guide
Page 103
...newest firmware. 4. Double-click the EPSON LFP Remote Panel icon on your printer. 3. Click Drivers and Downloads to extract it. 2. Choose your desktop. Note: Although the illustrations in this one: Note: For more information on using the LFP Remote Panel, click Help to see a window like this ...section show Macintosh screens, the procedure is the same in your printer, if necessary. Navigate to update the firmware. Choose the version for a newer version of...
...newest firmware. 4. Double-click the EPSON LFP Remote Panel icon on your printer. 3. Click Drivers and Downloads to extract it. 2. Choose your desktop. Note: Although the illustrations in this one: Note: For more information on using the LFP Remote Panel, click Help to see a window like this ...section show Macintosh screens, the procedure is the same in your printer, if necessary. Navigate to update the firmware. Choose the version for a newer version of...
Printer Guide
Page 107
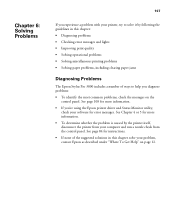
... check the messages on page 12. 107 Chapter 6: Solving Problems 107 If you experience a problem with your printer, try to help you 're using the Epson printer driver and Status Monitor utility, check your computer and run a nozzle check from your software for more information....problems • Solving miscellaneous printing problems • Solving paper problems, including clearing paper jams Diagnosing Problems The Epson Stylus Pro 3800 includes a number of ways to solve it by the printer itself, disconnect the printer from the control panel. See page 108 for error messages.
... check the messages on page 12. 107 Chapter 6: Solving Problems 107 If you experience a problem with your printer, try to help you 're using the Epson printer driver and Status Monitor utility, check your computer and run a nozzle check from your software for more information....problems • Solving miscellaneous printing problems • Solving paper problems, including clearing paper jams Diagnosing Problems The Epson Stylus Pro 3800 includes a number of ways to solve it by the printer itself, disconnect the printer from the control panel. See page 108 for error messages.

Printer Guide
Page 111
...EPSON'S WARRANTY. Select DECLINE (press the Menu r button) to replace the ink cartridge with a genuine Epson maintenance cartridge. REPLACE THE CARTRIDGE MAINTENANCE REQUEST NNNN A part used in the printer... may void Epson's warranty. See is loaded in the printer has nearly ...appears, print quality may void Epson's warranty. DO YOU ACCEPT ... DOWN BUTTON AND REMOVE PAPER The printer could not eject the printout. A...Epson. MAINTENANCE PLEASE USE GENUINE EPSON CARTRIDGES A non-genuine maintenance cartridge is installed. Replace the maintenance cartridge with a genuine Epson...
...EPSON'S WARRANTY. Select DECLINE (press the Menu r button) to replace the ink cartridge with a genuine Epson maintenance cartridge. REPLACE THE CARTRIDGE MAINTENANCE REQUEST NNNN A part used in the printer... may void Epson's warranty. See is loaded in the printer has nearly ...appears, print quality may void Epson's warranty. DO YOU ACCEPT ... DOWN BUTTON AND REMOVE PAPER The printer could not eject the printout. A...Epson. MAINTENANCE PLEASE USE GENUINE EPSON CARTRIDGES A non-genuine maintenance cartridge is installed. Replace the maintenance cartridge with a genuine Epson...

Printer Guide
Page 113
... you're using the auto sheet feeder, you can use the top edge guide to help feed the paper straight. If you are using . PAPER SKEW PRESS THE DOWN BUTTON. Check the Paper Source setting in the printer driver, and load the paper in the correct slot. Press the d Paper feed button...
... you're using the auto sheet feeder, you can use the top edge guide to help feed the paper straight. If you are using . PAPER SKEW PRESS THE DOWN BUTTON. Check the Paper Source setting in the printer driver, and load the paper in the correct slot. Press the d Paper feed button...
Printer Guide
Page 114
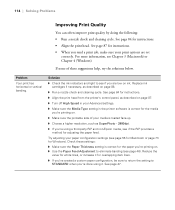
... setting to see if you 're done using a third-party RIP and non-Epson media, see page 46). Problem Your print has horizontal or vertical banding. Try adjusting your media ...is correct for Windows). Check these suggestions help, try the solutions below. See page 47. 6-114 Solution ◗ Check the ink ...nozzle check and cleaning cycle. See page 84 for instructions. ◗ Align the print head from the printer's control panel, as described on ink. Reduce the value for white lines, or increase it . For...
... setting to see if you 're done using a third-party RIP and non-Epson media, see page 46). Problem Your print has horizontal or vertical banding. Try adjusting your media ...is correct for Windows). Check these suggestions help, try the solutions below. See page 47. 6-114 Solution ◗ Check the ink ...nozzle check and cleaning cycle. See page 84 for instructions. ◗ Align the print head from the printer's control panel, as described on ink. Reduce the value for white lines, or increase it . For...
Printer Guide
Page 117
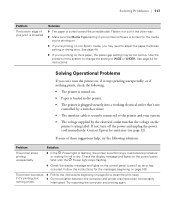
... of these suggestions help, try the following : • The printer is turned on the printer's rating label. If not, turn the printer on, if it stops printing unexpectedly, or if nothing prints. ◗ Communication between the computer and printer may be too narrow. Contact Epson for ink to ...WIDE or WIDER. Check the display message and lights on page 108. Follow the instructions for instructions. See page 44. ◗ If you're printing on non-Epson media, you 're printing...
... of these suggestions help, try the following : • The printer is turned on the printer's rating label. If not, turn the printer on, if it stops printing unexpectedly, or if nothing prints. ◗ Communication between the computer and printer may be too narrow. Contact Epson for ink to ...WIDE or WIDER. Check the display message and lights on page 108. Follow the instructions for instructions. See page 44. ◗ If you're printing on non-Epson media, you 're printing...

Printer Guide
Page 121
Paper Feed or Paper Jam Problems If paper jams frequently while feeding or during printing, try one or more of the auto sheet feeder to help the paper feed straight. Solving Problems | 121 Paper Skews When Printing on Large Format Media If your paper (see page 44). • If you are ...using a custom paper configuration for non-Epson special media, check the paper type selected in the printer's menu (see page 126). • Make sure the paper is not damp. • Store unused paper in its original package...
Paper Feed or Paper Jam Problems If paper jams frequently while feeding or during printing, try one or more of the auto sheet feeder to help the paper feed straight. Solving Problems | 121 Paper Skews When Printing on Large Format Media If your paper (see page 44). • If you are ...using a custom paper configuration for non-Epson special media, check the paper type selected in the printer's menu (see page 126). • Make sure the paper is not damp. • Store unused paper in its original package...
Printer Guide
Page 130
130 | Index E Electrical specifications, 126 Energy consumption, 126 Enlarging images, 70 Environmental specifications, 126 Epson accessories, 11, 89 help, 12 Preferred Protection Plan, 12 Store, 11, 89 Error messages, 108 to 113 Error notification, Windows, 77 to 79 Ethernet ...115 Firmware, updating, 103 to 105 Flip Horizontal setting Macintosh, 54 problems, 119 Windows, 72 H Head Alignment menu, 87 to 88 Height of printer, 126 Help, Epson, 12 High Speed Copies setting, Windows, 78 High Speed setting Macintosh, 54 Windows, 72 Highlight Point Shift setting, 61, 76 Highlight Tonality setting...
130 | Index E Electrical specifications, 126 Energy consumption, 126 Enlarging images, 70 Environmental specifications, 126 Epson accessories, 11, 89 help, 12 Preferred Protection Plan, 12 Store, 11, 89 Error messages, 108 to 113 Error notification, Windows, 77 to 79 Ethernet ...115 Firmware, updating, 103 to 105 Flip Horizontal setting Macintosh, 54 problems, 119 Windows, 72 H Head Alignment menu, 87 to 88 Height of printer, 126 Help, Epson, 12 High Speed Copies setting, Windows, 78 High Speed setting Macintosh, 54 Windows, 72 Highlight Point Shift setting, 61, 76 Highlight Tonality setting...

