
Product Information Guide
Page 15
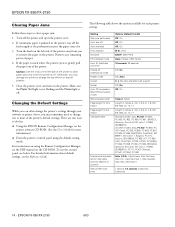
... clear paper jams only when the printer is off the printer and open the printer cover. 2. For detailed information about default settings, see below. Turn off . EPSON FX-890/FX-2190 Clearing Paper Jams Follow these steps to remove the paper in the printer. Caution: Use the knob on the CD-ROM. For instructions on using the default-setting...
... clear paper jams only when the printer is off the printer and open the printer cover. 2. For detailed information about default settings, see below. Turn off . EPSON FX-890/FX-2190 Clearing Paper Jams Follow these steps to remove the paper in the printer. Caution: Use the knob on the CD-ROM. For instructions on using the default-setting...
Product Information Guide
Page 16
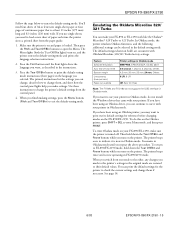
...print out its default settings for the printer to print the default-setting mode instructions (three pages) in the original mode are consistent with your printer in Okidata mode. To enter Okidata mode on the FX-890/FX-2190. If you use your printer. Press the Tear Off/Bin button ...you make sure the printer is on , and the printer enters the default-setting mode and prints the language selection instructions. 2. It remains in FX-890/2190 mode. The printer beeps twice and is at least 11 inches (279 mm) long and 8.3 inches (210 mm) wide. EPSON FX-890/FX-2190 Follow the steps below ...
...print out its default settings for the printer to print the default-setting mode instructions (three pages) in the original mode are consistent with your printer in Okidata mode. To enter Okidata mode on the FX-890/FX-2190. If you use your printer. Press the Tear Off/Bin button ...you make sure the printer is on , and the printer enters the default-setting mode and prints the language selection instructions. 2. It remains in FX-890/2190 mode. The printer beeps twice and is at least 11 inches (279 mm) long and 8.3 inches (210 mm) wide. EPSON FX-890/FX-2190 Follow the steps below ...
Product Information Guide
Page 17
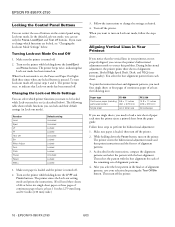
... three times when any locked button is loaded, then turn off the printer. 2. Make sure paper is pressed. As described in the instructions, compare the alignment patterns and select the pattern with the best alignment for each sheet. EPSON FX-890/FX-2190 Locking the Control Panel Buttons You can restrict the use only the Pause...
... three times when any locked button is loaded, then turn off the printer. 2. Make sure paper is pressed. As described in the instructions, compare the alignment patterns and select the pattern with the best alignment for each sheet. EPSON FX-890/FX-2190 Locking the Control Panel Buttons You can restrict the use only the Pause...

Technical Brief (Impact Printers)
Page 5
...access to easily change the printer's default settings. EPSON Sales Training EPSON is the DOS-based printer setup utility that allows you to the Printer Status Monitor. Start UP Utility Ver. 1.22 Copyright (C) SEIKO EPSON CORP. 1992 Printer: FX-2180 Mode: ESC/P Port:...F4 : Change Port Printer Status Monitor Utility The Printer Status Monitor provides Windows 95/98 users with automatic error messaging for direct printer to each printer L EPSON Remote! Utility EPSON Remote! This utility program provides printer status, error conditions, and trouble shooting instructions to the user....
...access to easily change the printer's default settings. EPSON Sales Training EPSON is the DOS-based printer setup utility that allows you to the Printer Status Monitor. Start UP Utility Ver. 1.22 Copyright (C) SEIKO EPSON CORP. 1992 Printer: FX-2180 Mode: ESC/P Port:...F4 : Change Port Printer Status Monitor Utility The Printer Status Monitor provides Windows 95/98 users with automatic error messaging for direct printer to each printer L EPSON Remote! Utility EPSON Remote! This utility program provides printer status, error conditions, and trouble shooting instructions to the user....
User Manual
Page 2
... respective owners. Neither SEIKO EPSON CORPORATION nor its affiliates shall be trademarks of this EPSON printer. General Notice: Other product names used herein are for identification purposes only and may be liable for any form or by SEIKO EPSON CORPORATION, Nagano, Japan. ...to other than those marks. Copyright © 2005 by any consumable products other printers. EPSON disclaims any and all rights in any use with SEIKO EPSON CORPORATION's operating and maintenance instructions. The information contained herein is not responsible for any damages or problems arising from...
... respective owners. Neither SEIKO EPSON CORPORATION nor its affiliates shall be trademarks of this EPSON printer. General Notice: Other product names used herein are for identification purposes only and may be liable for any form or by SEIKO EPSON CORPORATION, Nagano, Japan. ...to other than those marks. Copyright © 2005 by any consumable products other printers. EPSON disclaims any and all rights in any use with SEIKO EPSON CORPORATION's operating and maintenance instructions. The information contained herein is not responsible for any damages or problems arising from...
User Manual
Page 4
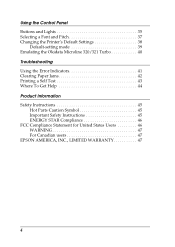
Using the Control Panel Buttons and Lights 35 Selecting a Font and Pitch 37 Changing the Printer's Default Settings 38 Default-setting mode 39 Emulating the Okidata Microline 320/321 Turbo 40 Troubleshooting Using the Error Indicators 41 Clearing Paper Jams 42 Printing a Self Test 43 Where To Get Help 44 Product Information Safety Instructions 45 Hot Parts Caution Symbol 45 Important Safety Instructions 45 ENERGY STAR Compliance 46 FCC Compliance Statement for United States Users 46 WARNING 47 For Canadian users 47 EPSON AMERICA, INC., LIMITED WARRANTY 47 4
Using the Control Panel Buttons and Lights 35 Selecting a Font and Pitch 37 Changing the Printer's Default Settings 38 Default-setting mode 39 Emulating the Okidata Microline 320/321 Turbo 40 Troubleshooting Using the Error Indicators 41 Clearing Paper Jams 42 Printing a Self Test 43 Where To Get Help 44 Product Information Safety Instructions 45 Hot Parts Caution Symbol 45 Important Safety Instructions 45 ENERGY STAR Compliance 46 FCC Compliance Statement for United States Users 46 WARNING 47 For Canadian users 47 EPSON AMERICA, INC., LIMITED WARRANTY 47 4
User Manual
Page 5
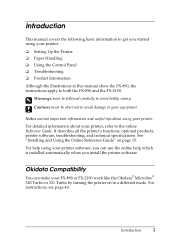
... Reference Guide" on in this manual show the FX-890, the instructions apply to both the FX-890 and the FX-2190. Notes contain important information and useful tips about your FX-890 or FX-2190 work like the Okidata® Microline® 320 Turbo or 321 Turbo by turning the printer on page 15. It describes all the...
... Reference Guide" on in this manual show the FX-890, the instructions apply to both the FX-890 and the FX-2190. Notes contain important information and useful tips about your FX-890 or FX-2190 work like the Okidata® Microline® 320 Turbo or 321 Turbo by turning the printer on page 15. It describes all the...
User Manual
Page 13
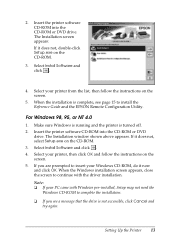
... that the drive is turned off. 2. Select Install Software and click . 4. Note: ❏ If your printer, then click OK and follow the instructions on the CD-ROM. 3. Insert the printer software CD-ROM into the CD-ROM or DVD drive. When the Windows installation screen appears, close the screen... you are prompted to install the Reference Guide and the EPSON Remote Configuration Utility. For Windows 98, 95, or NT 4.0 1. Make sure Windows is running and the printer is not accessible, click Cancel and try again. Insert the printer software CD-ROM into the CD-ROM or DVD drive....
... that the drive is turned off. 2. Select Install Software and click . 4. Note: ❏ If your printer, then click OK and follow the instructions on the CD-ROM. 3. Insert the printer software CD-ROM into the CD-ROM or DVD drive. When the Windows installation screen appears, close the screen... you are prompted to install the Reference Guide and the EPSON Remote Configuration Utility. For Windows 98, 95, or NT 4.0 1. Make sure Windows is running and the printer is not accessible, click Cancel and try again. Insert the printer software CD-ROM into the CD-ROM or DVD drive....
User Manual
Page 14
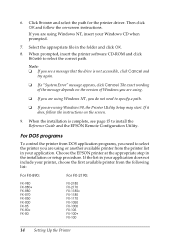
...instructions. 6. Note: ❏ If you are using or another available printer from the printer list in your application does not include your Windows CD when prompted. 7. If it does, follow the on the screen. 9. If the list in your application. For DOS programs To control the printer from the following list: For FX-890: For FX-2190: FX... and select the path for the printer driver. When the installation is not accessible, click Cancel and try again. ❏ If a "System Error" message appears, click Cancel. Choose the EPSON printer at the appropriate step in the ...
...instructions. 6. Note: ❏ If you are using or another available printer from the printer list in your application does not include your Windows CD when prompted. 7. If it does, follow the on the screen. 9. If the list in your application. For DOS programs To control the printer from the following list: For FX-890: For FX-2190: FX... and select the path for the printer driver. When the installation is not accessible, click Cancel and try again. ❏ If a "System Error" message appears, click Cancel. Choose the EPSON printer at the appropriate step in the ...
User Manual
Page 15
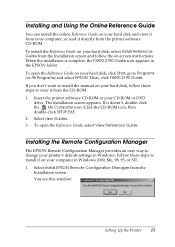
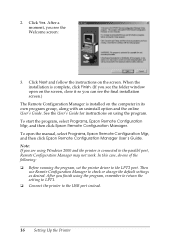
...the Reference Guide on your hard disk, click Start, go to change your printer's default settings in your hard disk, follow the on-screen instructions. Follow these steps to view it on your computer in the EPSON folder. To open the Reference Guide, select View Reference Guide. Select User...easy way to Programs (or All Programs) and select EPSON. When the installation is complete, the FX890 2190 Guide icon appears in Windows 2000, Me, 98, 95, or NT: 1. Select Install EPSON Remote Configuration Manager from the printer software CD-ROM. Installing and Using the Online Reference ...
...the Reference Guide on your hard disk, click Start, go to change your printer's default settings in your hard disk, follow the on-screen instructions. Follow these steps to view it on your computer in the EPSON folder. To open the Reference Guide, select View Reference Guide. Select User...easy way to Programs (or All Programs) and select EPSON. When the installation is complete, the FX890 2190 Guide icon appears in Windows 2000, Me, 98, 95, or NT: 1. Select Install EPSON Remote Configuration Manager from the printer software CD-ROM. Installing and Using the Online Reference ...
User Manual
Page 16
... the screen. Then use Remote Configuration Manager to the LPT2 port. Click Next and follow the instructions on using Windows 2000 and the printer is installed on the computer in its own program group, along with an uninstall option and the online User's Guide. ... installation screen.) The Remote Configuration Manager is connected to the USB port instead. 16 Setting Up the Printer To start the program, select Programs, Epson Remote Configuration Mgr, and then click Epson Remote Configuration Manager. Note: If you can see the folder window open the manual, select Programs...
... the screen. Then use Remote Configuration Manager to the LPT2 port. Click Next and follow the instructions on using Windows 2000 and the printer is installed on the computer in its own program group, along with an uninstall option and the online User's Guide. ... installation screen.) The Remote Configuration Manager is connected to the USB port instead. 16 Setting Up the Printer To start the program, select Programs, Epson Remote Configuration Mgr, and then click Epson Remote Configuration Manager. Note: If you can see the folder window open the manual, select Programs...

User Manual
Page 17
... position Description Single-sheet position For loading single-sheet paper from the tractor installed on top of the printer in the front, rear, or bottom slot. Pull tractor position For loading continuous paper from the top or front slot. You can load paper in... front push position or when using the rear push and pull tractors in combination. Paper Handling 17 Chapter 2 Paper Handling This chapter covers some important instructions you want to load and use , as described in the table below. Front push tractor position For loading continuous paper with the tractor installed in...
... position Description Single-sheet position For loading single-sheet paper from the tractor installed on top of the printer in the front, rear, or bottom slot. Pull tractor position For loading continuous paper from the top or front slot. You can load paper in... front push position or when using the rear push and pull tractors in combination. Paper Handling 17 Chapter 2 Paper Handling This chapter covers some important instructions you want to load and use , as described in the table below. Front push tractor position For loading continuous paper with the tractor installed in...
User Manual
Page 19
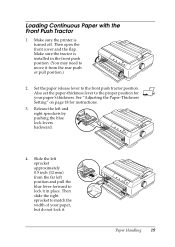
Set the paper release lever to match the width of your paper's thickness. Also set the paper-thickness lever to the proper position for instructions. 3. Then slide the right sprocket to the front push tractor position. Release the left sprocket approximately 0.5 inch (12 mm) from the rear... push or pull position.) 2. Loading Continuous Paper with the Front Push Tractor 1. Make sure the printer is installed in place. Then open the front cover and the flap. Make sure the tractor is turned off. See "Adjusting the Paper-Thickness ...
Set the paper release lever to match the width of your paper's thickness. Also set the paper-thickness lever to the proper position for instructions. 3. Then slide the right sprocket to the front push tractor position. Release the left sprocket approximately 0.5 inch (12 mm) from the rear... push or pull position.) 2. Loading Continuous Paper with the Front Push Tractor 1. Make sure the printer is installed in place. Then open the front cover and the flap. Make sure the tractor is turned off. See "Adjusting the Paper-Thickness ...
User Manual
Page 29
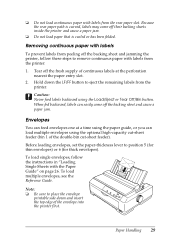
... nearest the paper entry slot. 2. Removing continuous paper with labels To prevent labels from peeling off the backing sheet and jamming the printer, follow the instructions in "Loading Single Sheets with the Paper Guide" on page 26. To load single envelopes, follow these steps to eject the remaining..., set the paper-thickness lever to place the envelope printable side down the LF/FF button to remove continuous paper with labels from the printer: 1. Paper Handling 29 When fed backward, labels can load multiple envelopes using the Load/Eject or Tear Off/Bin button. To load ...
... nearest the paper entry slot. 2. Removing continuous paper with labels To prevent labels from peeling off the backing sheet and jamming the printer, follow the instructions in "Loading Single Sheets with the Paper Guide" on page 26. To load single envelopes, follow these steps to eject the remaining..., set the paper-thickness lever to place the envelope printable side down the LF/FF button to remove continuous paper with labels from the printer: 1. Paper Handling 29 When fed backward, labels can load multiple envelopes using the Load/Eject or Tear Off/Bin button. To load ...
User Manual
Page 30
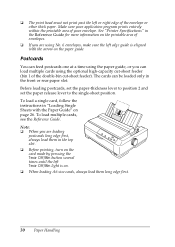
... by pressing the Tear Off/Bin button several times until the left edge guide is aligned with the Paper Guide" on the paper guide. See "Printer Specifications" in the Reference Guide for more information on the printable area of the double-bin cut -sheet feeder (bin 1 of envelopes. ❏ ...). Make sure your application program prints entirely within the printable area of the envelope or other thick paper. To load a single card, follow the instructions in the front or rear paper slot. To load multiple cards, see the Reference Guide. ❏ The print head must not print past the ...
... by pressing the Tear Off/Bin button several times until the left edge guide is aligned with the Paper Guide" on the paper guide. See "Printer Specifications" in the Reference Guide for more information on the printable area of the double-bin cut -sheet feeder (bin 1 of envelopes. ❏ ...). Make sure your application program prints entirely within the printable area of the envelope or other thick paper. To load a single card, follow the instructions in the front or rear paper slot. To load multiple cards, see the Reference Guide. ❏ The print head must not print past the ...
User Manual
Page 38
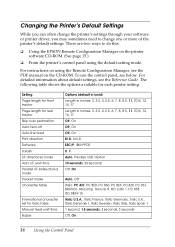
...sometimes need to do this: ❏ Using the EPSON Remote Configuration Manager on the printer software CD-ROM. (See page 15.) ❏ From the printer's control panel using the Remote Configuration Manager, see the Reference Guide. For instructions on the CD-ROM. For detailed information about default...slash I/F (interface) mode Auto I/F wait time Parallel I/F bidirectional mode Packet mode Character table International character set for each printer setting. To use the control panel, see below. Changing the Printer's Default Settings While you can often change one or more of the...
...sometimes need to do this: ❏ Using the EPSON Remote Configuration Manager on the printer software CD-ROM. (See page 15.) ❏ From the printer's control panel using the Remote Configuration Manager, see the Reference Guide. For instructions on the CD-ROM. For detailed information about default...slash I/F (interface) mode Auto I/F wait time Parallel I/F bidirectional mode Packet mode Character table International character set for each printer setting. To use the control panel, see below. Changing the Printer's Default Settings While you can often change one or more of the...

User Manual
Page 39
... exit default-setting mode. Repeat step 5 for the selected setting until the printer beeps and both the Tear Off/Bin lights turn on and paper is on . The selected language is currently selected for printing the instructions. When you want to enter the default-setting mode. Make sure the... printer is loaded. To go through the options for any other settings you need to print all the current...
... exit default-setting mode. Repeat step 5 for the selected setting until the printer beeps and both the Tear Off/Bin lights turn on and paper is on . The selected language is currently selected for printing the instructions. When you want to enter the default-setting mode. Make sure the... printer is loaded. To go through the options for any other settings you need to print all the current...
User Manual
Page 45
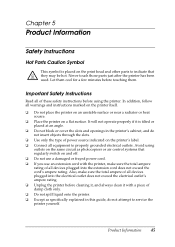
...that they may be hot. It will not operate properly if it with the printer, make sure the total ampere of all warnings and instructions marked on the printer itself. ❏ Do not place the printer on an unstable surface or near a radiator or heat source. ❏ ...plugged into the extension cord does not exceed the cord's ampere rating. Product Information 45 Let them . Important Safety Instructions Read all of power source indicated on the printer's label. ❏ Connect all devices plugged into the electrical outlet does not exceed the electrical outlet's ampere rating....
...that they may be hot. It will not operate properly if it with the printer, make sure the total ampere of all warnings and instructions marked on the printer itself. ❏ Do not place the printer on an unstable surface or near a radiator or heat source. ❏ ...plugged into the extension cord does not exceed the cord's ampere rating. Product Information 45 Let them . Important Safety Instructions Read all of power source indicated on the printer's label. ❏ Connect all devices plugged into the electrical outlet does not exceed the electrical outlet's ampere rating....

User Manual
Page 46
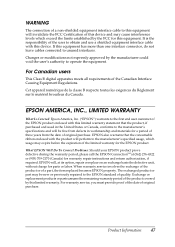
... Users This equipment has been tested and found to comply with the instructions, may cause harmful interference to provide reasonable protection against harmful interference in a particular installation. ❏ Unplug the printer and refer servicing to qualified service personnel under the following measures. &#...office equipment industry to promote the introduction of the FCC Rules. ENERGY STAR Compliance As an ENERGY STAR® Partner, EPSON has determined that this equipment does cause interference to radio and television reception, which can radiate radio frequency energy and, ...
... Users This equipment has been tested and found to comply with the instructions, may cause harmful interference to provide reasonable protection against harmful interference in a particular installation. ❏ Unplug the printer and refer servicing to qualified service personnel under the following measures. &#...office equipment industry to promote the introduction of the FCC Rules. ENERGY STAR Compliance As an ENERGY STAR® Partner, EPSON has determined that this equipment does cause interference to radio and television reception, which can radiate radio frequency energy and, ...
User Manual
Page 47
... at its option, repair or replace on an exchange basis the defective unit, without charge for warranty repair instructions and return authorization, if required. EPSON will, at (562) 276-4322 or (905) 709-2170 (Canada) for parts or labor. When warranty service involves the exchange of... operate the equipment. Exchange or replacement products or parts assume the remaining warranty period of the product covered by the FCC for the EPSON product. For Canadian users This Class B digital apparatus meets all requirements of the limited warranty for this equipment has more than one ...
... at its option, repair or replace on an exchange basis the defective unit, without charge for warranty repair instructions and return authorization, if required. EPSON will, at (562) 276-4322 or (905) 709-2170 (Canada) for parts or labor. When warranty service involves the exchange of... operate the equipment. Exchange or replacement products or parts assume the remaining warranty period of the product covered by the FCC for the EPSON product. For Canadian users This Class B digital apparatus meets all requirements of the limited warranty for this equipment has more than one ...