
Network Guide
Page 4
... the network interface or cannot print from the network 39 Cannot print even if you have assigned the IP address to the computer and the printer 39 Unable to start EpsonNet Config 39 The message "EpsonNet Config cannot be used because no network is installed" appears when you start EpsonNet Config... for Administrator 41 Network Setup Menu 41 Setting an IP Address Using the arp/ping Command 41 Checking the LAN 42 Setting and checking the new IP address 42 Uninstalling Software 43 Windows Vista 43 Windows XP 43 Macintosh 44 Index 45 4 Network Screens 31 Configuration -
... the network interface or cannot print from the network 39 Cannot print even if you have assigned the IP address to the computer and the printer 39 Unable to start EpsonNet Config 39 The message "EpsonNet Config cannot be used because no network is installed" appears when you start EpsonNet Config... for Administrator 41 Network Setup Menu 41 Setting an IP Address Using the arp/ping Command 41 Checking the LAN 42 Setting and checking the new IP address 42 Uninstalling Software 43 Windows Vista 43 Windows XP 43 Macintosh 44 Index 45 4 Network Screens 31 Configuration -
Network Guide
Page 15
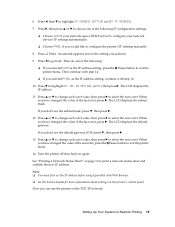
...Choose AUTO if your network uses a DHCP server to configure your network devices' IP settings automatically. ❏ Choose PANEL if you can use the printer on again. When you selected AUTO as the IP address setting, continue with Web Browser. ❏ See the User's Guide for Network Printing 15 ...You must first set the IP address before using EpsonNet with step 10. 10. Press l, then d to print a network status sheet and confirm the new IP address. The LCD displays the IP address. 11. If you have changed the value of the last octet, press r. See "Printing a Network Status...
...Choose AUTO if your network uses a DHCP server to configure your network devices' IP settings automatically. ❏ Choose PANEL if you can use the printer on again. When you selected AUTO as the IP address setting, continue with Web Browser. ❏ See the User's Guide for Network Printing 15 ...You must first set the IP address before using EpsonNet with step 10. 10. Press l, then d to print a network status sheet and confirm the new IP address. The LCD displays the IP address. 11. If you have changed the value of the last octet, press r. See "Printing a Network Status...

Network Guide
Page 17
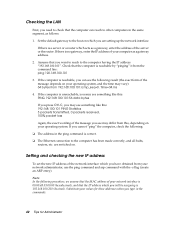
4. Select the Create a new port radio button, and then select Standard TCP/IP Port from the list. Setting Up Your System for Network Printing 17 Enter the IP address of the network interface and then click Next. Then click Next. 5.
4. Select the Create a new port radio button, and then select Standard TCP/IP Port from the list. Setting Up Your System for Network Printing 17 Enter the IP address of the network interface and then click Next. Then click Next. 5.

Network Guide
Page 20
Click Next. 20 Setting Up Your System for Network Printing Select Standard TCP/IP Port, then click the New Port button. 5. 4.
Click Next. 20 Setting Up Your System for Network Printing Select Standard TCP/IP Port, then click the New Port button. 5. 4.

Network Guide
Page 30
...on -screen instructions to restart EpsonNet Config by the administrator. Top Menu Bar Home Favorite Help About Epson Logo Links to the Epson Web site (http://www.epson.com). Links to the opening screen. Menu Information - Ethernet Displays information about Microsoft Network. SNMP ... information about TCP/IP. Time Displays information about IPP. Note: ❏ Since the new IP address becomes available after the printer is reset, you need to reset the printer. IPP Displays information about Time. 30 Network Software Note: If you press the Submit ...
...on -screen instructions to restart EpsonNet Config by the administrator. Top Menu Bar Home Favorite Help About Epson Logo Links to the Epson Web site (http://www.epson.com). Links to the opening screen. Menu Information - Ethernet Displays information about Microsoft Network. SNMP ... information about TCP/IP. Time Displays information about IPP. Note: ❏ Since the new IP address becomes available after the printer is reset, you need to reset the printer. IPP Displays information about Time. 30 Network Software Note: If you press the Submit ...

Network Guide
Page 37
.... Enter a URL (up to the default values. Click this screen when you update or change the settings on this button to 64 characters). Input the new password (up to 20 characters). Enter any comments concerning the URL above (up to 64 characters). Re-input the... new password. Descriptions Enter the name of the network interface (up to make the changes take effect. Enter the link item name (up to 20 characters) ...
.... Enter a URL (up to the default values. Click this screen when you update or change the settings on this button to 64 characters). Input the new password (up to 20 characters). Enter any comments concerning the URL above (up to 64 characters). Re-input the... new password. Descriptions Enter the name of the network interface (up to make the changes take effect. Enter the link item name (up to 20 characters) ...
Network Guide
Page 42
... an ARP entry). If there is reachable by "pinging" it from the command line: ping 192.168.100.101 3. Setting and checking the new IP address To set the new IP address of the network interface which acts as a gateway address. 2. Time=34.ms 4. Substitute your computer as a gateway, enter the address...
... an ARP entry). If there is reachable by "pinging" it from the command line: ping 192.168.100.101 3. Setting and checking the new IP address To set the new IP address of the network interface which acts as a gateway address. 2. Time=34.ms 4. Substitute your computer as a gateway, enter the address...

Network Guide
Page 43
... Follow the steps below to the network interface. Click Start, click Control Panel, and then click Uninstall a program. 2. Print a status sheet to check whether the new IP address has been assigned to uninstall the network software. Windows XP 1. If none of the IP address. Select the utility you may have incorrectly...
... Follow the steps below to the network interface. Click Start, click Control Panel, and then click Uninstall a program. 2. Print a status sheet to check whether the new IP address has been assigned to uninstall the network software. Windows XP 1. If none of the IP address. Select the utility you may have incorrectly...

Product Brochure
Page 2
64 Introducing the all-new Epson Stylus® Pro 11880 | Th
64 Introducing the all-new Epson Stylus® Pro 11880 | Th

Product Brochure
Page 4
...and toned, black-and-white prints with even higher density levels, along with Vivid Magenta Ink Technology Extreme color gamut especially within Epson - Improves overall black density for reduced nozzle clogging. And after a decade has past, we never forget our ...possible. With an even higher level of handling virtually any media type, in Epson's history. Capable of ink droplet accuracy, we've developed an all -new Epson Stylus Pro 11880. Our latest Epson Stylus Pro printers continue to represent a level of Creative Professionals who helped guide our engineering development...
...and toned, black-and-white prints with even higher density levels, along with Vivid Magenta Ink Technology Extreme color gamut especially within Epson - Improves overall black density for reduced nozzle clogging. And after a decade has past, we never forget our ...possible. With an even higher level of handling virtually any media type, in Epson's history. Capable of ink droplet accuracy, we've developed an all -new Epson Stylus Pro 11880. Our latest Epson Stylus Pro printers continue to represent a level of Creative Professionals who helped guide our engineering development...
Product Brochure
Page 5
... control, for highly accurate dot shape and placement All-new ink repelling coating for reduced nozzle clogging All-new Epson AccuPhoto HD Screening Radical screening algorithm resulting in a variety... Built-in sensor reads printed data for highly precise alignment of all color channels Aligns both single and bi-directional print modes Automatic Nozzle Verification ...Black Ink Mode Switching Printers can automatically clean the print head if required - Epson PreciseColor™ Manufacturing In order to ensure consistent printing between multiple Stylus Pro printers of large print ...
... control, for highly accurate dot shape and placement All-new ink repelling coating for reduced nozzle clogging All-new Epson AccuPhoto HD Screening Radical screening algorithm resulting in a variety... Built-in sensor reads printed data for highly precise alignment of all color channels Aligns both single and bi-directional print modes Automatic Nozzle Verification ...Black Ink Mode Switching Printers can automatically clean the print head if required - Epson PreciseColor™ Manufacturing In order to ensure consistent printing between multiple Stylus Pro printers of large print ...
Product Information Guide
Page 3
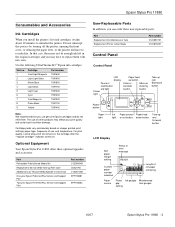
...on . Do not interrupt this process by turning off the printer, opening the front cover, or releasing the paper lever, or the printer will have to replace them . Optional Equipment Your Epson Stylus Pro 11880 offers these optional upgrades and accessories: Part Retractable Fabric-Based Media...may have to initialize the printer. Epson Stylus Pro 11880 Consumables and Accessories Ink Cartridges When you install the printer's first ink cartridges, it takes about 10 minutes to re-initialize. The use genuine Epson cartridges and do not refill them with new ones. In that you may...
...on . Do not interrupt this process by turning off the printer, opening the front cover, or releasing the paper lever, or the printer will have to replace them . Optional Equipment Your Epson Stylus Pro 11880 offers these optional upgrades and accessories: Part Retractable Fabric-Based Media...may have to initialize the printer. Epson Stylus Pro 11880 Consumables and Accessories Ink Cartridges When you install the printer's first ink cartridges, it takes about 10 minutes to re-initialize. The use genuine Epson cartridges and do not refill them with new ones. In that you may...
Product Information Guide
Page 7
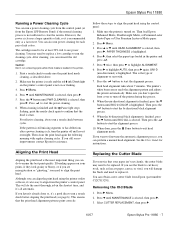
...r Menu. 4. This ensures that the head is not sufficient to ensure the best print quality. Press u or d until BI-D 2-COLOR is highlighted. Press r to fine-tune the automatic alignment process, you can do the most important thing you can perform a manual head ...MAINTENANCE is selected, then press r. You can obtain a new cutter blade from the printer's control panel. Press d until PWR CLEANING is selected, then press r. 3. Replacing the Cutter Blade If you can reinsert the old cartridge. Epson Stylus Pro 11880 Running a Power Cleaning Cycle You can run the cleaning ...
...r Menu. 4. This ensures that the head is not sufficient to ensure the best print quality. Press u or d until BI-D 2-COLOR is highlighted. Press r to fine-tune the automatic alignment process, you can do the most important thing you can perform a manual head ...MAINTENANCE is selected, then press r. You can obtain a new cutter blade from the printer's control panel. Press d until PWR CLEANING is selected, then press r. 3. Replacing the Cutter Blade If you can reinsert the old cartridge. Epson Stylus Pro 11880 Running a Power Cleaning Cycle You can run the cleaning ...

Product Information Guide
Page 8
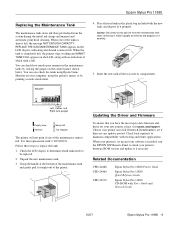
.... Make sure the spring doesn't pop out. 2. WARNING: The blade is sharp. Caution: To avoid damaging the printer, make sure you may damage the printer. 5. Insert the new cutter as shown and turn the latch to slide the carriage by hand, or you don't push the side pin ... printer or the cables around the print head. The cutter moves to the replacement position. The cutter pops out. Be careful when removing it : 1. The paper cutter holder moves to the home (far right) position. 8 - Caution: Wrap the used cutter blade and dispose of the print head. 7. Epson Stylus Pro 11880 ...
.... Make sure the spring doesn't pop out. 2. WARNING: The blade is sharp. Caution: To avoid damaging the printer, make sure you may damage the printer. 5. Insert the new cutter as shown and turn the latch to slide the carriage by hand, or you don't push the side pin ... printer or the cables around the print head. The cutter moves to the replacement position. The cutter pops out. Be careful when removing it : 1. The paper cutter holder moves to the home (far right) position. 8 - Caution: Wrap the used cutter blade and dispose of the print head. 7. Epson Stylus Pro 11880 ...
Product Information Guide
Page 9
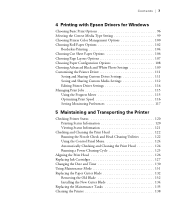
Follow these steps to -date firmware and driver for your new printer, please visit epson.com/support. Epson Stylus Pro 11880 Replacing the Maintenance Tank The maintenance tank stores ink that you have the most up and your printer's firmware ROM version and update it if necessary. Hold it upright at the bottom of the tanks is almost full...
Follow these steps to -date firmware and driver for your new printer, please visit epson.com/support. Epson Stylus Pro 11880 Replacing the Maintenance Tank The maintenance tank stores ink that you have the most up and your printer's firmware ROM version and update it if necessary. Hold it upright at the bottom of the tanks is almost full...

Quick Reference Guide
Page 9
Replacing Printer Parts (continued) 6 Hold down the side pin, as shown. 9 Hold down the side pin while turning the latch to be replaced. 7 Release the side pin ... tanks (part # C12C890191) when you see MAINT TANK FULL on the LCD, along with the new tank. 4 Insert the new tank. 10 Close the front cover. Right tank Left tank Center tank 8 Insert the new cutter blade. 2 Make sure the printer is full. 1 Check the LCD to determine which tank needs to the left.
Replacing Printer Parts (continued) 6 Hold down the side pin, as shown. 9 Hold down the side pin while turning the latch to be replaced. 7 Release the side pin ... tanks (part # C12C890191) when you see MAINT TANK FULL on the LCD, along with the new tank. 4 Insert the new tank. 10 Close the front cover. Right tank Left tank Center tank 8 Insert the new cutter blade. 2 Make sure the printer is full. 1 Check the LCD to determine which tank needs to the left.
User's Guide
Page 7
Contents | 7 4 Printing with Epson Drivers for Windows Choosing Basic Print Options 96 Selecting the Correct Media Type Setting 99 Choosing Printer Color Management Options 100 Choosing Roll Paper Options 102 ... Progress Meter 115 Optimizing Print Speed 116 Setting Monitoring Preferences 117 5 Maintaining and Transporting the Printer Checking Printer Status 120 Printing Status Information 120 Viewing Status Information 121 Checking and Cleaning the Print Head ... 132 Removing the Old Blade 132 Installing the New Cutter Blade 134 Replacing the Maintenance Tanks 135 Cleaning the...
Contents | 7 4 Printing with Epson Drivers for Windows Choosing Basic Print Options 96 Selecting the Correct Media Type Setting 99 Choosing Printer Color Management Options 100 Choosing Roll Paper Options 102 ... Progress Meter 115 Optimizing Print Speed 116 Setting Monitoring Preferences 117 5 Maintaining and Transporting the Printer Checking Printer Status 120 Printing Status Information 120 Viewing Status Information 121 Checking and Cleaning the Print Head ... 132 Removing the Old Blade 132 Installing the New Cutter Blade 134 Replacing the Maintenance Tanks 135 Cleaning the...

User's Guide
Page 44
... the control panel, check the instructions included with different settings to experiment with the paper, or look on the printer's control panel. 1. If you are using non-Epson paper, consult the manufacturer for the media you're using. You may have to determine which one is best .... SemiG. SemiG. (250) Prem. Selecting the Paper Type Whenever you load a new type of paper, you are using as listed below, then press the button to select the paper type on the Epson website (www.proimaging.epson.com). Select the paper that you need to save the setting. 5. SemiG. (170...
... the control panel, check the instructions included with different settings to experiment with the paper, or look on the printer's control panel. 1. If you are using non-Epson paper, consult the manufacturer for the media you're using. You may have to determine which one is best .... SemiG. SemiG. (250) Prem. Selecting the Paper Type Whenever you load a new type of paper, you are using as listed below, then press the button to select the paper type on the Epson website (www.proimaging.epson.com). Select the paper that you need to save the setting. 5. SemiG. (170...

User's Guide
Page 76
This selection is recommended for printing. 8. Select your new paper size from the Paper Size menu. (If you are printing on roll paper, choose Manage Custom Sizes from the Paper Size drop-down menu. 7. ... margins. Borderless (Auto Expand) prints without borders on roll paper with the standard printable area. 4. Borderless Banner prints a series of the paper. 76 | Printing with Epson Drivers for more information. • Roll Paper - If you are printing on a cut sheet, skip to step 7.) Click to 0.56 inch or less. See page...
This selection is recommended for printing. 8. Select your new paper size from the Paper Size menu. (If you are printing on roll paper, choose Manage Custom Sizes from the Paper Size drop-down menu. 7. ... margins. Borderless (Auto Expand) prints without borders on roll paper with the standard printable area. 4. Borderless Banner prints a series of the paper. 76 | Printing with Epson Drivers for more information. • Roll Paper - If you are printing on a cut sheet, skip to step 7.) Click to 0.56 inch or less. See page...

User's Guide
Page 132
...cutter blade may damage the printer. If you may need to replace it . • To return all control panel settings to their default values, press d to select DEFAULT PANEL, then press r to display EXEC. Press r Menu. 2. You can obtain a new cutter blade from Epson (part number C12C815291). ... stock, you want, then press to restore the default settings. • The CUSTOM setting is for instructions. 132 | Maintaining and Transporting the Printer • To run a super strong cleaning cycle, press d to select SS CLEANING, then press r to the replacement position. 5-132 Press to...
...cutter blade may damage the printer. If you may need to replace it . • To return all control panel settings to their default values, press d to select DEFAULT PANEL, then press r to display EXEC. Press r Menu. 2. You can obtain a new cutter blade from Epson (part number C12C815291). ... stock, you want, then press to restore the default settings. • The CUSTOM setting is for instructions. 132 | Maintaining and Transporting the Printer • To run a super strong cleaning cycle, press d to select SS CLEANING, then press r to the replacement position. 5-132 Press to...


