
Quick Install Guide
Page 6
Click "Install ActiveX Control..." to see the video images captured by running EdiView), and enter "admin" in the username field, and "1234" in the password field to log in the CD. 5 Configuring the Web-Based Management Interface 3. You should now be able to continue. 5. Once you are logged in, the browser will prompt you to the user manual included in . 4. For advanced settings, please refer to install ActiveX. Launch IE and type the IP address of the camera (found by your new Edimax network camera.
Click "Install ActiveX Control..." to see the video images captured by running EdiView), and enter "admin" in the username field, and "1234" in the password field to log in the CD. 5 Configuring the Web-Based Management Interface 3. You should now be able to continue. 5. Once you are logged in, the browser will prompt you to the user manual included in . 4. For advanced settings, please refer to install ActiveX. Launch IE and type the IP address of the camera (found by your new Edimax network camera.
Quick Install Guide
Page 7
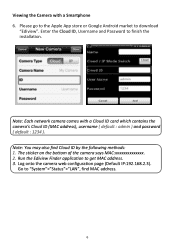
...You may also find MAC address. 6 Viewing the Camera with a Cloud ID card which contains the camera's Cloud ID (MAC address), username ( default : admin ) and password ( default : 1234 ). Log onto the camera web configuration page (Default IP:192.168.2.3). Enter the Cloud ID, Username and ...Password to get MAC address. 3. Run the Ediview Finder application to finish the installation. Note: Each network camera comes with a Smartphone 6. Please go to the...
...You may also find MAC address. 6 Viewing the Camera with a Cloud ID card which contains the camera's Cloud ID (MAC address), username ( default : admin ) and password ( default : 1234 ). Log onto the camera web configuration page (Default IP:192.168.2.3). Enter the Cloud ID, Username and ...Password to get MAC address. 3. Run the Ediview Finder application to finish the installation. Note: Each network camera comes with a Smartphone 6. Please go to the...
Manual
Page 3
... Contents 4 1.2 Basic Introduction 5 1.3 Product Highlights 6 1.4 Key Components 7 1.5 Descriptions for LED Indicators 11 1.6 Camera Installation 12 1.7 Locate the IP Address of this Network Camera 13 1.8 Using the Camera Admin Software to Locate the Camera 17 2.1 Camera Settings 29 2.1.1 MJPEG 34 2.1.2 MPEG4 35 2.1.3 H.264 36 2.1.4 OSD...37 2.2.1 LAN...39 2.2.2 WLAN 42 2.2.3 Dynamic DNS 45 2.2.4 UPnP 46 2.2.5 LoginFree 48...
... Contents 4 1.2 Basic Introduction 5 1.3 Product Highlights 6 1.4 Key Components 7 1.5 Descriptions for LED Indicators 11 1.6 Camera Installation 12 1.7 Locate the IP Address of this Network Camera 13 1.8 Using the Camera Admin Software to Locate the Camera 17 2.1 Camera Settings 29 2.1.1 MJPEG 34 2.1.2 MPEG4 35 2.1.3 H.264 36 2.1.4 OSD...37 2.2.1 LAN...39 2.2.2 WLAN 42 2.2.3 Dynamic DNS 45 2.2.4 UPnP 46 2.2.5 LoginFree 48...

Manual
Page 4
3-3-1 Configure cameras 81 3-3-2 General Settings 90 3-4 Change Display Layout 96 3-5 Full-screen mode 99 3-6 Scan...100 3-7 Zoom-in / Zoom-out 101 3-8 PTZ ...102 3-9 Snapshot...103 3-10 Recording 104 3-11 Video Playback 105 Chapter IV: How to Access the Network Camera Remotely with iPhone & Android Phones 106 4.1 iPhone App Installation 109 4.2 Android App installation 120 4.3 Web browser installation 135 Chapter V: Appendix 140 5.1 Specifications 140 5.2 How to apply for a free DNS account at http://www.no-ip.com .........141 5.3 Troubleshooting 143 3
3-3-1 Configure cameras 81 3-3-2 General Settings 90 3-4 Change Display Layout 96 3-5 Full-screen mode 99 3-6 Scan...100 3-7 Zoom-in / Zoom-out 101 3-8 PTZ ...102 3-9 Snapshot...103 3-10 Recording 104 3-11 Video Playback 105 Chapter IV: How to Access the Network Camera Remotely with iPhone & Android Phones 106 4.1 iPhone App Installation 109 4.2 Android App installation 120 4.3 Web browser installation 135 Chapter V: Appendix 140 5.1 Specifications 140 5.2 How to apply for a free DNS account at http://www.no-ip.com .........141 5.3 Troubleshooting 143 3
Manual
Page 7
... view images captured by every camera at the same time. MPEG4 XGA (1024 x 768), VGA (640 x 480), and QVGA (320 x 240). Wireless data encryption (WEP / WPA) Supports DHCP and PPPoE protocol, you can also assign a fixed IP address to 16 users, and you with every captured picture .../ video clip (also supports auto time synchronization via network time protocol). Built-in real-time clock, date and time information will discover this Network Camera in network neighbor automatically. 1.3 Product ...
... view images captured by every camera at the same time. MPEG4 XGA (1024 x 768), VGA (640 x 480), and QVGA (320 x 240). Wireless data encryption (WEP / WPA) Supports DHCP and PPPoE protocol, you can also assign a fixed IP address to 16 users, and you with every captured picture .../ video clip (also supports auto time synchronization via network time protocol). Built-in real-time clock, date and time information will discover this Network Camera in network neighbor automatically. 1.3 Product ...

Manual
Page 10
Bottom View Ethernet Connector Reset to Default /WPS Power Connector Microphone Audio Connector WPS: click the button on IP Cam and click it on the AP you want to connect wireless connection.(works on wired model with USB wifi dongle plugged or wireless model) ...Reset to Default Button: Press and hold for more than 10 seconds to reset the camera settings to external speaker for audio output Microphone: Built-in microphone for voice pick-up 9 Power Connector: Connects to 12V DC power adapter Ethernet Connector...
Bottom View Ethernet Connector Reset to Default /WPS Power Connector Microphone Audio Connector WPS: click the button on IP Cam and click it on the AP you want to connect wireless connection.(works on wired model with USB wifi dongle plugged or wireless model) ...Reset to Default Button: Press and hold for more than 10 seconds to reset the camera settings to external speaker for audio output Microphone: Built-in microphone for voice pick-up 9 Power Connector: Connects to 12V DC power adapter Ethernet Connector...
Manual
Page 14
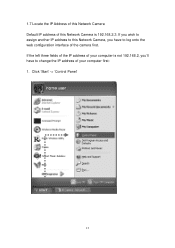
Click 'Start' -> 'Control Panel' 13 1.7 Locate the IP Address of this Network Camera Default IP address of this Network Camera, you 'll have to change the IP address of your computer is 192.168.2.3. If you wish to assign another IP address to this Network Camera is not 192.168.2, you have to log onto the web configuration interface of your computer first: 1. If the left three fields of the IP address of the camera first.
Click 'Start' -> 'Control Panel' 13 1.7 Locate the IP Address of this Network Camera Default IP address of this Network Camera, you 'll have to change the IP address of your computer is 192.168.2.3. If you wish to assign another IP address to this Network Camera is not 192.168.2, you have to log onto the web configuration interface of your computer first: 1. If the left three fields of the IP address of the camera first.
Manual
Page 17
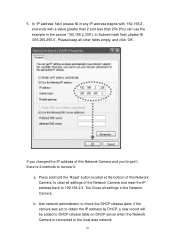
... it : a. Please keep all settings in the picture '192.168.2.339'). Press and hold the 'Reset' button located at the bottom of the Network Camera and reset the IP address back to recover it , there're 2 methods to 192.168.2.3. You'll lose all other fields empty, and click 'OK'. In Subnet... ends with a value greater than 2 and less than 254 (You can use the example in the Network Camera. Ask network administrator to check the DHCP release table, if the camera was set to obtain the IP address by DHCP, a new record will be added to DHCP release table on DHCP server when the...
... it : a. Please keep all settings in the picture '192.168.2.339'). Press and hold the 'Reset' button located at the bottom of the Network Camera and reset the IP address back to recover it , there're 2 methods to 192.168.2.3. You'll lose all other fields empty, and click 'OK'. In Subnet... ends with a value greater than 2 and less than 254 (You can use the example in the Network Camera. Ask network administrator to check the DHCP release table, if the camera was set to obtain the IP address by DHCP, a new record will be added to DHCP release table on DHCP server when the...
Manual
Page 19
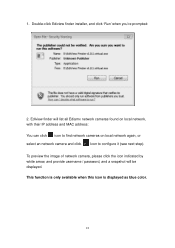
To preview the image of network camera, please click the icon indicated by white arrow, and provide username / password, and a snapshot will list all Ediamx network cameras found on local network, with their IP address and MAC address: You can click icon to find network cameras on local network again, or select an network camera and click Icon to configure it (see next step). Ediview finder will be displayed. This function is only available when this icon is displayed as blue color. 18 1. Double-click Ediview finder installer, and click 'Run' when you're prompted: 2.
To preview the image of network camera, please click the icon indicated by white arrow, and provide username / password, and a snapshot will list all Ediamx network cameras found on local network, with their IP address and MAC address: You can click icon to find network cameras on local network again, or select an network camera and click Icon to configure it (see next step). Ediview finder will be displayed. This function is only available when this icon is displayed as blue color. 18 1. Double-click Ediview finder installer, and click 'Run' when you're prompted: 2.
Manual
Page 24
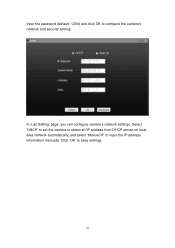
Click 'OK' to input the IP address information manually. Select 'DHCP' to set the camera to obtain an IP address from DHCP server on local area network automatically, and select 'Manual IP' to save settings. 23 Input the password (default: 1234) and click OK to configure the camera's network and security setting: In 'Lan Setting' page, you can configure camera's network settings.
Click 'OK' to input the IP address information manually. Select 'DHCP' to set the camera to obtain an IP address from DHCP server on local area network automatically, and select 'Manual IP' to save settings. 23 Input the password (default: 1234) and click OK to configure the camera's network and security setting: In 'Lan Setting' page, you can configure camera's network settings.
Manual
Page 25
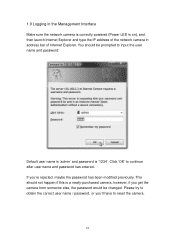
... be prompted to input the user name and password: Default user name is 'admin' and password is '1234'. Click 'OK' to reset the camera. 24 This should be changed. If you're rejected, maybe the password has been modified previously. 1.9 Logging in address bar of Internet Explorer.... not happen if this is on), and then launch Internet Explorer and type the IP address of the network camera in the Management Interface Make sure the network camera is correctly powered (Power LED is a newly-purchased camera, however, if you 'll have to continue after user name and password has entered...
... be prompted to input the user name and password: Default user name is 'admin' and password is '1234'. Click 'OK' to reset the camera. 24 This should be changed. If you're rejected, maybe the password has been modified previously. 1.9 Logging in address bar of Internet Explorer.... not happen if this is on), and then launch Internet Explorer and type the IP address of the network camera in the Management Interface Make sure the network camera is correctly powered (Power LED is a newly-purchased camera, however, if you 'll have to continue after user name and password has entered...

Manual
Page 41
.... Default value should input here. Input the PPPoE username assigned by your ISP here. Specify the IP address of web management interface here. Web Port This field is unreachable, Network Camera will be grayed out. Specify the port number of backup DNS server here. Input the MTU (Maximum... MTU For example, if the HTTP port number you specified here is 90 and the IP address of Network Camera is selected, IP address parameters below : Item Network Type Description This camera can obtain the IP address from DHCP server automatically (if you have to input 'http://10.20.20.30...
.... Default value should input here. Input the PPPoE username assigned by your ISP here. Specify the IP address of web management interface here. Web Port This field is unreachable, Network Camera will be grayed out. Specify the port number of backup DNS server here. Input the MTU (Maximum... MTU For example, if the HTTP port number you specified here is 90 and the IP address of Network Camera is selected, IP address parameters below : Item Network Type Description This camera can obtain the IP address from DHCP server automatically (if you have to input 'http://10.20.20.30...
Manual
Page 46
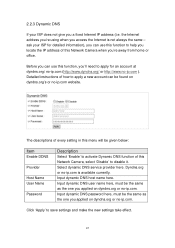
...away from home or office. Input dynamic DNS host name here. ask your ISP does not give you can use this Network Camera when you applied on dyndns.org or no-ip.com. The descriptions of every setting in this function to help you applied on dyndns.org's or no....org/ or http://www.no-ip.com ). Click 'Apply' to apply a new account can be given below: Item Enable DDNS Provider Host Name User Name Password Description Select 'Enable' to activate Dynamic DNS function of this Network Camera, select 'Disable' to apply for detailed information), you a fixed Internet IP address (i.e.
...away from home or office. Input dynamic DNS host name here. ask your ISP does not give you can use this Network Camera when you applied on dyndns.org or no-ip.com. The descriptions of every setting in this function to help you applied on dyndns.org's or no....org/ or http://www.no-ip.com ). Click 'Apply' to apply a new account can be given below: Item Enable DDNS Provider Host Name User Name Password Description Select 'Enable' to activate Dynamic DNS function of this Network Camera, select 'Disable' to apply for detailed information), you a fixed Internet IP address (i.e.
Manual
Page 47
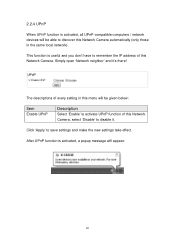
This function is useful and you don't have to remember the IP address of this Network Camera, select 'Disable' to disable it 's there! The descriptions of every setting in the same local network). Simply open 'Network neighbor' and it . Click 'Apply' ...make the new settings take effect. 2.2.4 UPnP When UPnP function is activated, all UPnP-compatible computers / network devices will be able to discover this Network Camera automatically (only those in this menu will appear: 46 After UPnP function is activated, a popup message will be given below: Item Enable UPnP Description ...
This function is useful and you don't have to remember the IP address of this Network Camera, select 'Disable' to disable it 's there! The descriptions of every setting in the same local network). Simply open 'Network neighbor' and it . Click 'Apply' ...make the new settings take effect. 2.2.4 UPnP When UPnP function is activated, all UPnP-compatible computers / network devices will be able to discover this Network Camera automatically (only those in this menu will appear: 46 After UPnP function is activated, a popup message will be given below: Item Enable UPnP Description ...
Manual
Page 49
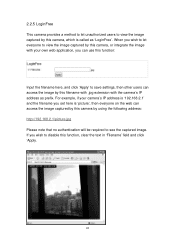
...to view the image captured by this filename with .jpg extension with your own web application, you can use this camera, or integrate the image with the camera's IP address as 'LoginFree'. 2.2.5 LoginFree This camera provides a method to let unauthorized users to disable this function, clear the text in 'Filename' field and click ...'Apply. 48 When you set here is called as prefix. For example, if your camera's IP address is '192.168.2.1' and the filename you wish to let everyone on the web can access the image captured by this...
...to view the image captured by this filename with .jpg extension with your own web application, you can use this camera, or integrate the image with the camera's IP address as 'LoginFree'. 2.2.5 LoginFree This camera provides a method to let unauthorized users to disable this function, clear the text in 'Filename' field and click ...'Apply. 48 When you set here is called as prefix. For example, if your camera's IP address is '192.168.2.1' and the filename you wish to let everyone on the web can access the image captured by this...

Manual
Page 53
... function. Select 'Enable' to save file to a network folder which supports SAMBA (also known as 'Windows Network Neighborhood'), select 'Disable' to disable this camera to record image when a motion is detected, select' Disable' to disable this function. Input password of saved file in Mbytes. Input the... IP address or host name of saved file in specified folder, select 'Anonymous'; Available options are not required to write files in Mbytes. You ...
... function. Select 'Enable' to save file to a network folder which supports SAMBA (also known as 'Windows Network Neighborhood'), select 'Disable' to disable this camera to record image when a motion is detected, select' Disable' to disable this function. Input password of saved file in Mbytes. Input the... IP address or host name of saved file in specified folder, select 'Anonymous'; Available options are not required to write files in Mbytes. You ...

Manual
Page 56
...descriptions of the SMTP server (the server that delivers the Email for you don't know, please refer to identify the Email sent by this camera from unknown sender, it's recommended to be given below: Item Recipient E-Mail Address E-Mail Subject SMTP Server Description Input the email recipient's... Email address here. SMTP Authentication NOTE: Some mail server would reject to deliver the Email from others quickly. Input the IP address or host name of every setting in your Email software (like Outlook, Outlook Express etc.), or ask your SMTP 55 Sender E-...
...descriptions of the SMTP server (the server that delivers the Email for you don't know, please refer to identify the Email sent by this camera from unknown sender, it's recommended to be given below: Item Recipient E-Mail Address E-Mail Subject SMTP Server Description Input the email recipient's... Email address here. SMTP Authentication NOTE: Some mail server would reject to deliver the Email from others quickly. Input the IP address or host name of every setting in your Email software (like Outlook, Outlook Express etc.), or ask your SMTP 55 Sender E-...
Manual
Page 63
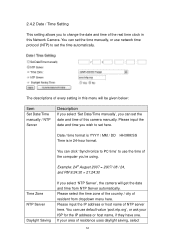
.... 2.4.2 Date / Time Setting This setting allows you to change the date and time of the real time clock in this camera manually. Please input the date and time you 're using. Example: 24th August 2007 = 2007/ 08 / 24, and... PM 9:24:30 = 21:24:30 Time Zone NTP Server Daylight Saving If you select 'NTP Server', the camera will be given below: Item Set Date/Time manually / NTP Server Description If you select 'Set Date/Time manually', you... the computer you wish to set the time automatically. Please input the IP address or host name of NTP server here. If your ISP for the...
.... 2.4.2 Date / Time Setting This setting allows you to change the date and time of the real time clock in this camera manually. Please input the date and time you 're using. Example: 24th August 2007 = 2007/ 08 / 24, and... PM 9:24:30 = 21:24:30 Time Zone NTP Server Daylight Saving If you select 'NTP Server', the camera will be given below: Item Set Date/Time manually / NTP Server Description If you select 'Set Date/Time manually', you... the computer you wish to set the time automatically. Please input the IP address or host name of NTP server here. If your ISP for the...

Manual
Page 66
You'll need to default value '192.168.2.3' also. PLEASE NOTE THAT THE IP ADDRESS OF THE CAMERA WILL RESET TO DEFAULT VALUE: 192.168.2.3 Clear all settings. Please think again before you do this, and then click this menu will be given ... pick a firmware file located on /off. Reset to Factory Defaults The Network Camera will be prompted to the Network Camera later. DO NOT DISCONNECT NOW! NOTE: IP address will reboot after the upgrade procedure is invalid of every setting in the camera. The descriptions of you didn't provide the firmware file, you can upload...
You'll need to default value '192.168.2.3' also. PLEASE NOTE THAT THE IP ADDRESS OF THE CAMERA WILL RESET TO DEFAULT VALUE: 192.168.2.3 Clear all settings. Please think again before you do this, and then click this menu will be given ... pick a firmware file located on /off. Reset to Factory Defaults The Network Camera will be prompted to the Network Camera later. DO NOT DISCONNECT NOW! NOTE: IP address will reboot after the upgrade procedure is invalid of every setting in the camera. The descriptions of you didn't provide the firmware file, you can upload...

Manual
Page 113
... the user name of network camera. IP: Input network camera's IP address or host name. Default user name is 'admin' Password: Input the password of network camera. (7) In this page, you can define a name for this network camera to help you to remember the purpose / location of this network camera. Port: Input network camera's port number, generally it...
... the user name of network camera. IP: Input network camera's IP address or host name. Default user name is 'admin' Password: Input the password of network camera. (7) In this page, you can define a name for this network camera to help you to remember the purpose / location of this network camera. Port: Input network camera's port number, generally it...
