Datasheet
Page 1
... Edimax router provide connection speeds of up your part and no configuration is a smart feature that complies with a few clicks. Gigabit Ethernet The gigabit Ethernet ports on this router to broaden its smart iQ Setup feature helps you to change without notice. iQ Setup iQ Setup is required on network conditions and environmental factors. Its simple and intuitive user interface allows you get this router is Edimax's answer to the need to manage Internet bandwidth...
... Edimax router provide connection speeds of up your part and no configuration is a smart feature that complies with a few clicks. Gigabit Ethernet The gigabit Ethernet ports on this router to broaden its smart iQ Setup feature helps you to change without notice. iQ Setup iQ Setup is required on network conditions and environmental factors. Its simple and intuitive user interface allows you get this router is Edimax's answer to the need to manage Internet bandwidth...
Datasheet
Page 2
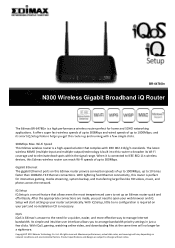
... (IPsec/PPTP) Schedule control 1 x RJ‐45 Gigabit WAN port 4 x RJ‐45 Gigabit LAN port Power, Wi‐Fi, WAN, LNK/ACT LED indicators 2 x 3dBi detachable antenna WPS/Reset button Wireless on network conditions and environmental factors. All rights reserved. Product specifications and design are subject to enable/disable wireless signal • Features iQ Setup for smart and automated Internet connection • Supports WMM, WEP, WPA, WPA2, DDNS, QoS, IP/MAC filter, DMZ, and virtual server Functions Hardware Management Supports AP...
... (IPsec/PPTP) Schedule control 1 x RJ‐45 Gigabit WAN port 4 x RJ‐45 Gigabit LAN port Power, Wi‐Fi, WAN, LNK/ACT LED indicators 2 x 3dBi detachable antenna WPS/Reset button Wireless on network conditions and environmental factors. All rights reserved. Product specifications and design are subject to enable/disable wireless signal • Features iQ Setup for smart and automated Internet connection • Supports WMM, WEP, WPA, WPA2, DDNS, QoS, IP/MAC filter, DMZ, and virtual server Functions Hardware Management Supports AP...
Quick Install Guide
Page 3
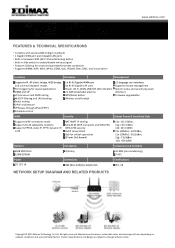
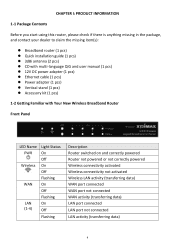
...z Quick installation guide (1 pcs) z 3dBi antenna (2 pcs) z CD with multi‐language QIG and user manual (1 pcs) z 12V DC power adapter (1 pcs) z Ethernet cable (1 pcs) z Power adapter (1 pcs) z Vertical stand (1 pcs) z Accessory kit (1 pcs) Front Panel LED Name PWR Wireless WAN LAN (1‐4) Light Status On Off On Off Flashing On Off Flashing On Off Flashing Description Router switched on and correctly powered Router not powered or not correctly powered Wireless connectivity activated Wireless connectivity not activated Wireless LAN activity (transferring data) WAN port connected WAN...
...z Quick installation guide (1 pcs) z 3dBi antenna (2 pcs) z CD with multi‐language QIG and user manual (1 pcs) z 12V DC power adapter (1 pcs) z Ethernet cable (1 pcs) z Power adapter (1 pcs) z Vertical stand (1 pcs) z Accessory kit (1 pcs) Front Panel LED Name PWR Wireless WAN LAN (1‐4) Light Status On Off On Off Flashing On Off Flashing On Off Flashing Description Router switched on and correctly powered Router not powered or not correctly powered Wireless connectivity activated Wireless connectivity not activated Wireless LAN activity (transferring data) WAN port connected WAN...
Quick Install Guide
Page 4
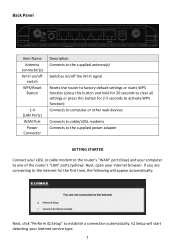
.../Reset Button 1‐4 (LAN Ports) WAN Port Power Connector Description Connects to the supplied antenna(s) Switches on/off the Wi‐Fi signal Resets the router to factory default settings or starts WPS function (press this button and hold for 20 seconds to clear all settings or press this button for 2‐5 seconds to activate WPS function) Connects to computer or other web devices Connects to cable/xDSL modems Connects to the supplied power adapter GETTING STARTED Connect your xDSL or cable modem to the router's "WAN" port...
.../Reset Button 1‐4 (LAN Ports) WAN Port Power Connector Description Connects to the supplied antenna(s) Switches on/off the Wi‐Fi signal Resets the router to factory default settings or starts WPS function (press this button and hold for 20 seconds to clear all settings or press this button for 2‐5 seconds to activate WPS function) Connects to computer or other web devices Connects to cable/xDSL modems Connects to the supplied power adapter GETTING STARTED Connect your xDSL or cable modem to the router's "WAN" port...
Quick Install Guide
Page 5
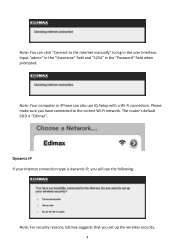
Note: You can also use iQ Setup with a Wi‐Fi connection. Dynamic IP If your Internet connection type is "Edimax". The router's default SSID is dynamic IP, you will see the following: Note: For security reasons, Edimax suggests that you have connected to log in the "Password" field when prompted. Input "admin" in the "Username" field and "1234" in the user interface. Note: Your computer or iPhone can click "Connect to the Internet manually" to the correct Wi‐Fi network. Please make sure you set up the wireless security. 4
Note: You can also use iQ Setup with a Wi‐Fi connection. Dynamic IP If your Internet connection type is "Edimax". The router's default SSID is dynamic IP, you will see the following: Note: For security reasons, Edimax suggests that you have connected to log in the "Password" field when prompted. Input "admin" in the "Username" field and "1234" in the user interface. Note: Your computer or iPhone can click "Connect to the Internet manually" to the correct Wi‐Fi network. Please make sure you set up the wireless security. 4
Quick Install Guide
Page 8
... set forth for an uncontrolled environment. Federal Communications Commission (FCC) Radiation Exposure Statement This equipment complies with Part 15 of the FCC Rules. This transmitter is designed with the specific antenna tested in the application for certification. Safety This equipment is restricted for use with the utmost care for the safety of those who install and use...
... set forth for an uncontrolled environment. Federal Communications Commission (FCC) Radiation Exposure Statement This equipment complies with Part 15 of the FCC Rules. This transmitter is designed with the specific antenna tested in the application for certification. Safety This equipment is restricted for use with the utmost care for the safety of those who install and use...
Manual
Page 3
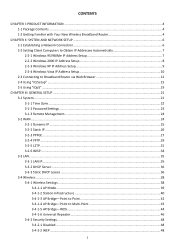
...;2 Windows 2000 IP Address Setup 8 2‐2‐3 Windows XP IP Address Setup 9 2‐2‐4 Windows Vista IP Address Setup 10 2‐3 Connecting to Broadband Router via Web Browser 12 2‐4 Using "iQ Setup" ...15 2‐5 Using "iQoS" ...19 CHAPTER III: GENERAL SETUP ...21 3‐1 System...21 3‐1‐1 Time Zone ...22 3‐1‐2 Password Settings...23 3‐1‐3 Remote Management...24 3‐2 WAN...24 3‐2‐1 Dynamic IP ...25 3‐2‐2 Static IP...
...;2 Windows 2000 IP Address Setup 8 2‐2‐3 Windows XP IP Address Setup 9 2‐2‐4 Windows Vista IP Address Setup 10 2‐3 Connecting to Broadband Router via Web Browser 12 2‐4 Using "iQ Setup" ...15 2‐5 Using "iQoS" ...19 CHAPTER III: GENERAL SETUP ...21 3‐1 System...21 3‐1‐1 Time Zone ...22 3‐1‐2 Password Settings...23 3‐1‐3 Remote Management...24 3‐2 WAN...24 3‐2‐1 Dynamic IP ...25 3‐2‐2 Static IP...

Manual
Page 4
...;3 MAC Address Filtering ...51 3‐4‐4 WPS (Wi‐Fi Protected Setup) Settings 52 3‐5 Advanced Settings ...53 3‐5‐1 QoS ...54 3‐5‐2 DDNS...56 3‐5‐3 Port Forwarding...58 3‐5‐4 DMZ ...59 3‐6 NAT ...60 3‐6‐1 Virtual Server ...60 3‐6‐2 Special Applications ...62 3‐6‐3 UPnP Settings ...63 3‐6‐4 ALG Settings...63 3‐6‐5 Static Routing...64 3‐7 Firewall...65 3‐7‐1 Access Control...
...;3 MAC Address Filtering ...51 3‐4‐4 WPS (Wi‐Fi Protected Setup) Settings 52 3‐5 Advanced Settings ...53 3‐5‐1 QoS ...54 3‐5‐2 DDNS...56 3‐5‐3 Port Forwarding...58 3‐5‐4 DMZ ...59 3‐6 NAT ...60 3‐6‐1 Virtual Server ...60 3‐6‐2 Special Applications ...62 3‐6‐3 UPnP Settings ...63 3‐6‐4 ALG Settings...63 3‐6‐5 Static Routing...64 3‐7 Firewall...65 3‐7‐1 Access Control...
Manual
Page 5
...) z Quick installation guide (1 pcs) z 3dBi antenna (2 pcs) z CD with multi‐language QIG and user manual (1 pcs) z 12V DC power adapter (1 pcs) z Ethernet cable (1 pcs) z Power adapter (1 pcs) z Vertical stand (1 pcs) z Accessory kit (1 pcs) 1‐2 Getting Familiar with Your New Wireless Broadband Router Front Panel LED Name PWR Wireless WAN LAN (1‐4) Light Status On Off On Off Flashing On Off Flashing On Off Flashing Description Router switched on and correctly powered Router not powered or not correctly powered Wireless connectivity activated Wireless connectivity not...
...) z Quick installation guide (1 pcs) z 3dBi antenna (2 pcs) z CD with multi‐language QIG and user manual (1 pcs) z 12V DC power adapter (1 pcs) z Ethernet cable (1 pcs) z Power adapter (1 pcs) z Vertical stand (1 pcs) z Accessory kit (1 pcs) 1‐2 Getting Familiar with Your New Wireless Broadband Router Front Panel LED Name PWR Wireless WAN LAN (1‐4) Light Status On Off On Off Flashing On Off Flashing On Off Flashing Description Router switched on and correctly powered Router not powered or not correctly powered Wireless connectivity activated Wireless connectivity not...
Manual
Page 6
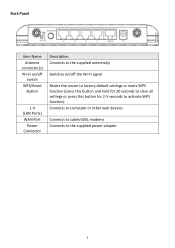
Back Panel Item Name Antenna connector(s) Wi‐Fi on/off switch WPS/Reset Button 1‐4 (LAN Ports) WAN Port Power Connector Description Connects to the supplied antenna(s) Switches on/off the Wi‐Fi signal Resets the router to factory default settings or starts WPS function (press this button and hold for 20 seconds to clear all settings or press this button for 2‐5 seconds to activate WPS function) Connects to computer or other web devices Connects to cable/xDSL modems Connects to the supplied power adapter 5
Back Panel Item Name Antenna connector(s) Wi‐Fi on/off switch WPS/Reset Button 1‐4 (LAN Ports) WAN Port Power Connector Description Connects to the supplied antenna(s) Switches on/off the Wi‐Fi signal Resets the router to factory default settings or starts WPS function (press this button and hold for 20 seconds to clear all settings or press this button for 2‐5 seconds to activate WPS function) Connects to computer or other web devices Connects to cable/xDSL modems Connects to the supplied power adapter 5
Manual
Page 7
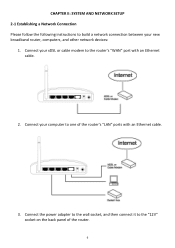
Connect your new broadband router, computers, and other network devices: 1. Connect the power adapter to the wall socket, and then connect it to the router's "WAN" port with an Ethernet cable. 3. CHAPTER II: SYSTEM AND NETWORK SETUP 2‐1 Establishing a Network Connection Please follow the following instructions to one of the router. 6 Connect your computer to build a network connection between your xDSL or cable modem to the "12V" socket on the back panel of the router's "LAN" ports with an Ethernet cable. 2.
Connect your new broadband router, computers, and other network devices: 1. Connect the power adapter to the wall socket, and then connect it to the router's "WAN" port with an Ethernet cable. 3. CHAPTER II: SYSTEM AND NETWORK SETUP 2‐1 Establishing a Network Connection Please follow the following instructions to one of the router. 6 Connect your computer to build a network connection between your xDSL or cable modem to the "12V" socket on the back panel of the router's "LAN" ports with an Ethernet cable. 2.
Manual
Page 14
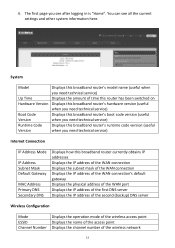
...address of the WAN connection's default gateway Displays the physical address of the WAN port Displays the IP address of the first DNS server Displays the IP address of the second (backup) DNS server Wireless Configuration Mode Displays the operation mode of the wireless access point ESSID Displays the name of the access point Channel Number Displays the channel number of time this router has been switched on Hardware Version Displays this broadband router's hardware version (useful when you need technical service) Boot Code Displays this broadband router's boot code version (useful...
...address of the WAN connection's default gateway Displays the physical address of the WAN port Displays the IP address of the first DNS server Displays the IP address of the second (backup) DNS server Wireless Configuration Mode Displays the operation mode of the wireless access point ESSID Displays the name of the access point Channel Number Displays the channel number of time this router has been switched on Hardware Version Displays this broadband router's hardware version (useful when you need technical service) Boot Code Displays this broadband router's boot code version (useful...
Manual
Page 16
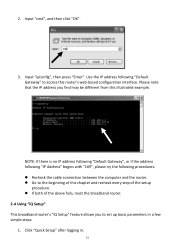
... the following "Default Gateway" to access this illustrated example. Please note that the IP address you to the beginning of this chapter and recheck every step of the above fails, reset the broadband router. 2‐4 Using "iQ Setup" This broadband router's "iQ Setup" feature allows you find may be different from this router's web‐based configuration interface. Use the IP address following procedures: z Recheck the cable connection between the...
... the following "Default Gateway" to access this illustrated example. Please note that the IP address you to the beginning of this chapter and recheck every step of the above fails, reset the broadband router. 2‐4 Using "iQ Setup" This broadband router's "iQ Setup" feature allows you find may be different from this router's web‐based configuration interface. Use the IP address following procedures: z Recheck the cable connection between the...
Manual
Page 23
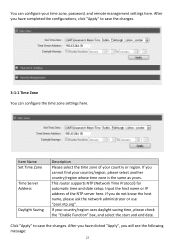
This router supports NTP (Network Time Protocol) for automatic time and date setup. After you have clicked "Apply", you cannot find your time zone, password, and remote management settings here. If you will see the following message: 22 After you do not know the host name, please ask the network administrator or use "pool.ntp.org". If you have completed the configurations, click "Apply" to save the changes. 3‐...
This router supports NTP (Network Time Protocol) for automatic time and date setup. After you have clicked "Apply", you cannot find your time zone, password, and remote management settings here. If you will see the following message: 22 After you do not know the host name, please ask the network administrator or use "pool.ntp.org". If you have completed the configurations, click "Apply" to save the changes. 3‐...
Manual
Page 24
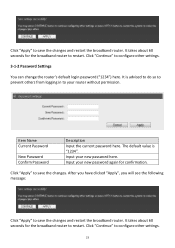
... router to configure other settings. 3‐1‐2 Password Settings You can change the router's default login password ("1234") here. Click "Continue" to restart. Click "Apply" to restart. Input your new password here. The default value is advised to do so to prevent others from logging in to configure other settings. 23 Input your new password again for the broadband router to save the changes. Click "Continue" to your router...
... router to configure other settings. 3‐1‐2 Password Settings You can change the router's default login password ("1234") here. Click "Continue" to restart. Click "Apply" to restart. Input your new password here. The default value is advised to do so to prevent others from logging in to configure other settings. 23 Input your new password again for the broadband router to save the changes. Click "Continue" to your router...
Manual
Page 32
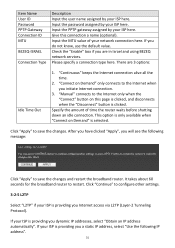
..., use the default value. Item Name User ID Password PPTP Gateway Connection ID MTU BEZEQ‐ISRAEL Connection Type Description Input the user name assigned by your ISP here. Give this page is clicked, and disconnects when the "Disconnect" button is providing you a static IP address, select "Use the following message: Click "Apply" to the Internet only when the "Connect" button on Demand" only connects to configure other settings. 3‐...
..., use the default value. Item Name User ID Password PPTP Gateway Connection ID MTU BEZEQ‐ISRAEL Connection Type Description Input the user name assigned by your ISP here. Give this page is clicked, and disconnects when the "Disconnect" button is providing you a static IP address, select "Use the following message: Click "Apply" to the Internet only when the "Connect" button on Demand" only connects to configure other settings. 3‐...
Manual
Page 44
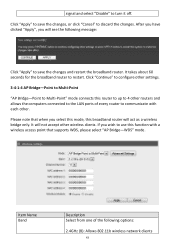
... use this function with each other. If you wish to 4 other wireless clients. Click "Apply" to discard the changes. Click "Continue" to configure other settings. 3‐4‐1‐4 AP Bridge-Point to Multi‐Point "AP Bridge-Point to Multi‐Point" mode connects this broadband router will see the following options: 2.4GHz (B): Allows 802.11b wireless network clients 43 Please note that supports WDS, please select "AP Bridge-WDS" mode...
... use this function with each other. If you wish to 4 other wireless clients. Click "Apply" to discard the changes. Click "Continue" to configure other settings. 3‐4‐1‐4 AP Bridge-Point to Multi‐Point "AP Bridge-Point to Multi‐Point" mode connects this broadband router will see the following options: 2.4GHz (B): Allows 802.11b wireless network clients 43 Please note that supports WDS, please select "AP Bridge-WDS" mode...

Manual
Page 57
... priority. Click "Continue" to configure other users over the Internet. Click "Reset" to erase all the rules listed in the QoS table and click "Edit" to save the changes and restart the broadband router. The "Move Up" button moves a selected rule up in the list, giving it a lower priority. Click "Apply" to modify the contents of a specific rule. It takes about 60...
... priority. Click "Continue" to configure other users over the Internet. Click "Reset" to erase all the rules listed in the QoS table and click "Edit" to save the changes and restart the broadband router. The "Move Up" button moves a selected rule up in the list, giving it a lower priority. Click "Apply" to modify the contents of a specific rule. It takes about 60...

Manual
Page 61
Computer names found in the local network are listed here. You can select a computer name and click the " Computer Name Add Reset local network here.
Computer names found in the local network are listed here. You can select a computer name and click the " Computer Name Add Reset local network here.

Manual
Page 66
... computer. 65 Click "Continue" to configure other settings. 3‐7 Firewall You can configure the firewall functions under "Firewall" to clear all the settings. Click "Add" to add the settings to the destination network (LAN or WAN). Item Name Enable Static Routing Destination LAN IP Subnet Mask Default Gateway Hop Count Interface Add Reset Description Check this broadband router) here. Select the interface that leads to discard the changes. After you have clicked "Apply", you will see the...
... computer. 65 Click "Continue" to configure other settings. 3‐7 Firewall You can configure the firewall functions under "Firewall" to clear all the settings. Click "Add" to add the settings to the destination network (LAN or WAN). Item Name Enable Static Routing Destination LAN IP Subnet Mask Default Gateway Hop Count Interface Add Reset Description Check this broadband router) here. Select the interface that leads to discard the changes. After you have clicked "Apply", you will see the...


