User Manual (English)
Page 2
... 2 Cautions 2 Installing the stand or removing the stand column 4 Installing the stand 4 Removing the stand column 5 Installing a wall-mount bracket 5 TV components 6 Front 6 Side 6 Back 7 Remote control 8 Using the remote control 9 Installing remote control batteries 9 Aiming the remote control 9 Programming a universal remote control to work with your TV 9 Making connections 10 Selecting a location 10 Connecting the power 10 Connecting an antenna, cable...
... 2 Cautions 2 Installing the stand or removing the stand column 4 Installing the stand 4 Removing the stand column 5 Installing a wall-mount bracket 5 TV components 6 Front 6 Side 6 Back 7 Remote control 8 Using the remote control 9 Installing remote control batteries 9 Aiming the remote control 9 Programming a universal remote control to work with your TV 9 Making connections 10 Selecting a location 10 Connecting the power 10 Connecting an antenna, cable...
User Manual (English)
Page 3
... Setting or changing the password 22 Setting parental control levels 23 Downloading rating information 25 Using closed captioning 25 Turning closed captioning on or off 25 Selecting the closed captioning mode 26 Customizing DTV closed captioning styles 27 Adjusting time ...settings 28 Setting the clock 28 Setting the sleep timer 28 Adjusting menu settings 29 Selecting the menu language and transparency 29 Labeling an input source 29 Restoring default settings 30 Troubleshooting 30 Video and audio 30 Remote control...
... Setting or changing the password 22 Setting parental control levels 23 Downloading rating information 25 Using closed captioning 25 Turning closed captioning on or off 25 Selecting the closed captioning mode 26 Customizing DTV closed captioning styles 27 Adjusting time ...settings 28 Setting the clock 28 Setting the sleep timer 28 Adjusting menu settings 29 Selecting the menu language and transparency 29 Labeling an input source 29 Restoring default settings 30 Troubleshooting 30 Video and audio 30 Remote control...
User Manual (English)
Page 6
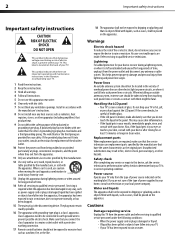
...The apparatus shall not be fatal. Warnings Electric shock hazard To reduce the risk of glass. Handling the LCD panel • Your TV's screen is located on the back of your outlet, consult an electrician for replacement of time. 14...TV from the power outlet and refer servicing to qualified service personnel under the following conditions: • When the power supply cord or plug is required when the apparatus has been damaged in accordance with the manufacturer's instructions. 8 Do not install near water. 6 Clean only with a protective earthing connection. 17 Remote control...
...The apparatus shall not be fatal. Warnings Electric shock hazard To reduce the risk of glass. Handling the LCD panel • Your TV's screen is located on the back of your outlet, consult an electrician for replacement of time. 14...TV from the power outlet and refer servicing to qualified service personnel under the following conditions: • When the power supply cord or plug is required when the apparatus has been damaged in accordance with the manufacturer's instructions. 8 Do not install near water. 6 Clean only with a protective earthing connection. 17 Remote control...
User Manual (English)
Page 10
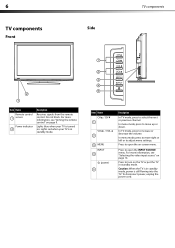
... up or down. In TV mode, press to select the next or previous channel. Do not block. Press to open the on the TV or put the TV in standby mode. 6 TV components Side Front TV components 2 1 Item Name Remote control 1 sensor Power indicator 2 Description Receives signals from the remote control. Lights blue when your TV is in standby mode...
... up or down. In TV mode, press to select the next or previous channel. Do not block. Press to open the on the TV or put the TV in standby mode. 6 TV components Side Front TV components 2 1 Item Name Remote control 1 sensor Power indicator 2 Description Receives signals from the remote control. Lights blue when your TV is in standby mode...
User Manual (English)
Page 12
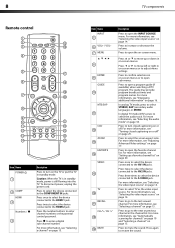
.... Press to the next or previous channel in on or off . Press once to select the device connected to turn closed captioning on -screen menus. 8 TV components Remote control 1 2 15 3 16 4 5 17 6 18 19 7 20 8 9 10 21 11 22 12 23 13 24 14 25 Item Name POWER 1 2 COMP HDMI 3 Numbers / 4 Description Press...
.... Press to the next or previous channel in on or off . Press once to select the device connected to turn closed captioning on -screen menus. 8 TV components Remote control 1 2 15 3 16 4 5 17 6 18 19 7 20 8 9 10 21 11 22 12 23 13 24 14 25 Item Name POWER 1 2 COMP HDMI 3 Numbers / 4 Description Press...

User Manual (English)
Page 13
... or bright light shines on the battery compartment cover lock, then remove the remote control cover. 2 Insert two AAA batteries into place. Either move your set the sleep timer. Dynex TV codes for universal remote controls (for all Dynex TVs manufactured after Jan. 1, 2007) Universal remote control manufacturer and model Philips PHDVD5, DirectTV PH5DSS, RC23 PMDVR8, PDVR8 RCA RCU807 One...
... or bright light shines on the battery compartment cover lock, then remove the remote control cover. 2 Insert two AAA batteries into place. Either move your set the sleep timer. Dynex TV codes for universal remote controls (for all Dynex TVs manufactured after Jan. 1, 2007) Universal remote control manufacturer and model Philips PHDVD5, DirectTV PH5DSS, RC23 PMDVR8, PDVR8 RCA RCU807 One...
User Manual (English)
Page 14
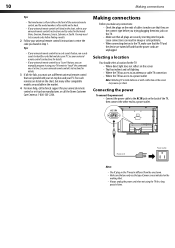
...universal remote control's instructions to the TV, make sure that they are securely inserting into the jacks. Tips: • If your universal remote control has a code search feature, run a code search to a power outlet. See your universal remote control's instructions for the TV: ...Dynex Customer Care Center at a time. Power cord Power outlet Notes: • The AC plug on the TV may need to try codes for a long period of time. Five such remotes are listed on the chart, but many other end to identify a code that all else fails, you only use a different universal remote control...
...universal remote control's instructions to the TV, make sure that they are securely inserting into the jacks. Tips: • If your universal remote control has a code search feature, run a code search to a power outlet. See your universal remote control's instructions for the TV: ...Dynex Customer Care Center at a time. Power cord Power outlet Notes: • The AC plug on the TV may need to try codes for a long period of time. Five such remotes are listed on the chart, but many other end to identify a code that all else fails, you only use a different universal remote control...
User Manual (English)
Page 17
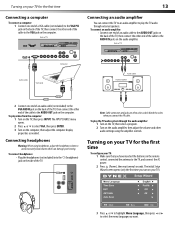
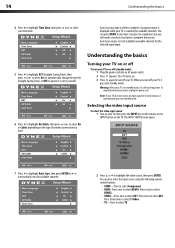
...the computer. The initial Setup Wizard screen opens (only the first time you turn on your TV). 3 Press or to highlight Menu Language, then press or to select the menu language you have inserted the batteries in the remote control, connected the antenna to play video from the computer: 1 Turn on the... TV, then press INPUT. The INPUT SOURCE menu opens. 2 Press or to the AUDIO IN jacks on the audio...
...the computer. The initial Setup Wizard screen opens (only the first time you turn on your TV). 3 Press or to highlight Menu Language, then press or to select the menu language you have inserted the batteries in the remote control, connected the antenna to play video from the computer: 1 Turn on the... TV, then press INPUT. The INPUT SOURCE menu opens. 2 Press or to the AUDIO IN jacks on the audio...
User Manual (English)
Page 18
... the INPUT button on . 3 Press again to turn off your TV does not receive an input signal for available channels. Press twice to complete. You can also select the input source using the following remote control buttons: • COMP-Press to select Component. • HDMI-Press once to select HDMI1.... Note: If your TV. You can press MENU to exit Auto Scan prior to completion, but you have. Auto...
... the INPUT button on . 3 Press again to turn off your TV does not receive an input signal for available channels. Press twice to complete. You can also select the input source using the following remote control buttons: • COMP-Press to select Component. • HDMI-Press once to select HDMI1.... Note: If your TV. You can press MENU to exit Auto Scan prior to completion, but you have. Auto...
User Manual (English)
Page 20
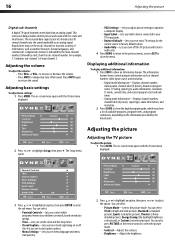
...times, and program summaries, depending on the remote control to highlight Setup, then press . Press MUTE again to show the digital program guide, which programs/movies your TV's input jacks. • Restore Default-Lets you reset most TV settings for the current source to adjust ...Contrast-Adjusts the contrast. • Brightness-Adjusts the brightness. 16 Adjusting the picture Digital sub-channels A digital TV signal transmits more data than an analog signal. Parental Controls 3 Press or to highlight an option, then press ENTER to close the menu. For example, 5.1 indicates sub...
...times, and program summaries, depending on the remote control to highlight Setup, then press . Press MUTE again to show the digital program guide, which programs/movies your TV's input jacks. • Restore Default-Lets you reset most TV settings for the current source to adjust ...Contrast-Adjusts the contrast. • Brightness-Adjusts the brightness. 16 Adjusting the picture Digital sub-channels A digital TV signal transmits more data than an analog signal. Parental Controls 3 Press or to highlight an option, then press ENTER to close the menu. For example, 5.1 indicates sub...

User Manual (English)
Page 22
...can select the audio mode for a customized sound mode). Selecting the audio mode You can select: • Sound Mode-Selects the sound mode. Playing TV audio only You can select Standard (for normal programs), News (for news programs), Music (for musical programs), Movie (for movies), or Custom (for... Press MENU to return to the previous menu, or press EXIT to only the program audio. The on the remote one or more times. You can turn off . • AVC-(Auto volume control) Equalizes the overall volume levels for analog channels: • Press MTS/SAP on -screen menu opens. 2...
...can select the audio mode for a customized sound mode). Selecting the audio mode You can select: • Sound Mode-Selects the sound mode. Playing TV audio only You can select Standard (for normal programs), News (for news programs), Music (for musical programs), Movie (for movies), or Custom (for... Press MENU to return to the previous menu, or press EXIT to only the program audio. The on the remote one or more times. You can turn off . • AVC-(Auto volume control) Equalizes the overall volume levels for analog channels: • Press MTS/SAP on -screen menu opens. 2...
User Manual (English)
Page 32
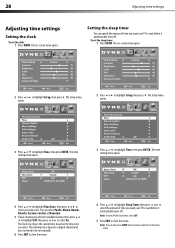
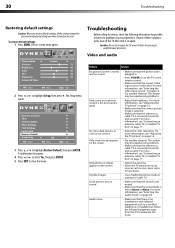
... sleep timer. The Clock row shows the current time, based on -screen menu opens. The Setup menu opens. This information is based on the remote control to highlight Setup, then press . 28 Adjusting time settings Setting the clock To set the sleep timer: 1 Press MENU. The on the time ...zone you want your TV to wait before it automatically turns off . Parental Controls 2 Press or to set manually. 6 Press EXIT to close the menu. Note: You can specify the amount of time...
... sleep timer. The Clock row shows the current time, based on -screen menu opens. The Setup menu opens. This information is based on the remote control to highlight Setup, then press . 28 Adjusting time settings Setting the clock To set the sleep timer: 1 Press MENU. The on the time ...zone you want your TV to wait before it automatically turns off . Parental Controls 2 Press or to set manually. 6 Press EXIT to close the menu. Note: You can specify the amount of time...
User Manual (English)
Page 34
...• Make sure that the correct video input source is not correct. For more information, see "Selecting the audio mode" on the TV or the remote control. • Make sure that the power cord is not lit) and no interference with infrared equipment such as cars, neon signs, or ...hair dryers. • Use a highly directional outdoor antenna or cable TV. Move the infrared equipment away from noise sources such as a cordless telephone or...
...• Make sure that the correct video input source is not correct. For more information, see "Selecting the audio mode" on the TV or the remote control. • Make sure that the power cord is not lit) and no interference with infrared equipment such as cars, neon signs, or ...hair dryers. • Use a highly directional outdoor antenna or cable TV. Move the infrared equipment away from noise sources such as a cordless telephone or...
User Manual (English)
Page 35
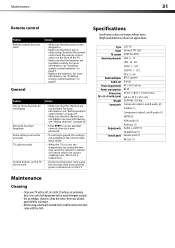
...8226; Make sure that the power cord is plugged in. • Make sure that there are no obstructions between the remote control and the remote control sensor on the TV do not display. • Make sure that came with a soft, dry cloth. General Problem Solution One or more ... Receiving channels Audio multiples Audio out Power requirement Power consumption Dimensions (W × H × D with stand) Weight Input ports Output ports Control ports LCD TV 26-inch TFT LCD NTSC-M, ATSC VHF: 2 - 13 UHF: 14 - 69 CATV: 1 - 125 CADTV: 1 - 135 DTV: 2 - 69 BTSC system 5 W (2) AC 120 V, 60 Hz ...
...8226; Make sure that the power cord is plugged in. • Make sure that there are no obstructions between the remote control and the remote control sensor on the TV do not display. • Make sure that came with a soft, dry cloth. General Problem Solution One or more ... Receiving channels Audio multiples Audio out Power requirement Power consumption Dimensions (W × H × D with stand) Weight Input ports Output ports Control ports LCD TV 26-inch TFT LCD NTSC-M, ATSC VHF: 2 - 13 UHF: 14 - 69 CATV: 1 - 125 CADTV: 1 - 135 DTV: 2 - 69 BTSC system 5 W (2) AC 120 V, 60 Hz ...


