User Guide
Page 4
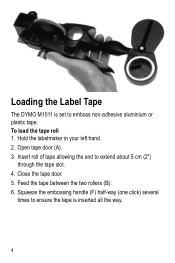
Insert roll of tape allowing the end to emboss non-adhesive aluminium or plastic tape. Close the tape door. 5. To load the tape roll 1. Open tape door (A). 3. Hold the labelmaker in your left hand. 2. Feed the tape between the two rollers (B). 6. Squeeze the embossing handle (F) half-way (one click) several times to ensure the tape is set to extend about 5 cm (2") through the tape slot. 4. Loading the Label Tape The DYMO M1011 is inserted all the way. 4
Insert roll of tape allowing the end to emboss non-adhesive aluminium or plastic tape. Close the tape door. 5. To load the tape roll 1. Open tape door (A). 3. Hold the labelmaker in your left hand. 2. Feed the tape between the two rollers (B). 6. Squeeze the embossing handle (F) half-way (one click) several times to ensure the tape is set to extend about 5 cm (2") through the tape slot. 4. Loading the Label Tape The DYMO M1011 is inserted all the way. 4
User Guide
Page 7
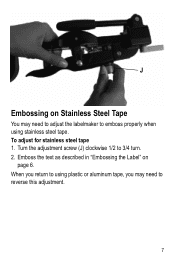
J Embossing on page 6. Turn the adjustment screw (J) clockwise 1/2 to reverse this adjustment. 7 When you return to using plastic or aluminum tape, you may need to 3/4 turn. 2. Emboss the text as described in "Embossing the Label" on Stainless Steel Tape You may need to adjust the labelmaker to emboss properly when using stainless steel tape. To adjust for stainless steel tape 1.
J Embossing on page 6. Turn the adjustment screw (J) clockwise 1/2 to reverse this adjustment. 7 When you return to using plastic or aluminum tape, you may need to 3/4 turn. 2. Emboss the text as described in "Embossing the Label" on Stainless Steel Tape You may need to adjust the labelmaker to emboss properly when using stainless steel tape. To adjust for stainless steel tape 1.


