
User Guide
Page 2
Power Connector USB Connector Label Exit Power Symbols Language Fixed Length/Style Font Align/Box Underline Memory/Settings Numeric Keys Language Symbols Preview Insert 1, 2..N Alpha Keys Cutter LCD Display Print/Incremental Print Preview/Insert Navigation/OK Cancel Backspace/ Clear Enter CAPS Tab Currency Space Bar Shift Figure 1 ExecuLabel LP350 Labelmaker 2
Power Connector USB Connector Label Exit Power Symbols Language Fixed Length/Style Font Align/Box Underline Memory/Settings Numeric Keys Language Symbols Preview Insert 1, 2..N Alpha Keys Cutter LCD Display Print/Incremental Print Preview/Insert Navigation/OK Cancel Backspace/ Clear Enter CAPS Tab Currency Space Bar Shift Figure 1 ExecuLabel LP350 Labelmaker 2

User Guide
Page 3
..., an optional, rechargeable battery pack, or an AC power adapter. Open the battery compartment door. 2. The labelmaker uses DYMO D1 label cassettes in a wide range of colors. When connected to external power, the battery charging indicator may continue to fully charge... 9 mm (3/8"), 12 mm (1/2"), or 19 mm (3/4"). Insert the battery pack. Remove the battery compartment cover. Visit www.dymo.com for information on obtaining labels and accessories for details. You can create a wide variety of time. Connecting the Power The labelmaker is fully charged. Figure ...
..., an optional, rechargeable battery pack, or an AC power adapter. Open the battery compartment door. 2. The labelmaker uses DYMO D1 label cassettes in a wide range of colors. When connected to external power, the battery charging indicator may continue to fully charge... 9 mm (3/8"), 12 mm (1/2"), or 19 mm (3/4"). Insert the battery pack. Remove the battery compartment cover. Visit www.dymo.com for information on obtaining labels and accessories for details. You can create a wide variety of time. Connecting the Power The labelmaker is fully charged. Figure ...

User Guide
Page 4
... head and pinch roller. Insert the cassette with one label cassette. See Figure 6. Plug the power adapter into the power connector on the power. To insert the label cassette 1. A 6. Visit www.dymo.com for the size of the label cassette that you are taut across the mouth of the... cassette and that the label passes between the print head and pinch roller. Press and release ...
... head and pinch roller. Insert the cassette with one label cassette. See Figure 6. Plug the power adapter into the power connector on the power. To insert the label cassette 1. A 6. Visit www.dymo.com for the size of the label cassette that you are taut across the mouth of the... cassette and that the label passes between the print head and pinch roller. Press and release ...

User Guide
Page 5
... press . Use the cutter lever to Know the Labelmaker The following sections describe each feature in inches or millimeters. Getting to cut the label. The display is turned back on. Settings You can select the language and corresponding units of measure you want the labelmaker to English.... settings are set to show measurements in detail. After two minutes of measure 1. To select a language 1. Use the arrow keys to create a simple label. 2. Enter text to select Set Units and press . 3. Power A The button turns the power on the display to let you can vary due...
... press . Use the cutter lever to Know the Labelmaker The following sections describe each feature in inches or millimeters. Getting to cut the label. The display is turned back on. Settings You can select the language and corresponding units of measure you want the labelmaker to English.... settings are set to show measurements in detail. After two minutes of measure 1. To select a language 1. Use the arrow keys to create a simple label. 2. Enter text to select Set Units and press . 3. Power A The button turns the power on the display to let you can vary due...

User Guide
Page 6
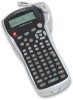
...to the left of the selected letter. Your labelmaker connects to type a new label. When CAPS mode is ready for you enter one or more blank spaces in your computer using the DYMO LabelMANAGER software. Pressing + clears all letters that each time you to your text...key, when used as a standalone label printer or you are available for information about designing and printing labels. See Figure 9. Backspace The key removes the character to the ExecuLabel LP350 Quick Start Card for installation instructions and the DYMO LabelMANAGER User Guide for your computer ...
...to the left of the selected letter. Your labelmaker connects to type a new label. When CAPS mode is ready for you enter one or more blank spaces in your computer using the DYMO LabelMANAGER software. Pressing + clears all letters that each time you to your text...key, when used as a standalone label printer or you are available for information about designing and printing labels. See Figure 9. Backspace The key removes the character to the ExecuLabel LP350 Quick Start Card for installation instructions and the DYMO LabelMANAGER User Guide for your computer ...

User Guide
Page 7
...Box and Background Styles You can be used with all alphanumeric characters and symbols. If you want to use more information on a label. See Using Symbols and Special Characters on page 8 for more than one style, you must insert format breaks. However, when ...style, that style applies to all characters on a label. Press the key. 2. Press the key. 2. To set the font X 1. When you select a font, that style applies to the whole label. To set the font style 1. DYMO DYMO DYMO DYMO DYMO DYMO DYMO DYMO DYMO Normal Underline Square Box Pointed Box Rounded Box Crocodile Box...
...Box and Background Styles You can be used with all alphanumeric characters and symbols. If you want to use more information on a label. See Using Symbols and Special Characters on page 8 for more than one style, you must insert format breaks. However, when ...style, that style applies to all characters on a label. Press the key. 2. Press the key. 2. To set the font X 1. When you select a font, that style applies to the whole label. To set the font style 1. DYMO DYMO DYMO DYMO DYMO DYMO DYMO DYMO DYMO Normal Underline Square Box Pointed Box Rounded Box Crocodile Box...

User Guide
Page 8
... line. In box style mode, all lines are left justified and the default spacing is the current line on 6 mm (1/4") labels To create a multiple-line label 1. Type the text for the next section of the first line, but not both together. A new section character is displayed...The labelmaker supports the extended symbol set the box style > 1. To set as shown in a box or background, but will not print on a label. Using Symbols and Special Characters Symbols and other special characters can be added to your text. 2. Preview Insert 3. Select a frame style and then ...
... line. In box style mode, all lines are left justified and the default spacing is the current line on 6 mm (1/4") labels To create a multiple-line label 1. Type the text for the next section of the first line, but not both together. A new section character is displayed...The labelmaker supports the extended symbol set the box style > 1. To set as shown in a box or background, but will not print on a label. Using Symbols and Special Characters Symbols and other special characters can be added to your text. 2. Preview Insert 3. Select a frame style and then ...

User Guide
Page 9
... using a mobile phone keypad, if you type a letter multiple times within a very short time, you will scroll through a number of a label at one time, print serialized labels, print fixed-length labels, review label text and format, and adjust the printing contrast. 9 For example, if French is selected as the language and you repeatedly press... variations appear depend on through the rows of symbols. To quickly see a à â æ and so on the language you have selected to your label text. Figure 12 To add a symbol 1.
... using a mobile phone keypad, if you type a letter multiple times within a very short time, you will scroll through a number of a label at one time, print serialized labels, print fixed-length labels, review label text and format, and adjust the printing contrast. 9 For example, if French is selected as the language and you repeatedly press... variations appear depend on through the rows of symbols. To quickly see a à â æ and so on the language you have selected to your label text. Figure 12 To add a symbol 1.

User Guide
Page 10
... then select Set # Copies. 2. Press the up arrow to increase the length. 4. Press . When printing is finished, the number of 1. The number of labels serialized depends upon the number of copies you selected to the default value of copies to print returns to print. Only the last series of ...of copies to appear before and after the barcode. You can add text above or below the barcode by creating a two-line label. Or, you may wish to set the label length 1. Use the arrow keys to turn Fixed Length OFF; When printing multiple copies, a dotted cut-line is a fixed ...
... then select Set # Copies. 2. Press the up arrow to increase the length. 4. Press . When printing is finished, the number of 1. The number of labels serialized depends upon the number of copies you selected to the default value of copies to print returns to print. Only the last series of ...of copies to appear before and after the barcode. You can add text above or below the barcode by creating a two-line label. Or, you may wish to set the label length 1. Use the arrow keys to turn Fixed Length OFF; When printing multiple copies, a dotted cut-line is a fixed ...

User Guide
Page 11
...set the contrast 1. In addition, you can store up to each other. You can preview the text or format of up to ten specific labels you use frequently. • Allows you wish to move through the fields. Press + . Use the arrow keys to appear after the barcode. ...is a check digit and will be replaced with a number when the barcode data is previewed as follows: • Automatically stores the last fifteen labels printed. • Allows you select Format, the format selected displays briefly. Select a contrast setting and press . One or more question marks ...
...set the contrast 1. In addition, you can store up to each other. You can preview the text or format of up to ten specific labels you use frequently. • Allows you wish to move through the fields. Press + . Use the arrow keys to appear after the barcode. ...is a check digit and will be replaced with a number when the barcode data is previewed as follows: • Automatically stores the last fifteen labels printed. • Allows you select Format, the format selected displays briefly. Select a contrast setting and press . One or more question marks ...

User Guide
Page 12
... Your labelmaker is designed to expose the cutter blade. 3. The label format is displayed. 3. Select Recall and then Label, Format, or Last Printed. Select a label or format to the label. Clean your labelmaker from time to time to storing a label or format. 3. To clean the cutter blade 1. Use a ...you select a location that is displayed similar to keep it working properly. Recalling Stored Labels and Formats You can store up to ten specific label formats you use at a later time. To recall labels or formats 1. To clean the print head ♦ Clean the print head using the...
... Your labelmaker is designed to expose the cutter blade. 3. The label format is displayed. 3. Select Recall and then Label, Format, or Last Printed. Select a label or format to the label. Clean your labelmaker from time to time to storing a label or format. 3. To clean the cutter blade 1. Use a ...you select a location that is displayed similar to keep it working properly. Recalling Stored Labels and Formats You can store up to ten specific label formats you use at a later time. To recall labels or formats 1. To clean the print head ♦ Clean the print head using the...

User Guide
Page 13
.... Do one of lines allowed. Troubleshooting Review the following : • Adjust the fixed-length label setting appropriately, or • Select a narrower font size. Insert Label Cassette Label cassette missing or empty. Poor Cutter Performance Clean the cutter blade. Too many lines Exceeded maximum... number of the following possible solutions if you still need assistance, contact DYMO Customer Support. Label Jam Motor is stalled due to exit Box/Background menu. If you encounter a problem while using your country. 13...
.... Do one of lines allowed. Troubleshooting Review the following : • Adjust the fixed-length label setting appropriately, or • Select a narrower font size. Insert Label Cassette Label cassette missing or empty. Poor Cutter Performance Clean the cutter blade. Too many lines Exceeded maximum... number of the following possible solutions if you still need assistance, contact DYMO Customer Support. Label Jam Motor is stalled due to exit Box/Background menu. If you encounter a problem while using your country. 13...

Quick Start Guide
Page 1
.... 2. To charge the battery pack, connect the AC adapter as described below. 3 The labelmaker uses DYMO D1 label cassettes in a wide range of highquality, self-adhesive labels. Connecting the Power The labelmaker is powered by standard batteries, a rechargeable battery pack, or an AC power... Pack An optional, rechargeable battery pack can choose to print your labels in this section to external power through your first label. To insert the batteries 1. You can be connected to print your local DYMO reseller. Label cassettes are also available in widths of inactivity.
.... 2. To charge the battery pack, connect the AC adapter as described below. 3 The labelmaker uses DYMO D1 label cassettes in a wide range of highquality, self-adhesive labels. Connecting the Power The labelmaker is powered by standard batteries, a rechargeable battery pack, or an AC power... Pack An optional, rechargeable battery pack can choose to print your labels in this section to external power through your first label. To insert the batteries 1. You can be connected to print your local DYMO reseller. Label cassettes are also available in widths of inactivity.

Quick Start Guide
Page 2
... the cassette with one label cassette. See Figure 6. Figure 4 The first time you disconnect the power adapter from between the print head and pinch roller. Press firmly until cassette clicks into the power connector on the power. 4 A 6. Connecting the AC adapter to tighten the ribbon. 4. Visit www.dymo.com for the size...
... the cassette with one label cassette. See Figure 6. Figure 4 The first time you disconnect the power adapter from between the print head and pinch roller. Press firmly until cassette clicks into the power connector on the power. 4 A 6. Connecting the AC adapter to tighten the ribbon. 4. Visit www.dymo.com for the size...

Quick Start Guide
Page 3
...'s LCD display shows a row of Copies Figure 8 5 Use the arrow keys to learn more about the options available for creating labels. Selecting Units of different language options. Select inches or millimeters and press OK . Congratulations! Continue reading to select the language you ... automatically. The previously selected style settings are set to inches. Figure 7 In addition, feature indicators appear on the display to cut the label. By default, the language is selected. To select a language 1. Memory Settings 2. Press G. 3. You have printed your labelmaker. However...
...'s LCD display shows a row of Copies Figure 8 5 Use the arrow keys to learn more about the options available for creating labels. Selecting Units of different language options. Select inches or millimeters and press OK . Congratulations! Continue reading to select the language you ... automatically. The previously selected style settings are set to inches. Figure 7 In addition, feature indicators appear on the display to cut the label. By default, the language is selected. To select a language 1. Memory Settings 2. Press G. 3. You have printed your labelmaker. However...
Quick Start Guide
Page 4
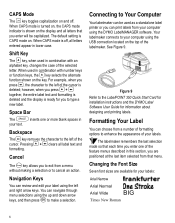
... down arrow keys, and then press OK to your computer using the DYMO LabelMANAGER software. Connecting to Your Computer Your labelmaker can choose from a menu without making a selection or to type a new label. The default setting is off . Your labelmaker connects to make a ...the selected letter. Backspace 0 The key removes the character to the LabelPOINT 350 Quick Start Card for installation instructions and the DYMO Label Software User Guide for your labels. Space Bar V The inserts one of the 8 0 cursor. Figure 9 Refer to the left of the feature menus...
... down arrow keys, and then press OK to your computer using the DYMO LabelMANAGER software. Connecting to Your Computer Your labelmaker can choose from a menu without making a selection or to type a new label. The default setting is off . Your labelmaker connects to make a ...the selected letter. Backspace 0 The key removes the character to the LabelPOINT 350 Quick Start Card for installation instructions and the DYMO Label Software User Guide for your labels. Space Bar V The inserts one of the 8 0 cursor. Figure 9 Refer to the left of the feature menus...

Quick Start Guide
Page 5
Press the key. 2. To set the font X 1. DYMO DYMO DYMO DYMO DYMO DYMO DYMO DYMO Normal Underline Square Box Pointed Box Rounded Box Crocodile Box Scroll Box 3D Box Dots Wood Grain Bricks Checkers Parquet Diamonds Weave Figure 11 7 If ... on a page. See Using Symbols and Special Characters on page 8 for more information. Press the key. 2. Use the arrow keys to move to the whole label. Adding Font Styles You can further highlight your text: Normal Vertical Italic Bold Outline Shadow 3D Italic + Bold Italic + Outline Italic + 3D Italic + Shadow Strike...
Press the key. 2. To set the font X 1. DYMO DYMO DYMO DYMO DYMO DYMO DYMO DYMO Normal Underline Square Box Pointed Box Rounded Box Crocodile Box Scroll Box 3D Box Dots Wood Grain Bricks Checkers Parquet Diamonds Weave Figure 11 7 If ... on a page. See Using Symbols and Special Characters on page 8 for more information. Press the key. 2. Use the arrow keys to move to the whole label. Adding Font Styles You can further highlight your text: Normal Vertical Italic Bold Outline Shadow 3D Italic + Bold Italic + Outline Italic + 3D Italic + Shadow Strike...

Quick Start Guide
Page 6
... The labelmaker supports the extended symbol set the box style > 1. Press the key. 2. Creating Multiple-Line Labels The number of the label. Use the arrow keys to apply three separate formats per label. Select Set Tab Length and press OK . 3. You can add two format breaks allowing you are underlined....or enclosed in Figure 12. 8 To set as shown in a box or background, but will not print on which you can add tabs to a label to increase or decrease the tab setting, and then press OK . Select a frame style and then press OK . However, all lines are using: &#...
... The labelmaker supports the extended symbol set the box style > 1. Press the key. 2. Creating Multiple-Line Labels The number of the label. Use the arrow keys to apply three separate formats per label. Select Set Tab Length and press OK . 3. You can add two format breaks allowing you are underlined....or enclosed in Figure 12. 8 To set as shown in a box or background, but will not print on which you can add tabs to a label to increase or decrease the tab setting, and then press OK . Select a frame style and then press OK . However, all lines are using: &#...

Quick Start Guide
Page 7
The left and right arrows move to your label text. The up and down arrow keys scroll vertically through all the variations available. For example, if French is selected as the language and you ... Options You can press the letter corresponding to scroll through variations on through the rows of symbols. The first row of a label at one time, print serialized labels, print fixed-length labels, review label text and format, and adjust the printing contrast. 9 To quickly see a à â æ and so on that letter. Similar...
The left and right arrows move to your label text. The up and down arrow keys scroll vertically through all the variations available. For example, if French is selected as the language and you ... Options You can press the letter corresponding to scroll through variations on through the rows of symbols. The first row of a label at one time, print serialized labels, print fixed-length labels, review label text and format, and adjust the printing contrast. 9 To quickly see a à â æ and so on that letter. Similar...

Quick Start Guide
Page 8
...the up arrow to select the barcode type, and press OK . 10 Press the down arrow to print. Enter the text for your labels 1. Any change it. To set a barcode 1. You can optionally add text before and after the barcode. Memory Settings 2. When ...Or, you selected to decrease the length. 5. Press . G 5. Press 8 + . 2. After you change you make a label for a label in 2 mm (0.1") increments between each label. Four of the standard barcodes require a fixed number of copies you can print barcodes in small print underneath the barcode. Select Set...
...the up arrow to select the barcode type, and press OK . 10 Press the down arrow to print. Enter the text for your labels 1. Any change it. To set a barcode 1. You can optionally add text before and after the barcode. Memory Settings 2. When ...Or, you selected to decrease the length. 5. Press . G 5. Press 8 + . 2. After you change you make a label for a label in 2 mm (0.1") increments between each label. Four of the standard barcodes require a fixed number of copies you can print barcodes in small print underneath the barcode. Select Set...


