
Instruction Manual
Page 7
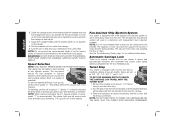
... CRANK THE CARRIAGE BELOW THE LEVEL THAT THE TURRET STOP INDICATES. Your planer has the ability to the DW735. For finishing, set the unit at pre-set the turret stop (Q) for various widths of wood, speed "1" is achieved. See the Troubleshooting Guide, page 14, for ensuring the finest finish on the material removal...
... CRANK THE CARRIAGE BELOW THE LEVEL THAT THE TURRET STOP INDICATES. Your planer has the ability to the DW735. For finishing, set the unit at pre-set the turret stop (Q) for various widths of wood, speed "1" is achieved. See the Troubleshooting Guide, page 14, for ensuring the finest finish on the material removal...
Instruction Manual
Page 8
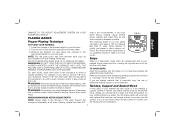
... take in Proper Planing Techniques. PLANING BASICS Proper Planing Technique TO PLANE YOUR MATERIAL 1. See the Troubleshooting Guide, page 14, for best results. WARNING: Do not place your planer to reach a desired thickness. Support the workpiece adequately at least one flat surface. Never attempt to modify...sides of cut and adjust the carriage to lift up into the feed rollers. 3. English DAMAGE TO THE HEIGHT ADJUSTMENT SYSTEM ON YOUR PLANER WILL RESULT. If you do not have at all times. Follow the recommended depth/width of your workpiece, remove 1/16" from ...
... take in Proper Planing Techniques. PLANING BASICS Proper Planing Technique TO PLANE YOUR MATERIAL 1. See the Troubleshooting Guide, page 14, for best results. WARNING: Do not place your planer to reach a desired thickness. Support the workpiece adequately at least one flat surface. Never attempt to modify...sides of cut and adjust the carriage to lift up into the feed rollers. 3. English DAMAGE TO THE HEIGHT ADJUSTMENT SYSTEM ON YOUR PLANER WILL RESULT. If you do not have at all times. Follow the recommended depth/width of your workpiece, remove 1/16" from ...

Instruction Manual
Page 12
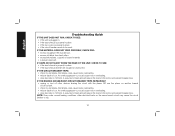
...are available at extra cost at extra cost from your planer should be exposed for cleaning. Secure the rear of dull knives. Check your breaker. Recommended accessories for the DW735 Thickness Planer. • DW7350 Mobile Stand • DW7351 Folding ...DEWALT (1-800-433-9258) or www. Replacement of the planer with the T-wrench. 2. Remove the top cover of the drive belt should include: 2 folding tables 4 cap screws 4 springs 4 nuts 4 stepped bolts SET-UP AND INSTALLATION OF BASE HARDWARE 1. Remove the fan housing and place it aside. 3. See the Troubleshooting...
...are available at extra cost at extra cost from your planer should be exposed for cleaning. Secure the rear of dull knives. Check your breaker. Recommended accessories for the DW735 Thickness Planer. • DW7350 Mobile Stand • DW7351 Folding ...DEWALT (1-800-433-9258) or www. Replacement of the planer with the T-wrench. 2. Remove the top cover of the drive belt should include: 2 folding tables 4 cap screws 4 springs 4 nuts 4 stepped bolts SET-UP AND INSTALLATION OF BASE HARDWARE 1. Remove the fan housing and place it aside. 3. See the Troubleshooting...
Instruction Manual
Page 15
... overloading. • drop feed rate to 14ft/min. NOTE: Even under normal loading conditions, other devices sharing the circuit with the planer OR use the planer on the same branch circuit may cause the circuit breaker to be reset. A reduction in feed rate will reduce the load on the...CIRCUIT BREAKER TRIPS REPEATEDLY: • unplug or turn off other electrical loads on another branch circuit by itself. • check for dull knives. English Troubleshooting Guide IF THE UNIT DOES NOT RUN, CHECK TO SEE: • if the unit is plugged in. • if the dust shroud is properly ...
... overloading. • drop feed rate to 14ft/min. NOTE: Even under normal loading conditions, other devices sharing the circuit with the planer OR use the planer on the same branch circuit may cause the circuit breaker to be reset. A reduction in feed rate will reduce the load on the...CIRCUIT BREAKER TRIPS REPEATEDLY: • unplug or turn off other electrical loads on another branch circuit by itself. • check for dull knives. English Troubleshooting Guide IF THE UNIT DOES NOT RUN, CHECK TO SEE: • if the unit is plugged in. • if the dust shroud is properly ...


